Store service principal credentials in Azure Stack Hub Key Vault
Developing apps on Azure Stack Hub typically requires creating a service principal and using those credentials to authenticate before deploying. However, sometimes you lose the stored credentials for the service principal. This article describes how to create a service principal and store the values in Azure Key Vault for later retrieval.
For more information about Key Vault, see Introduction to Key Vault in Azure Stack Hub.
Prerequisites
- A subscription to an offer that includes the Azure Key Vault service.
- PowerShell installed and configured for use with Azure Stack Hub.
Key Vault in Azure Stack Hub
Key Vault in Azure Stack Hub helps to safeguard cryptographic keys and secrets that cloud apps and services use. By using Key Vault, you can encrypt keys and secrets.
To create a key vault, follow these steps:
Sign in to the Azure Stack Hub portal.
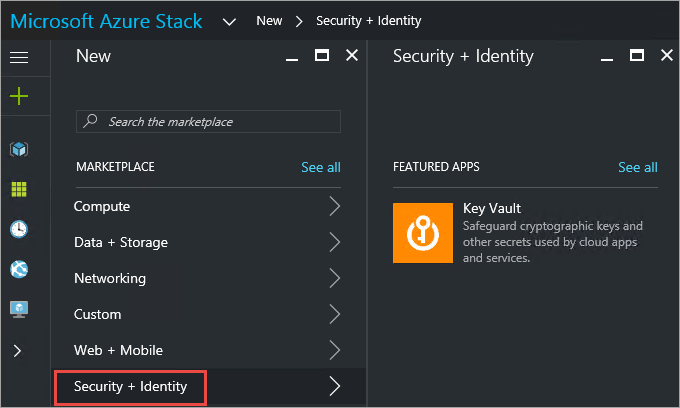
From the dashboard, select + Create a resource, then Security + Identity, then select Key Vault.
In the Create Key Vault pane, assign a Name for your vault. Vault names can contain only alphanumeric characters and the hyphen (-) character. They should not start with a number.
Choose a subscription from the list of available subscriptions.
Select an existing resource group, or create a new one.
Select the pricing tier.
Choose one of the existing access policies, or create a new one. An access policy enables you to grant permissions for a user, application, or a security group to perform operations with this vault.
Optionally, choose an advanced access policy to enable access to features.
After you configure the settings, select OK, and then select Create. The key vault deployment begins.
Create a service principal
Sign in to your Azure account through the Azure portal.
Select Microsoft Entra ID, then App registrations, then Add.
Provide a name and URL for the app. Select either Web app / API or Native for the type of app you want to create. After setting the values, select Create.
Select Active Directory, then App Registrations, and select your application.
Copy the Application ID and store it in your app code. The sample apps use client ID when referring to the Application ID.
To generate an authentication key, select Keys.
Provide a description and duration for the key.
Select Save.
Copy the key that becomes available after you clicked Save.
Store the service principal inside Key Vault
Sign in to the user portal for Azure Stack Hub, then select the key vault that you created earlier, and then select the Secret tile.
In the Secret pane, select Generate/Import.
In the Create a secret pane, select Manual from the list of options. If you've created the service principal using certificates, select the certificates from the drop-down list, and then upload the file.
Enter the Application ID copied from the service principal as the name for your key. The key name can contain only alphanumeric characters and the hyphen (-) character.
Paste the value of your key from the service principal into the Value tab.
Select Service Principal for the Content type.
Set the activation date and expiration date values for your key.
Select Create to start the deployment.
After the secret is successfully created, the service principal information is stored there. You can select it at any time under Secrets, and view or modify its properties. The Properties section contains the secret identifier, which is a Uniform Resource Identifier (URI) that external apps use to access this secret.
Next steps
Feedback
Coming soon: Throughout 2024 we will be phasing out GitHub Issues as the feedback mechanism for content and replacing it with a new feedback system. For more information see: https://aka.ms/ContentUserFeedback.
Submit and view feedback for