SQL server best practices to optimize performance in Azure Stack Hub
This article provides SQL server best practices to optimize SQL Server and improve performance in Microsoft Azure Stack Hub virtual machines (VMs). When running SQL Server in Azure Stack Hub VMs, use the same database performance-tuning options applicable to SQL Server in an on-premises server environment. The performance of a relational database in an Azure Stack Hub cloud depends on many factors, including family size of a VM and the configuration of the data disks.
When creating SQL Server images, consider provisioning your VMs in the Azure Stack Hub portal. Download the SQL IaaS Extension from Marketplace Management in the Azure Stack Hub administrator portal and download your choice of SQL Server VM images. These include SQL Server 2016 SP1, SQL Server 2016 SP2, and SQL Server 2017.
Note
While the article describes how to provision a SQL Server VM using the global Azure portal, the guidance also applies to Azure Stack Hub with the following differences: SSD isn't available for the operating system disk and there are minor differences in storage configuration.
In the VM images, for SQL Server, you can only use bring-your-own-license (BYOL). For Windows Server, the default license model is pay-as-you-go (PAYG). For detailed information of Windows Server license model in VM, refer the article Windows Server in Azure Stack Hub Marketplace FAQ.
Getting the best performance for SQL Server on Azure Stack Hub VMs is the focus of this article. If your workload is less demanding, you might not require every recommended optimization. Consider your performance needs and workload patterns as you evaluate these recommendations.
Note
For performance guidance for SQL Server in Azure VMs, refer to this article.
Checklist for SQL server best practices
The following checklist is for optimal performance of SQL Server on Azure Stack Hub VMs:
| Area | Optimizations |
|---|---|
| VM size | DS3 or higher for SQL Server Enterprise edition. DS2 or higher for SQL Server Standard edition and Web edition. |
| Storage | Use a VM family that supports Premium storage. |
| Disks | Use a minimum of two data disks (one for log files and one for data file and TempDB), and choose the disk size based on your capacity needs. Set the default data file locations to these disks during the SQL Server install. Avoid using operating system or temporary disks for database storage or logging. Stripe multiple Azure data disks to get increased IO throughput using Storage Spaces. Format with documented allocation sizes. |
| I/O | Enable instant file initialization for data files. Limit autogrow on the databases with reasonably small fixed increments (64 MB-256 MB). Disable autoshrink on the database. Set up default backup and database file locations on data disks, not the operating system disk. Enable locked pages. Apply SQL Server service packs and cumulative updates. |
| Feature-specific | Back up directly to blob storage (if supported by the SQL Server version in use). |
For more information on how and why to make these optimizations, review the details and guidance provided in the following sections.
VM size guidance
For performance-sensitive applications, the following VM sizes are recommended:
SQL Server Enterprise edition: DS3 or higher
SQL Server Standard edition and Web edition: DS2 or higher
With Azure Stack Hub, there's no performance difference between the DS and DS_v2 VM family series.
Storage guidance
DS-series (along with DSv2-series) VMs in Azure Stack Hub provide the maximum operating system disk and data disk throughput (IOPS). A VM from the DS or DSv2 series provides up to 1,000 IOPS for the operating system disk and up to 2,300 IOPS per data disk, no matter the type or size of the chosen disk.
Data disk throughput is determined uniquely based on the VM family series. You can refer to this article to identify the data disk throughput per VM family series.
Note
For production workloads, select a DS-series or DSv2-series VM to provide the maximum possible IOPS on the operating system disk and data disks.
When creating a storage account in Azure Stack Hub, the geo-replication option has no effect because this capability isn't available in Azure Stack Hub.
Disks guidance
There are three main disk types on an Azure Stack Hub VM:
Operating system disk: When you create an Azure Stack Hub VM, the platform attaches at least one disk (labeled as the C drive) to the VM for your operating system disk. This disk is a VHD stored as a page blob in storage.
Temporary disk: Azure Stack Hub VMs contain another disk called the temporary disk (labeled as the D drive). This is a disk on the node that can be used for scratch space.
Data disks: You can attach additional disks to your VM as data disks, and these disks are stored in storage as page blobs.
The following sections describe recommendations for using these different disks.
Operating system disk
An operating system disk is a VHD that you can boot and mount as a running version of an operating system and is labeled as C drive.
Temporary disk
The temporary storage drive, labeled as the D drive, isn't persistent. Don't store any data you're unwilling to lose on the D drive. This includes your user database files and user transaction log files.
We recommend storing TempDB on a data disk as each data disk provides a maximum of up to 2,300 IOPS per data disk.
Data disks
- Use data disks for data and log files. If you're not using disk striping, use two data disks from a VM that supports Premium storage, where one disk contains the log files and the other contains the data and TempDB files. Each data disk provides a number of IOPS depending on the VM family, as described in VM sizes supported in Azure Stack Hub. If you're using a disk-striping technique, such as Storage Spaces, place all data and log files on the same drive (including TempDB). This configuration gives you the maximum number of IOPS available for SQL Server to consume, no matter which file needs them at any particular time.
Note
When you provision a SQL Server VM in the portal, you have the option of editing your storage configuration. Depending on your configuration, Azure Stack Hub configures one or more disks. Multiple disks are combined into a single storage pool. Both the data and log files reside together in this configuration.
Disk striping: For more throughput, you can add additional data disks and use disk striping. To determine the number of data disks you need, analyze the number of IOPS required for your log files and for your data and TempDB files. Notice that IOPS limits are per data disk based on the VM series family, and not based on the VM size. Network bandwidth limits, however, are based on the VM size. See the tables on VM sizes in Azure Stack Hub for more detail. Use the following guidelines:
For Windows Server 2012 or later, use Storage Spaces with the following guidelines:
Set the interleave (stripe size) to 64 KB (65,536 bytes) for online transaction processing (OLTP) workloads and 256 KB (262,144 bytes) for data warehousing workloads to avoid performance impact due to partition misalignment. This must be set with PowerShell.
Set column count = number of physical disks. Use PowerShell when configuring more than eight disks (not Server Manager UI).
For example, the following PowerShell creates a new storage pool with the interleave size set to 64 KB and the number of columns to 2:
$PoolCount = Get-PhysicalDisk -CanPool $True
$PhysicalDisks = Get-PhysicalDisk | Where-Object {$_.FriendlyName -like "*2" -or $_.FriendlyName -like "*3"}

New-StoragePool -FriendlyName "DataFiles" -StorageSubsystemFriendlyName "Storage Spaces*" -PhysicalDisks $PhysicalDisks | New-VirtualDisk -FriendlyName "DataFiles" -Interleave 65536 -NumberOfColumns 2 -ResiliencySettingName simple -UseMaximumSize |Initialize-Disk -PartitionStyle GPT -PassThru |New-Partition -AssignDriveLetter -UseMaximumSize |Format-Volume -FileSystem NTFS -NewFileSystemLabel "DataDisks" -AllocationUnitSize 65536 -Confirm:$false
Determine the number of disks associated with your storage pool based on your load expectations. Keep in mind that different VM sizes allow different numbers of attached data disks. For more information, see VM sizes supported in Azure Stack Hub.
To get the maximum possible IOPS for data disks, the recommendation is to add the maximum number of data disks supported by your VM size and to use disk striping.
NTFS allocation unit size: When formatting the data disk, we recommend you use a 64-KB allocation unit size for data and log files as well as TempDB.
Disk management practices: When removing a data disk, stop the SQL Server service during the change. Also, don't change cache settings on the disks as it doesn't provide any performance improvements.
Warning
Failure to stop the SQL Service during these operations can cause database corruption.
I/O guidance
Consider enabling instant file initialization to reduce the time that is required for initial file allocation. To take advantage of instant file initialization, you grant the SQL Server (MSSQLSERVER) service account with SE_MANAGE_VOLUME_NAME and add it to the Perform Volume Maintenance Tasks security policy. If you're using a SQL Server platform image for Azure, the default service account (NT Service\MSSQLSERVER) isn't added to the Perform Volume Maintenance Tasks security policy. In other words, instant file initialization isn't enabled in a SQL Server Azure platform image. After adding the SQL Server service account to the Perform Volume Maintenance Tasks security policy, restart the SQL Server service. There could be security considerations for using this feature. For more information, see Database File Initialization.
Autogrow is a contingency for unexpected growth. Don't manage your data and log growth on a day-to-day basis with autogrow. If autogrow is used, pre-grow the file using the Size switch.
Make sure autoshrink is disabled to avoid unnecessary overhead that can negatively affect performance.
Setup default backup and database file locations. Use the recommendations in this article and make the changes in the Server properties window. For instructions, see View or Change the Default Locations for Data and Log Files (SQL Server Management Studio). The following screenshot shows where to make these changes:

Enable locked pages to reduce IO and any paging activities. For more information, see Enable the Lock Pages in Memory Option (Windows).
Consider compressing any data files when transferring in/out of Azure Stack Hub, including backups.
Feature-specific guidance
Some deployments may achieve additional performance benefits using more advanced configuration techniques. The following list highlights some SQL Server features that may help you achieve better performance:
Back up to Azure storage. When making backups for SQL Server running in Azure Stack Hub VMs, you can use SQL Server Backup to URL. This feature is available starting with SQL Server 2012 SP1 CU2 and recommended for backing up to the attached data disks.
When you backup or restore using Azure storage, follow the recommendations provided in SQL Server Backup to URL Best Practices and Troubleshooting and Restoring From Backups Stored in Microsoft Azure. You can also automate these backups using Automated Backup for SQL Server in Azure VMs.
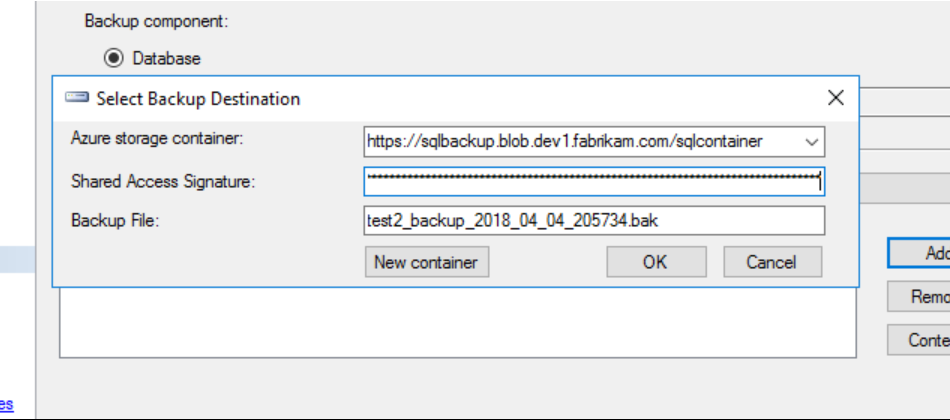
Back up to Azure Stack Hub storage. You can back up to Azure Stack Hub storage in a similar fashion as with backing up to Azure Storage. When you create a backup inside SQL Server Management Studio (SSMS), you need to enter the configuration information manually. You can't use SSMS to create the storage container or the Shared Access Signature. SSMS only connects to Azure subscriptions, not Azure Stack Hub subscriptions. Instead, you need to create the storage account, container, and Shared Access Signature in the Azure Stack Hub portal or with PowerShell.
Note
The Shared Access Signature is the SAS token from the Azure Stack Hub portal, without the leading '?' in the string. If you use the copy function from the portal, you need to delete the leading '?' for the token to work within SQL Server.
Once you have the Backup Destination set up and configured in SQL Server, you can then back up to the Azure Stack Hub blob storage.
Next steps
Feedback
Coming soon: Throughout 2024 we will be phasing out GitHub Issues as the feedback mechanism for content and replacing it with a new feedback system. For more information see: https://aka.ms/ContentUserFeedback.
Submit and view feedback for