Install Azure CLI on Azure Stack Hub
You can install the Azure CLI to manage Azure Stack Hub with a Windows or Linux machines. This article walks you through the steps of installing and setting up Azure CLI.
Install Azure CLI
Sign in to your development workstation and install CLI. Azure Stack Hub requires version 2.0 or later of Azure CLI.
Important
Due to a CVE affecting Azure CLI versions previous to 2.40.0, it is no longer recommended that you use Azure CLI 2.29.2 for AD FS in Azure Stack Hub. You can update to Azure CLI 2.40.0 or higher. However, AD FS customers might encounter issues with Azure CLI commands that interact with Microsoft Graph endpoints. This is because Microsoft Graph is not supported for AD FS. For workarounds to Microsoft Graph issues, see the General known issues section.
You can install the CLI by using the steps described in the Install the Azure CLI article.
To verify whether the installation was successful, open a terminal or command prompt window and run the following command:
az --versionYou should see the version of Azure CLI and other dependent libraries that are installed on your computer.
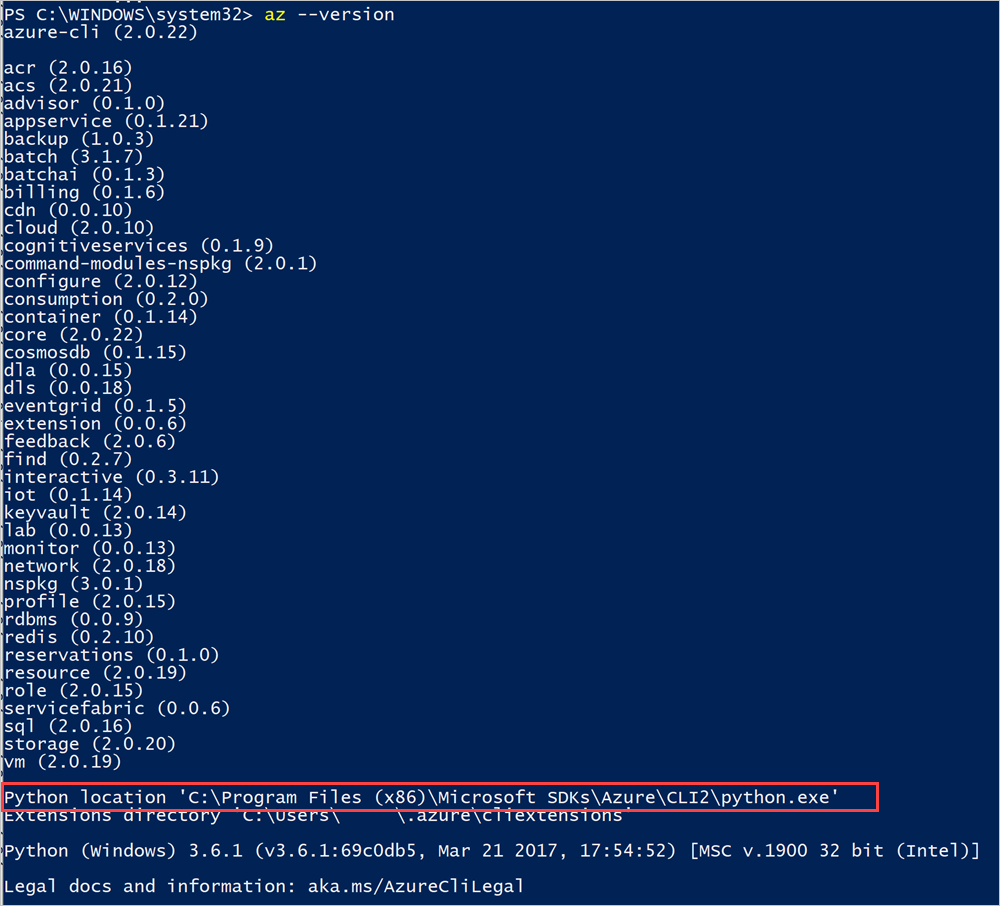
Make a note of the CLI's Python location.
Add certificate
Export and then import the Azure Stack Hub certificate for disconnected integrated systems and for the ASDK. For connected integrated systems, the certificate is publicly signed and this step isn't necessary. For instructions, see Setting up certificates for Azure CLI on Azure Stack Development Kit.
Connect with Azure CLI
This section walks you through setting up CLI if you're using Microsoft Entra ID as your identity management service, and are using CLI on a Windows machine.
Connect to Azure Stack Hub
If you are using the ASDK, trust the Azure Stack Hub CA root certificate. For instruction, see Trust the certificate.
Register your Azure Stack Hub environment by running the
az cloud registercommand.Register your environment. Use the following parameters when running
az cloud register:Value Example Description Environment name AzureStackUser Use AzureStackUserfor the user environment. If you're operator, specifyAzureStackAdmin.Resource Manager endpoint https://management.contoso.onmicrosoft.comThe ResourceManagerUrl in the ASDK is: https://management.local.azurestack.external/The ResourceManagerUrl in integrated systems is:https://management.<region>.<fqdn>/If you have a question about the integrated system endpoint, contact your cloud operator.Storage endpoint local.contoso.onmicrosoft.com local.azurestack.externalis for the ASDK. For an integrated system, use an endpoint for your system.Keyvault suffix .vault.contoso.onmicrosoft.com .vault.local.azurestack.externalis for the ASDK. For an integrated system, use an endpoint for your system.Endpoint active directory graph resource ID https://graph.windows.net/ The Active Directory resource ID. az cloud register ` -n <environmentname> ` --endpoint-resource-manager "https://management.<region>.<fqdn>" ` --suffix-storage-endpoint "<fqdn>" ` --suffix-keyvault-dns ".vault.<fqdn>"You can find a reference for the register command in the Azure CLI reference documentation.
Set the active environment by using the following commands.
az cloud set -n <environmentname>Update your environment configuration to use the Azure Stack Hub specific API version profile. To update the configuration, run the following command:
az cloud update --profile 2020-09-01-hybridSign in to your Azure Stack Hub environment by using the
az logincommand.You can sign in to the Azure Stack Hub environment using your user credentials, or with a service principal (SPN) provided to you by your cloud operator.
Sign in as a user:
You can either specify the username and password directly within the
az logincommand, or authenticate by using a browser. You must do the latter if your account has multifactor authentication enabled:az login -u "user@contoso.onmicrosoft.com" -p 'Password123!' --tenant contoso.onmicrosoft.comNote
If your user account has multifactor authentication enabled, use the
az logincommand without providing the-uparameter. Running this command gives you a URL and a code that you must use to authenticate.Sign in as a service principal:
Before you sign in, create a service principal through the Azure portal or CLI and assign it a role. Now, sign in by using the following command:
az login `
  --tenant <Azure Active Directory Tenant name. `
            For example: myazurestack.onmicrosoft.com> `
--service-principal `
  -u <Application Id of the Service Principal> `
  -p <Key generated for the Service Principal>
Verify that your environment is set correctly and that your environment is the active cloud.
az cloud list --output tableYou should see that your environment is listed and IsActive is
true. For example:IsActive Name Profile ---------- ----------------- ----------------- False AzureCloud 2020-09-01-hybrid False AzureChinaCloud latest False AzureUSGovernment latest False AzureGermanCloud latest True AzureStackUser 2020-09-01-hybrid
Test the connectivity
With everything set up, use CLI to create resources within Azure Stack Hub. For example, you can create a resource group for an app and add a VM. Use the following command to create a resource group named "MyResourceGroup":
az group create -n MyResourceGroup -l local
If the resource group is created successfully, the previous command outputs the following properties of the newly created resource:
{
  "id": "/subscriptions/84edee99-XXXX-4f5c-b646-5cdab9759a03/resourceGroups/RGCL11",
  "location": "local",
  "name": "RGCLI1",
  " properties ": {
    "provisioningState": "Succeeded"
  },
  "tags ": null
}
General known issues
The general fix for most issues is to use the az rest command that uses the current Azure Stack context, to make a REST API call for the associated command with the issue. The workarounds in the following issues list can generally be adapted for other Azure CLI issues as long as these issues are caused by Azure CLI and not Azure Stack Hub resource providers or other Azure Stack Hub services.
Microsoft Graph issues
These are the known Microsoft Graph issues for Azure CLI 2.40.0, or greater, for Azure Stack Hub. This primarily affects ADFS environments as it doesn't support Microsoft Graph.
az keyvault createinteracts with Microsoft Graph. The following is an example workaround for ADFS. Primarily, the workaround uses the Azure AD Graph to retrieve user information such as theobjectIdrather than the Microsoft Graph.# First, sign into Azure CLI account you want to create the Key Vault from. # TODO: change the principal name to name of principal you want to create the key vault with. $principalNameLike = "CloudUser*" # TODO: change location to your preference. $location = "local" $aadGraph = az cloud show --query endpoints.activeDirectoryGraphResourceId --output tsv $tenantId = az account show --query tenantId --output tsv if ($aadGraph[-1] -ne '/') { $aadGraph += '/' } $userObject = az rest --method get --url "${aadGraph}${tenantId}/users?api-version=1.6" ` | ConvertFrom-Json ` | Select-Object -ExpandProperty value ` | Where-Object {$_.userPrincipalName -like $principalNameLike} $body = '{ "location": "' + $location + '", "properties": { "tenantId": "' + $tenantId + '", "sku": { "family": "A", "name": "standard" }, "accessPolicies": [ { "tenantId": "' + $tenantId + '", "objectId": "' + $userObject.objectId + '", "permissions": { "keys": [ "get", "create", "delete", "list", "update", "import", "backup", "restore", "recover" ], "secrets": [ "get", "list", "set", "delete", "backup", "restore", "recover" ], "certificates": [ "get", "list", "delete", "create", "import", "update", "managecontacts", "getissuers", "listissuers", "setissuers", "deleteissuers", "manageissuers", "recover" ], "storage": [ "get", "list", "delete", "set", "update", "regeneratekey", "setsas", "listsas", "getsas", "deletesas" ] } } ], "enabledForDeployment": true, "enabledForTemplateDeployment": true } }' $body | Out-File -FilePath (Join-Path -Path "." -ChildPath "body.json") $resourceGroupName = "testrg123" az group create -n $resourceGroupName -l $location $armEndpoint = az cloud show --query endpoints.resourceManager --output tsv if ($armEndpoint[-1] -ne '/') { $armEndpoint += '/' } $subscriptionId = az account show --query id --output tsv $keyVaultName = "testkv123" az rest --method put --url "${armEndpoint}subscriptions/${subscriptionId}/resourceGroups/${resourceGroupName}/providers/Microsoft.KeyVault/vaults/${keyVaultName}?api-version=2016-10-01" --body `@body.json # OPTIONAL: test access to the Key Vault. # az keyvault secret set --name MySecretName --vault-name $keyVaultName --value MySecretFor more information about Key Vault REST API, see the Key Vault REST API reference.
Other issues
The following are issues not limited to specific versions or ranges of versions of Azure CLI.
az role assignment createisn't currently supported by Azure CLI for Azure Stack Hub due to an old API issue. The following workaround is required for both Microsoft Entra ID or ADFS.
For more information about role assignment REST API, see the role assignments article.# First, sign into account with access to the resource that is being given access or a role to another user. # TODO: change the principal name to name of principal you want to assign the role to. $principalNameLike = "CloudUser*" # TODO: change role name to your preference. $roleName = "Owner" # TODO: change location to your preference. $location = "local" $aadGraph = az cloud show --query endpoints.activeDirectoryGraphResourceId --output tsv $tenantId = az account show --query tenantId --output tsv if ($aadGraph[-1] -ne '/') { $aadGraph += '/' } $userObject = az rest --method get --url "${aadGraph}${tenantId}/users?api-version=1.6" ` | ConvertFrom-Json ` | Select-Object -ExpandProperty value ` | Where-Object {$_.userPrincipalName -like $principalNameLike} $roleDefinitionId = az role definition list --query "[?roleName=='${roleName}'].id" --output tsv $body = @{ properties = @{ roleDefinitionId = $roleDefinitionId principalId = $userObject.objectId } } $body | ConvertTo-Json | Out-File -FilePath (Join-Path -Path "." -ChildPath "body.json") $resourceGroupName = "testrg123" az group create -n $resourceGroupName -l $location $armEndpoint = az cloud show --query endpoints.resourceManager --output tsv if ($armEndpoint[-1] -ne '/') { $armEndpoint += '/' } $scope = az group show --name $resourceGroupName --query id --output tsv $guid = (New-Guid).ToString() az rest --method put --url "${armEndpoint}${scope}/providers/Microsoft.Authorization/roleAssignments/${guid}?api-version=2015-07-01" --body `@body.json # OPTIONAL: test access to the resource group, or use the portal. # az login -u <assigned user name> -p <assigned user password> --tenant $tenantId # Test a resource creation command in the resource group: # az network dns zone create -g $resourceGroupName -n "www.mysite.com"
Next steps
Feedback
Coming soon: Throughout 2024 we will be phasing out GitHub Issues as the feedback mechanism for content and replacing it with a new feedback system. For more information see: https://aka.ms/ContentUserFeedback.
Submit and view feedback for