Note
Access to this page requires authorization. You can try signing in or changing directories.
Access to this page requires authorization. You can try changing directories.
You can set up GitHub Actions to deploy a web app to your Azure Stack Hub instance. This allows you to set up continuous integration and deployment for your app. This article will help you get up and running with automated deployment using GitHub Actions and Azure Stack Hub. You'll create a web app and use the publish profile to create the web app to host your app.
GitHub Actions are workflows composed of actions that enable automation right in your code repository. You can trigger the workflows with events in your GitHub development process. You can set common DevOps automation tasks such as testing, deployment, and continuous integration.
This example workflow includes instructions for:
- Creating and validating your service principal
- Creating your web app publish profile
- Adding a runtime-specific workflow
- Adding a matching workflow with web app deploy
Create a service principal
A service principal can use role-based access control in order to connect to and interact with resources. You'll need a service principal with contributor access and the attributes specified in these instructions to use with your GitHub Actions.
Important
If you're a developer or user of Azure Stack Hub, you don't have permission to create a service principal. You'll either need to have cloud operator privileges, or request this principle from your cloud operator using the instructions in this section.
The following code snippets are written for a Windows machine using the PowerShell prompt with Azure CLI. If you're using CLI on a Linux machine and bash, either remove the line extension or replace them with a \.
Prepare the values of the following parameters used to create the service principal:
Parameter Example Description endpoint-resource-manager "https://management.orlando.azurestack.corp.microsoft.com" The resource management endpoint. suffix-storage-endpoint "orlando.azurestack.corp.microsoft.com" The endpoint suffix for storage accounts. suffix-keyvault-dns ".vault.orlando.azurestack.corp.microsoft.com" The Key Vault service dns suffix. endpoint-active-directory-graph-resource-id "https://graph.windows.net/" The Active Directory resource ID. endpoint-sql-management https://notsupported The sql server management endpoint. Set this to https://notsupportedprofile 2020-09-01-hybrid Profile to use for this cloud. Open your command line tool such as Windows PowerShell or Bash. Sign in to Azure CLI using the following command:
az loginUse the
registercommand for a new environment or theupdatecommand if you're using an existing environment. Use the following command.az cloud register ` -n "AzureStackUser" ` --endpoint-resource-manager "https://management.<local>.<FQDN>" ` --suffix-storage-endpoint ".<local>.<FQDN>" ` --suffix-keyvault-dns ".vault.<local>.<FQDN>" ` --endpoint-active-directory-graph-resource-id "https://graph.windows.net/" ` --endpoint-sql-management https://notsupported ` --profile 2020-09-01-hybridGet the subscription ID and resource group that you want to use for the service principal.
Create the service principal using the following command with the subscription ID and resource group:
az ad sp create-for-rbac --name "myApp" --role contributor `
    --scopes /subscriptions/{subscription-id}/resourceGroups/{resource-group} `
    --sdk-auth
Copy the resulting JSON object. You'll use the JSON object to create your secret in your GitHub repository that contains your action. The JSON object should have the following attributes:
{
  "clientId": <Application ID for the service principal>,
  "clientSecret": <Client secret for the service principal>,
  "subscriptionId": <Subscription ID for the service principal>,
  "tenantId": <Tenant ID for the service principal>,
  "activeDirectoryEndpointUrl": "https://login.microsoftonline.com/",
  "resourceManagerEndpointUrl": "https://management.<FQDN>",
  "activeDirectoryGraphResourceId": "https://graph.windows.net/",
  "sqlManagementEndpointUrl": "https://notsupported",
  "galleryEndpointUrl": "https://providers.<FQDN>:30016/",
  "managementEndpointUrl": "https://management.<FQDN>"
}
Create the web app publish profile
Open the create web app blade
- Sign in to your Azure Stack Hub portal.
- Select Create a resource > Web + Mobile > Web App.

To create your web app
- Select your Subscription.
- Create or select a Resource Group.
- Type the Name of your app. The name of the app will appear in the URL for your app, for example,
yourappname.appservice.<region>.<FQDN> - Select the Runtime stack for your app. The runtime must match the workflow you use to target your publish profile.
- Select the Operating System (OS) that will host your runtime and app.
- Select or type the Region for your Azure Stack Hub instance.
- Select the plan based on your Azure Stack Hub instance, region, and app OS.
- Select Review + Create.
- Review your Web app. Select Create.
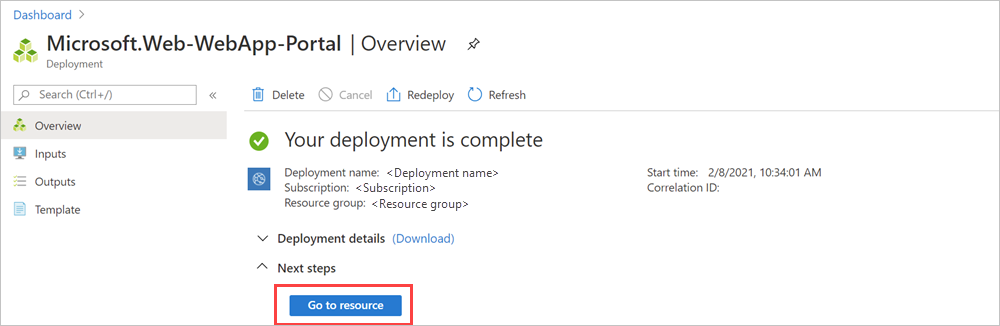
- Select Go to resource.
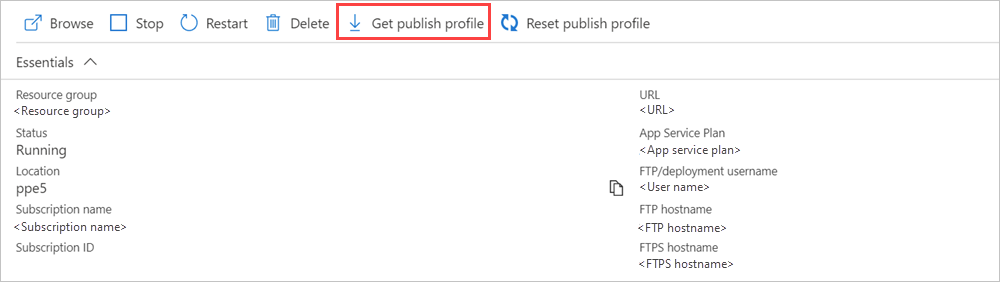
- Select Get publish profile. Your publish profile downloads and is named
<yourappname>.PublishSettings. The file contains an XML with the target values of your web app. - Store your publish profile so that you can access it when you create the secrets for your repository.
Add your secrets to the repository
You can use GitHub secrets to encrypt sensitive information to use in your actions. You'll create a secret to contain your service principal, and another secret to contain your web app publish profile. The action uses these to sign in to your Azure Stack Hub instance and build your app to the web app target.
- Open or create a GitHub repository. If you need guidance on creating a repository in GitHub, you can find instructions in the GitHub docs.
- Select Settings.
- Select Secrets.
- Select New repository secret.
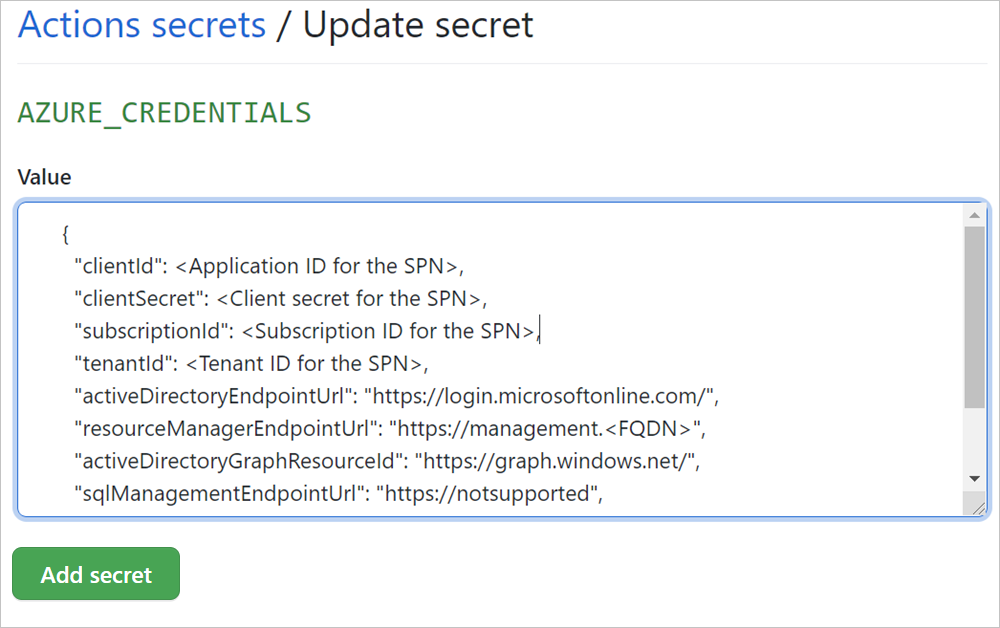
- Name your secret
AZURE_CREDENTIALS. - Paste the JSON object that represents your service principal.
- Select Add secret.
- Select New repository secret.
- Name your secret
AZURE_WEBAPP_PUBLISH_PROFILE. - Open your
<yourappname>.PublishSettingsin a text editor, and then copy and paste the XML into the repository secret. - Select Add secret.
Add a runtime workflow
Choose a template from the table for your web app runtime.
Runtime Template DotNet dotnet.yml NodeJS node.yml Java java_jar.yml Java java_war.yml Python python.yml PHP php.yml Docker docker.yml Place the template GitHub Actions workflow directory in your project repository:
.github/workflows/<runtime.yml>Your workflow directory will contain two workflows.
Add the web app deploy action
Create a second workflow using the yaml in this section. In this example, you're deploying a Python web app. You would need to select a setup action based on your workflow. You can find references to set up actions for various runtimes in the table, Setup actions for different runtimes, after the steps used to create the action.
Example GitHub Actions workflow
Open your GitHub repository. If you have not already added your web app application resources, add them now. In this example, I am using the Python Flask Hello World sample, and I added the Python
.gitignore,app.py, andrequirements.txtfiles.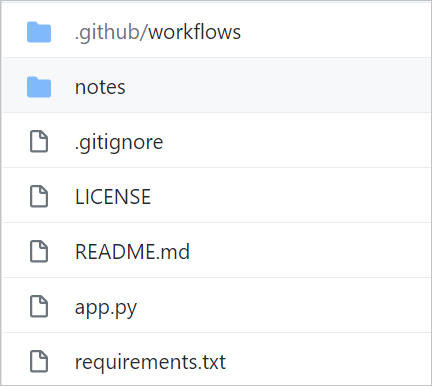
Select Actions.
Select New workflow.
- If this is your first workflow, select set up a workflow yourself under Choose a workflow template.
- If you have existing workflows, select New workflow > Set up a workflow yourself.
In the path, name the file
workflow.yml.Copy and paste the workflow yml.
# .github/workflows/worfklow.yml
on: push

jobs:
  build-and-deploy:
    runs-on: ubuntu-latest
    steps:
    # checkout the repo
    - name: 'Checkout Github Action'
      uses: actions/checkout@main

    - name: Setup Python 3.6
      uses: actions/setup-node@v1
      with:
        python-version: '3.6'
    - name: 'create a virtual environment and install dependencies'
      run: |
        python3 -m venv .venv
        source .venv/bin/activate
        pip install -r requirements.txt

    - name: 'Run Azure webapp deploy action using publish profile credentials'
      uses: azure/webapps-deploy@v2
      with:
        app-name: <YOURAPPNAME>
        publish-profile: ${{ secrets.AZURE_WEBAPP_PUBLISH_PROFILE }}
In the workflow.yaml update
<YOURAPPNAME>with your app name.Select Start commit.
Add the commit title and optional details, and then select Commit new file.
Setup actions for different runtimes
To build app code in a specific language-based environment, use setup actions:
| Runtime | Set up actions |
|---|---|
| DotNet | Setup DotNet |
| NodeJS | Setup Node |
| Java | Setup Java |
| Python | Setup Python |
| Docker | docker-login |
Once the login action is done, the next set of actions in the workflow can perform tasks such as building, tagging, and pushing containers. For more information, see the documentation for the Azure Webapp action.
Trigger your deployment
When the action runs, verify that it has run successfully.
- Open your GitHub repository. You can trigger the workflow by pushing to the repository.
- Select Actions.
- Select the name of the commit under All workflows. Both workflows have logged their status.

- Select the name of the job for the deployment,
.github/workflows/workflow.yml. - Expand the sections to review the return values for your workflow actions. Find the URL for your deployed web app.
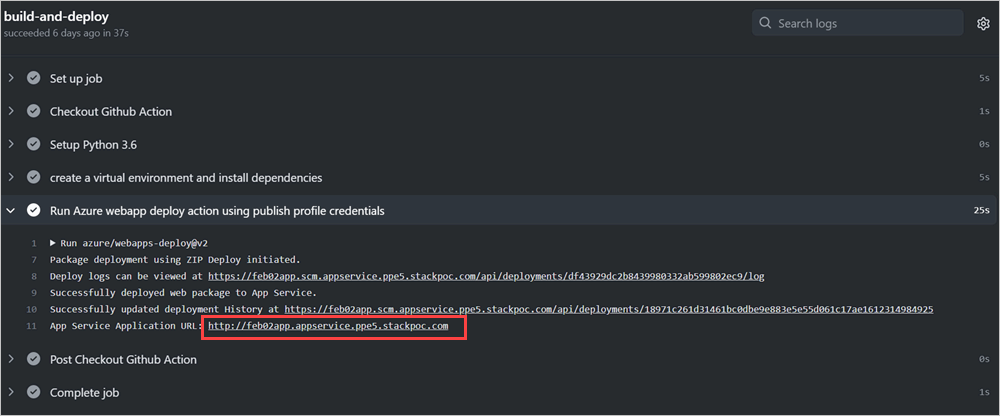
- Open a web browser and load the URL.
Next steps
- Find more actions in the GitHub Marketplace.
- Learn about Common deployments for Azure Stack Hub
- Learn about Use Azure Resource Manager templates in Azure Stack Hub
- Review the DevOps hybrid cloud pattern, DevOps pattern