Configure Transmit Security with Azure Active Directory B2C for passwordless authentication
In this tutorial, learn to integrate Azure Active Directory B2C (Azure AD B2C) authentication with Transmit Security's hosted passwordless authentication solution. Transmit Security uses strong Fast Identity Online (FIDO2) biometric authentication for reliable omni-channel authentication. The solution ensures a smooth sign-in experience for customers across devices and channels, while reducing fraud, phishing, and credential reuse.
Scenario description
The following architecture diagram illustrates the implementation:
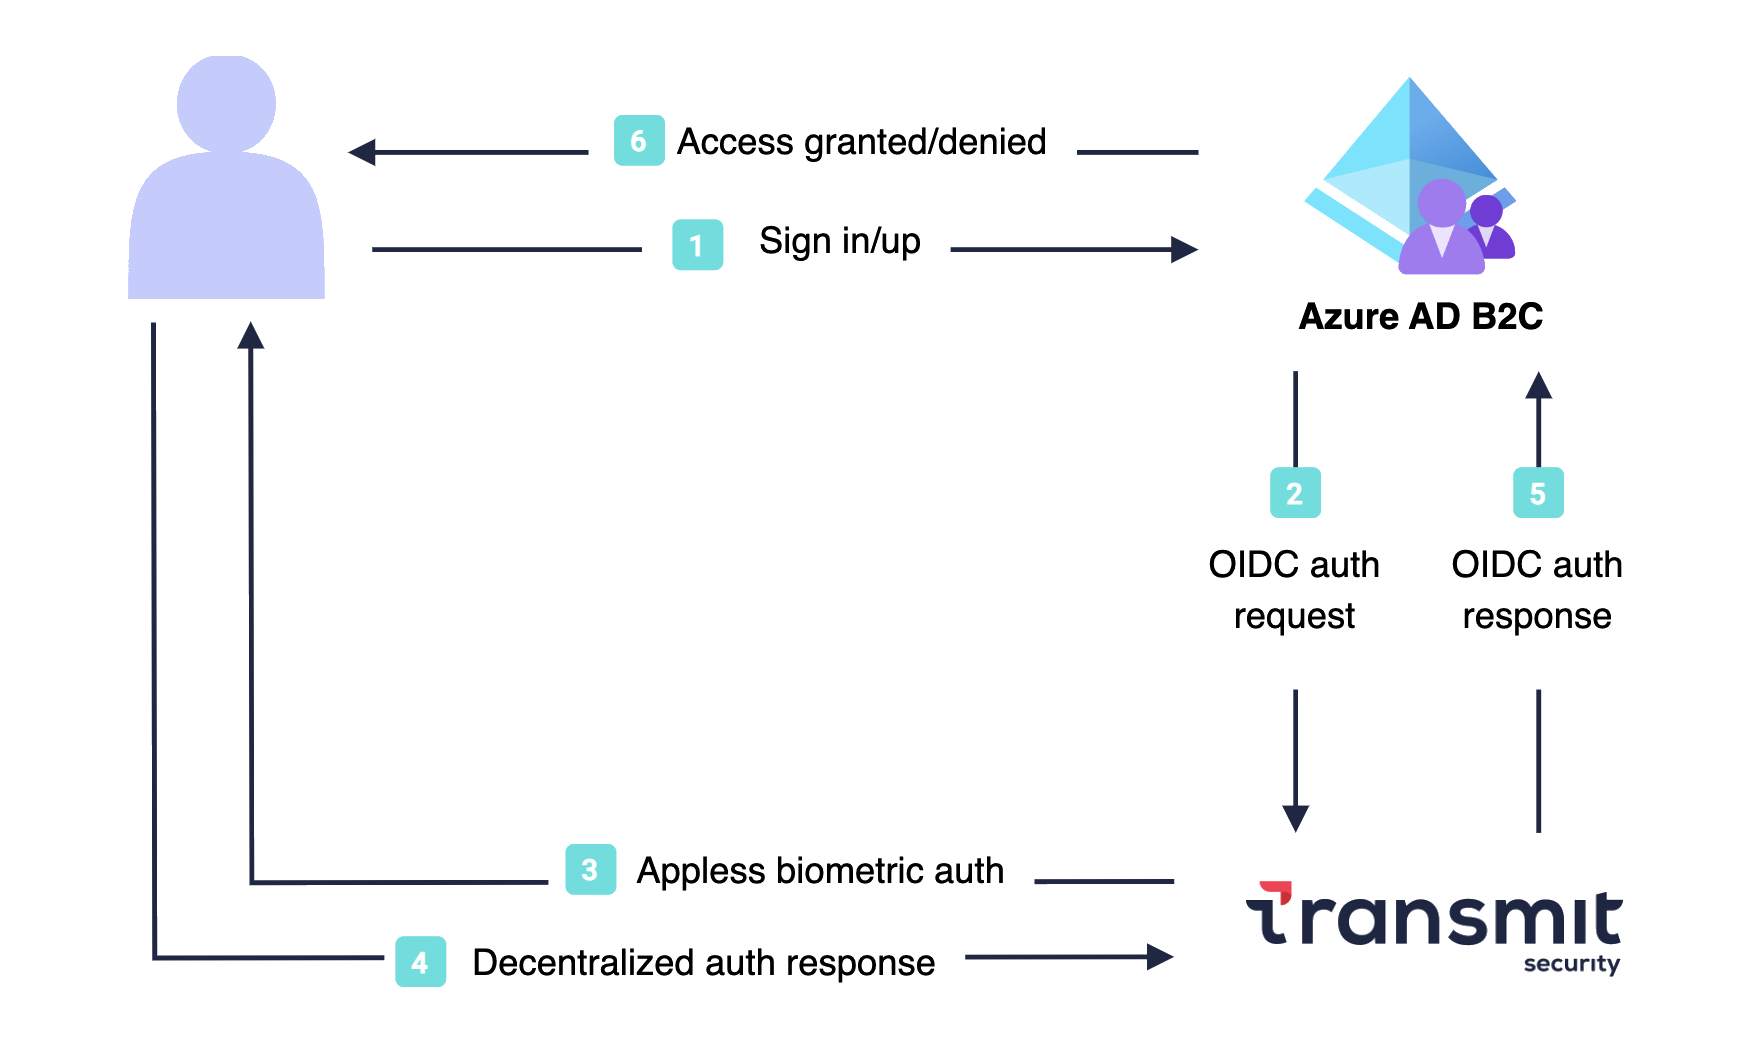
- User opens the Azure AD B2C sign-in page, and signs in or signs up.
- Azure AD B2C redirects the user to Transmit Security using an OpenID Connect (OIDC) request.
- Transmit Security authenticates the user using appless FIDO2 biometrics, such as fingerprint.
- A decentralized authentication response is returned to Transmit Security.
- The OIDC response passes to Azure AD B2C.
- User is granted or denied access to the application, based on verification results.
Prerequisites
To get started, you need:
- A Microsoft Entra subscription. If you don't have one, get a free account.
- An Azure AD B2C tenant linked to the Entra subscription.
- A registered web application in your Azure AD B2C tenant.
- A Transmit Security tenant. Go to transmitsecurity.com.
- A Microsoft Entra subscription. If you don't have one, get a free account.
- An Azure AD B2C tenant linked to the Entra subscription.
- A registered web application in your Azure AD B2C tenant.
- Azure AD B2C custom policies.
- A Transmit Security tenant. Go to transmitsecurity.com.
Step 1: Create a Transmit app
Sign in to the Transmit Admin Portal and create an application:
From Applications, select Add application.
Configure the application with the following attributes:
Property Description Application name Application name Client name Client name Redirect URIs https://<your-B2C-tenant>.b2clogin.com/<your-B2C-tenant>.onmicrosoft.com/oauth2/authrespwhere<your-B2C-tenant>is your Azure AD B2C tenant domain (or<your-B2C-tenant>.b2clogin.comis your custom domain)Select Add.
Upon registration, a Client ID and Client Secret appear. Record the values to use later.
Step 2: Configure the sign-in experience
From the Transmit Admin Portal, configure the user authentication experience:
Select Authentication, and then select Experiences Management.
From the drop-down menu, select your application.
Configure your application with the following attributes:
Property Description User identifier Select Email Primary authentication method Select Passkey Secondary authentication method Only enable WebAuthn QR and Email OTP Select user information Delete all the default fields Select Save.
Step 3: Add Transmit as an identity provider
To enable users to sign in with Transmit Security, configure Transmit Security as a new identity provider. In Azure AD B2C follow these steps:
Sign in to the Azure portal as Global Administrator.
In the portal toolbar, select Directories + subscriptions.
On the Portal settings | Directories + subscriptions page, in the Directory name list, find the Azure AD B2C directory and then select Switch.
Under Azure services, select Azure AD B2C (or select More services and use the All services search box to search for Azure AD B2C).
Select Identity providers, and then select New OpenID Connect provider.
Configure the provider as follows:
Property Description Name Name, such as Transmit Security Metadata URL https://api.transmitsecurity.io/cis/oidc/.well-known/openid-configurationClient ID Client ID provided by Transmit Client secret Client secret provided by Transmit Scope openid emailResponse type code Response mode form_post Display name emailEmail emailSelect Save.
Step 4: Create a user flow
At this point, the Transmit Security identity provider has been set up, but it's not yet available in any of the sign-in pages. To add the Transmit Security identity provider to a user flow:
- In your Azure AD B2C tenant, under Policies, select User flows.
- Select New user flow.
- Select Sign up and sign in user flow type, and then select Create.
- Enter a Name for the user flow, such as signupsignin.
- Under Identity providers:
- For Local Accounts, select None.
- For Custom identity providers, select the Transmit Security provider.
- Select Create to add the user flow.
Step 5: Test the user flow
- In the Azure AD B2C tenant, select User flows.
- Select the created user flow, such as B2C_1_signupsignin.
- Select Run user flow:
- For Application, select your registered web application.
- For Reply URL, select
https://jwt.ms.
- Select Run user flow.
- The browser is redirected to Transmit's sign-in page.
- Complete the sign-in flow: enter your account email and authenticate using biometrics (for example, fingerprint).
- The browser is redirected to
https://jwt.mswith an Azure AD B2C token.
Step 3: Create a policy key
You need to store the client secret of your Transmit application that you previously recorded in your Azure AD B2C tenant.
Sign in to the Azure portal.
In the portal toolbar, select Directories + subscriptions.
On the Portal settings | Directories + subscriptions page, in the Directory name list, find the Azure AD B2C directory and then select Switch.
On the Overview page, under Policies, select Identity Experience Framework.
Select Policy Keys, and then select Add.
Configure the policy key as follows:
Property Description Options Manual Name Policy key name, such as TransmitClientSecret Secret Client secret provided by Transmit Key usage Signature Select Create to add the policy key.
Step 4: Add Transmit as an identity provider
To enable sign in with Transmit Security, define Transmit Security as a claims provider that Azure AD B2C communicates with through an endpoint. The endpoint provides claims used by Azure AD B2C to verify a user authenticated with a digital identity on a device.
You can define the Transmit Security as a claims provider by adding it to the ClaimsProviders element in the extension file of your policy.
Get the custom policy starter packs from GitHub, then update the XML files in the SocialAndLocalAccounts starter pack with your Azure AD B2C tenant name:
Download the .zip file or clone the repository:
git clone https://github.com/Azure-Samples/active-directory-b2c-custom-policy-starterpackIn the files in the LocalAccounts directory, replace the string
yourtenantwith the Azure AD B2C tenant name.
Open the
LocalAccounts/ TrustFrameworkExtensions.xml.Find the ClaimsProviders element. If it doesn't appear, add it under the root element.
Add a new ClaimsProvider similar to the following example:
 <ClaimsProvider>
     <Domain>api.transmitsecurity.io</Domain>
     <DisplayName>Transmit</DisplayName>
     <TechnicalProfiles>
       <TechnicalProfile Id="TS-OpenIdConnect">
         <DisplayName>Transmit</DisplayName>
         <Protocol Name="OpenIdConnect" />
         <Metadata>
           <Item Key="METADATA">https://api.transmitsecurity.io/cis/oidc/.well-known/openid-configuration</Item>
            <!-- Update the Client ID below to the Transmit Security client ID -->
           <Item Key="client_id">00000000-0000-0000-0000-000000000000</Item>
           <Item Key="response_types">code</Item>
           <Item Key="scope">openid email</Item>
           <Item Key="response_mode">form_post</Item>
           <Item Key="HttpBinding">POST</Item>
           <Item Key="UsePolicyInRedirectUri">false</Item>
           <Item Key="AccessTokenResponseFormat">json</Item>
         </Metadata>
         <CryptographicKeys>
           <Key Id="client_secret" StorageReferenceId="B2C_1A_TransmitClientSecret" />
         </CryptographicKeys>
         <OutputClaims>
           <OutputClaim ClaimTypeReferenceId="issuerUserId" PartnerClaimType="sub" />
           <OutputClaim ClaimTypeReferenceId="email" PartnerClaimType="email" />
           <OutputClaim ClaimTypeReferenceId="identityProvider" PartnerClaimType="iss" />
           <OutputClaim ClaimTypeReferenceId="authenticationSource" DefaultValue="socialIdpAuthentication" AlwaysUseDefaultValue="true" />
         </OutputClaims>
         <OutputClaimsTransformations>
           <OutputClaimsTransformation ReferenceId="CreateRandomUPNUserName" />
           <OutputClaimsTransformation ReferenceId="CreateUserPrincipalName" />
           <OutputClaimsTransformation ReferenceId="CreateAlternativeSecurityId" />
         </OutputClaimsTransformations>
         <UseTechnicalProfileForSessionManagement ReferenceId="SM-SocialLogin" />
       </TechnicalProfile>
     </TechnicalProfiles>
   </ClaimsProvider>
Set client_id with the Transmit Security client ID.
Update the client_secret section with the name of the policy key you created (for example, B2C_1A_TransmitClientSecret):
<Key Id="client_secret" StorageReferenceId="B2C_1A_TransmitClientSecret" />Select Save.
Step 5: Add a user journey
At this point, the identity provider is set up, but it's not yet available in any of the sign-in pages. If you have a custom user journey, continue to the Add Transmit to the user journey step. Otherwise, create a duplicate template user journey:
- From the starter pack, open the
LocalAccounts/ TrustFrameworkBase.xmlfile. - Find and copy the contents of the UserJourney element that includes
Id=SignUpOrSignIn. - Open the
LocalAccounts/ TrustFrameworkExtensions.xml. - Find the UserJourneys element. If there's no element, add one.
- Paste the UserJourney element as a child of the UserJourneys element.
- Rename the user journey ID (for example,
Id=TransmitSUSI)
Step 6: Add Transmit to the user journey
Add the new identity provider to the user journey:
- Find the orchestration step element that includes
Type=CombinedSignInAndSignUp, orType=ClaimsProviderSelectionin the user journey. It's usually the first orchestration step. The ClaimsProviderSelections element has an identity provider list that users sign in with. The order of the elements controls the order of the sign in buttons. - Add a ClaimsProviderSelection XML element.
- Set the value of TargetClaimsExchangeId to a friendly name.
- Add a ClaimsExchange element.
- Set the Id to the value of the target claims exchange ID.
- Update the TechnicalProfileReferenceId value to the technical profile ID you created.
The following XML demonstrates orchestration user journey with the identity provider:
    <OrchestrationStep Order="1" Type="CombinedSignInAndSignUp" ContentDefinitionReferenceId="api.signuporsignin">
      <ClaimsProviderSelections>
        ...
        <ClaimsProviderSelection TargetClaimsExchangeId="TSIDExchange" />
      </ClaimsProviderSelections>
      ...
    </OrchestrationStep>

    <OrchestrationStep Order="2" Type="ClaimsExchange">
      ...
      <ClaimsExchanges>
        <ClaimsExchange Id="TSIDExchange" TechnicalProfileReferenceId="TS-OpenIdConnect" />
      </ClaimsExchanges>
    </OrchestrationStep>
Step 7: Configure the relying party policy
The relying party policy, for example SignUpSignIn.xml, specifies the user journey Azure AD B2C executes. Find the DefaultUserJourney element within relying party. Update the ReferenceId to match the user journey ID, in which you added the identity provider.
In the following example, for the TransmitSUSI user journey, the ReferenceId is set to TransmitSUSI:
  <RelyingParty>
    <DefaultUserJourney ReferenceId="TransmitSUSI" />
    <TechnicalProfile Id="TS-OpenIdConnect">
      <DisplayName>PolicyProfile</DisplayName>
      <Protocol Name="OpenIdConnect" />
      <OutputClaims>
        <OutputClaim ClaimTypeReferenceId="displayName" />
        <OutputClaim ClaimTypeReferenceId="givenName" />
        <OutputClaim ClaimTypeReferenceId="surname" />
        <OutputClaim ClaimTypeReferenceId="email" />
        <OutputClaim ClaimTypeReferenceId="objectId" PartnerClaimType="sub"/>
        <OutputClaim ClaimTypeReferenceId="identityProvider" />
        <OutputClaim ClaimTypeReferenceId="tenantId" AlwaysUseDefaultValue="true" DefaultValue="{Policy:TenantObjectId}" />
      </OutputClaims>
      <SubjectNamingInfo ClaimType="sub" />
    </TechnicalProfile>
  </RelyingParty>
Step 8: Upload the custom policy
Using the directory with your Azure AD B2C tenant, upload the custom policy:
- Sign in to the Azure portal.
- In the portal toolbar, select Directories + subscriptions.
- On the Portal settings | Directories + subscriptions page, in the Directory name list, find the Azure AD B2C directory and then select Switch.
- Under Policies, select Identity Experience Framework.
- Select Upload Custom Policy, and then upload the updated files in the following order:
- Base policy, for example
TrustFrameworkBase.xml - Localization policy, for example
TrustFrameworkLocalization.xml - Extension policy, for example
TrustFrameworkExtensions.xml - Relying party policy, such as
SignUpOrSignIn.xml
Step 9: Test your custom policy
Using the directory with your Azure AD B2C tenant, test your custom policy:
- In the Azure AD B2C tenant, and under Policies, select Identity Experience Framework.
- Under Custom policies, select B2C_1A_signup_signin.
- For Application, select the web application you registered. The Reply URL is
https://jwt.ms. - Select Run now.
- The browser is redirected to Transmit's sign-in page.
- Complete the sign-in flow: enter your account email and authenticate using biometrics (for example, fingerprint).
- The browser is redirected to
https://jwt.mswith an Azure AD B2C token.
Next steps
For additional information, review the following articles:
Feedback
Coming soon: Throughout 2024 we will be phasing out GitHub Issues as the feedback mechanism for content and replacing it with a new feedback system. For more information see: https://aka.ms/ContentUserFeedback.
Submit and view feedback for