Tutorial: Configure Zscaler Private Access with Azure Active Directory B2C
In this tutorial, learn how to integrate Azure Active Directory B2C (Azure AD B2C) authentication with Zscaler Private Access (ZPA). ZPA is policy-based, secure access to private applications and assets without the overhead or security risks of a virtual private network (VPN). Zscaler secure hybrid access reduces attack surface for consumer-facing applications when combined with Azure AD B2C.
Learn more: Go to Zscaler and select Products & Solutions, Products.
Prerequisites
Before you begin, you’ll need:
- An Azure subscription
- If you don't have one, you can get an Azure free account
- An Azure AD B2C tenant linked to your Azure subscription
- A ZPA subscription
Scenario description
ZPA integration includes the following components:
- Azure AD B2C - The identity provider (IdP) that verifies user credentials
- ZPA - Secures web applications by enforcing Zero Trust access
- See, Zero Trust defined
- Web application - Hosts the service users access
The following diagram shows how ZPA integrates with Azure AD B2C.
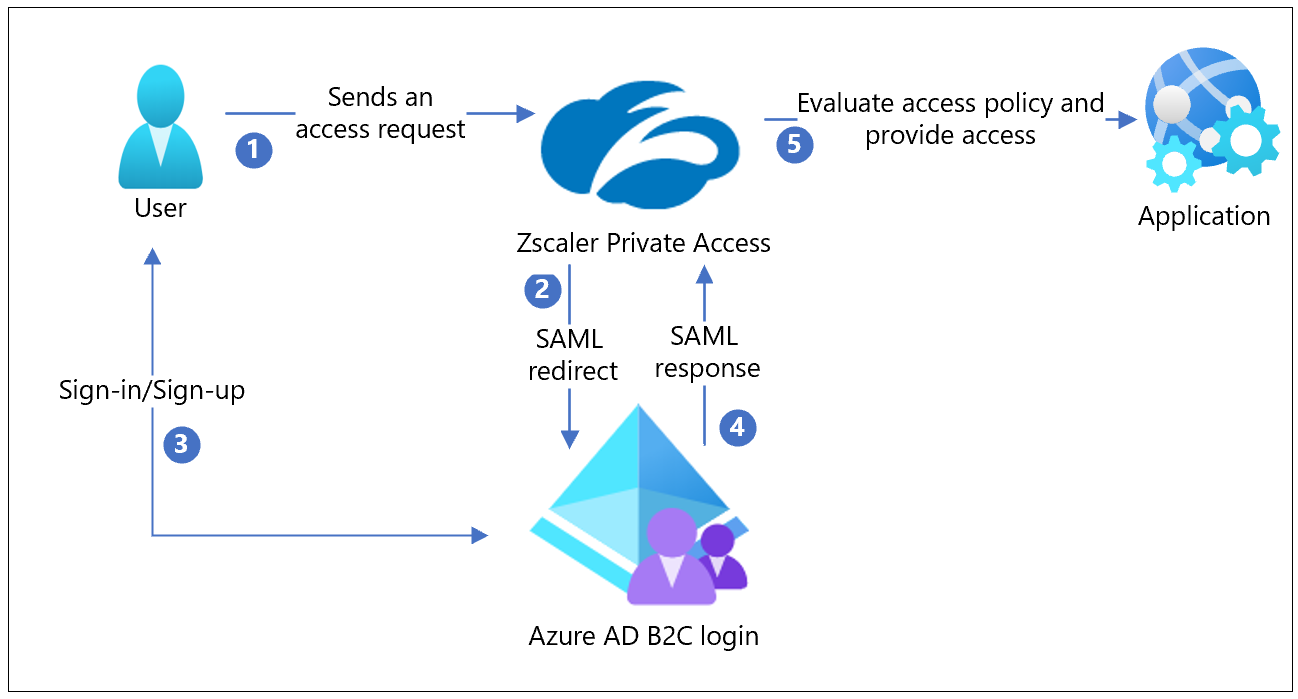
- A user arrives at the ZPA portal, or a ZPA browser-access application, to request access
- ZPA collects user attributes. ZPA performs a SAML redirect to the Azure AD B2C sign-in page.
- New users sign up and create an account. Current users sign in with credentials. Azure AD B2C validates user identity.
- Azure AD B2C redirects the user to ZPA with the SAML assertion, which ZPA verifies. ZPA sets the user context.
- ZPA evaluates access policies. The request is allowed or it isn't.
Onboard to ZPA
This tutorial assumes ZPA is installed and running.
To get started with ZPA, go to help.zscaler.com for Step-by-Step Configuration Guide for ZPA.
Integrate ZPA with Azure AD B2C
Configure Azure AD B2C as an IdP on ZPA
Configure Azure AD B2C as an IdP on ZPA.
For more information, see Configuring an IdP for single sign-on.
Sign in to the ZPA Admin portal.
Go to Administration > IdP Configuration.
Select Add IdP Configuration.
The Add IdP Configuration pane appears.
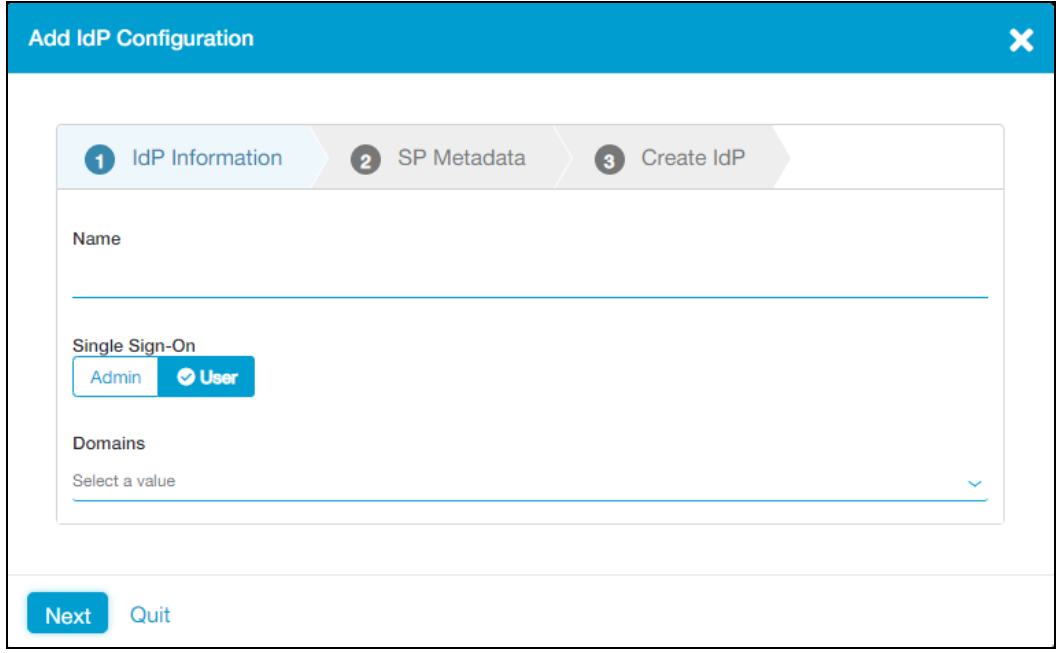
Select the IdP Information tab
In the Name box, enter Azure AD B2C.
Under Single Sign-On, select User.
In the Domains drop-down list, select the authentication domains to associate with the IdP.
Select Next.
Select the SP Metadata tab.
Under Service Provider URL, copy the value to use later.
Under Service Provider Entity ID, copy the value to user later.
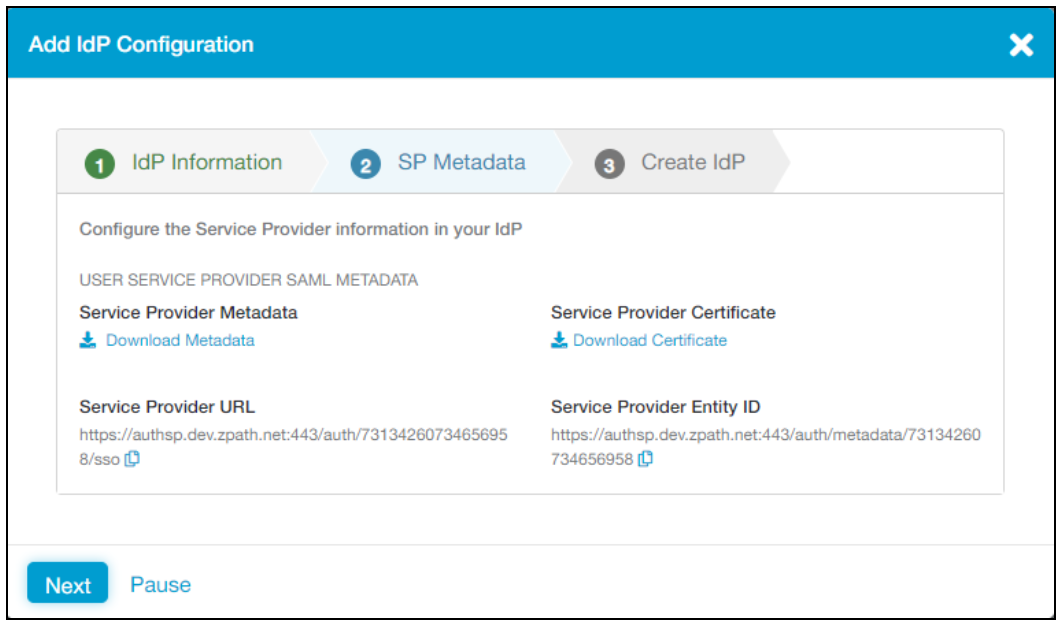
Select Pause.
Configure custom policies in Azure AD B2C
Important
Configure custom policies in Azure AD B2C if you haven’t configured custom policies.
For more information, see Tutorial: Create user flows and custom policies in Azure Active Directory B2C.
Register ZPA as a SAML application in Azure AD B2C
During registration, in Upload your policy, copy the IdP SAML metadata URL used by Azure AD B2C to use later.
Follow the instructions until Configure your application in Azure AD B2C.
For step 4.2, update the app manifest properties
- For identifierUris, enter the Service Provider Entity ID you copied
- For samlMetadataUrl, skip this entry
- For replyUrlsWithType, enter the Service Provider URL you copied
- For logoutUrl, skip this entry
The remaining steps aren't required.
Extract the IdP SAML metadata from Azure AD B2C
Obtain a SAML metadata URL in the following format:
https://<tenant-name>.b2clogin.com/<tenant-name>.onmicrosoft.com/<policy-name>/Samlp/metadata
Note
<tenant-name> is your Azure AD B2C tenant, and <policy-name> is the custom SAML policy that you created.
The URL might be:
https://safemarch.b2clogin.com/safemarch.onmicrosoft.com/B2C_1A_signup_signin_saml/Samlp/metadata.
- Open a web browser.
- Go to the SAML metadata URL.
- Right-click on the page.
- Select Save as.
- Save the file to your computer to use later.
Complete IdP configuration on ZPA
To complete the IdP configuration:
Go to the ZPA Admin portal.
Select Administration > IdP Configuration.
Select the IdP you configured, and then select Resume.
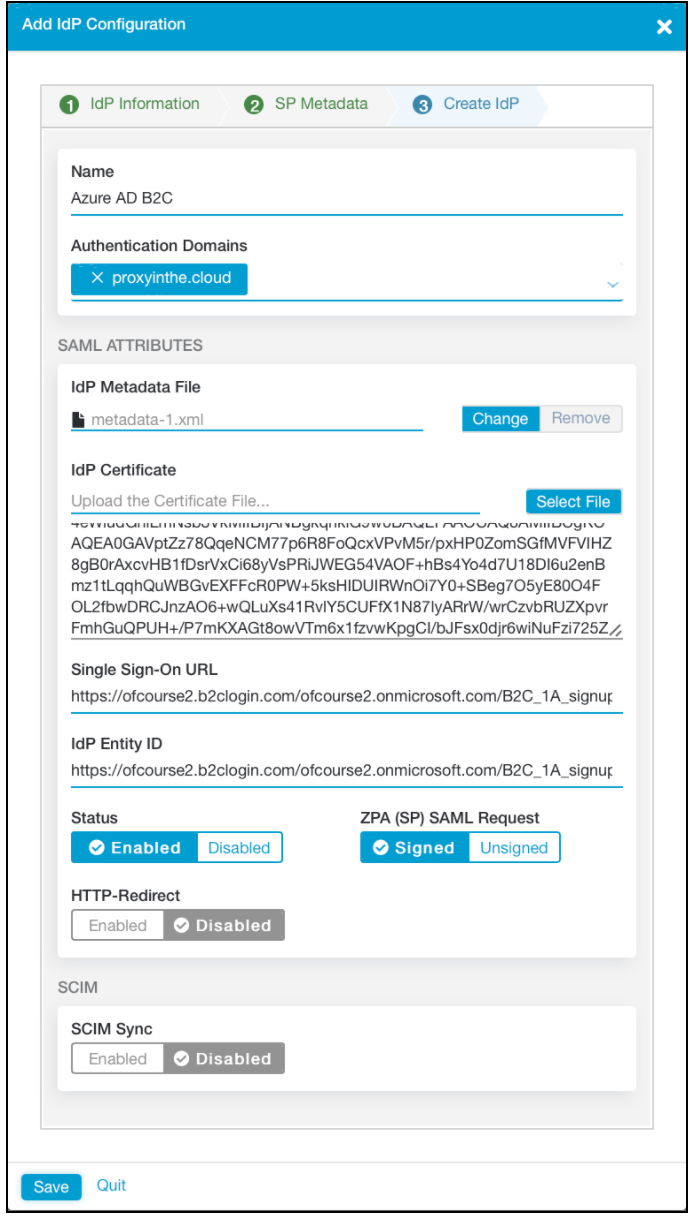
On the Add IdP Configuration pane, select the Create IdP tab.
Under IdP Metadata File, upload the metadata file you saved.
Under Status, verify the configuration is Enabled.
Select Save.
Test the solution
To confirm SAML authentication, go to a ZPA user portal or a browser-access application, and test the sign-up or sign-in process.
Next steps
Feedback
Coming soon: Throughout 2024 we will be phasing out GitHub Issues as the feedback mechanism for content and replacing it with a new feedback system. For more information see: https://aka.ms/ContentUserFeedback.
Submit and view feedback for