MFA Server migration
This topic covers how to migrate MFA settings for Microsoft Entra users from on-premises Azure MFA Server to Microsoft Entra multifactor authentication.
Solution overview
The MFA Server Migration Utility helps synchronize multifactor authentication data stored in the on-premises Azure MFA Server directly to Microsoft Entra multifactor authentication. After the authentication data is migrated to Microsoft Entra ID, users can perform cloud-based MFA seamlessly without having to register again or confirm authentication methods. Admins can use the MFA Server Migration Utility to target single users or groups of users for testing and controlled rollout without having to make any tenant-wide changes.
Video: How to use the MFA Server Migration Utility
Take a look at our video for an overview of the MFA Server Migration Utility and how it works.
Limitations and requirements
The MFA Server Migration Utility requires a new build of the MFA Server solution to be installed on your Primary MFA Server. The build makes updates to the MFA Server data file, and includes the new MFA Server Migration Utility. You don't have to update the WebSDK or User portal. Installing the update doesn't start the migration automatically.
Note
The MFA Server Migration Utility can be executed on a secondary MFA Server. For more information, please check Run a secondary MFA Server (optional).
The MFA Server Migration Utility copies the data from the database file onto the user objects in Microsoft Entra ID. During migration, users can be targeted for Microsoft Entra multifactor authentication for testing purposes using Staged Rollout. Staged migration lets you test without making any changes to your domain federation settings. Once migrations are complete, you must finalize your migration by making changes to your domain federation settings.
AD FS running Windows Server 2016 or higher is required to provide MFA authentication on any AD FS relying parties, not including Microsoft Entra ID and Office 365.
Review your AD FS access control policies and make sure none requires MFA to be performed on-premises as part of the authentication process.
Staged rollout can target a maximum of 500,000 users (10 groups containing a maximum of 50,000 users each).
Migration guide
An MFA Server migration generally includes the steps in the following process:
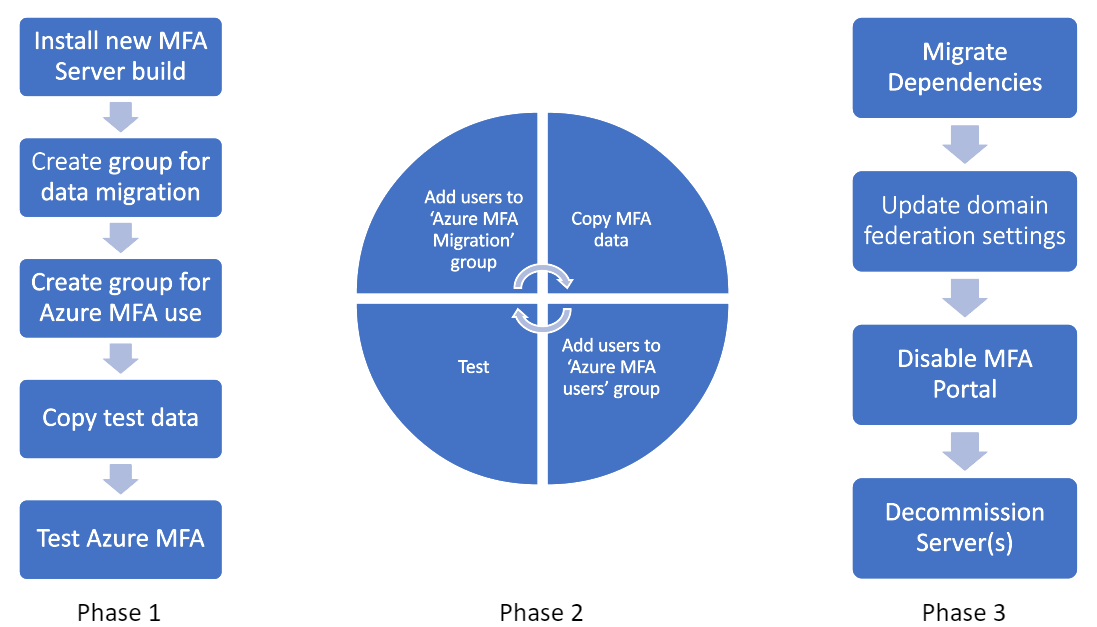
A few important points:
Phase 1 should be repeated as you add test users.
- The migration tool uses Microsoft Entra groups for determining the users for which authentication data should be synced between MFA Server and Microsoft Entra multifactor authentication. After user data has been synced, that user is then ready to use Microsoft Entra multifactor authentication.
- Staged Rollout allows you to reroute users to Microsoft Entra multifactor authentication, also using Microsoft Entra groups. While you certainly could use the same groups for both tools, we recommend against it as users could potentially be redirected to Microsoft Entra multifactor authentication before the tool has synched their data. We recommend setting up Microsoft Entra groups for syncing authentication data by the MFA Server Migration Utility, and another set of groups for Staged Rollout to direct targeted users to Microsoft Entra multifactor authentication rather than on-premises.
Phase 2 should be repeated as you migrate your user base. By the end of Phase 2, your entire user base should be using Microsoft Entra multifactor authentication for all workloads federated against Microsoft Entra ID.
During the previous phases, you can remove users from the Staged Rollout folders to take them out of scope of Microsoft Entra multifactor authentication and route them back to your on-premises Azure MFA server for all MFA requests originating from Microsoft Entra ID.
Phase 3 requires moving all clients that authenticate to the on-premises MFA Server (VPNs, password managers, and so on) to Microsoft Entra federation via SAML/OAUTH. If modern authentication standards aren't supported, you're required to stand up NPS server(s) with the Microsoft Entra multifactor authentication extension installed. Once dependencies are migrated, users should no longer use the User portal on the MFA Server, but rather should manage their authentication methods in Microsoft Entra ID (aka.ms/mfasetup). Once users begin managing their authentication data in Microsoft Entra ID, those methods won't be synced back to MFA Server. If you roll back to the on-premises MFA Server after users have made changes to their Authentication Methods in Microsoft Entra ID, those changes will be lost. After user migrations are complete, change the federatedIdpMfaBehavior domain federation setting. The change tells Microsoft Entra ID to no longer perform MFA on-premises and to perform all MFA requests with Microsoft Entra multifactor authentication, regardless of group membership.
The following sections explain the migration steps in more detail.
Identify Azure Multi-Factor Authentication Server dependencies
We've worked hard to ensure that moving onto our cloud-based Microsoft Entra multifactor authentication solution will maintain and even improve your security posture. There are three broad categories that should be used to group dependencies:
To help your migration, we've matched widely used MFA Server features with the functional equivalent in Microsoft Entra multifactor authentication for each category.
MFA methods
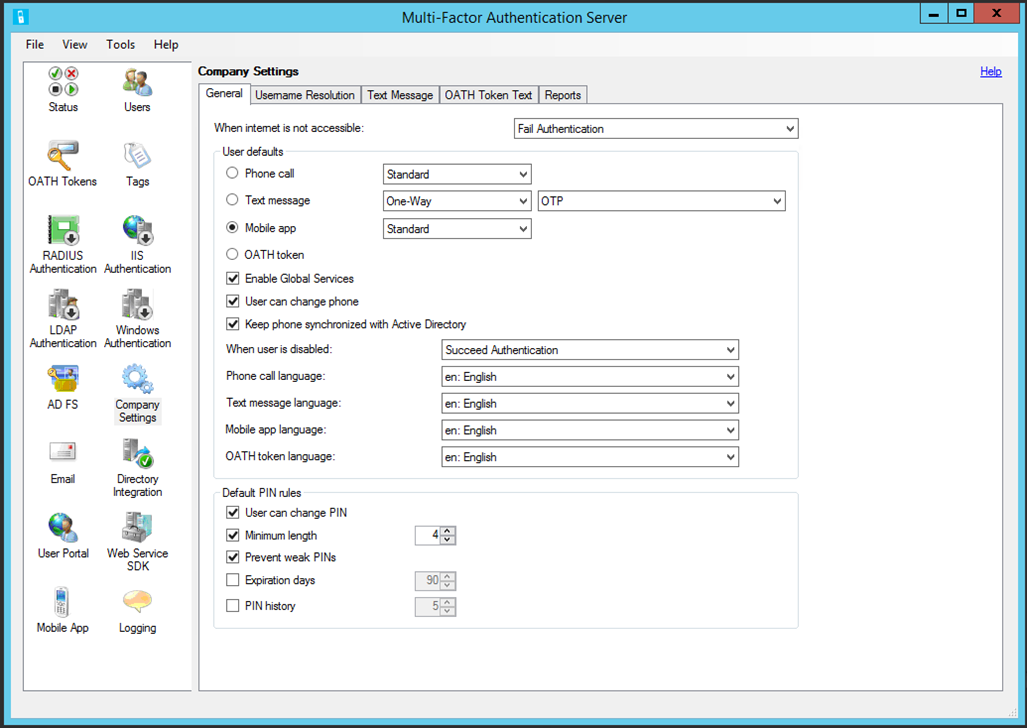
Open MFA Server, click Company Settings:
| MFA Server | Microsoft Entra multifactor authentication |
|---|---|
| General Tab | |
| User Defaults section | |
| Phone call (Standard) | No action needed |
| Text message (OTP)* | No action needed |
| Mobile app (Standard) | No action needed |
| Phone Call (PIN)* | Enable Voice OTP |
| Text message (OTP + PIN)** | No action needed |
| Mobile app (PIN)* | Enable number matching |
| Phone call/text message/mobile app/OATH token language | Language settings will be automatically applied to a user based on the locale settings in their browser |
| Default PIN rules section | Not applicable; see updated methods in the preceding screenshot |
| Username Resolution tab | Not applicable; username resolution isn't required for Microsoft Entra multifactor authentication |
| Text Message tab | Not applicable; Microsoft Entra multifactor authentication uses a default message for text messages |
| OATH Token tab | Not applicable; Microsoft Entra multifactor authentication uses a default message for OATH tokens |
| Reports | Microsoft Entra authentication Methods Activity reports |
*When a PIN is used to provide proof-of-presence functionality, the functional equivalent is provided above. PINs that aren't cryptographically tied to a device don't sufficiently protect against scenarios where a device has been compromised. To protect against these scenarios, including SIM swap attacks, move users to more secure methods according to Microsoft authentication methods best practices.
**The default Text MFA experience in Microsoft Entra multifactor authentication sends users a code, which they're required to enter in the login window as part of authentication. The requirement to roundtrip the code provides proof-of-presence functionality.
User portal
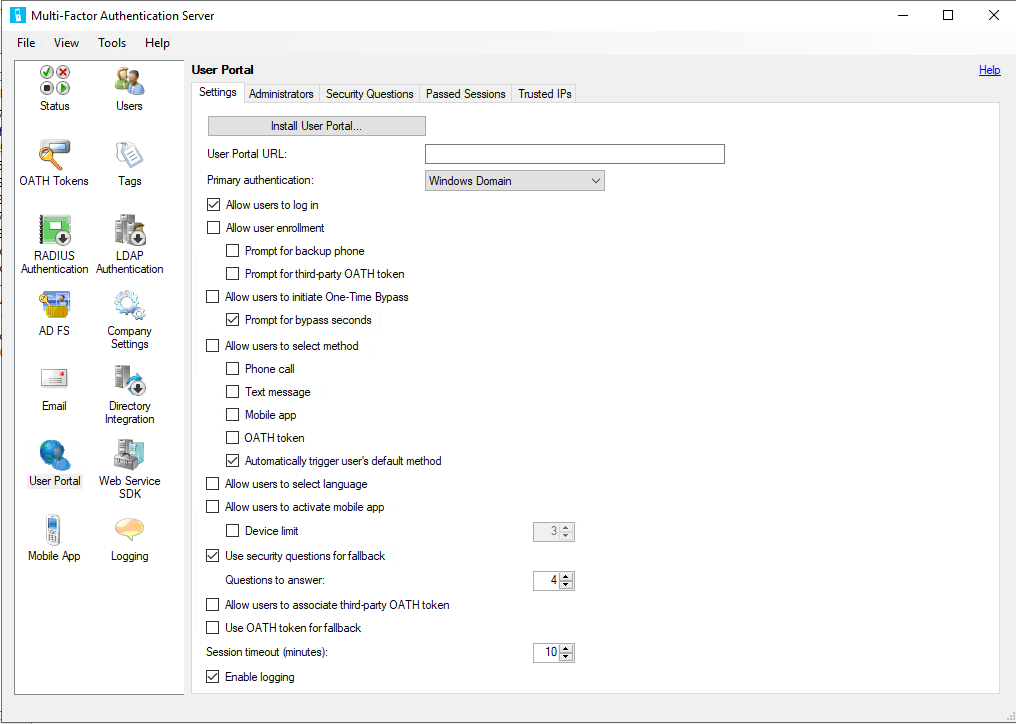
Open MFA Server, click User Portal:
| MFA Server | Microsoft Entra multifactor authentication |
|---|---|
| Settings Tab | |
| User portal URL | aka.ms/mfasetup |
| Allow user enrollment | See Combined security information registration |
| - Prompt for backup phone | See MFA Service settings |
| - Prompt for third-party OATH token | See MFA Service settings |
| Allow users to initiate a One-Time Bypass | See Microsoft Entra ID TAP functionality |
| Allow users to select method | See MFA Service settings |
| - Phone call | See Phone call documentation |
| - Text message | See MFA Service settings |
| - Mobile app | See MFA Service settings |
| - OATH token | See OATH token documentation |
| Allow users to select language | Language settings will be automatically applied to a user based on the locale settings in their browser |
| Allow users to activate mobile app | See MFA Service settings |
| - Device limit | Microsoft Entra ID limits users to five cumulative devices (mobile app instances + hardware OATH token + software OATH token) per user |
| Use security questions for fallback | Microsoft Entra ID allows users to choose a fallback method at authentication time should the chosen authentication method fail |
| - Questions to answer | Security Questions in Microsoft Entra ID can only be used for SSPR. See more details for Microsoft Entra Custom Security Questions |
| Allow users to associate third-party OATH token | See OATH token documentation |
| Use OATH token for fallback | See OATH token documentation |
| Session Timeout | |
| Security Questions tab | Security questions in MFA Server were used to gain access to the User portal. Microsoft Entra multifactor authentication only supports security questions for self-service password reset. See security questions documentation. |
| Passed Sessions tab | All authentication method registration flows are managed by Microsoft Entra ID and don't require configuration |
| Trusted IPs | Microsoft Entra ID trusted IPs |
Any MFA methods available in MFA Server must be enabled in Microsoft Entra multifactor authentication by using MFA Service settings. Users can't try their newly migrated MFA methods unless they're enabled.
Authentication services
Azure MFA Server can provide MFA functionality for third-party solutions that use RADIUS or LDAP by acting as an authentication proxy. To discover RADIUS or LDAP dependencies, click RADIUS Authentication and LDAP Authentication options in MFA Server. For each of these dependencies, determine if these third parties support modern authentication. If so, consider federation directly with Microsoft Entra ID.
For RADIUS deployments that can't be upgraded, you'll need to deploy an NPS Server and install the Microsoft Entra multifactor authentication NPS extension.
For LDAP deployments that can't be upgraded or moved to RADIUS, determine if Microsoft Entra Domain Services can be used. In most cases, LDAP was deployed to support in-line password changes for end users. Once migrated, end users can manage their passwords by using self-service password reset in Microsoft Entra ID.
If you enabled the MFA Server Authentication provider in AD FS 2.0 on any relying party trusts except for the Office 365 relying party trust, you'll need to upgrade to AD FS 3.0 or federate those relying parties directly to Microsoft Entra ID if they support modern authentication methods. Determine the best plan of action for each of the dependencies.
Backup Azure Multi-Factor Authentication Server datafile
Make a backup of the MFA Server data file located at %programfiles%\Multi-Factor Authentication Server\Data\PhoneFactor.pfdata (default location) on your primary MFA Server. Make sure you have a copy of the installer for your currently installed version in case you need to roll back. If you no longer have a copy, contact Customer Support Services.
Depending on user activity, the data file can become outdated quickly. Any changes made to MFA Server, or any end-user changes made through the portal after the backup won't be captured. If you roll back, any changes made after this point won't be restored.
Install MFA Server update
Run the new installer on the Primary MFA Server. Before you upgrade a server, remove it from load balancing or traffic sharing with other MFA Servers. You don't need to uninstall your current MFA Server before running the installer. The installer performs an in-place upgrade using the current installation path (for example, C:\Program Files\Multi-Factor Authentication Server). If you're prompted to install a Microsoft Visual C++ 2015 Redistributable update package, accept the prompt. Both the x86 and x64 versions of the package are installed. It isn't required to install updates for User portal, Web SDK, or AD FS Adapter.
Note
After you run the installer on your primary server, secondary servers may begin to log Unhandled SB entries. This is due to schema changes made on the primary server that will not be recognized by secondary servers. These errors are expected. In environments with 10,000 users or more, the amount of log entries can increase significantly. To mitigate this issue, you can increase the file size of your MFA Server logs, or upgrade your secondary servers.
Configure the MFA Server Migration Utility
After installing the MFA Server update, open an elevated PowerShell command prompt: hover over the PowerShell icon, right-click, and click Run as Administrator. Run the .\Configure-MultiFactorAuthMigrationUtility.ps1 script found in your MFA Server installation directory (C:\Program Files\Multi-Factor Authentication Server by default).
This script will require you to provide credentials for an Application Administrator in your Microsoft Entra tenant. The script will then create a new MFA Server Migration Utility application within Microsoft Entra ID, which will be used to write user authentication methods to each Microsoft Entra user object.
For government cloud customers who wish to carry out migrations, replace ".com" entries in the script with ".us". This script will then write the HKLM:\SOFTWARE\WOW6432Node\Positive Networks\PhoneFactor\ StsUrl and GraphUrl registry entries and instruct the Migration Utility to use the appropriate GRAPH endpoints.
You'll also need access to the following URLs:
https://graph.microsoft.com/*(orhttps://graph.microsoft.us/*for government cloud customers)https://login.microsoftonline.com/*(orhttps://login.microsoftonline.us/*for government cloud customers)
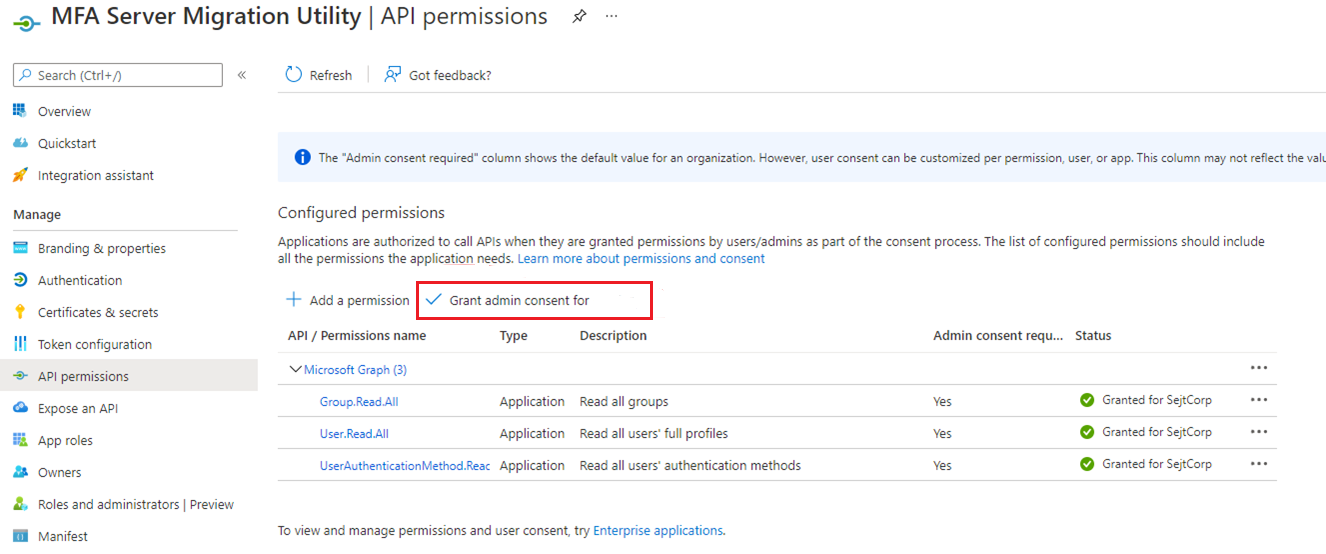
The script will instruct you to grant admin consent to the newly created application. Navigate to the URL provided, or within the Microsoft Entra admin center, click Application Registrations, find and select the MFA Server Migration Utility app, click on API permissions and then granting the appropriate permissions.
Once complete, navigate to the Multi-Factor Authentication Server folder, and open the MultiFactorAuthMigrationUtilityUI application. You should see the following screen:
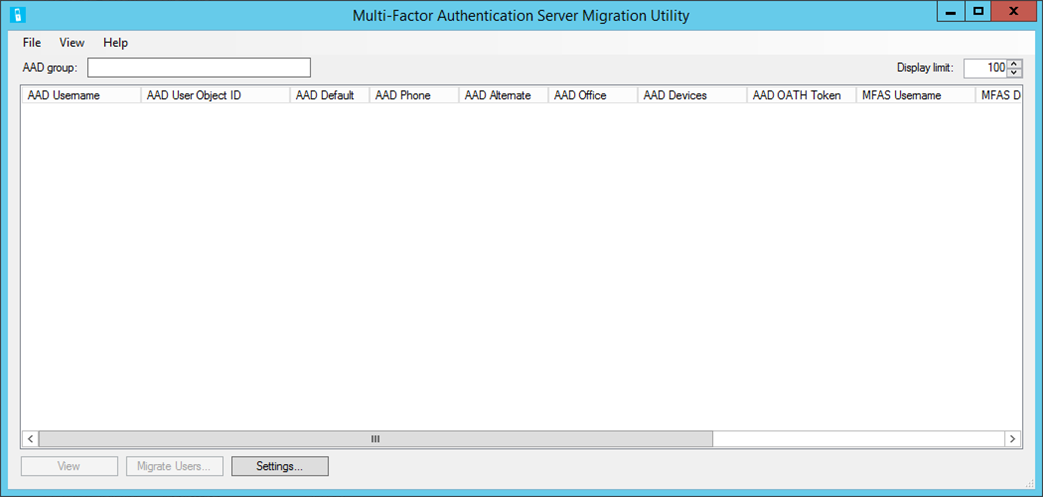
You've successfully installed the Migration Utility.
Note
To ensure no changes in behavior during migration, if your MFA Server is associated with an MFA Provider with no tenant reference, you'll need to update the default MFA settings (such as custom greetings) for the tenant you're migrating to match the settings in your MFA Provider. We recommend doing this before migrating any users.
Run a secondary MFA Server (optional)
If your MFA Server implementation has a large number of users or a busy primary MFA Server, you may want to consider deploying a dedicated secondary MFA Server for running the MFA Server Migration Utility and Migration Sync services. After upgrading your primary MFA Server, either upgrade an existing secondary server or deploy a new secondary server. The secondary server you choose should not be handling other MFA traffic.
The Configure-MultiFactorAuthMigrationUtility.ps1 script should be run on the secondary server to register a certificate with the MFA Server Migration Utility app registration. The certificate is used to authenticate to Microsoft Graph. Running the Migration Utility and Sync services on a secondary MFA Server should improve performance of both manual and automated user migrations.
Migrate user data
Migrating user data doesn't remove or alter any data in the Multi-Factor Authentication Server database. Likewise, this process won't change where a user performs MFA. This process is a one-way copy of data from the on-premises server to the corresponding user object in Microsoft Entra ID.
The MFA Server Migration utility targets a single Microsoft Entra group for all migration activities. You can add users directly to this group, or add other groups. You can also add them in stages during the migration.
To begin the migration process, enter the name or GUID of the Microsoft Entra group you want to migrate. Once complete, press Tab or click outside the window to begin searching for the appropriate group. All users in the group are populated. A large group can take several minutes to finish.
To view attribute data for a user, highlight the user, and select View:
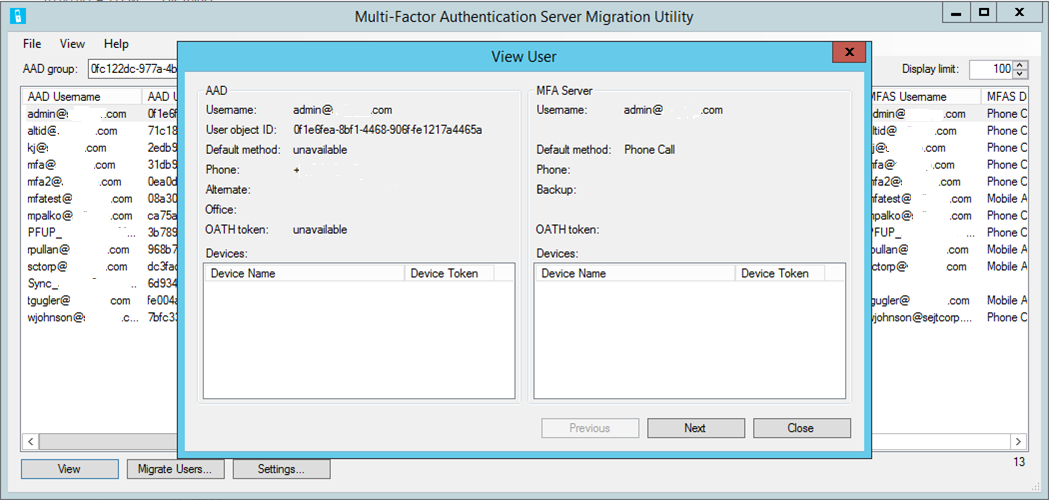
This window displays the attributes for the selected user in both Microsoft Entra ID and the on-premises MFA Server. You can use this window to view how data was written to a user after migration.
The Settings option allows you to change the settings for the migration process:
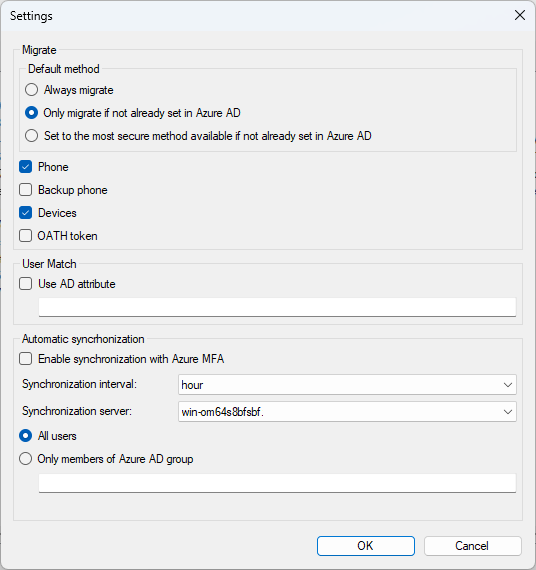
Migrate – there are three options for migrating the user's default authentication method:
- Always migrate
- Only migrate if not already set in Microsoft Entra ID
- Set to the most secure method available if not already set in Microsoft Entra ID
These options provide flexibility when you migrate the default method. In addition, the Authentication methods policy is checked during migration. If the default method being migrated isn't allowed by policy, it's set to the most secure method available instead.
User Match – Allows you to specify a different on-premises Active Directory attribute for matching Microsoft Entra UPN instead of the default match to userPrincipalName:
- The migration utility tries direct matching to UPN before using the on-premises Active Directory attribute.
- If no match is found, it calls a Windows API to find the Microsoft Entra UPN and get the SID, which it uses to search the MFA Server user list.
- If the Windows API doesn't find the user or the SID isn't found in the MFA Server, then it will use the configured Active Directory attribute to find the user in the on-premises Active Directory, and then use the SID to search the MFA Server user list.
Automatic synchronization – Starts a background service that will continually monitor any authentication method changes to users in the on-premises MFA Server, and write them to Microsoft Entra ID at the specified time interval defined.
Synchronization server – Allows the MFA Server Migration Sync service to run on a secondary MFA Server rather than only run on the primary. To configure the Migration Sync service to run on a secondary server, the
Configure-MultiFactorAuthMigrationUtility.ps1script must be run on the server to register a certificate with the MFA Server Migration Utility app registration. The certificate is used to authenticate to Microsoft Graph.
The migration process can be automatic or manual.
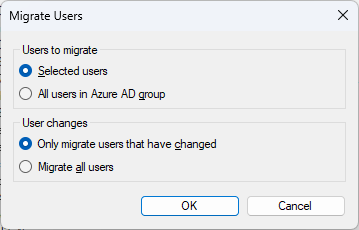
The manual process steps are:
To begin the migration process for a user or selection of multiple users, press and hold the Ctrl key while selecting each of the user(s) you wish to migrate.
After you select the desired users, click Migrate Users > Selected users > OK.
To migrate all users in the group, click Migrate Users > All users in Microsoft Entra group > OK.
You can migrate users even if they are unchanged. By default, the utility is set to Only migrate users that have changed. Click Migrate all users to re-migrate previously migrated users that are unchanged. Migrating unchanged users can be useful during testing if an administrator needs to reset a user's Azure MFA settings and wants to re-migrate them.
For the automatic process, click Automatic synchronization in Settings, and then select whether you want all users to be synced, or only members of a given Microsoft Entra group.
The following table lists the sync logic for the various methods.
| Method | Logic |
|---|---|
| Phone | If there's no extension, update MFA phone. If there's an extension, update Office phone. Exception: If the default method is Text Message, drop extension and update MFA phone. |
| Backup Phone | If there's no extension, update Alternate phone. If there's an extension, update Office phone. Exception: If both Phone and Backup Phone have an extension, skip Backup Phone. |
| Mobile App | Maximum of five devices will be migrated or only four if the user also has a hardware OATH token. If there are multiple devices with the same name, only migrate the most recent one. Devices will be ordered from newest to oldest. If devices already exist in Microsoft Entra ID, match on OATH Token Secret Key and update. - If there's no match on OATH Token Secret Key, match on Device Token -- If found, create a Software OATH Token for the MFA Server device to allow OATH Token method to work. Notifications will still work using the existing Microsoft Entra multifactor authentication device. -- If not found, create a new device. If adding a new device will exceed the five-device limit, the device will be skipped. |
| OATH Token | If devices already exist in Microsoft Entra ID, match on OATH Token Secret Key and update. - If not found, add a new Hardware OATH Token device. If adding a new device will exceed the five-device limit, the OATH token will be skipped. |
MFA Methods will be updated based on what was migrated and the default method will be set. MFA Server will track the last migration timestamp and only migrate the user again if the user's MFA settings change or an admin modifies what to migrate in the Settings dialog.
During testing, we recommend doing a manual migration first, and test to ensure a given number of users behave as expected. Once testing is successful, turn on automatic synchronization for the Microsoft Entra group you wish to migrate. As you add users to this group, their information will be automatically synchronized to Microsoft Entra ID. MFA Server Migration Utility targets one Microsoft Entra group, however that group can encompass both users and nested groups of users.
Once complete, a confirmation will inform you of the tasks completed:

As mentioned in the confirmation message, it can take several minutes for the migrated data to appear on user objects within Microsoft Entra ID. Users can view their migrated methods by navigating to aka.ms/mfasetup.
Tip
You can reduce the time required to display groups if you don't need to view Microsoft Entra MFA methods. Click View > Azure AD MFA Methods to toggle the display of columns for AAD Default, AAD Phone, AAD Alternate, AAD Office, AAD Devices, and AAD OATH Token. When columns are hidden, some Microsoft Graph API calls are skipped, which greatly improves user load time.
View migration details
You can use Audit logs or Log Analytics to view details of MFA Server to Azure MFA user migrations.
Use Audit logs
To access the Audit logs in the Microsoft Entra admin center to view details of MFA Server to Azure MFA user migrations, follow these steps:
Sign in to the Microsoft Entra admin center as at least an Authentication Administrator.
Browse to Identity > Monitoring & health > Audit logs. To filter the logs, click Add filters.

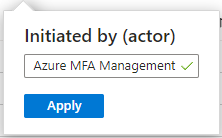
Select Initiated by (actor) and click Apply.

Type Azure MFA Management and click Apply.
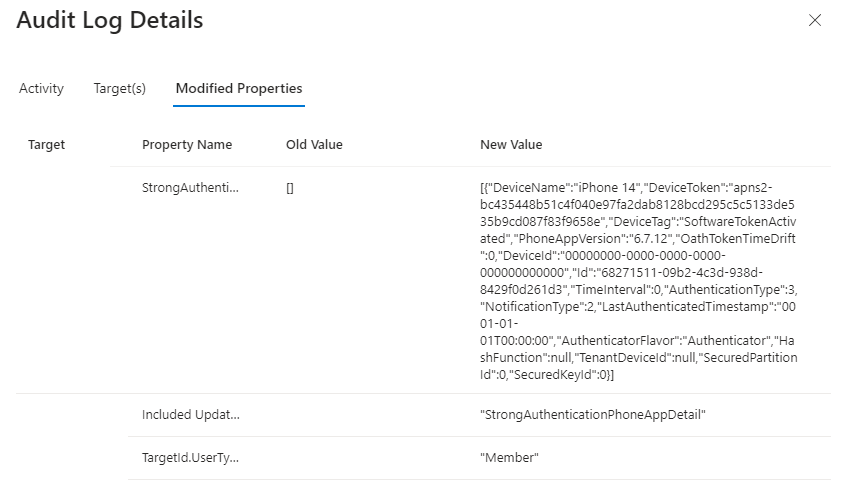
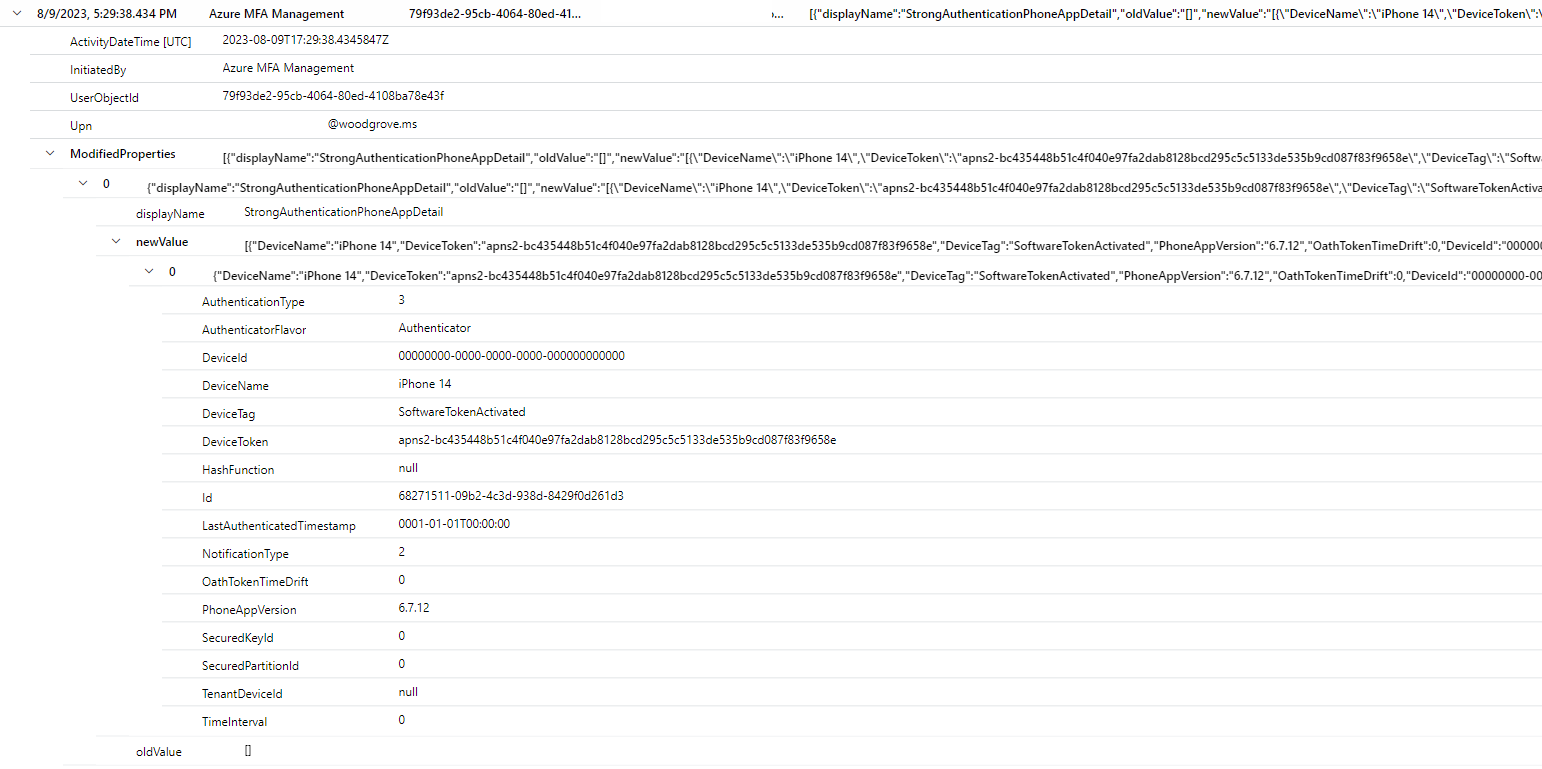
This filter displays only MFA Server Migration Utility logs. To view details for a user migration, click a row, and then choose the Modified Properties tab. This tab shows changes to registered MFA methods and phone numbers.
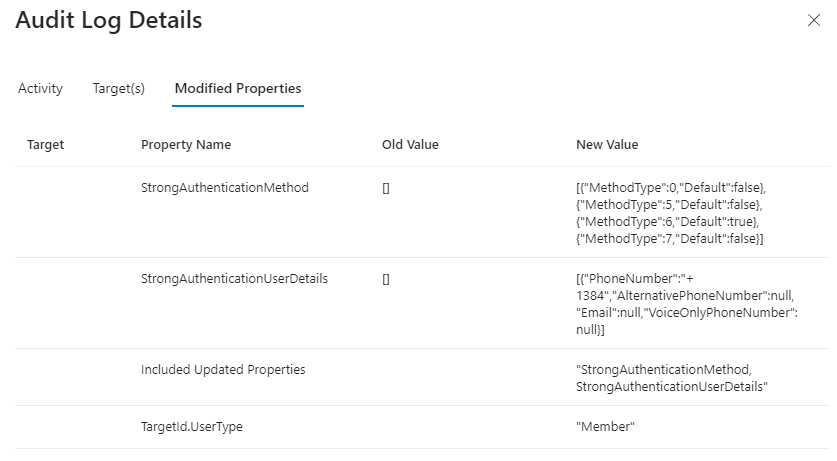
The following table lists the authentication method for each code.
Code Method 0 Voice mobile 2 Voice office 3 Voice alternate mobile 5 SMS 6 Microsoft Authenticator push notification 7 Hardware or software token OTP If any user devices were migrated, there is a separate log entry.
Use Log Analytics
The details of MFA Server to Azure MFA user migrations can also be queried using Log Analytics.
AuditLogs
| where ActivityDateTime > ago(7d)
| extend InitiatedBy = tostring(InitiatedBy["app"]["displayName"])
| where InitiatedBy == "Azure MFA Management"
| extend UserObjectId = tostring(TargetResources[0]["id"])
| extend Upn = tostring(TargetResources[0]["userPrincipalName"])
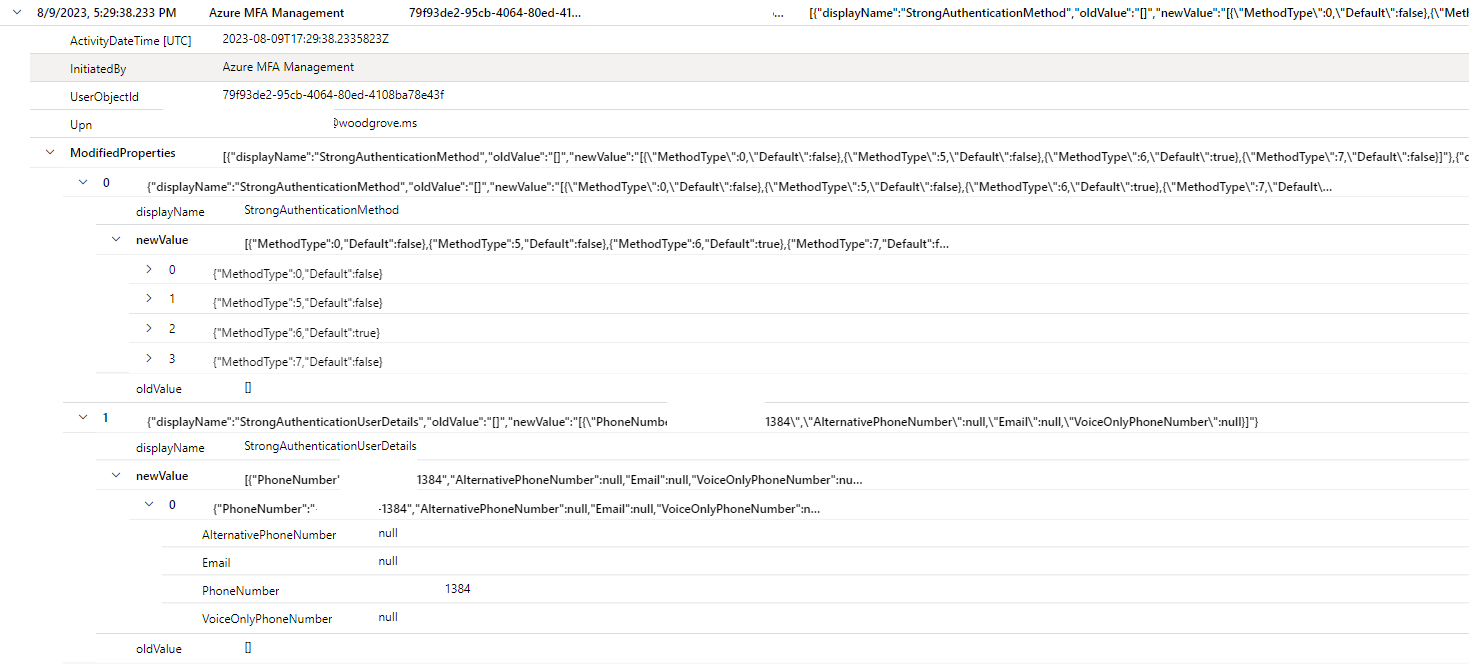
| extend ModifiedProperties = TargetResources[0]["modifiedProperties"]
| project ActivityDateTime, InitiatedBy, UserObjectId, Upn, ModifiedProperties
| order by ActivityDateTime asc
This screenshot shows changes for user migration:
This screenshot shows changes for device migration:
Log Analytics can also be used to summarize user migration activity.
AuditLogs
| where ActivityDateTime > ago(7d)
| extend InitiatedBy = tostring(InitiatedBy["app"]["displayName"])
| where InitiatedBy == "Azure MFA Management"
| extend UserObjectId = tostring(TargetResources[0]["id"])
| summarize UsersMigrated = dcount(UserObjectId) by InitiatedBy, bin(ActivityDateTime, 1d)

Validate and test
Once you've successfully migrated user data, you can validate the end-user experience using Staged Rollout before making the global tenant change. The following process will allow you to target specific Microsoft Entra group(s) for Staged Rollout for MFA. Staged Rollout tells Microsoft Entra ID to perform MFA by using Microsoft Entra multifactor authentication for users in the targeted groups, rather than sending them on-premises to perform MFA. You can validate and test—we recommend using the Microsoft Entra admin center, but if you prefer, you can also use Microsoft Graph.
Enable Staged Rollout
Navigate to the following url: Enable staged rollout features - Microsoft Azure.
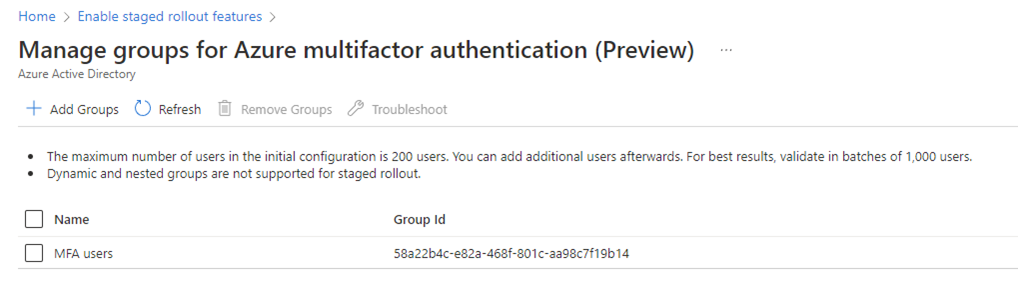
Change Azure multifactor authentication to On, and then click Manage groups.

Click Add groups and add the group(s) containing users you wish to enable for Azure MFA. Selected groups appear in the displayed list.
Note
Any groups you target using the Microsoft Graph method below will also appear in this list.
Enable Staged Rollout using Microsoft Graph
Create the featureRolloutPolicy
Navigate to aka.ms/ge and login to Graph Explorer using a Hybrid Identity Administrator account in the tenant you wish to setup for Staged Rollout.
Ensure POST is selected targeting the following endpoint:
https://graph.microsoft.com/v1.0/policies/featureRolloutPoliciesThe body of your request should contain the following (change MFA rollout policy to a name and description for your organization):
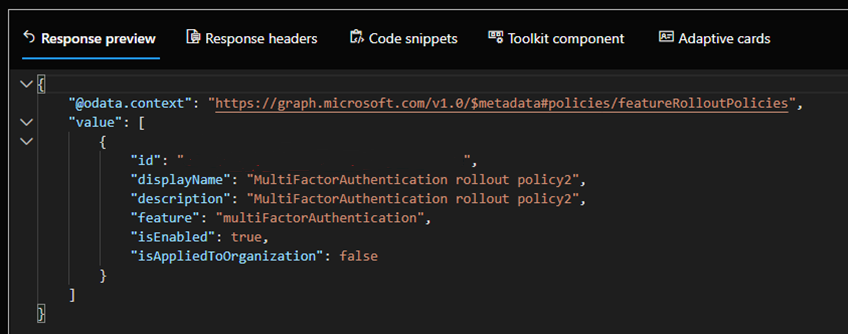
{
     "displayName": "MFA rollout policy",
     "description": "MFA rollout policy",
     "feature": "multiFactorAuthentication",
     "isEnabled": true,
     "isAppliedToOrganization": false
}
Perform a GET with the same endpoint and make note of the ID value (crossed out in the following image):
Target the Microsoft Entra group(s) that contain the users you wish to test
Create a POST request with the following endpoint (replace {ID of policy} with the ID value you copied from step 1d):
https://graph.microsoft.com/v1.0/policies/featureRolloutPolicies/{ID of policy}/appliesTo/$refThe body of the request should contain the following (replace {ID of group} with the object ID of the group you wish to target for staged rollout):
{
"@odata.id": "https://graph.microsoft.com/v1.0/directoryObjects/{ID of group}"
}
Repeat steps a and b for any other groups you wish to target with staged rollout.
You can view the current policy in place by doing a GET against the following URL:
https://graph.microsoft.com/v1.0/policies/featureRolloutPolicies/{policyID}?$expand=appliesToThe preceding process uses the featureRolloutPolicy resource. The public documentation hasn't yet been updated with the new multifactorAuthentication feature, but it has detailed information on how to interact with the API.
Confirm that the end-user MFA experience. Here are a few things to check:
- Do users see their methods in aka.ms/mfasetup?
- Do users receive phone calls/text messages?
- Are they able to successfully authenticate using the above methods?
- Do users successfully receive Authenticator notifications? Are they able to approve these notifications? Is authentication successful?
- Are users able to authenticate successfully using Hardware OATH tokens?
Educate users
Ensure users know what to expect when they're moved to Azure MFA, including new authentication flows. You may also wish to instruct users to use the Microsoft Entra ID Combined Registration portal (aka.ms/mfasetup) to manage their authentication methods rather than the User portal once migrations are complete. Any changes made to authentication methods in Microsoft Entra ID won't propagate back to your on-premises environment. In a situation where you had to roll back to MFA Server, any changes users have made in Microsoft Entra ID won't be available in the MFA Server User portal.
If you use third-party solutions that depend on Azure MFA Server for authentication (see Authentication services), you'll want users to continue to make changes to their MFA methods in the User portal. These changes will be synced to Microsoft Entra ID automatically. Once you've migrated these third party solutions, you can move users to the Microsoft Entra ID combined registration page.
Complete user migration
Repeat migration steps found in Migrate user data and Validate and test sections until all user data is migrated.
Migrate MFA Server dependencies
Using the data points you collected in Authentication services, begin carrying out the various migrations necessary. Once this is completed, consider having users manage their authentication methods in the combined registration portal, rather than in the User portal on MFA server.
Update domain federation settings
Once you've completed user migrations, and moved all of your Authentication services off of MFA Server, it's time to update your domain federation settings. After the update, Microsoft Entra no longer sends MFA request to your on-premises federation server.
To configure Microsoft Entra ID to ignore MFA requests to your on-premises federation server, install the Microsoft Graph PowerShell SDK and set federatedIdpMfaBehavior to rejectMfaByFederatedIdp, as shown in the following example.
Request
PATCH https://graph.microsoft.com/beta/domains/contoso.com/federationConfiguration/6601d14b-d113-8f64-fda2-9b5ddda18ecc
Content-Type: application/json
{
  "federatedIdpMfaBehavior": "rejectMfaByFederatedIdp"
}
Response
Note: The response object shown here might be shortened for readability.
HTTP/1.1 200 OK
Content-Type: application/json
{
  "@odata.type": "#microsoft.graph.internalDomainFederation",
  "id": "6601d14b-d113-8f64-fda2-9b5ddda18ecc",
   "issuerUri": "http://contoso.com/adfs/services/trust",
   "metadataExchangeUri": "https://sts.contoso.com/adfs/services/trust/mex",
   "signingCertificate": "MIIE3jCCAsagAwIBAgIQQcyDaZz3MI",
   "passiveSignInUri": "https://sts.contoso.com/adfs/ls",
   "preferredAuthenticationProtocol": "wsFed",
   "activeSignInUri": "https://sts.contoso.com/adfs/services/trust/2005/usernamemixed",
   "signOutUri": "https://sts.contoso.com/adfs/ls",
   "promptLoginBehavior": "nativeSupport",
   "isSignedAuthenticationRequestRequired": true,
   "nextSigningCertificate": "MIIE3jCCAsagAwIBAgIQQcyDaZz3MI",
   "signingCertificateUpdateStatus": {
        "certificateUpdateResult": "Success",
        "lastRunDateTime": "2021-08-25T07:44:46.2616778Z"
    },
   "federatedIdpMfaBehavior": "rejectMfaByFederatedIdp"
}
Users will no longer be redirected to your on-premises federation server for MFA, whether they're targeted by the Staged Rollout tool or not. Note this can take up to 24 hours to take effect.
Note
The update of the domain federation setting can take up to 24 hours to take effect.
Optional: Disable MFA Server User portal
Once you've completed migrating all user data, end users can begin using the Microsoft Entra ID combined registration pages to manage MFA Methods. There are a couple ways to prevent users from using the User portal in MFA Server:
- Redirect your MFA Server User portal URL to aka.ms/mfasetup
- Clear the Allow users to log in checkbox under the Settings tab in the User portal section of MFA Server to prevent users from logging into the portal altogether.
Decommission MFA Server
When you no longer need the Azure MFA server, follow your normal server deprecation practices. No special action is required in Microsoft Entra ID to indicate MFA Server retirement.
Rollback plan
If the upgrade had issues, follow these steps to roll back:
Uninstall MFA Server 8.1.
Replace PhoneFactor.pfdata with the backup made before upgrading.
Note
Any changes since the backup was made will be lost, but should be minimal if backup was made right before upgrade and upgrade was unsuccessful.
Run the installer for your previous version (for example, 8.0.x.x).
Configure Microsoft Entra ID to accept MFA requests to your on-premises federation server. Use Graph PowerShell to set federatedIdpMfaBehavior to
enforceMfaByFederatedIdp, as shown in the following example.Request
PATCH https://graph.microsoft.com/beta/domains/contoso.com/federationConfiguration/6601d14b-d113-8f64-fda2-9b5ddda18ecc
Content-Type: application/json
{
  "federatedIdpMfaBehavior": "enforceMfaByFederatedIdp"
}
The following response object is shortened for readability.
Response
HTTP/1.1 200 OK
Content-Type: application/json
{
  "@odata.type": "#microsoft.graph.internalDomainFederation",
  "id": "6601d14b-d113-8f64-fda2-9b5ddda18ecc",
   "issuerUri": "http://contoso.com/adfs/services/trust",
   "metadataExchangeUri": "https://sts.contoso.com/adfs/services/trust/mex",
   "signingCertificate": "MIIE3jCCAsagAwIBAgIQQcyDaZz3MI",
   "passiveSignInUri": "https://sts.contoso.com/adfs/ls",
   "preferredAuthenticationProtocol": "wsFed",
   "activeSignInUri": "https://sts.contoso.com/adfs/services/trust/2005/usernamemixed",
   "signOutUri": "https://sts.contoso.com/adfs/ls",
   "promptLoginBehavior": "nativeSupport",
   "isSignedAuthenticationRequestRequired": true,
   "nextSigningCertificate": "MIIE3jCCAsagAwIBAgIQQcyDaZz3MI",
   "signingCertificateUpdateStatus": {
        "certificateUpdateResult": "Success",
        "lastRunDateTime": "2021-08-25T07:44:46.2616778Z"
    },
   "federatedIdpMfaBehavior": "enforceMfaByFederatedIdp"
}
Set the Staged Rollout for Azure MFA to Off. Users will once again be redirected to your on-premises federation server for MFA.
Next steps
Feedback
Coming soon: Throughout 2024 we will be phasing out GitHub Issues as the feedback mechanism for content and replacing it with a new feedback system. For more information see: https://aka.ms/ContentUserFeedback.
Submit and view feedback for