Enable passkeys for your organization (preview)
For enterprises that use passwords today, passkeys (FIDO2) provide a seamless way for workers to authenticate without entering a username or password. Passkeys provide improved productivity for workers, and have better security.
This article lists requirements and steps to enable passkeys in your organization. After completing these steps, users in your organization can then register and sign in to their Microsoft Entra account using a passkey stored on a FIDO2 security key or in Microsoft Authenticator.
For more information about enabling passkeys in Microsoft Authenticator, see How to enable passkeys in Microsoft Authenticator.
For more information about passkey authentication, see Support for FIDO2 authentication with Microsoft Entra ID.
Note
Microsoft Entra ID currently supports device-bound passkeys stored on FIDO2 security keys and in Microsoft Authenticator. Microsoft is committed to securing customers and users with passkeys. We are investing in both synced and device-bound passkeys for work accounts.
Requirements
- Microsoft Entra multifactor authentication (MFA).
- Compatible FIDO2 security keys or Microsoft Authenticator.
- Devices that support passkey (FIDO2) authentication. For Windows devices that are joined to Microsoft Entra ID, the best experience is on Windows 10 version 1903 or higher. Hybrid-joined devices must run Windows 10 version 2004 or higher.
Passkeys are supported across major scenarios on Windows, macOS, Android, and iOS. For more information on supported scenarios, see Support for FIDO2 authentication in Microsoft Entra ID.
Enable passkey (FIDO2) authentication method
Sign in to the Microsoft Entra admin center as at least an Authentication Policy Administrator.
Browse to Protection > Authentication methods > Authentication method policy.
Under the method FIDO2 security key, select All users or Add groups to select specific groups. Only security groups are supported.
Save the configuration.
Note
If you see an error when you try to save, the cause might be due to the number of users or groups being added. As a workaround, replace the users and groups you are trying to add with a single group, in the same operation, and then click Save again.
Passkey optional settings
There are some optional settings on the Configure tab to help manage how passkeys can be used for sign-in. You can select Microsoft Authenticator (preview) if the checkbox is displayed in the admin center. This will automatically populate the Authenticator app AAGUIDs for you in the key restriction list.

Allow self-service set up should remain set to Yes. If set to no, your users can't register a passkey through MySecurityInfo, even if enabled by Authentication Methods policy.
Enforce attestation should be set to Yes if your organization wants to be assured that a FIDO2 security key model or passkey provider is genuine and comes from the legitimate vendor.
- For FIDO2 security keys, we require security key metadata to be published and verified with the FIDO Alliance Metadata Service, and also pass Microsoft's another set of validation testing. For more information, see What is a Microsoft-compatible security key?.
- For passkeys in Microsoft Authenticator, we don't currently support attestation.
Warning
Attestation enforcement governs whether a passkey is allowed during registration only. Users who are able to register a passkey without attestation will not be blocked during sign-in if Enforce attestation is set to Yes at a later time.
Key Restriction Policy
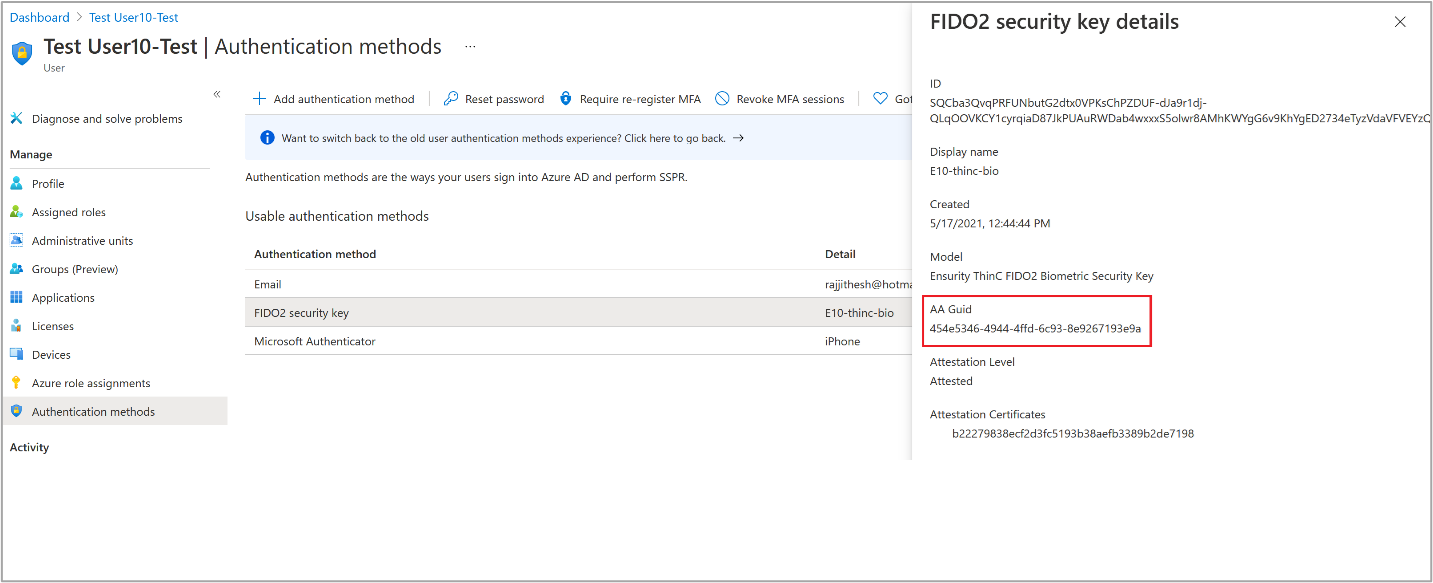
Enforce key restrictions should be set to Yes only if your organization wants to only allow or disallow certain security key models or passkey providers, which are identified by their Authenticator Attestation GUID (AAGUID). You can work with your security key vendor or passkey provider to determine the AAGUID of a device. If the passkey is already registered, you can find the AAGUID by viewing the authentication method details of the passkey for the user.
Warning
Key restrictions set the usability of specific models or providers for both registration and authentication. If you change key restrictions and remove an AAGUID that you previously allowed, users who previously registered an allowed method can no longer use it for sign-in.
Passkey Authenticator Attestation GUID (AAGUID)
The FIDO2 specification requires each security key vendor to provide an Authenticator Attestation GUID (AAGUID) during registration. An AAGUID is a 128-bit identifier indicating the key type, such as the make and model. Passkey providers on desktop and mobile devices are also expected to provide an AAGUID during registration.
Note
The vendor must ensure that the AAGUID is identical across all substantially identical security keys or passkey providers made by that vendor, and different (with high probability) from the AAGUIDs of all other types of security keys or passkey providers. To ensure this, the AAGUID for a given security key model or passkey provider should be randomly generated. For more information, see Web Authentication: An API for accessing Public Key Credentials - Level 2 (w3.org).
There are two ways to get your AAGUID. You can either ask your security key or passkey provider vendor, or view the authentication method details of the key per user.
Enable passkeys using Microsoft Graph API
In addition to using the Microsoft Entra admin center, you can also enable passkeys by using the Microsoft Graph API. To enable passkeys, you need to update the Authentication methods policy as a Global Administrator or Authentication Policy Administrator.
To configure the policy using Graph Explorer:
Sign in to Graph Explorer and consent to the Policy.Read.All and Policy.ReadWrite.AuthenticationMethod permissions.
Retrieve the Authentication methods policy:
GET https://graph.microsoft.com/beta/authenticationMethodsPolicy/authenticationMethodConfigurations/FIDO2To disable attestation enforcement and enforce key restrictions to only allow the AAGUID for RSA DS100 for example, perform a PATCH operation using the following request body:
PATCH https://graph.microsoft.com/beta/authenticationMethodsPolicy/authenticationMethodConfigurations/FIDO2

Request Body:
{
    "@odata.type": "#microsoft.graph.fido2AuthenticationMethodConfiguration",
    "isAttestationEnforced": false,
    "keyRestrictions": {
        "isEnforced": true,
        "enforcementType": "allow",
        "aaGuids": [
            "7e3f3d30-3557-4442-bdae-139312178b39",

            <insert previous AAGUIDs here to keep them stored in policy>
        ]
    }
}
Make sure that the passkey (FIDO2) policy is updated properly.
GET https://graph.microsoft.com/beta/authenticationMethodsPolicy/authenticationMethodConfigurations/FIDO2
Delete a passkey
To remove a passkey associated with a user account, delete the key from the user's authentication method.
Sign in to the Microsoft Entra admin center and search for the user whose passkey needs to be removed.
Select Authentication methods > right-click Passkey (device-bound) and select Delete.

Enforce passkey sign-in (preview)
To make users sign in with a passkey when they access a sensitive resource, you can:
Use a built-in phishing-resistant authentication strength
Or
Create a custom authentication strength
The following steps show how to create a custom authentication strength Conditional Access policy that allows passkey sign-in for only a specific security key model or passkey provider. For a list of FIDO2 providers, see Current FIDO2 hardware vendor partners.
- Sign in to the Microsoft Entra admin center as a Conditional Access Administrator.
- Browse to Protection > Authentication methods > Authentication strengths.
- Select New authentication strength.
- Provide a Name for your new authentication strength.
- Optionally provide a Description.
- Select Passkeys (FIDO2).
- Optionally, if you want to restrict by specific AAGUID(s), select Advanced options then Add AAGUID. Enter the AAGUID(s) that you allow. Select Save.
- Choose Next and review the policy configuration.
Known issues
B2B collaboration users
Registration of FIDO2 credentials isn't supported for B2B collaboration users in the resource tenant.
Security key provisioning
Administrator provisioning and deprovisioning of security keys isn't available.
UPN changes
If a user's UPN changes, you can no longer modify passkeys to account for the change. If the user has a passkey, they need to sign in to My Security info, delete the old passkey, and add a new one.
Next steps
Native app and browser support of passkey (FIDO2) passwordless authentication
FIDO2 security key Windows 10 sign in
Enable FIDO2 authentication to on-premises resources
Feedback
Coming soon: Throughout 2024 we will be phasing out GitHub Issues as the feedback mechanism for content and replacing it with a new feedback system. For more information see: https://aka.ms/ContentUserFeedback.
Submit and view feedback for