How users in your organization can invite guest users to an app
Applies to:  Workforce tenants
  External tenants (learn more)
After a guest user has been added to the directory in Microsoft Entra ID, an application owner can send the guest user a direct link to the app they want to share. Microsoft Entra admins can also set up self-service management for gallery or SAML-based apps in their Microsoft Entra tenant. This way, application owners can manage their own guest users, even if the guest users haven’t been added to the directory yet. When an app is configured for self-service, the application owner uses their Access Panel to invite a guest user to an app or add a guest user to a group that has access to the app.
Self-service app management for gallery and SAML-based apps requires some initial setup by an admin. Follow the summary of the setup steps (for more detailed instructions, see Prerequisites later on this page):
- Enable self-service group management for your tenant
- Create a group to assign to the app and make the user an owner
- Configure the app for self-service and assign the group to the app
Note
- This article describes how to set up self-service management for gallery and SAML-based apps that you’ve added to your Microsoft Entra tenant. You can also set up self-service Microsoft 365 groups so your users can manage access to their own Microsoft 365 groups. For more ways users can share Office files and apps with guest users, see Guest access in Microsoft 365 groups and Share SharePoint files or folders.
- Users are only able to invite guests if they have the Guest inviter role.
Invite someone to join a group that has access to the app
After an app is configured for self-service, application owners can invite guest users to the groups they manage that have access to the apps they want to share. The guest users don't have to already exist in the directory. The application owner follows these steps to invite a guest user to the group so that they can access the app.
- Make sure you're an owner of the self-service group that has access to the app you want to share.
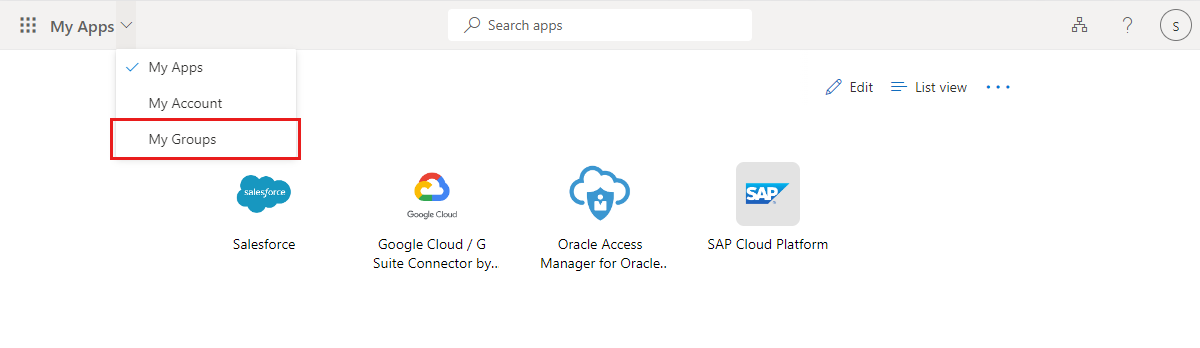
- Open your Access Panel by going to
https://myapps.microsoft.com. - Select the Groups app.
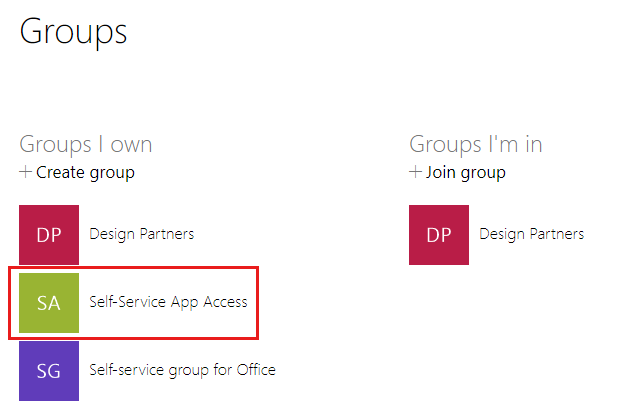
- Under Groups I own, select the group that has access to the app you want to share.
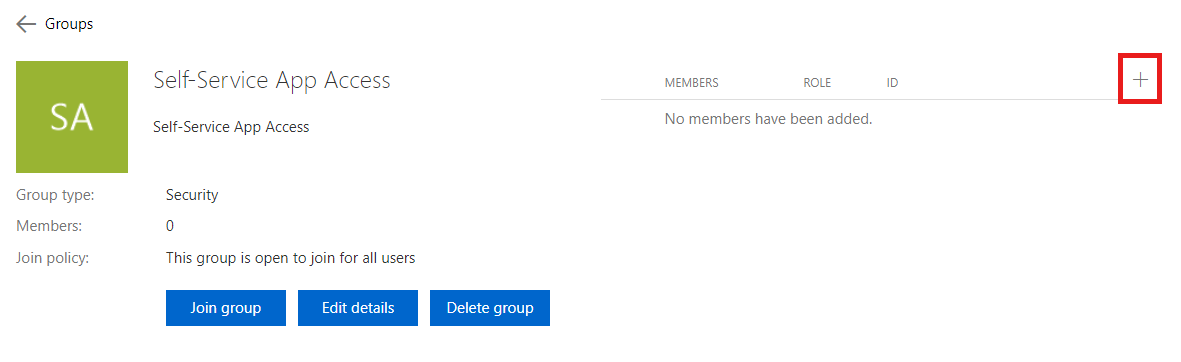
- At the top of the group members list, select +.
- In the Add members search box, type the email address for the guest user. Optionally, include a welcome message.
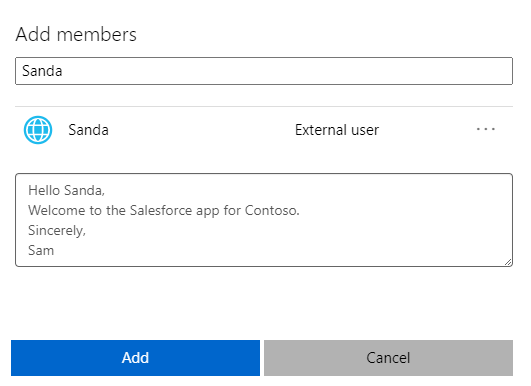
- Select Add to automatically send the invitation to the guest user. After you send the invitation, the user account is automatically added to the directory as a guest.
Prerequisites
Self-service app management requires some initial setup by a Microsoft Entra administrator. As part of this setup, you'll configure the app for self-service and assign a group to the app that the application owner can manage. You can also configure the group to allow anyone to request membership but require a group owner's approval. (Learn more about self-service group management.)
Note
You cannot add guest users to a dynamic group or to a group that is synced with on-premises Active Directory.
Enable self-service group management for your tenant
Tip
Steps in this article might vary slightly based on the portal you start from.
- Sign in to the Microsoft Entra admin center as at least a User Administrator.
- Browse to Identity > Groups > All groups.
- Under Settings, select General.
- Under Self Service Group Management, next to Owners can manage group membership requests in the Access Panel, select Yes.
- Select Save.
Create a group to assign to the app and make the user an owner
- Sign in to the Microsoft Entra admin center as at least a User Administrator.
- Browse to Identity > Groups > All groups.
- Select New group.
- Under Group type, select Security.
- Type a Group name and Group description.
- Under Membership type, select Assigned.
- Select Create, and close the Group page.
- On the Groups - All groups page, open the group.
- Under Manage, select Owners > Add owners. Search for the user who should manage access to the application. Select the user, and then select Select.
Configure the app for self-service and assign the group to the app
Sign in to the Microsoft Entra admin center as at least a User Administrator.
Browse to Identity > Applications > Enterprise applications.
Select All applications, in the application list, find and open the app.
Under Manage, select Single sign-on, and configure the application for single sign-on. (For details, see how to manage single sign-on for enterprise apps.)
Under Manage, select Self-service, and set up self-service app access. (For details, see how to use self-service app access.)
Note
For the setting To which group should assigned users be added? select the group you created in the previous section.
Under Manage, select Users and groups, and verify that the self-service group you created appears in the list.
To add the app to the group owner's Access Panel, select Add user > Users and groups. Search for the group owner and select the user, select Select, and then select Assign to add the user to the app.
Next steps
See the following articles on Microsoft Entra B2B collaboration: