Microsoft Entra pass-through authentication: Upgrade preview Authentication Agents
Overview
This article is for customers using Microsoft Entra pass-through authentication through preview. We recently upgraded (and rebranded) the Authentication Agent software. You need to manually upgrade preview Authentication Agents installed on your on-premises servers. This manual upgrade is a one-time action only. All future updates to Authentication Agents are automatic. The reasons to upgrade are as follows:
- The preview versions of Authentication Agents won't receive any further security or bug fixes.
- The preview versions of Authentication Agents can't be installed on other servers, for high availability.
Check versions of your Authentication Agents
Step 1: Check where your Authentication Agents are installed
Tip
Steps in this article might vary slightly based on the portal you start from.
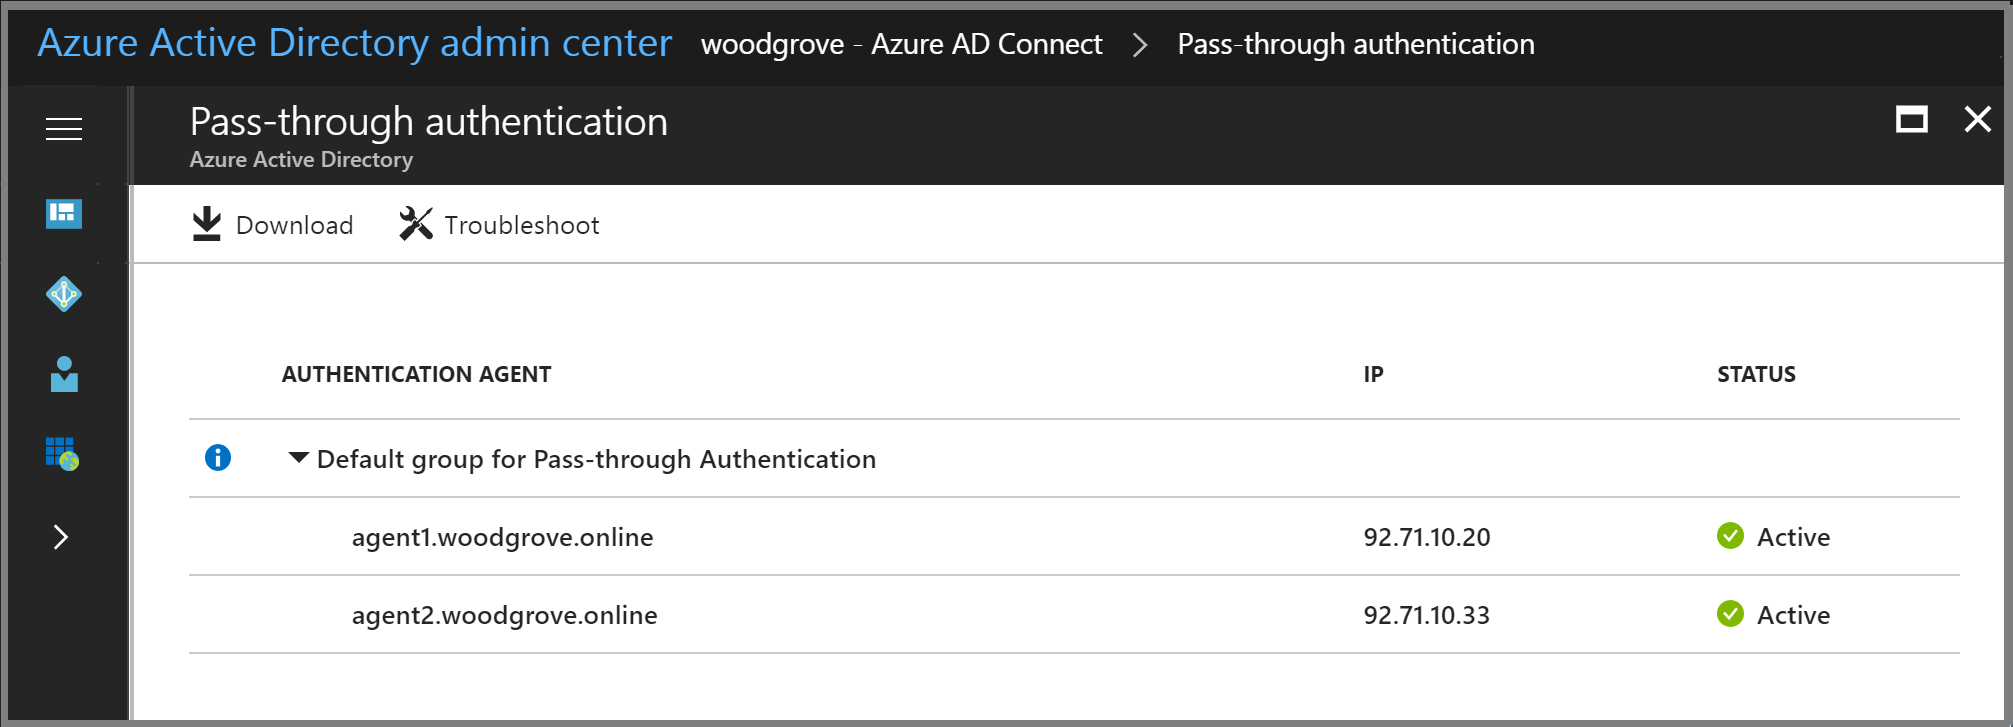
Follow these steps to check where your Authentication Agents are installed:
- Sign in to the Microsoft Entra admin center as at least a Hybrid Identity Administrator.
- Browse to Identity > Hybrid management > Microsoft Entra Connect > Connect sync.
- Select Pass-through Authentication. This blade lists the servers where your Authentication Agents are installed.
Step 2: Check the versions of your Authentication Agents
To check the versions of your Authentication Agents, on each server identified in the preceding step, follow these instructions:
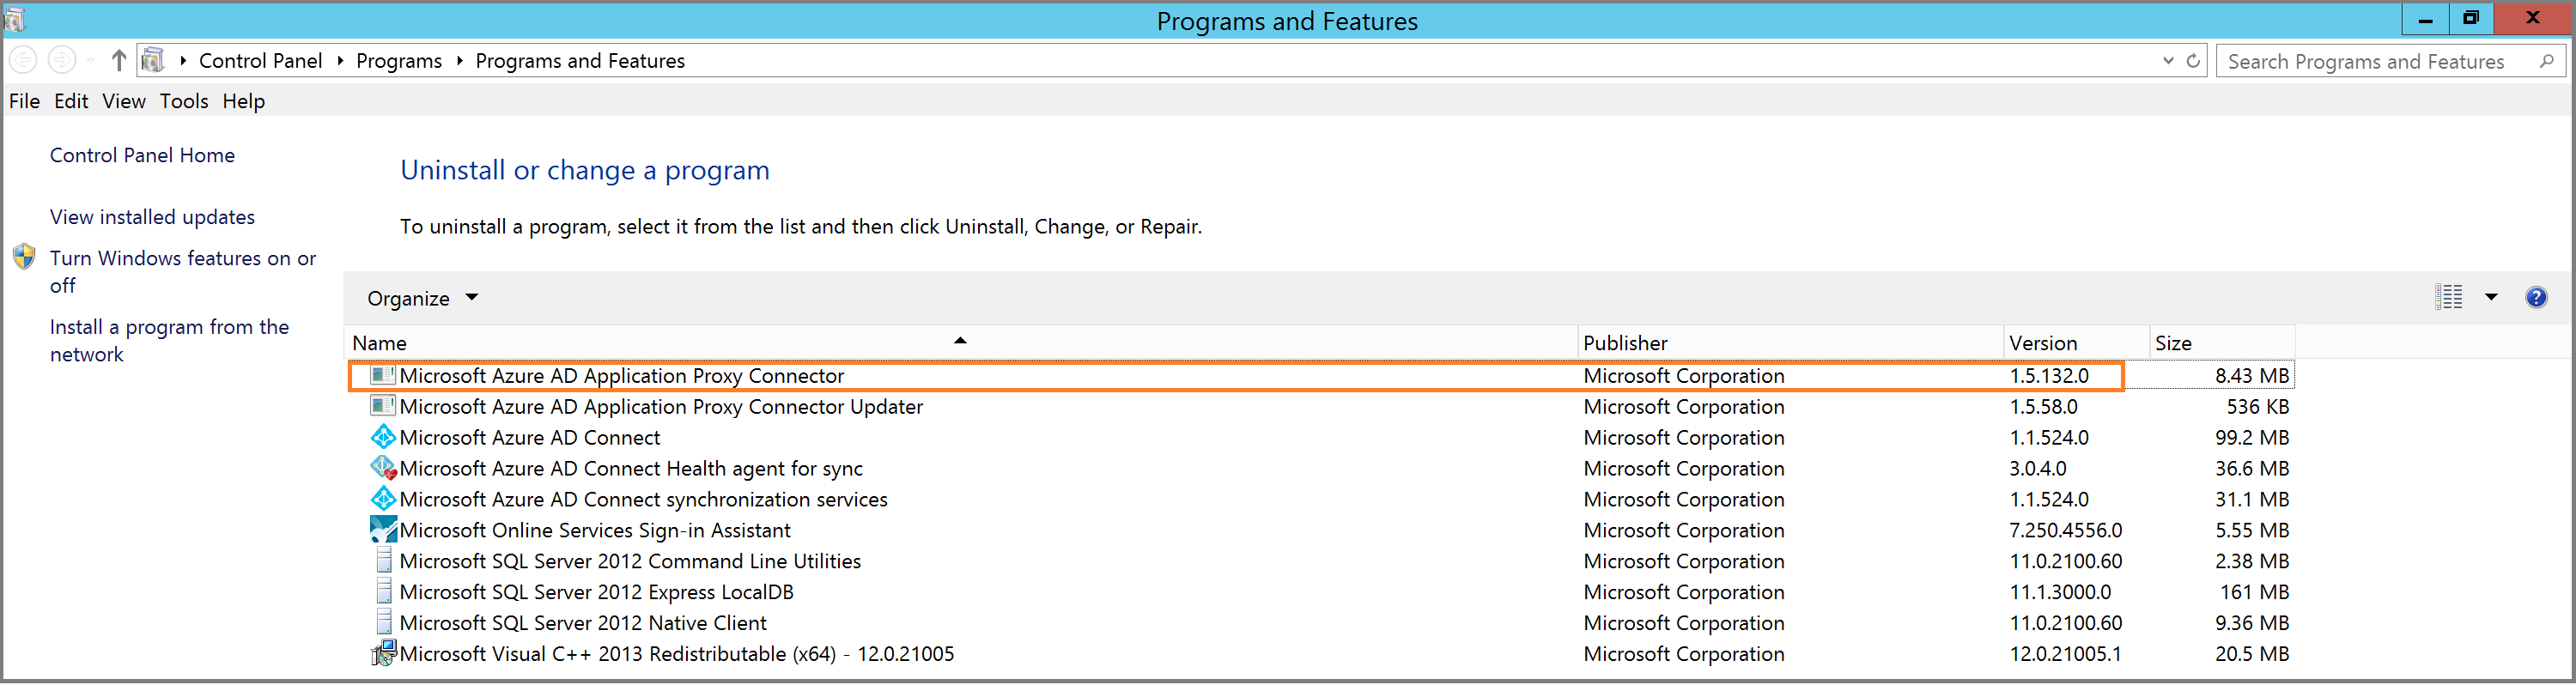
- Go to Control Panel -> Programs -> Programs and Features on the on-premises server.
- If there's an entry for "Microsoft Entra Connect Authentication Agent", you don't need to take any action on this server.
- If there's an entry for "Microsoft Entra private network connector", you need to manually upgrade on this server.
Best practices to follow before starting the upgrade
Before upgrading, ensure that you have the following items in place:
- Create cloud-only Global Administrator account: Don’t upgrade without having a cloud-only Global Administrator account to use in emergency situations where your Pass-through Authentication Agents aren't working properly. Learn about adding a cloud-only Global Administrator account. Doing this step is critical and ensures that you don't get locked out of your tenant.
- Ensure high availability: If not completed previously, install a second standalone Authentication Agent to provide high availability for sign-in requests, using these instructions.
Upgrading the Authentication Agent on your Microsoft Entra Connect server
You need upgrade Microsoft Entra Connect before upgrading the Authentication Agent on the same server. Follow these steps on both your primary and staging Microsoft Entra Connect servers:
- Upgrade Microsoft Entra Connect: Follow this article and upgrade to the latest Microsoft Entra Connect version.
- Uninstall the preview version of the Authentication Agent: Download this PowerShell script and run it as an Administrator on the server.
- Download the latest version of the Authentication Agent (versions 1.5.2482.0 or later): Sign in to the Microsoft Entra admin center as at least a Hybrid Identity Administrator. Browse to Identity > Hybrid management > Microsoft Entra Connect > Connect sync.
Select Pass-through Authentication -> Download agent. Accept the terms of service and download the latest version of the Authentication Agent. You can also download the Authentication Agent from here. 4. Install the latest version of the Authentication Agent: Run the executable downloaded in Step 3. Provide your tenant's Global Administrator credentials when prompted. 5. Verify that the latest version has been installed: As shown before, go to Control Panel -> Programs -> Programs and Features and verify that there's an entry for "Microsoft Entra Connect Authentication Agent".
Note
If you check the Pass-through Authentication blade on the Microsoft Entra admin center as at least a Hybrid Identity Administrator. after completing the preceding steps, you'll see two Authentication Agent entries per server - one entry showing the Authentication Agent as Active and the other as Inactive. This is expected. The Inactive entry is automatically dropped after a few days.
Upgrading the Authentication Agent on other servers
Follow these steps to upgrade Authentication Agents on other servers (where Microsoft Entra Connect isn't installed):
- Uninstall the preview version of the Authentication Agent: Download this PowerShell script and run it as an Administrator on the server.
- Download the latest version of the Authentication Agent (versions 1.5.2482.0 or later): Sign in to the Microsoft Entra admin center as at least a Hybrid Identity Administrator with your tenant's Global Administrator credentials. Select Microsoft Entra ID -> Microsoft Entra Connect -> Pass-through Authentication -> Download agent. Accept the terms of service and download the latest version.
- Install the latest version of the Authentication Agent: Run the executable downloaded in Step 2. Provide your tenant's Global Administrator credentials when prompted.
- Verify that the latest version has been installed: As shown before, go to Control Panel -> Programs -> Programs and Features and verify that there's an entry called Microsoft Entra Connect Authentication Agent.
Note
If you check the Pass-through Authentication blade on the Microsoft Entra admin center as at least a Hybrid Identity Administrator after completing the preceding steps, you'll see two Authentication Agent entries per server - one entry showing the Authentication Agent as Active and the other as Inactive. This is expected. The Inactive entry is automatically dropped after a few days.
Next steps
- Troubleshoot - Learn how to resolve common issues with the feature.
Feedback
Coming soon: Throughout 2024 we will be phasing out GitHub Issues as the feedback mechanism for content and replacing it with a new feedback system. For more information see: https://aka.ms/ContentUserFeedback.
Submit and view feedback for