Configure Azure resource role settings in Privileged Identity Management
In Privileged Identity Management (PIM) in Microsoft Entra ID, which is part of Microsoft Entra, role settings define role assignment properties. These properties include multifactor authentication and approval requirements for activation, assignment maximum duration, and notification settings. This article shows you how to configure role settings and set up the approval workflow to specify who can approve or deny requests to elevate privilege.
You must have an Owner or User Access Administrator role to manage PIM role settings for the resource. Role settings are defined per role and per resource. All assignments for the same role follow the same role settings. Role settings of one role are independent from role settings of another role. Role settings of one resource are independent from role settings of another resource. Role settings configured on a higher level, such as Subscription, for example, aren't inherited on a lower level, such as Resource Group.
PIM role settings are also known as PIM policies.
Open role settings
To open the settings for an Azure resource role:
Sign in to the Microsoft Entra admin center.
Browse to Identity governance > Privileged Identity Management > Azure Resources. On this page you can select the resource type you want to manage. Start at either the Management group dropdown or the Subscriptions dropdown, and then select Resource groups or Resources as needed.
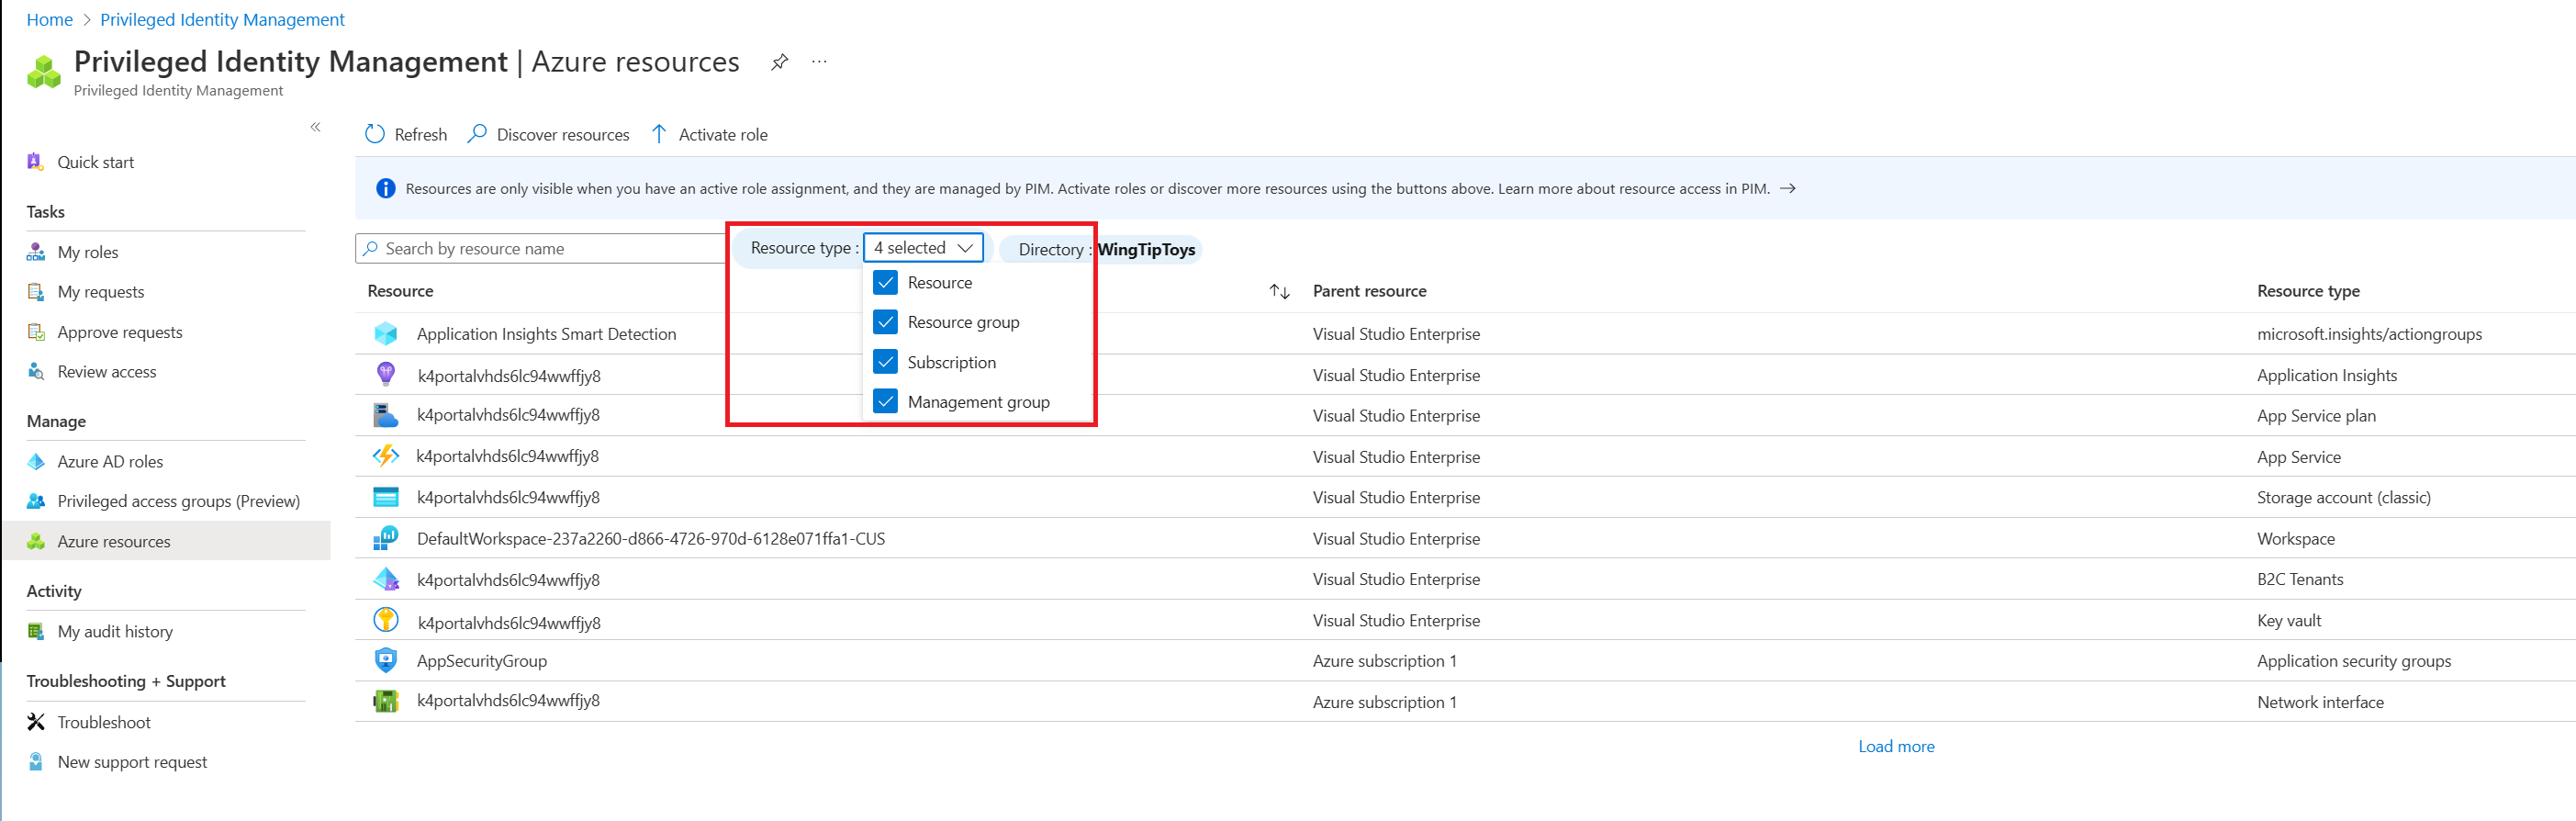
Select the resource for which you need to configure PIM role settings.
Select Settings. View a list of PIM policies for a selected resource.
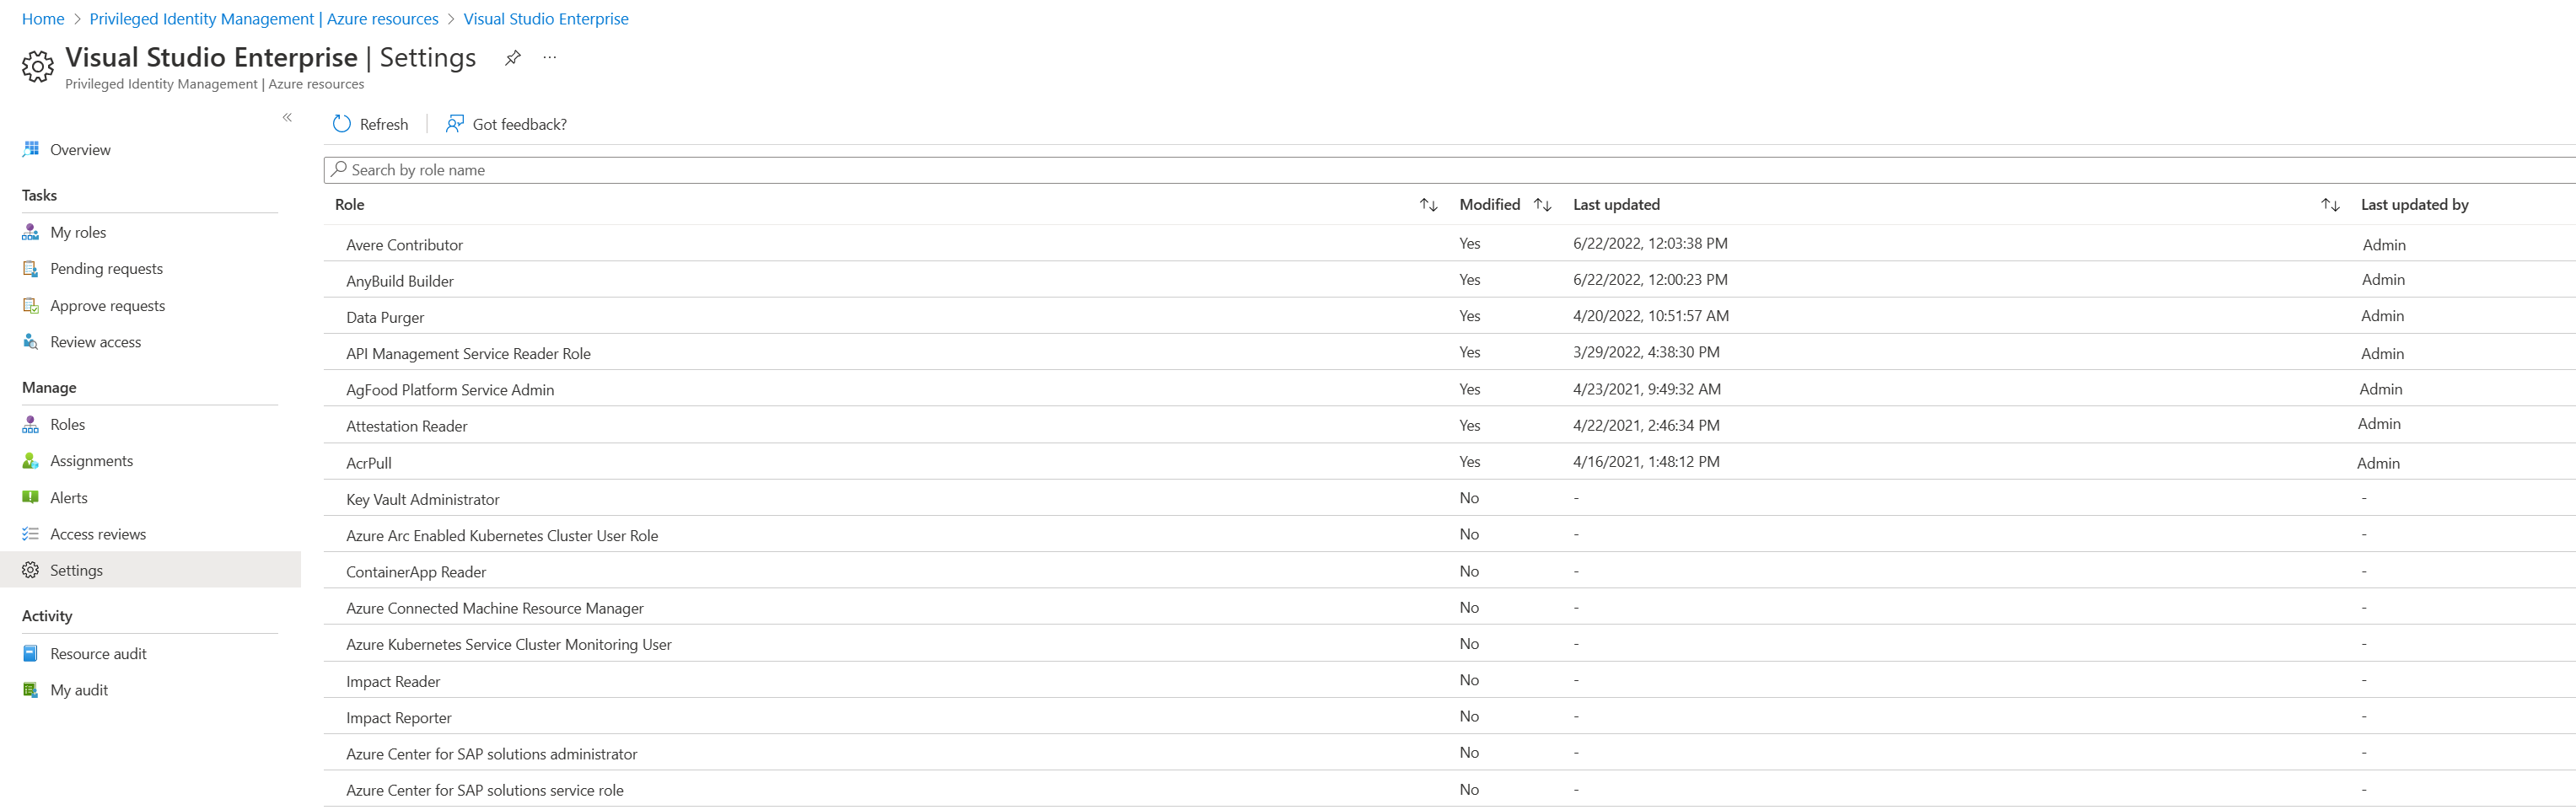
Select the role or policy that you want to configure.
Select Edit to update role settings.
Select Update.


Role settings
This section discusses options for role settings.
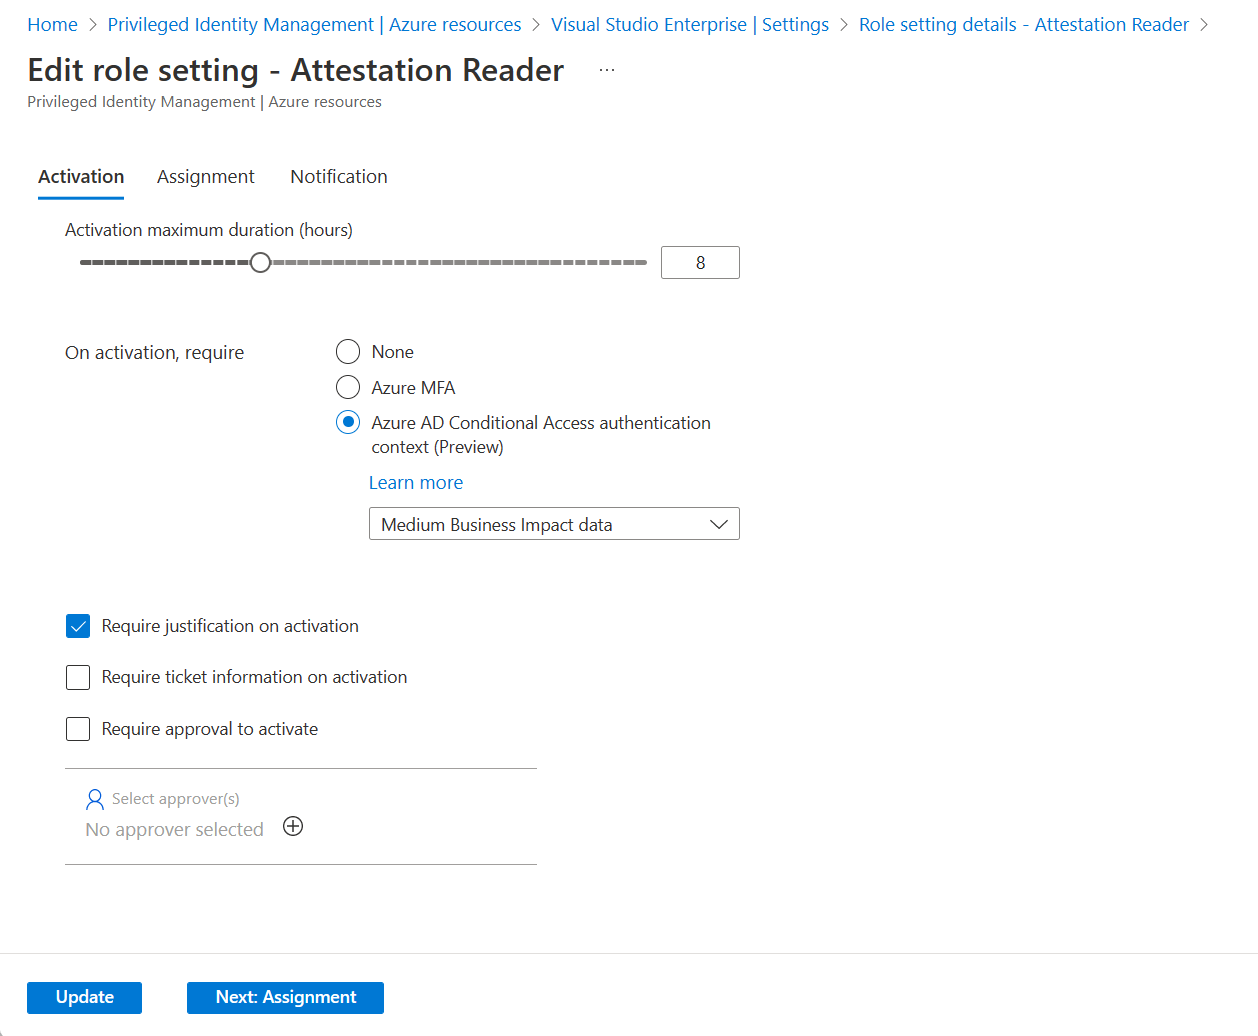
Activation maximum duration
Use the Activation maximum duration slider to set the maximum time, in hours, that an activation request for a role assignment remains active before it expires. This value can be from 1 to 24 hours.
On activation, require multifactor authentication
You can require users who are eligible for a role to prove who they are by using the multifactor authentication feature in Microsoft Entra ID before they can activate. Multifactor authentication helps safeguard access to data and applications. It provides another layer of security by using a second form of authentication.
Users might not be prompted for multifactor authentication if they authenticated with strong credentials or provided multifactor authentication earlier in this session.
If your goal is to ensure that users must provide authentication during activation, you can use On activation, require Microsoft Entra Conditional Access authentication context together with Authentication Strengths. These options require users to authenticate during activation by using methods different from the one they used to sign in to the machine.
For example, if users sign in to the machine by using Windows Hello for Business, you can use On activation, require Microsoft Entra Conditional Access authentication context and Authentication Strengths to require users to do passwordless sign-in with Microsoft Authenticator when they activate the role.
After the user provides passwordless sign-in with Microsoft Authenticator once in this example, they can do their next activation in this session without another authentication. Passwordless sign-in with Microsoft Authenticator is already part of their token.
We recommend that you enable the multifactor authentication feature of Microsoft Entra ID for all users. For more information, see Plan a Microsoft Entra multifactor authentication deployment.
On activation, require Microsoft Entra Conditional Access authentication context
You can require users who are eligible for a role to satisfy Conditional Access policy requirements. For example, you can require users to use a specific authentication method enforced through Authentication Strengths, elevate the role from an Intune-compliant device, and comply with terms of use.
To enforce this requirement, you create Conditional Access authentication context.
Configure a Conditional Access policy that would enforce requirements for this authentication context.
Configure an authentication context in PIM settings for the role.

If PIM settings have On activation, require Microsoft Entra Conditional Access authentication context configured, the Conditional Access policies define conditions a user must meet to satisfy the access requirements.
This means that security principals with permissions to manage Conditional Access policies, such as Conditional Access administrators or security administrators, can change requirements, remove them, or block eligible users from activating the role. Security principals that can manage the Conditional Access policies should be considered highly privileged and protected accordingly.
We recommend that you create and enable a Conditional Access policy for the authentication context before the authentication context is configured in PIM settings. As a backup protection mechanism, if there are no Conditional Access policies in the tenant that target authentication context configured in PIM settings, during PIM role activation, the multifactor authentication feature in Microsoft Entra ID is required as the On activation, require multifactor authentication setting would be set.
This backup protection mechanism is designed to solely protect from a scenario when PIM settings were updated before the Conditional Access policy was created because of a configuration mistake. This backup protection mechanism isn't triggered if the Conditional Access policy is turned off, is in report-only mode, or has an eligible user excluded from the policy.
The On activation, require Microsoft Entra Conditional Access authentication context setting defines the authentication context requirements that users must satisfy when they activate the role. After the role is activated, users aren't prevented from using another browsing session, device, or location to use permissions.
For example, users might use an Intune-compliant device to activate the role. Then after the role is activated, they might sign in to the same user account from another device that isn't Intune compliant and use the previously activated role from there.
To prevent this situation, you can scope Conditional Access policies to enforce certain requirements for eligible users directly. For example, you can require users who are eligible for certain roles to always use Intune-compliant devices.
To learn more about Conditional Access authentication context, see Conditional Access: Cloud apps, actions, and authentication context.
Require justification on activation
You can require users to enter a business justification when they activate the eligible assignment.
Require ticket information on activation
You can require users to enter a support ticket number when they activate the eligible assignment. This option is an information-only field. Correlation with information in any ticketing system isn't enforced.
Require approval to activate
You can require approval for activation of an eligible assignment. The approver doesn't have to have any roles. When you use this option, you must select at least one approver. We recommend that you select at least two approvers. There are no default approvers.
To learn more about approvals, see Approve or deny requests for Microsoft Entra roles in Privileged Identity Management.
Assignment duration
When you configure settings for a role, you can choose from two assignment duration options for each assignment type: eligible and active. These options become the default maximum duration when a user is assigned to the role in Privileged Identity Management.
You can choose one of these eligible assignment duration options.
| Setting | Description |
|---|---|
| Allow permanent eligible assignment | Resource administrators can assign permanent eligible assignments. |
| Expire eligible assignment after | Resource administrators can require that all eligible assignments have a specified start and end date. |
You can also choose one of these active assignment duration options.
| Setting | Description |
|---|---|
| Allow permanent active assignment | Resource administrators can assign permanent active assignments. |
| Expire active assignment after | Resource administrators can require that all active assignments have a specified start and end date. |
All assignments that have a specified end date can be renewed by Global admins and Privileged Role admins. Also, users can initiate self-service requests to extend or renew role assignments.
Require multifactor authentication on active assignment
You can require that an administrator provides multifactor authentication when they create an active (as opposed to eligible) assignment. Privileged Identity Management can't enforce multifactor authentication when the user uses their role assignment because they're already active in the role from the time that it's assigned.
An administrator might not be prompted for multifactor authentication if they authenticated with strong credentials or provided multifactor authentication earlier in this session.
Require justification on active assignment
You can require that users enter a business justification when they create an active (as opposed to eligible) assignment.
On the Notifications tab on the Role settings page, Privileged Identity Management enables granular control over who receives notifications and which notifications they receive.
- Turning off an email: You can turn off specific emails by clearing the default recipient checkbox and deleting any other recipients.
- Limit emails to specified email addresses: You can turn off emails sent to default recipients by clearing the default recipient checkbox. You can then add other email addresses as recipients. If you want to add more than one email address, separate them by using a semicolon (;).
- Send emails to both default recipients and more recipients: You can send emails to both the default recipient and another recipient. Select the default recipient checkbox and add email addresses for other recipients.
- Critical emails only: For each type of email, you can select the checkbox to receive critical emails only. Privileged Identity Management continues to send emails to the specified recipients only when the email requires immediate action. For example, emails that ask users to extend their role assignment aren't triggered. Emails that require admins to approve an extension request are triggered.
Note
One event in Privileged Identity Management can generate email notifications to multiple recipients – assignees, approvers, or administrators. The maximum number of notifications sent per one event is 1000. If the number of recipients exceeds 1000 – only the first 1000 recipients will receive an email notification. This does not prevent other assignees, administrators, or approvers from using their permissions in Microsoft Entra ID and Privileged Identity Management.
Next steps
Feedback
Coming soon: Throughout 2024 we will be phasing out GitHub Issues as the feedback mechanism for content and replacing it with a new feedback system. For more information see: https://aka.ms/ContentUserFeedback.
Submit and view feedback for