Tutorial: Microsoft Entra single sign-on integration with F5
In this tutorial, you'll learn how to integrate F5 with Microsoft Entra ID. When you integrate F5 with Microsoft Entra ID, you can:
- Control in Microsoft Entra ID who has access to F5.
- Enable your users to be automatically signed-in to F5 with their Microsoft Entra accounts.
- Manage your accounts in one central location.
To learn more about SaaS app integration with Microsoft Entra ID, see What is application access and single sign-on with Microsoft Entra ID.
Prerequisites
To get started, you need the following items:
A Microsoft Entra subscription. If you don't have a subscription, you can get a free account.
F5 single sign-on (SSO) enabled subscription.
Deploying the joint solution requires the following license:
F5 BIG-IP® Best bundle (or)
F5 BIG-IP Access Policy Manager™ (APM) standalone license
F5 BIG-IP Access Policy Manager™ (APM) add-on license on an existing BIG-IP F5 BIG-IP® Local Traffic Manager™ (LTM).
In addition to the above license, the F5 system may also be licensed with:
A URL Filtering subscription to use the URL category database
An F5 IP Intelligence subscription to detect and block known attackers and malicious traffic
A network hardware security module (HSM) to safeguard and manage digital keys for strong authentication
F5 BIG-IP system is provisioned with APM modules (LTM is optional)
Although optional, it is highly recommended to Deploy the F5 systems in a sync/failover device group (S/F DG), which includes the active standby pair, with a floating IP address for high availability (HA). Further interface redundancy can be achieved using the Link Aggregation Control Protocol (LACP). LACP manages the connected physical interfaces as a single virtual interface (aggregate group) and detects any interface failures within the group.
For Kerberos applications, an on-premises AD service account for constrained delegation. Refer to F5 Documentation for creating a AD delegation account.
Access guided configuration
Access guided configuration' is supported on F5 TMOS version 13.1.0.8 and above. If your BIG-IP system is running a version below 13.1.0.8, please refer to the Advanced configuration section.
Access guided configuration presents a completely new and streamlined user experience. This workflow-based architecture provides intuitive, re-entrant configuration steps tailored to the selected topology.
Before proceeding to the configuration, upgrade the guided configuration by downloading the latest use case pack from downloads.f5.com. To upgrade, follow the below procedure.
Note
The screenshots below are for the latest released version (BIG-IP 15.0 with AGC version 5.0). The configuration steps below are valid for this use case across from 13.1.0.8 to the latest BIG-IP version.
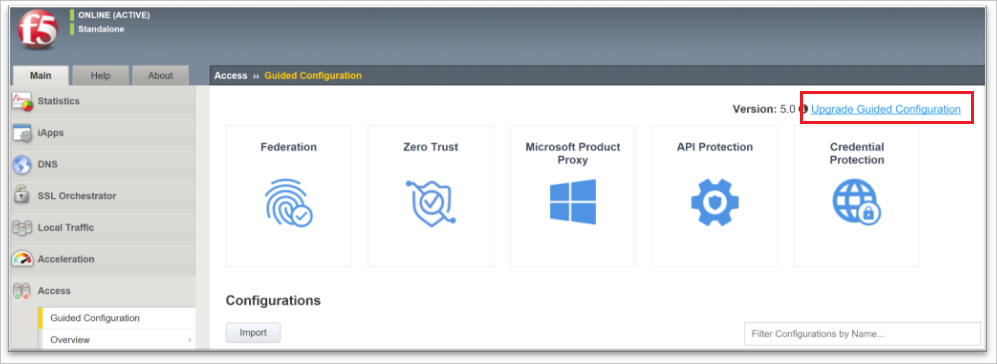
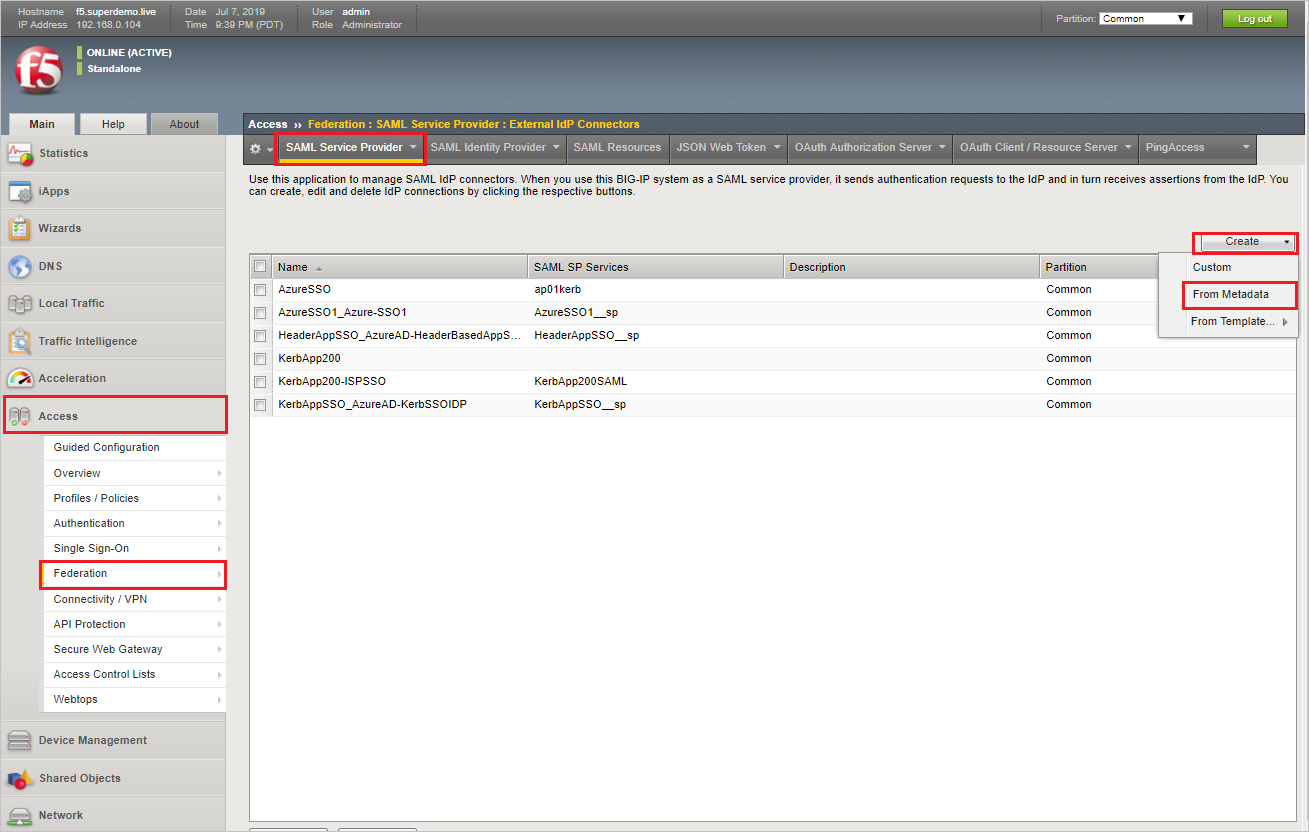
On the F5 BIG-IP Web UI, click on Access >> Guide Configuration.
On the Guided Configuration page, click on Upgrade Guided Configuration on the top left-hand corner.
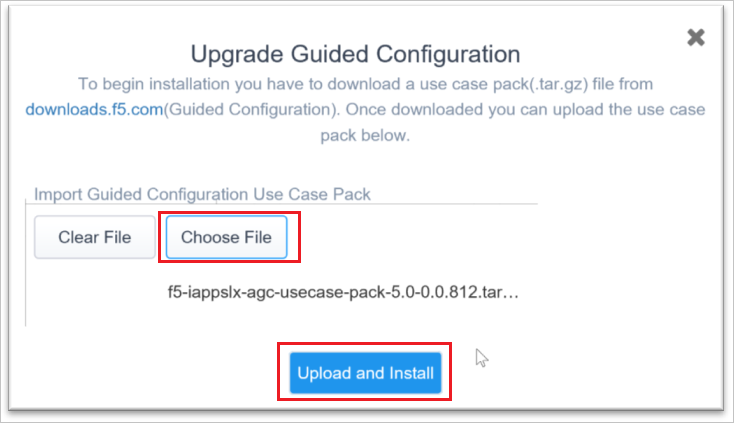
On the Upgrade Guide Configuration pop screen, select Choose File to upload the downloaded use case pack and click on Upload and Install button.
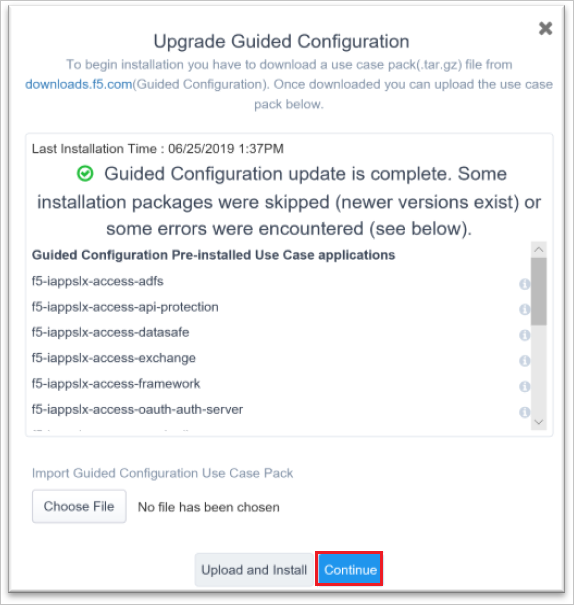
When upgrade is completed, click on the Continue button.
Scenario description
In this tutorial, you configure and test Microsoft Entra SSO in a test environment.
- F5 supports SP and IDP initiated SSO
- F5 SSO can be configured in three different ways.
Key Authentication Scenarios
Apart from Microsoft Entra native integration support for modern authentication protocols like OpenID Connect, SAML and WS-Fed, F5 extends secure access for legacy-based authentication apps for both internal and external access with Microsoft Entra ID, enabling modern scenarios (e.g. password-less access) to these applications. This include:
Header-based authentication apps
Kerberos authentication apps
Anonymous authentication or no inbuilt authentication apps
NTLM authentication apps (protection with dual prompts for the user)
Forms Based Application (protection with dual prompts for the user)
Adding F5 from the gallery
To configure the integration of F5 into Microsoft Entra ID, you need to add F5 from the gallery to your list of managed SaaS apps.
- Sign in to the Microsoft Entra admin center as at least a Cloud Application Administrator.
- Browse to Identity > Applications > Enterprise applications > New application.
- In the Add from the gallery section, type F5 in the search box.
- Select F5 from results panel and then add the app. Wait a few seconds while the app is added to your tenant.
Alternatively, you can also use the Enterprise App Configuration Wizard. In this wizard, you can add an application to your tenant, add users/groups to the app, assign roles, as well as walk through the SSO configuration as well. Learn more about Microsoft 365 wizards.
Configure and test Microsoft Entra single sign-on for F5
Configure and test Microsoft Entra SSO with F5 using a test user called B.Simon. For SSO to work, you need to establish a link relationship between a Microsoft Entra user and the related user in F5.
To configure and test Microsoft Entra SSO with F5, complete the following building blocks:
- Configure Microsoft Entra SSO - to enable your users to use this feature.
- Create a Microsoft Entra test user - to test Microsoft Entra single sign-on with B.Simon.
- Assign the Microsoft Entra test user - to enable B.Simon to use Microsoft Entra single sign-on.
- Configure F5 SSO - to configure the single sign-on settings on application side.
- Create F5 test user - to have a counterpart of B.Simon in F5 that is linked to the Microsoft Entra representation of user.
- Test SSO - to verify whether the configuration works.
Configure Microsoft Entra SSO
Follow these steps to enable Microsoft Entra SSO.
Sign in to the Microsoft Entra admin center as at least a Cloud Application Administrator.
Browse to Identity > Applications > Enterprise applications > F5 > Single sign-on.
On the Select a single sign-on method page, select SAML.
On the Set up single sign-on with SAML page, click the edit/pen icon for Basic SAML Configuration to edit the settings.
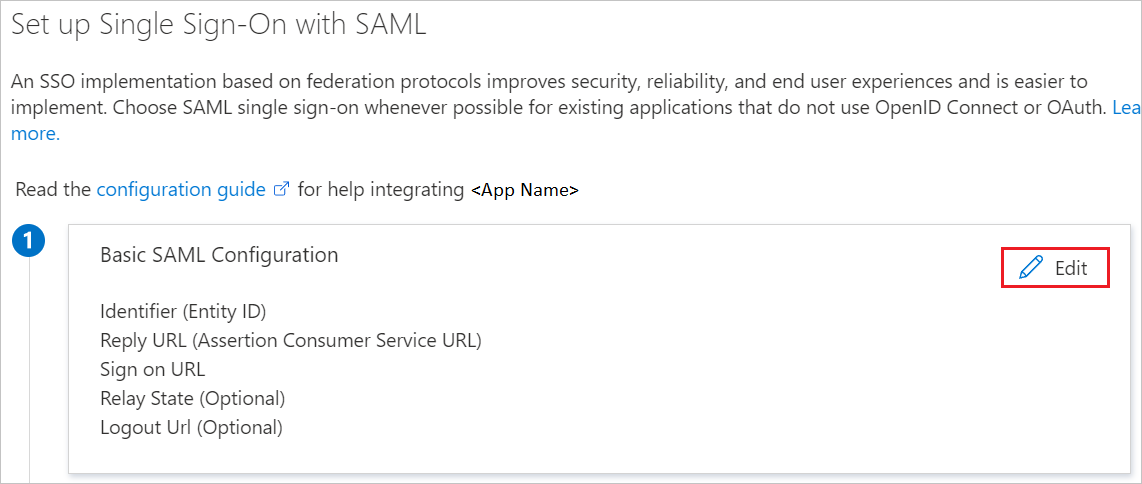
On the Basic SAML Configuration section, if you wish to configure the application in IDP initiated mode, enter the values for the following fields:
a. In the Identifier text box, type a URL using the following pattern:
https://<YourCustomFQDN>.f5.com/b. In the Reply URL text box, type a URL using the following pattern:
https://<YourCustomFQDN>.f5.com/Click Set additional URLs and perform the following step if you wish to configure the application in SP initiated mode:
In the Sign-on URL text box, type a URL using the following pattern:
https://<YourCustomFQDN>.f5.com/Note
These values are not real. Update these values with the actual Identifier, Reply URL and Sign-on URL. Contact F5 Client support team to get these values. You can also refer to the patterns shown in the Basic SAML Configuration section.
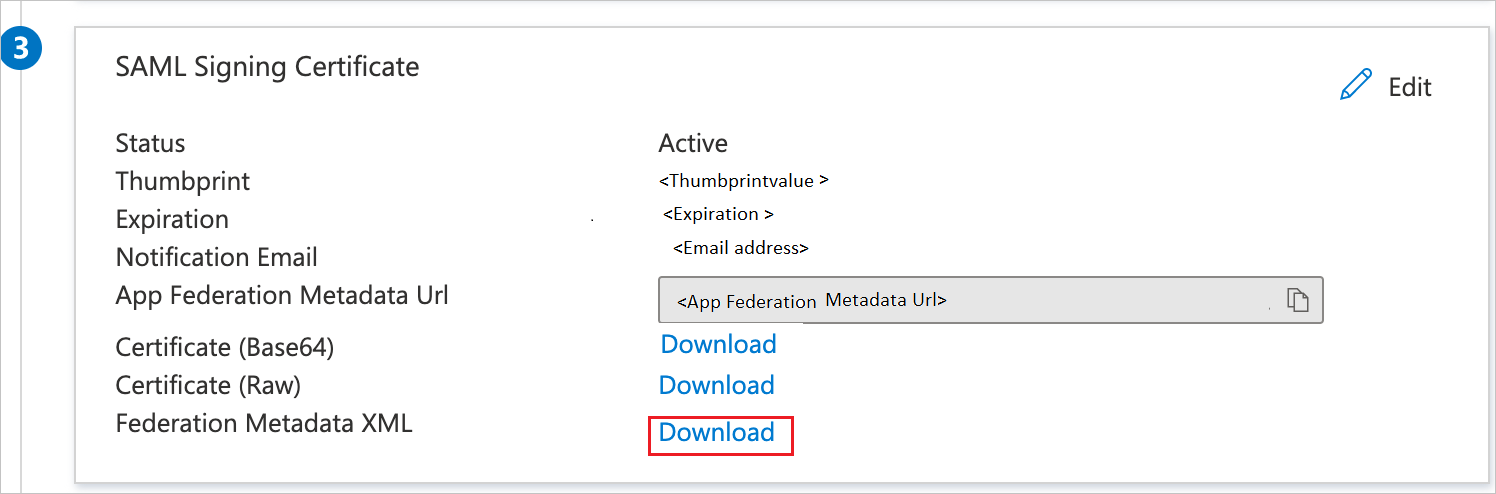
On the Set up single sign-on with SAML page, in the SAML Signing Certificate section, find Federation Metadata XML and Certificate (Base64) then select Download to download the certificate and save it on your computer.
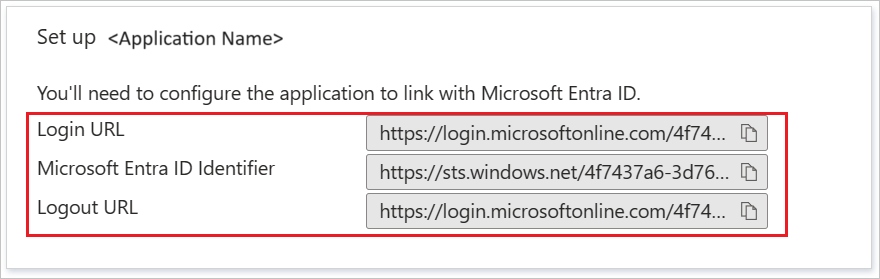
On the Set up F5 section, copy the appropriate URL(s) based on your requirement.
Create a Microsoft Entra test user
In this section, you'll create a test user called B.Simon.
- Sign in to the Microsoft Entra admin center as at least a User Administrator.
- Browse to Identity > Users > All users.
- Select New user > Create new user, at the top of the screen.
- In the User properties, follow these steps:
- In the Display name field, enter
B.Simon. - In the User principal name field, enter the username@companydomain.extension. For example,
B.Simon@contoso.com. - Select the Show password check box, and then write down the value that's displayed in the Password box.
- Select Review + create.
- In the Display name field, enter
- Select Create.
Assign the Microsoft Entra test user
In this section, you'll enable B.Simon to use single sign-on by granting access to F5.
Sign in to the Microsoft Entra admin center as at least a Cloud Application Administrator.
Browse to Identity > Applications > Enterprise applications > F5.
In the app's overview page, find the Manage section and select Users and groups.
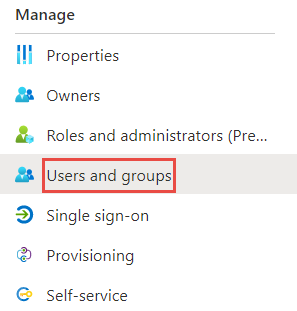
Select Add user, then select Users and groups in the Add Assignment dialog.

In the Users and groups dialog, select B.Simon from the Users list, then click the Select button at the bottom of the screen.
If you're expecting any role value in the SAML assertion, in the Select Role dialog, select the appropriate role for the user from the list and then click the Select button at the bottom of the screen.
In the Add Assignment dialog, click the Assign button.
Click on Conditional Access .
Click on New Policy.
You can now see your F5 App as a resource for Conditional Access policy and apply any Conditional Access including Multifactor Auth, Device based access control or Identity Protection Policy.
Configure F5 SSO
Configure F5 single sign-on for Kerberos application
Guided Configuration
Open a new web browser window and sign into your F5 (Kerberos) company site as an administrator and perform the following steps:
You will need to import the Metadata Certificate into the F5 which will be used later in the setup process.
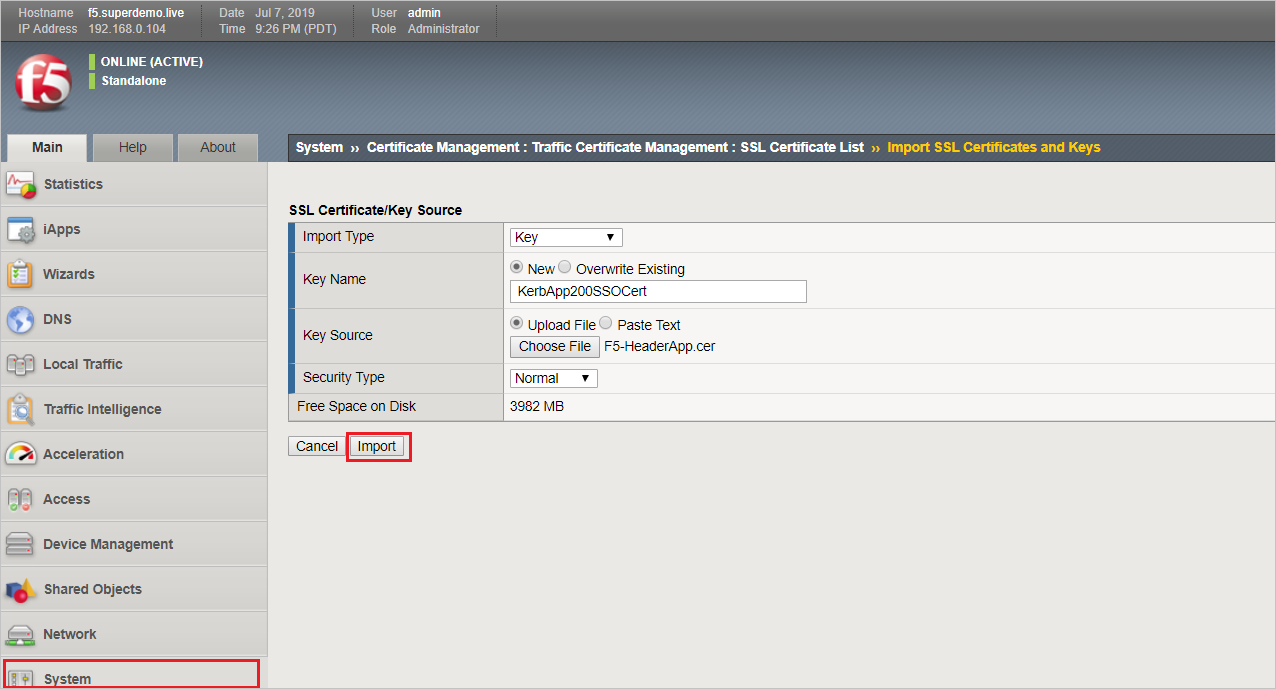
Navigate to System > Certificate Management > Traffic Certificate Management > SSL Certificate List. Select Import from the right-hand corner. Specify a Certificate Name (will be referenced Later in the config). In the Certificate Source, select Upload File specify the certificate downloaded from Azure while configuring SAML Single Sign on. Click Import.

Additionally, you will require SSL Certificate for the Application Hostname. Navigate to System > Certificate Management > Traffic Certificate Management > SSL Certificate List. Select Import from the right-hand corner. Import Type will be PKCS 12(IIS). Specify a Key Name (will be referenced Later in the config) and the specify the PFX file. Specify the Password for the PFX. Click Import.
Note
In the example our app name is
Kerbapp.superdemo.live, we are using a Wild Card Certificate our keyname isWildCard-SuperDemo.live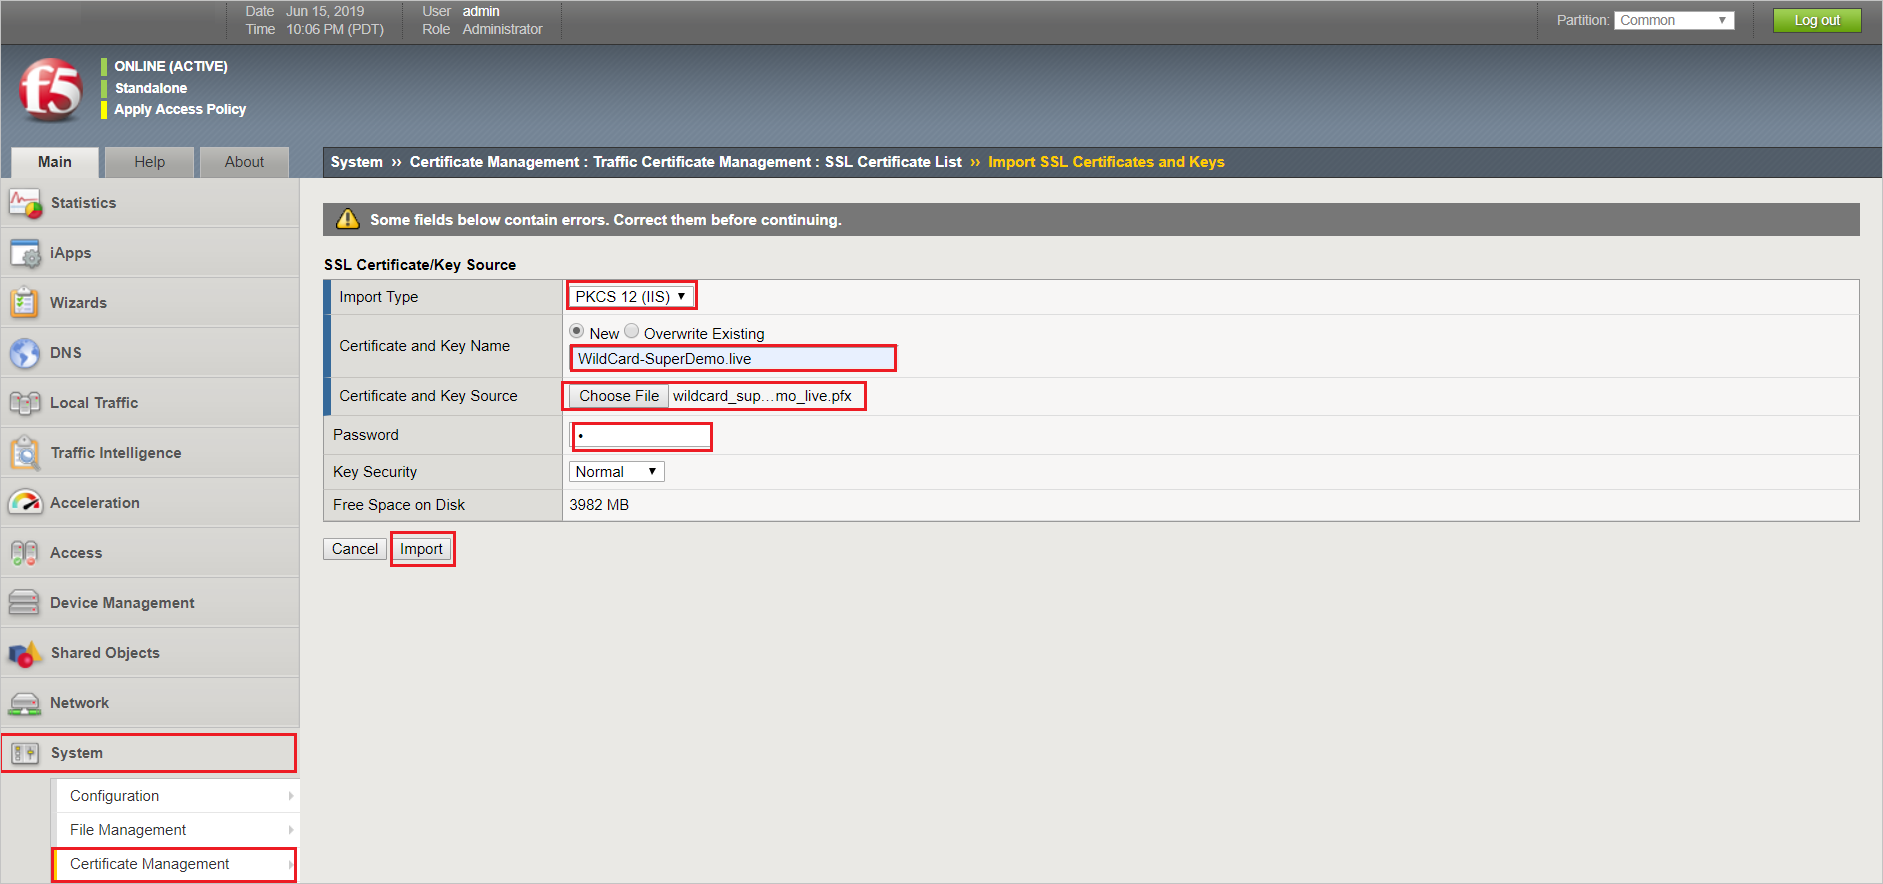
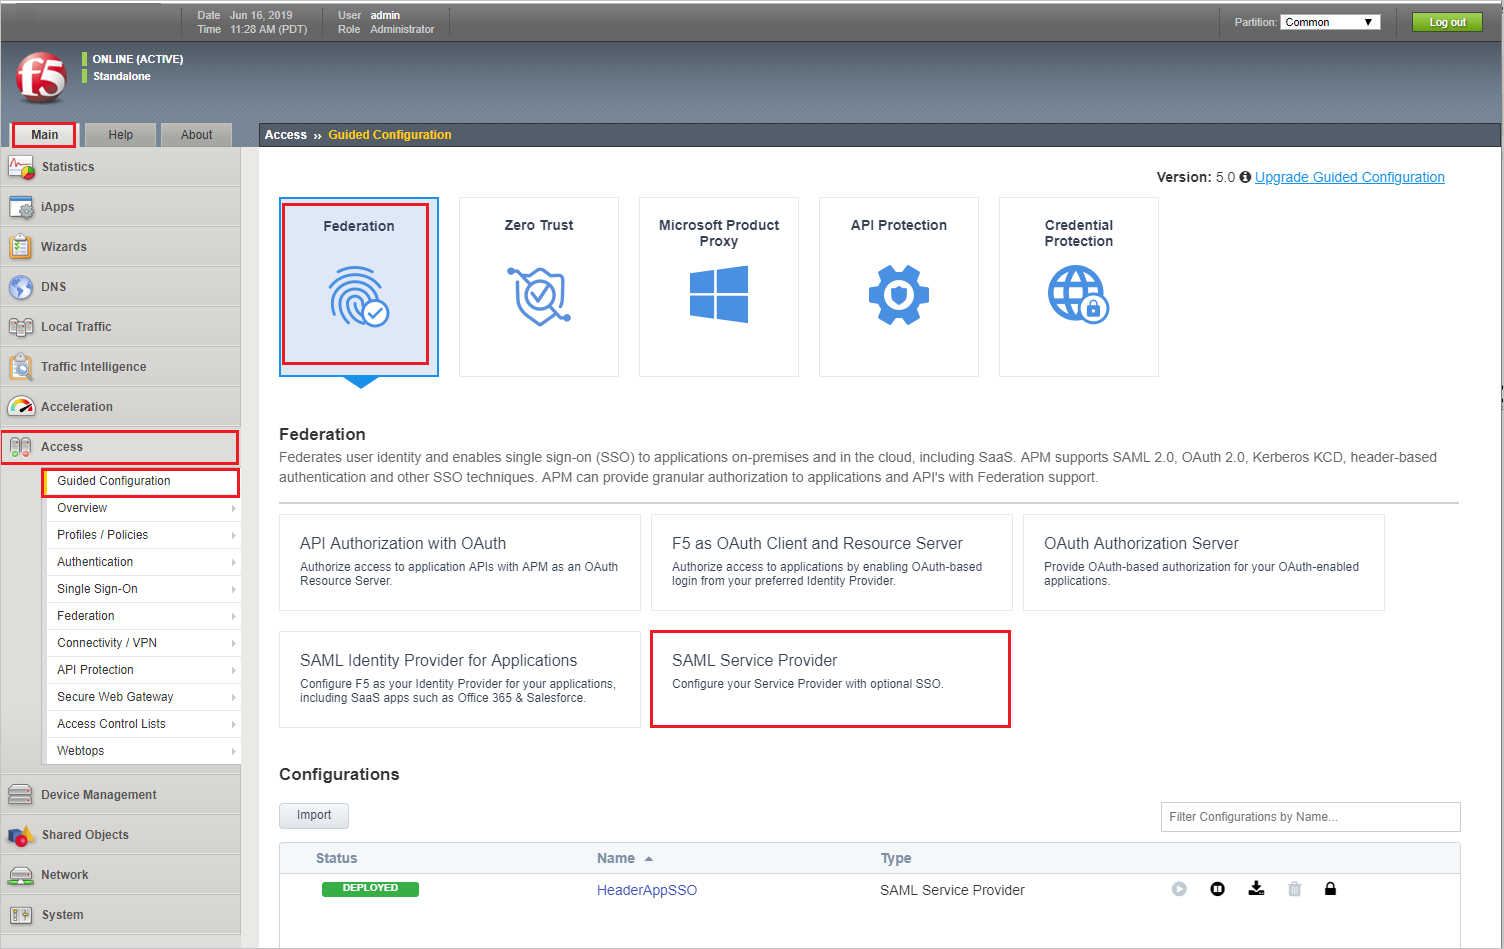
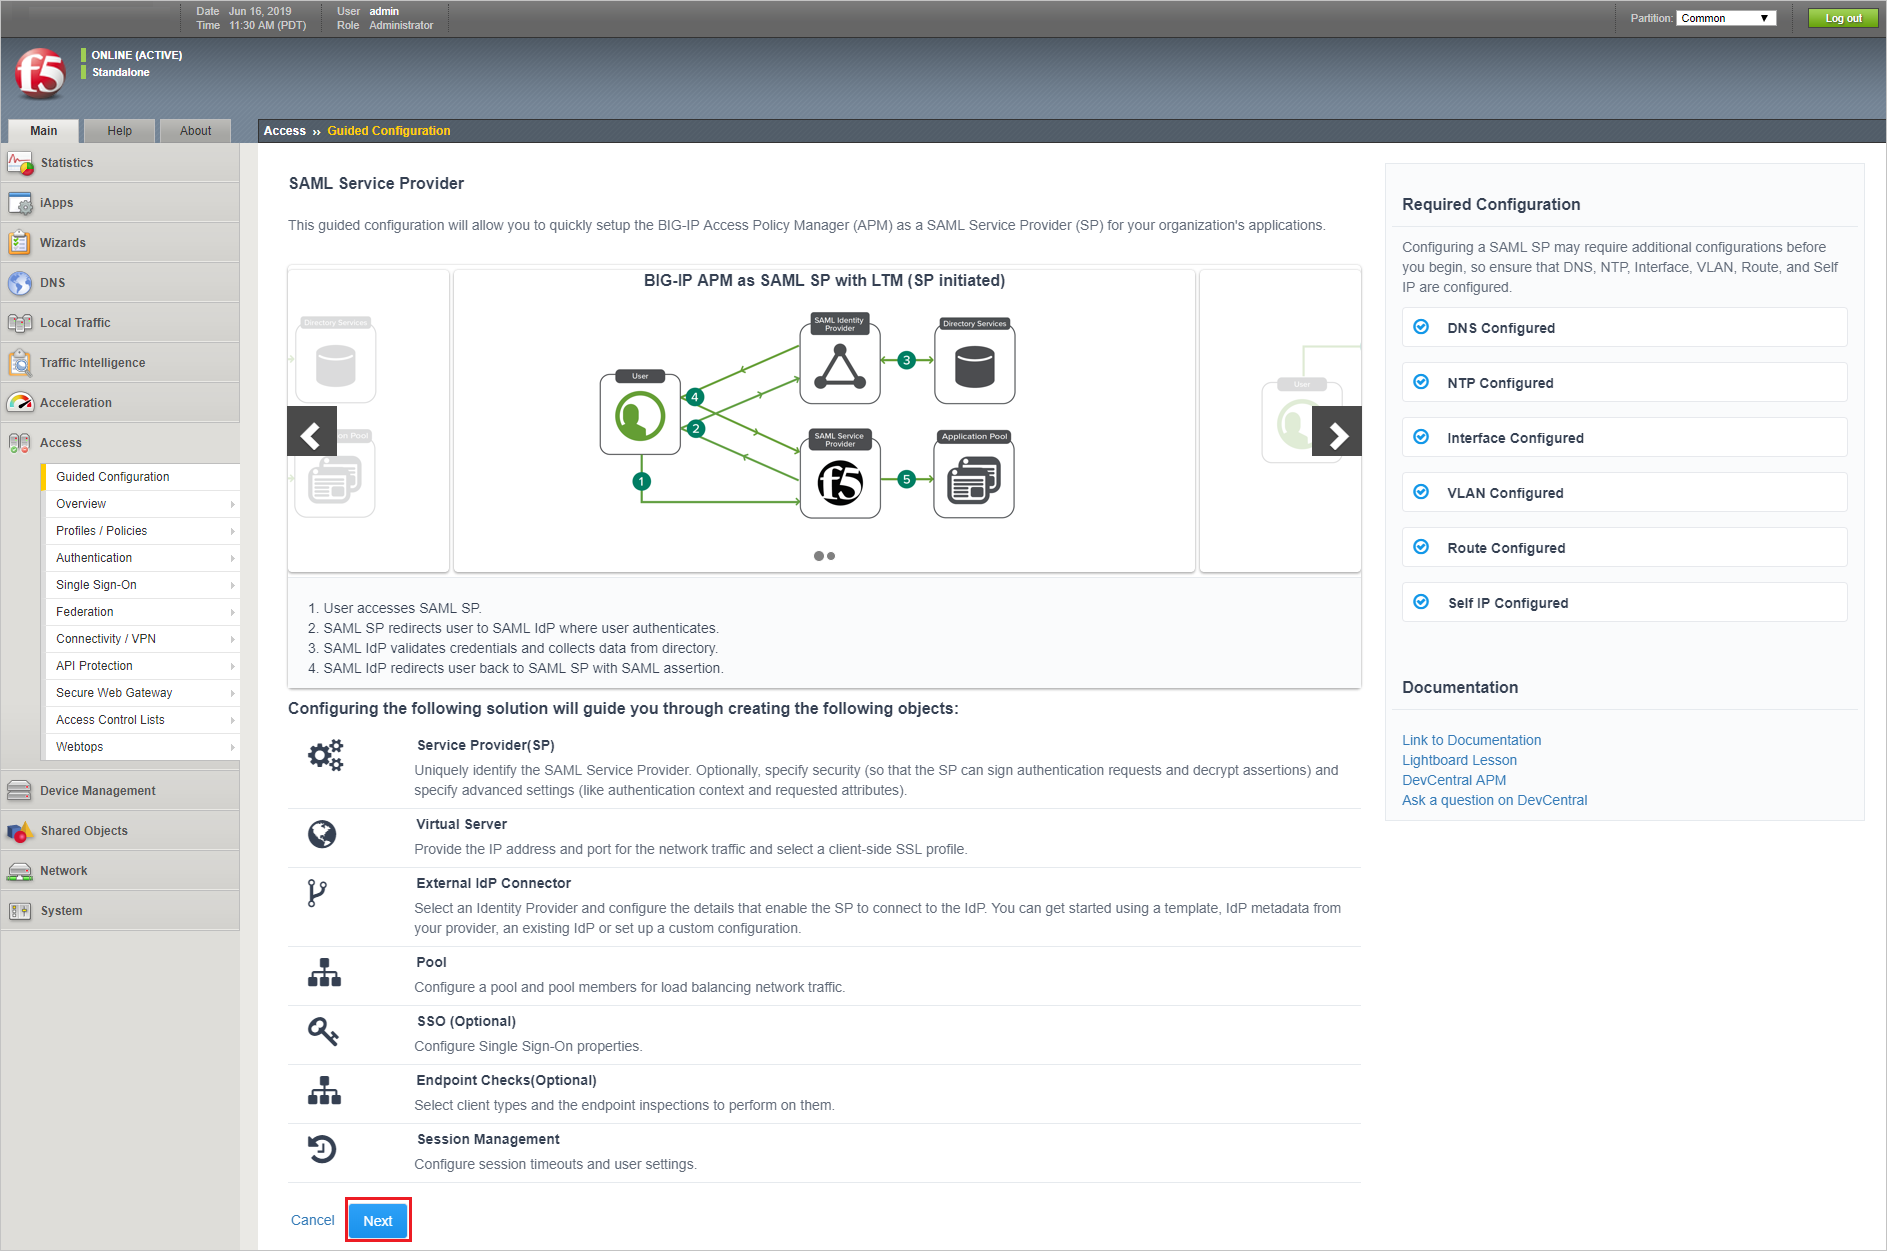
We will use the Guided Experience to setup the Microsoft Entra Federation and Application Access. Go to – F5 BIG-IP Main and select Access > Guided Configuration > Federation > SAML Service Provider. Click Next then click Next to begin configuration.
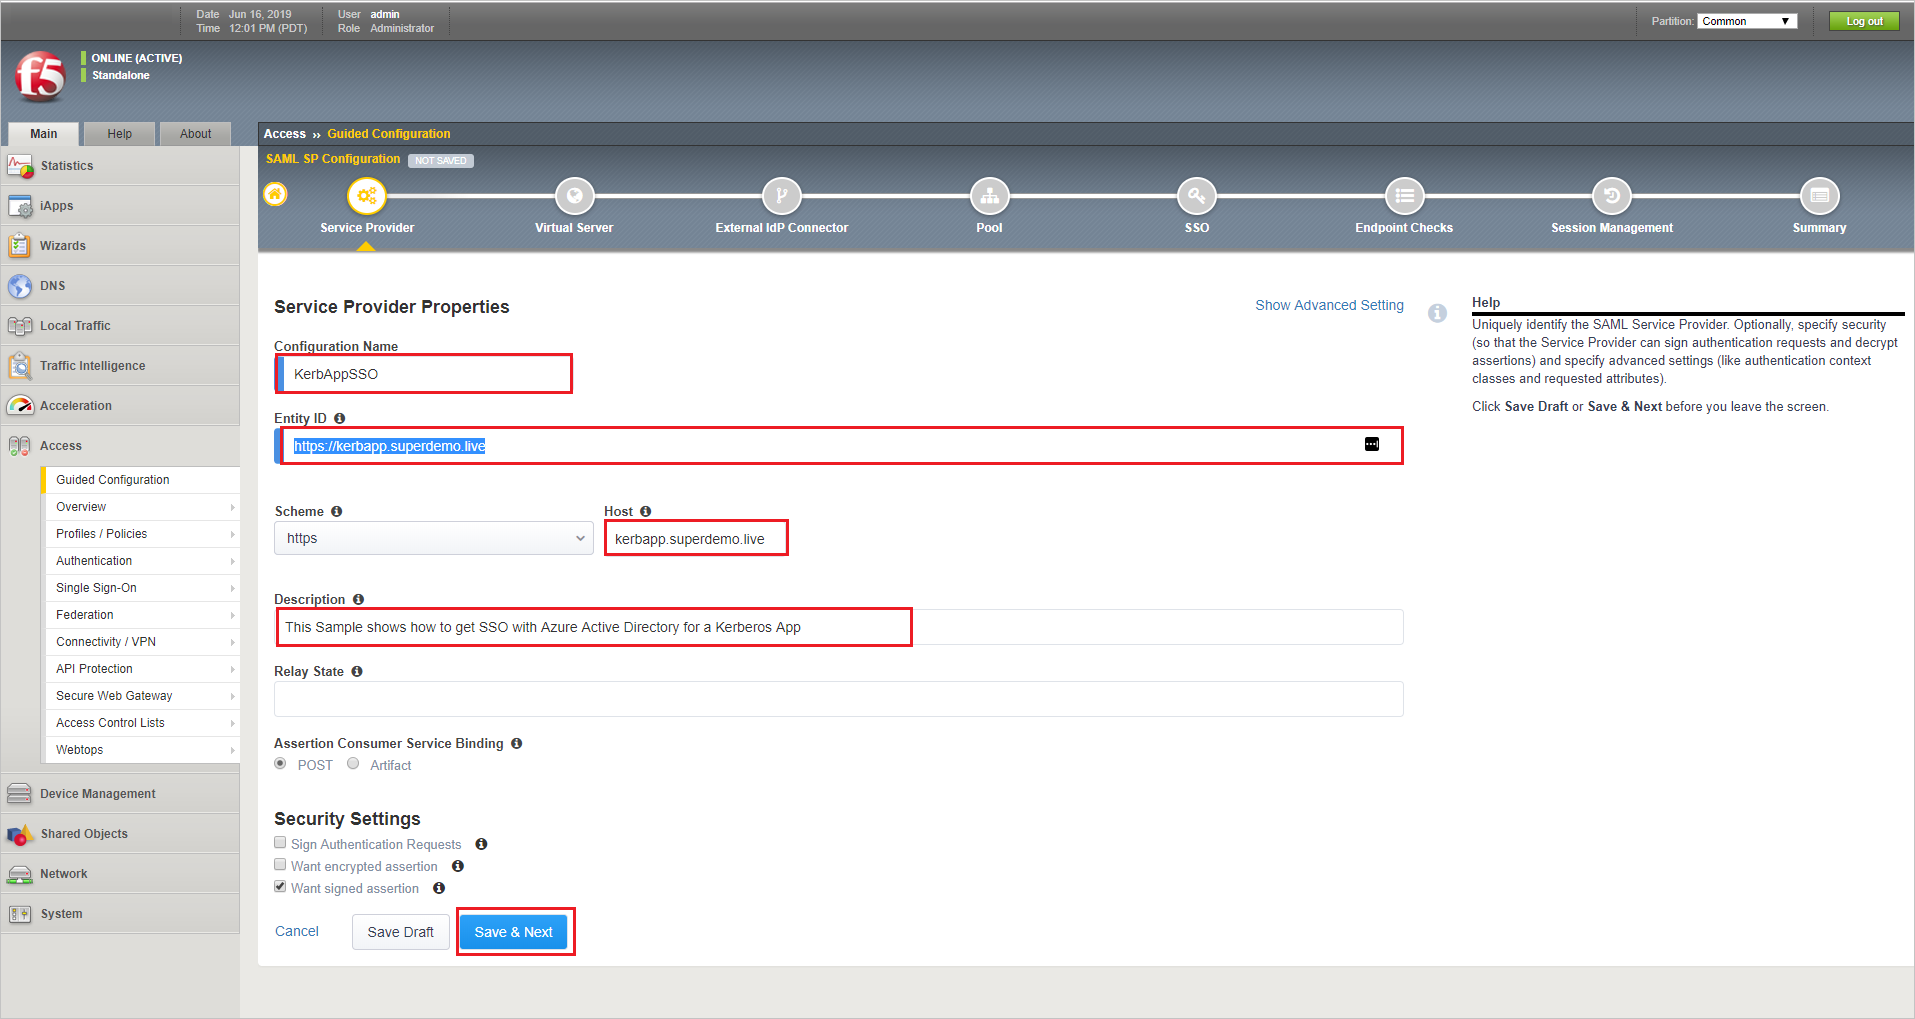
Provide a Configuration Name. Specify the Entity ID (same as what you configured on the Microsoft Entra Application Configuration). Specify the Host name. Add a Description for reference. Accept the remaining default entries and select and then click Save & Next.
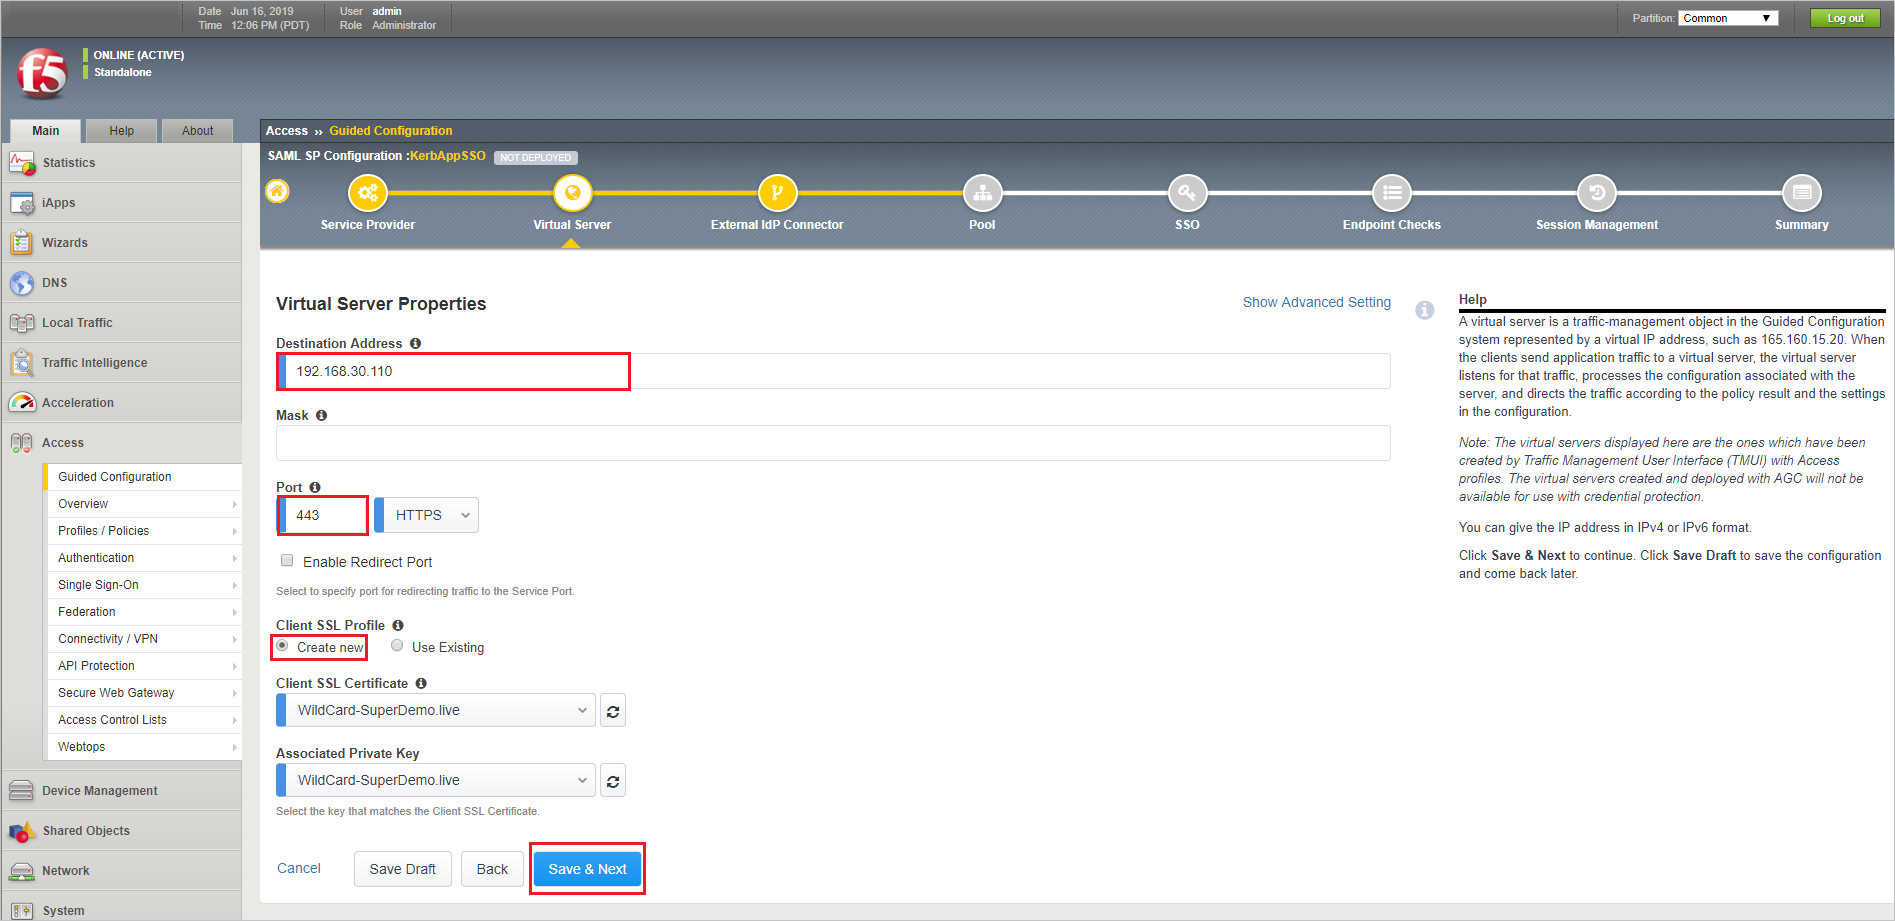
In this example we are creating a new Virtual Server as 192.168.30.200 with port 443. Specify the Virtual Server IP address in the Destination Address. Select the Client SSL Profile, select Create new. Specify previously uploaded application certificate, (the wild card certificate in this example) and the associated key, and then click Save & Next.
Note
in this example our Internal webserver is running on port 80 and we want to publish it with 443.
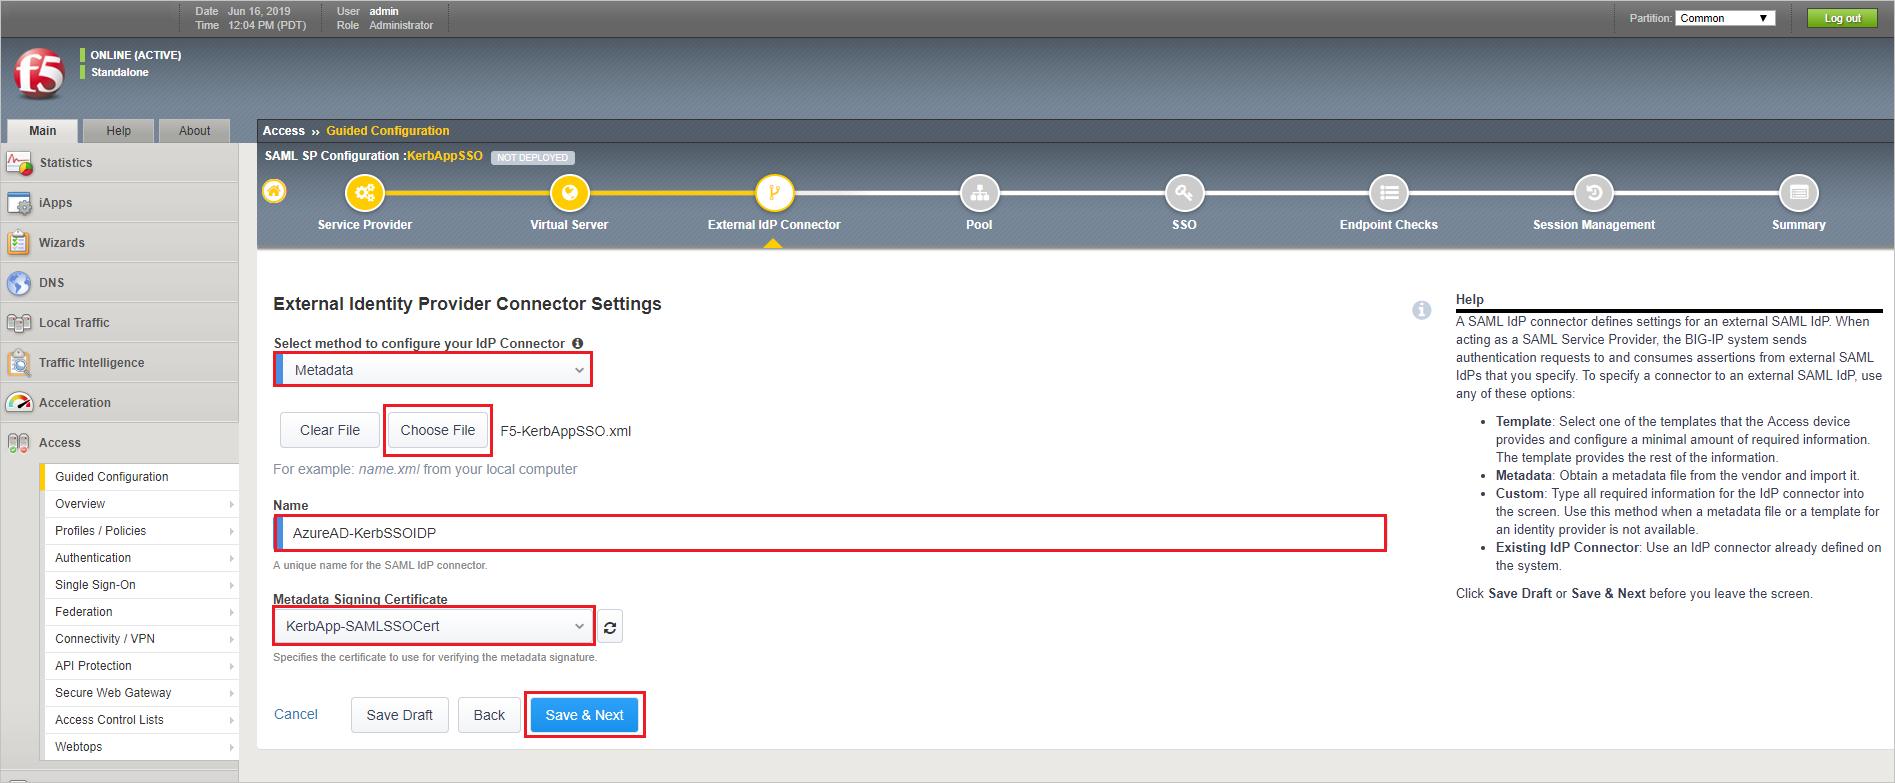
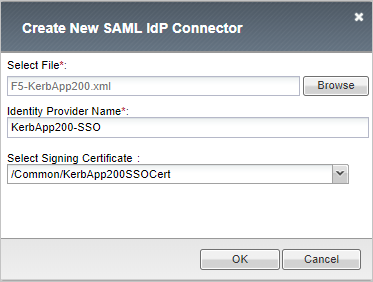
Under Select method to configure your IdP connector, specify Metadata, click on Choose File and upload the Metadata XML file downloaded earlier from Microsoft Entra ID. Specify a unique Name for SAML IDP connector. Choose the Metadata Signing Certificate which was upload earlier. Click Save & Next.
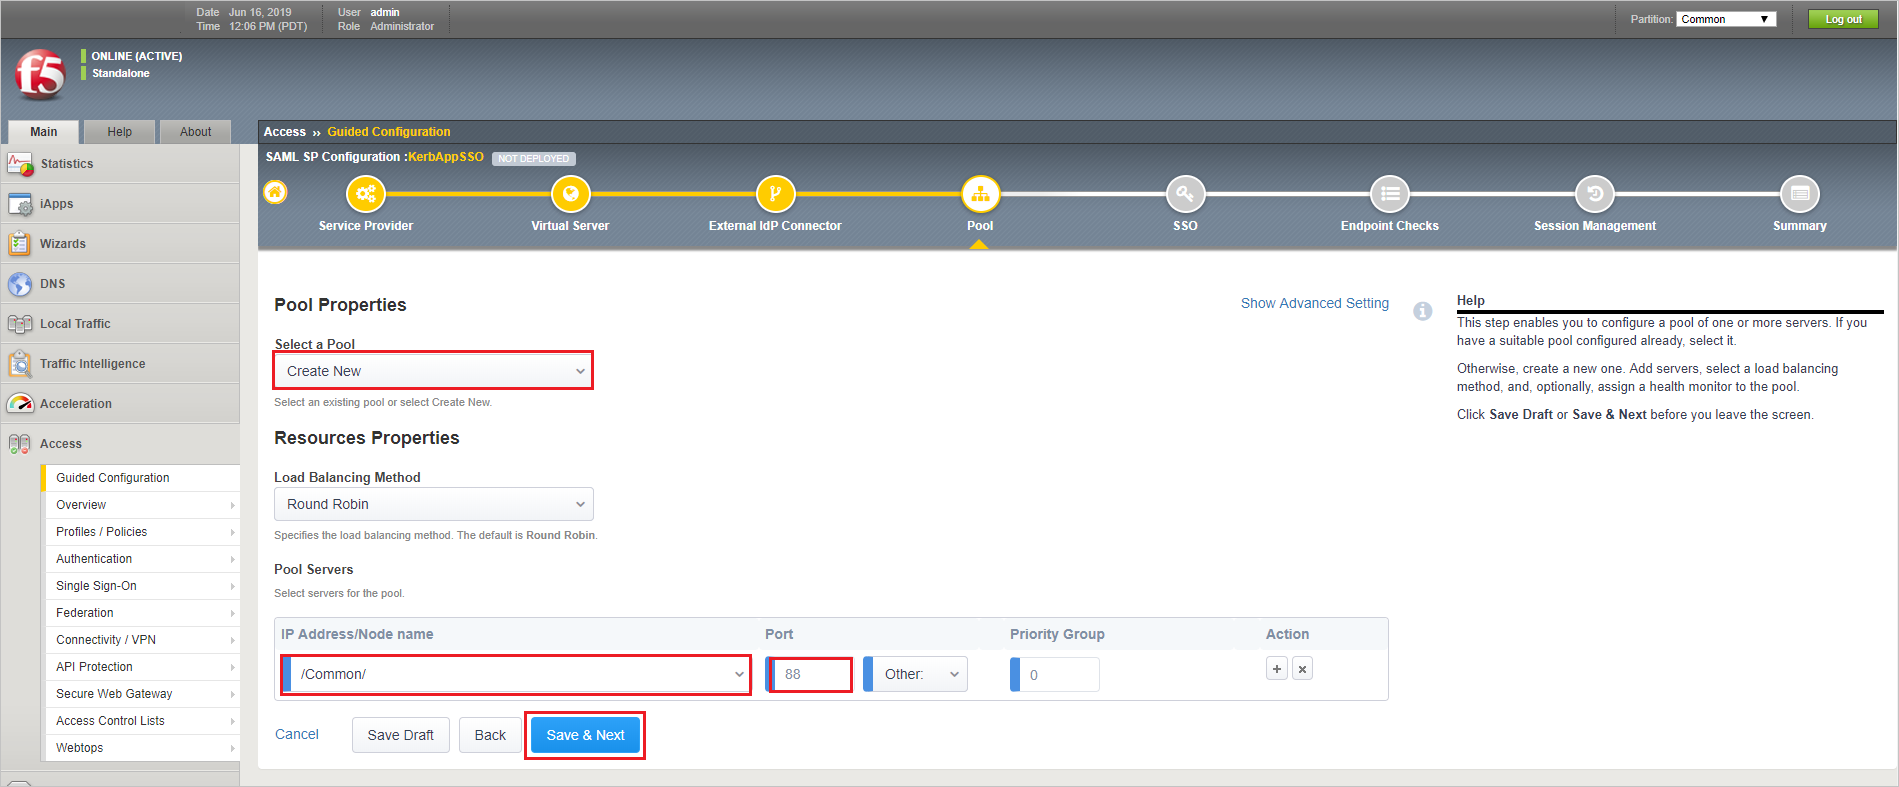
Under Select a Pool, specify Create New (alternatively select a pool it already exists). Let other value be default. Under Pool Servers, type the IP Address under IP Address/Node Name. Specify the Port. Click Save & Next.
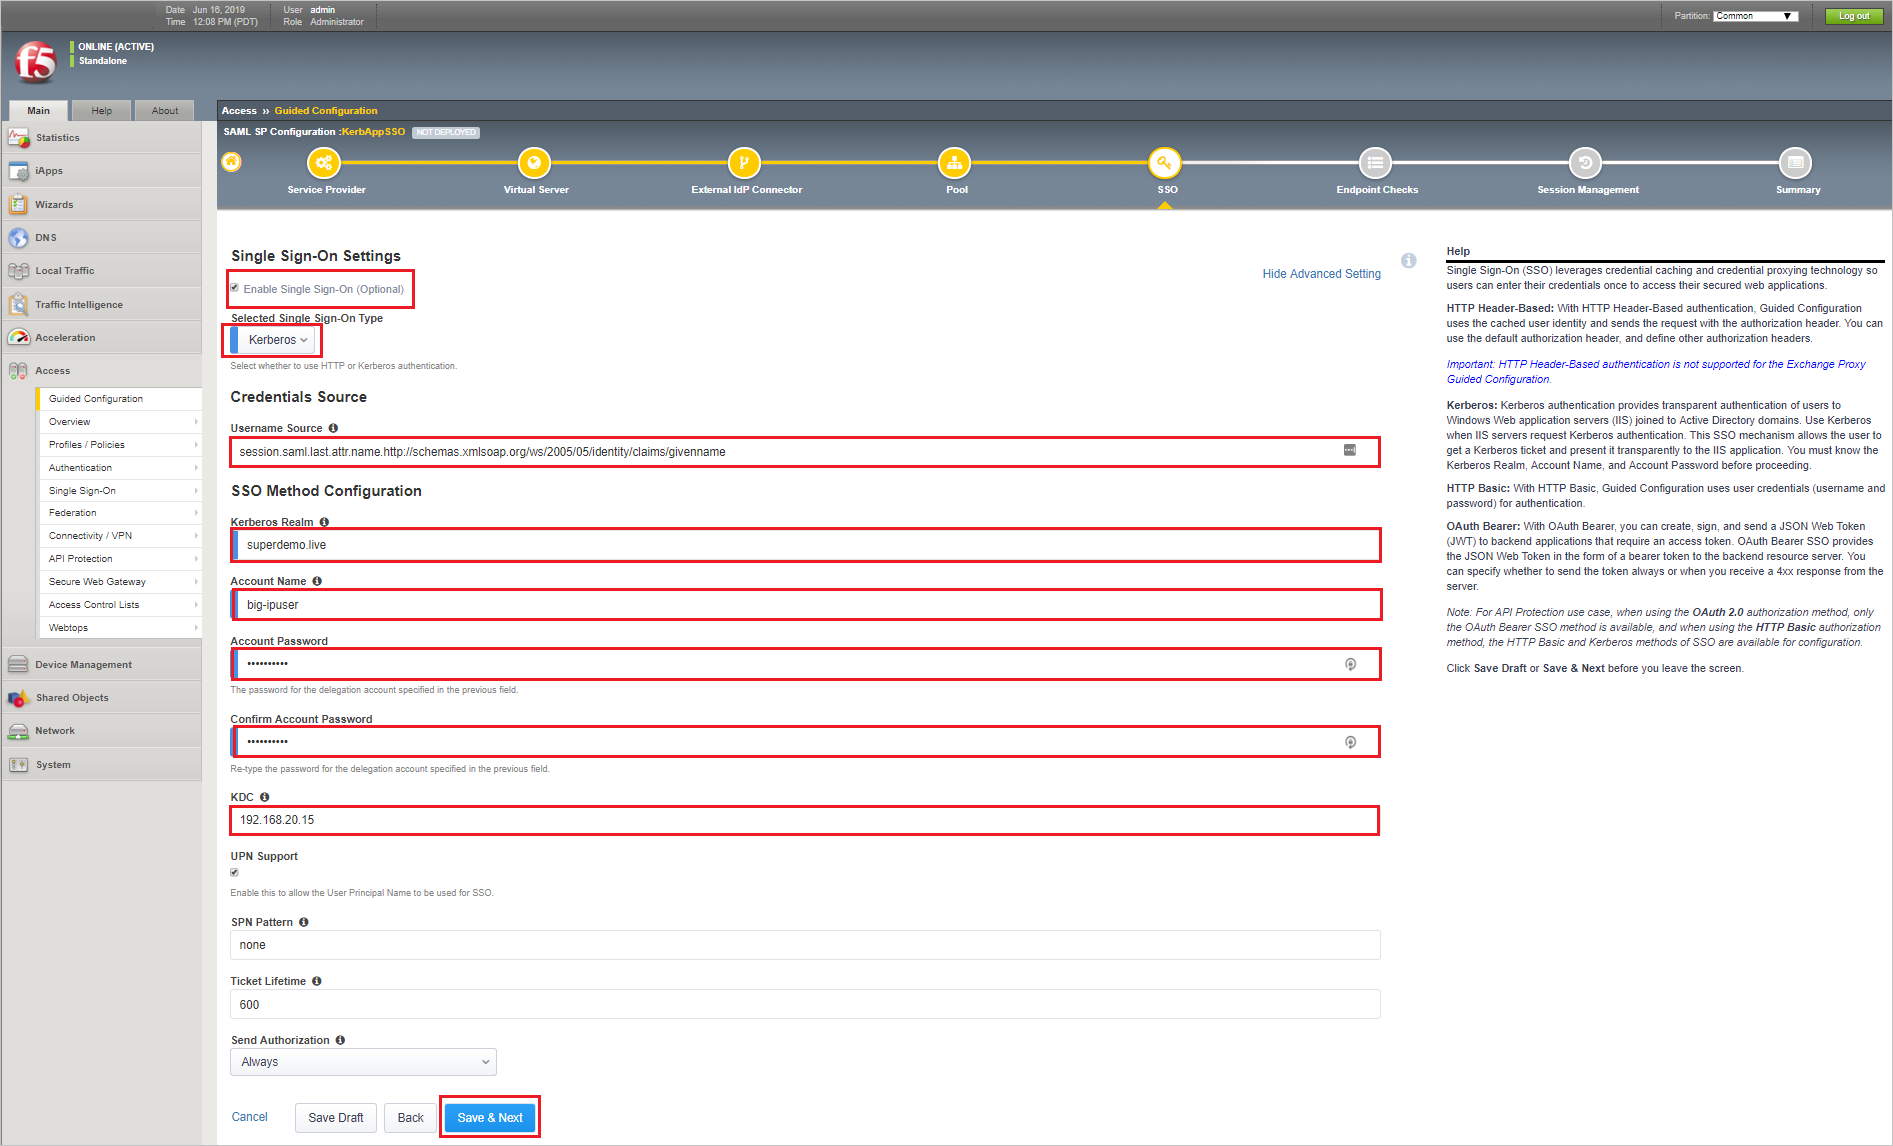
On the Single Sign-On Settings screen, select Enable Single Sign-On. Under Selected Single Sign-On Type choose Kerberos. Replace session.saml.last.Identity with session.saml.last.attr.name.Identity under Username Source (this variable it set using claims mapping in the Microsoft Entra ID). Select Show Advanced Setting. Under Kerberos Realm type the Domain Name. Under Account Name/ Account Password Specify the APM Delegation Account and Password. Specify the Domain Controller IP in the KDC Field. Click Save & Next.
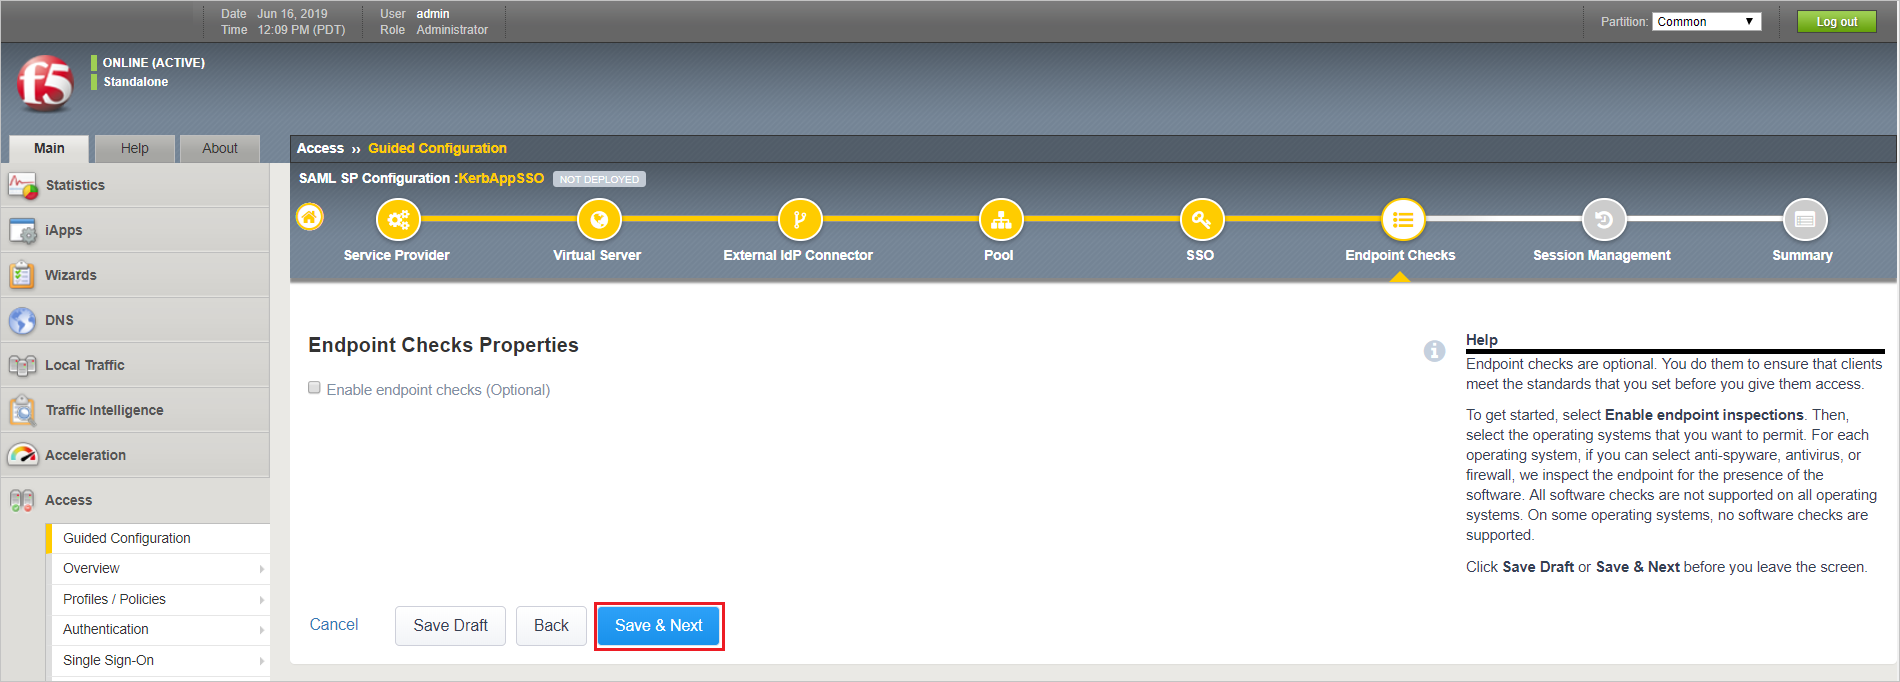
For purposes of this guidance, we will skip endpoint checks. Refer to F5 documentation for details. On screen select Save & Next.
Accept the defaults and click Save & Next. Consult F5 documentation for details regarding SAML session management settings.

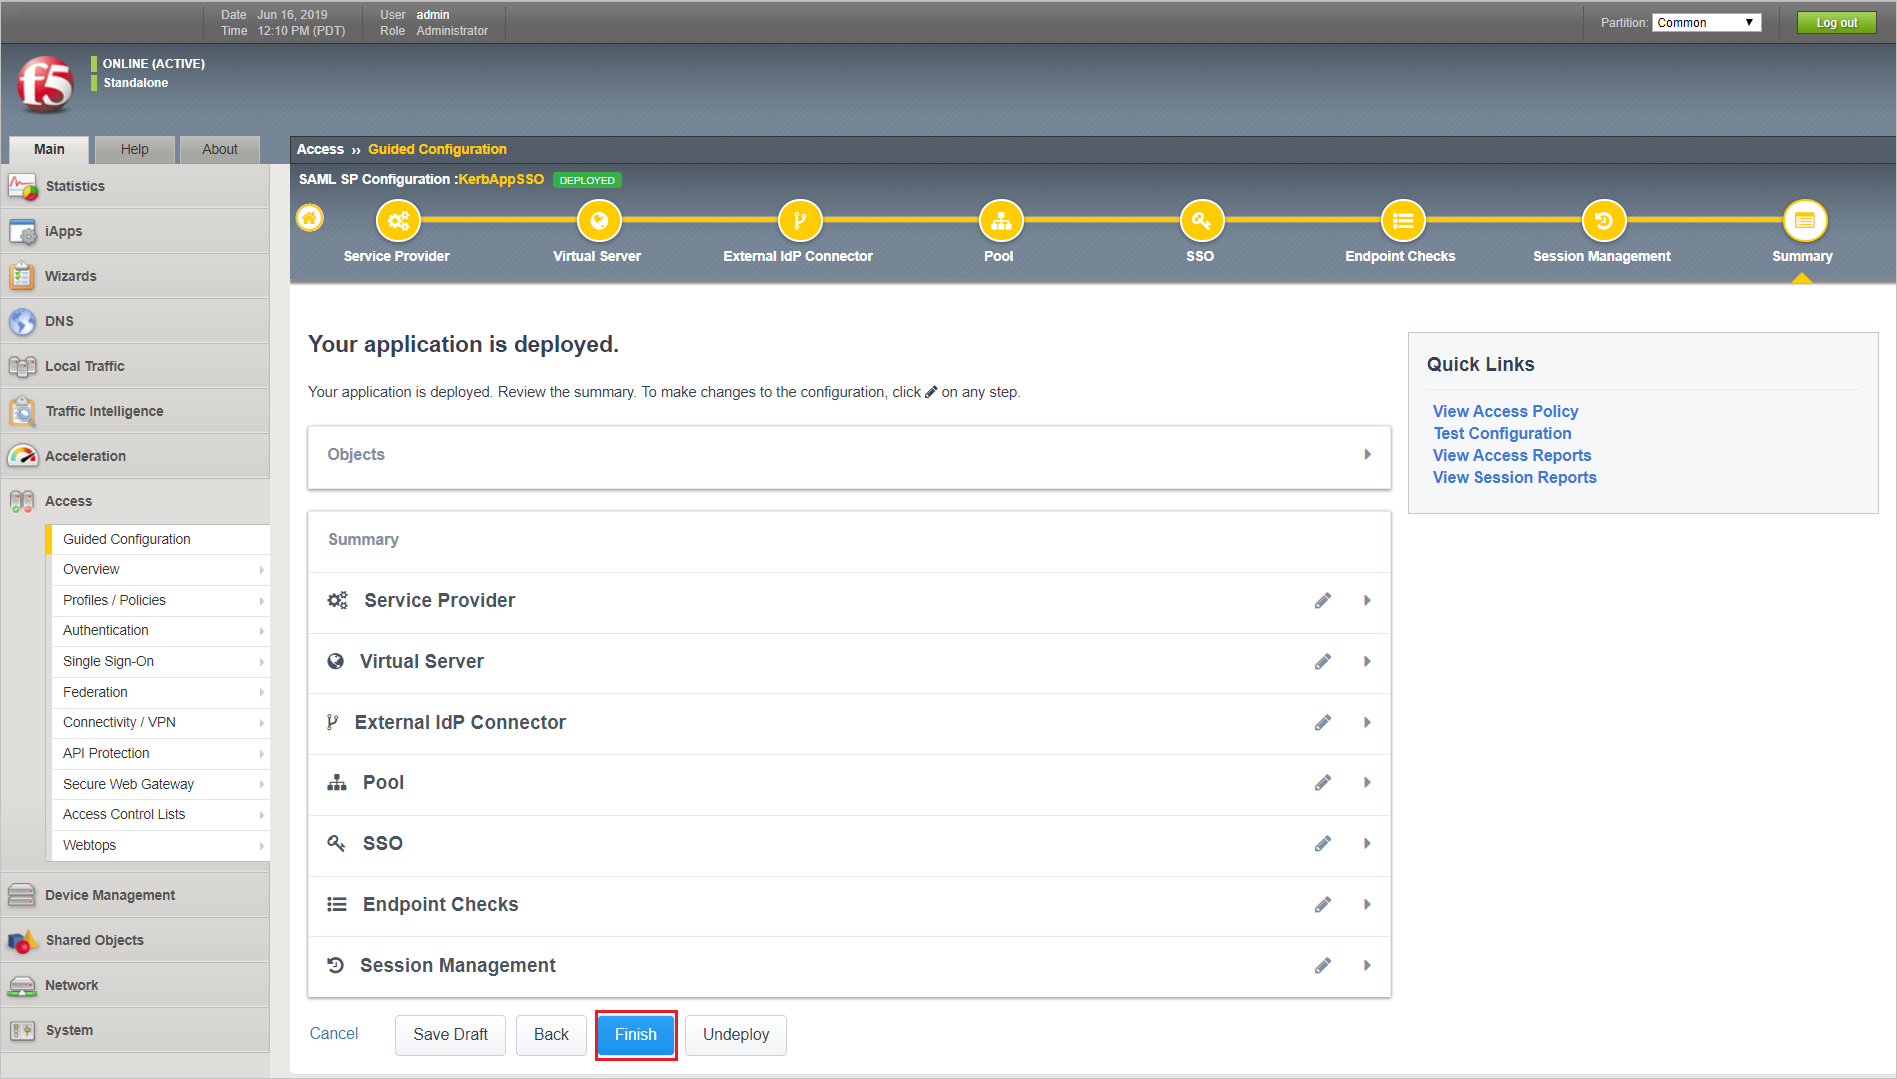
Review the summary screen and select Deploy to configure the BIG-IP.
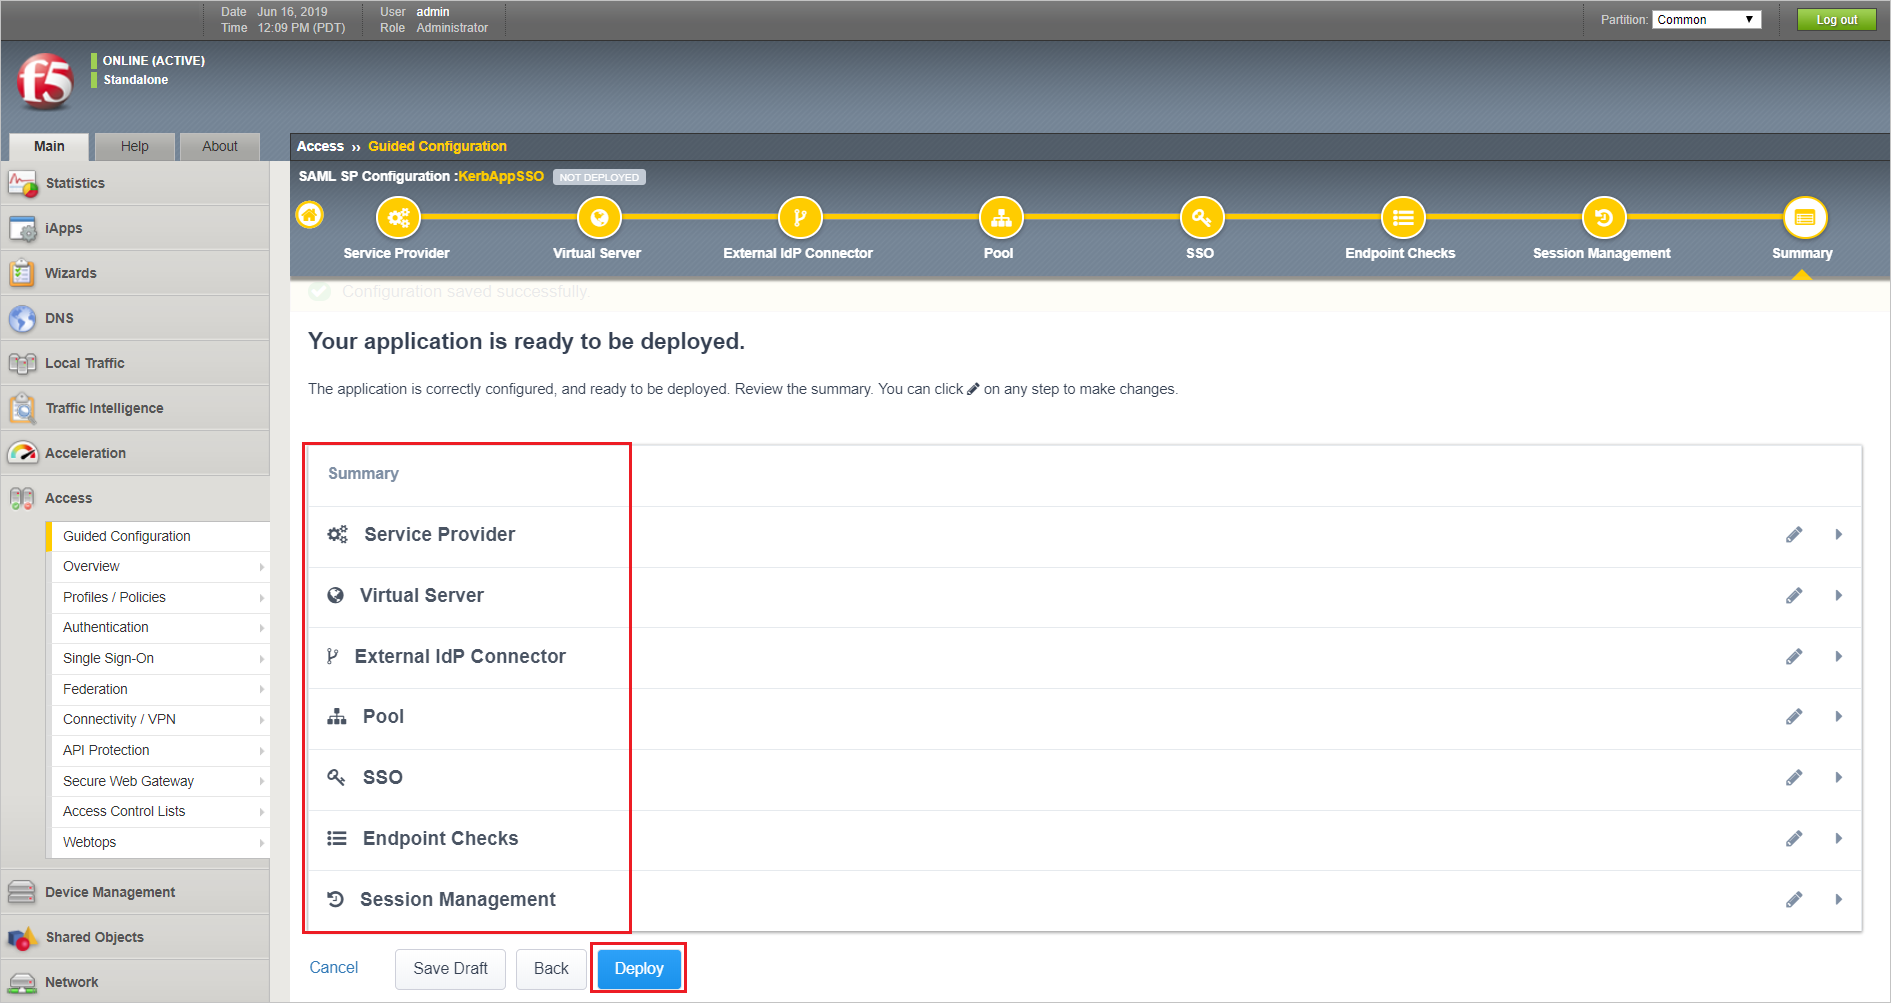
Once the application has been configured click on Finish.
Advanced Configuration
Note
For reference click here
Configuring an Active Directory AAA server
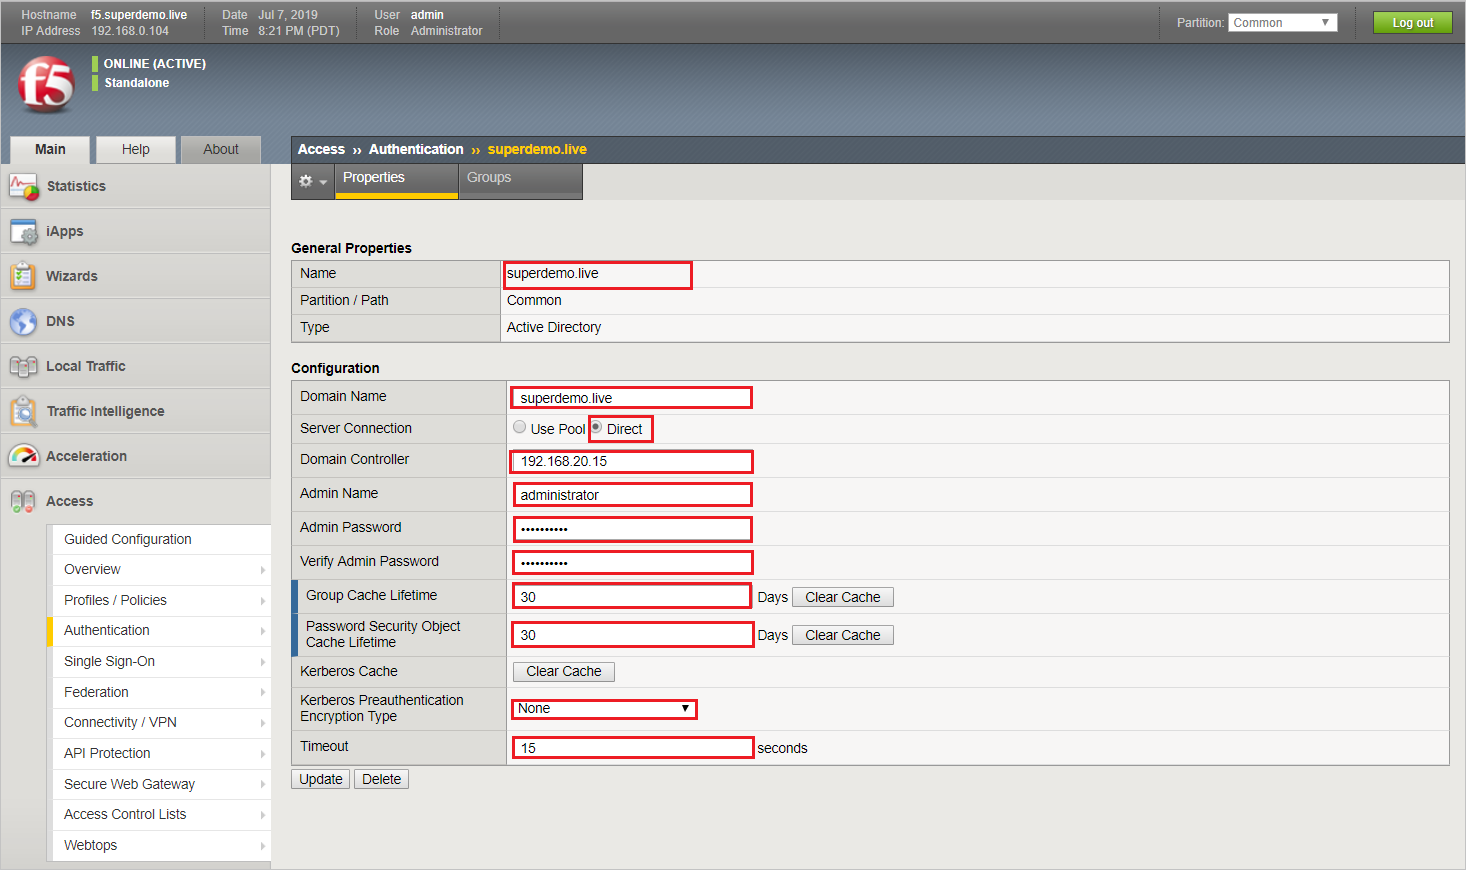
You configure an Active Directory AAA server in Access Policy Manager (APM) to specify domain controllers and credentials for APM to use for authenticating users.
On the Main tab, click Access Policy > AAA Servers > Active Directory. The Active Directory Servers list screen opens.
Click Create. The New Server properties screen opens.
In the Name field, type a unique name for the authentication server.
In the Domain Name field, type the name of the Windows domain.
For the Server Connection setting, select one of these options:
Select Use Pool to set up high availability for the AAA server.
Select Direct to set up the AAA server for standalone functionality.
If you selected Direct, type a name in the Domain Controller field.
If you selected Use Pool, configure the pool:
Type a name in the Domain Controller Pool Name field.
Specify the Domain Controllers in the pool by typing the IP address and host name for each, and clicking the Add button.
To monitor the health of the AAA server, you have the option of selecting a health monitor: only the gateway_icmp monitor is appropriate in this case; you can select it from the Server Pool Monitor list.
In the Admin Name field, type an is case-sensitive name for an administrator who has Active Directory administrative permissions. APM uses the information in the Admin Name and Admin Password fields for AD Query. If Active Directory is configured for anonymous queries, you do not need to provide an Admin Name. Otherwise, APM needs an account with sufficient privilege to bind to an Active Directory server, fetch user group information, and fetch Active Directory password policies to support password-related functionality. (APM must fetch password policies, for example, if you select the Prompt user to change password before expiration option in an AD Query action.) If you do not provide Admin account information in this configuration, APM uses the user account to fetch information. This works if the user account has sufficient privilege.
In the Admin Password field, type the administrator password associated with the Domain Name.
In the Verify Admin Password field, retype the administrator password associated with the Domain Name setting.
In the Group Cache Lifetime field, type the number of days. The default lifetime is 30 days.
In the Password Security Object Cache Lifetime field, type the number of days. The default lifetime is 30 days.
From the Kerberos Preauthentication Encryption Type list, select an encryption type. The default is None. If you specify an encryption type, the BIG-IP system includes Kerberos preauthentication data within the first authentication service request (AS-REQ) packet.
In the Timeout field, type a timeout interval (in seconds) for the AAA server. (This setting is optional.)
Click Finished. The new server displays on the list. This adds the new Active Directory server to the Active Directory Servers list.
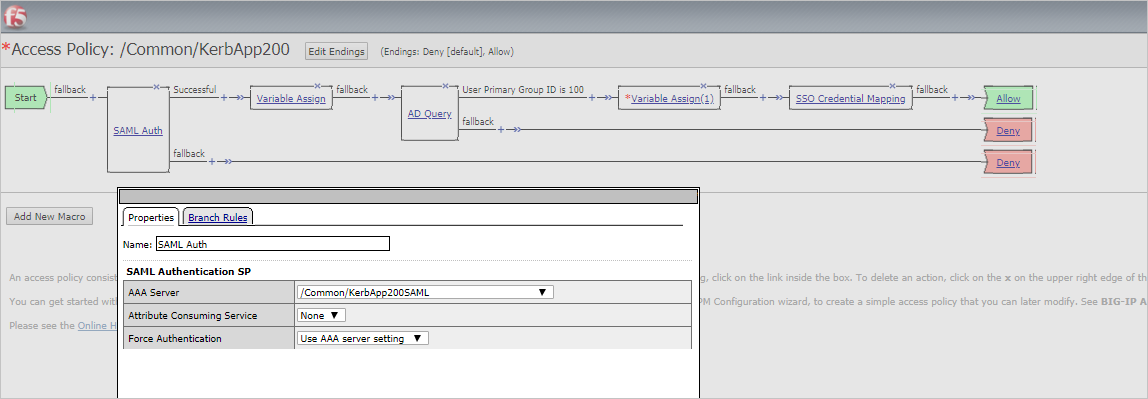
SAML Configuration
You will need to import the Metadata Certificate into the F5 which will be used later in the setup process. Navigate to System > Certificate Management > Traffic Certificate Management > SSL Certificate List. Select Import from the right-hand corner.
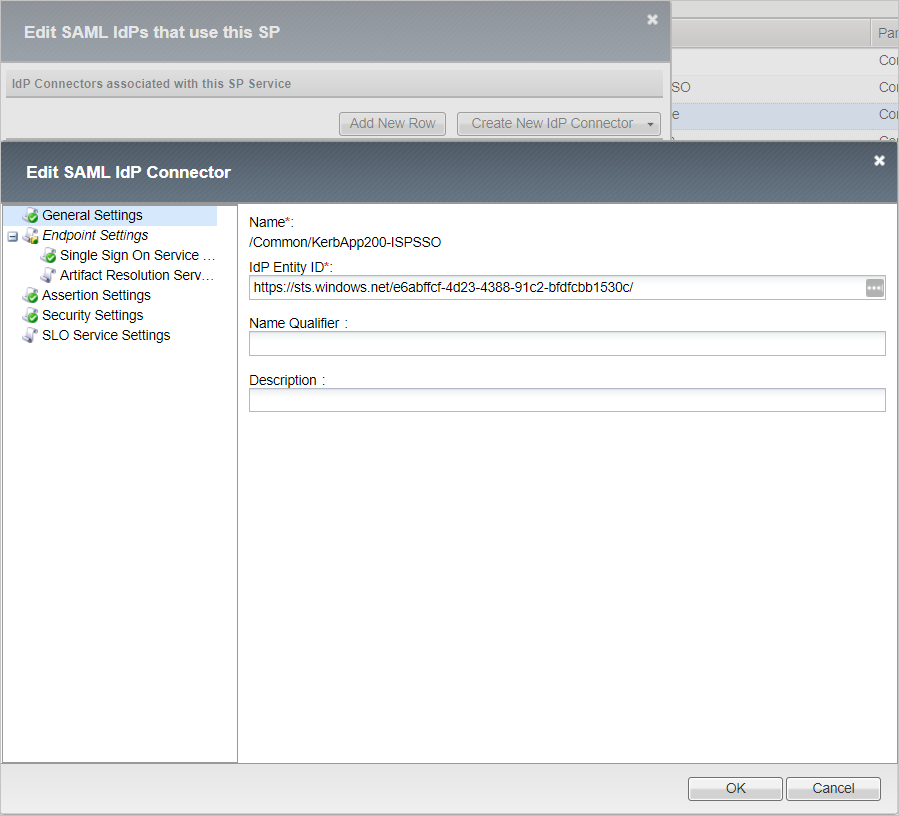
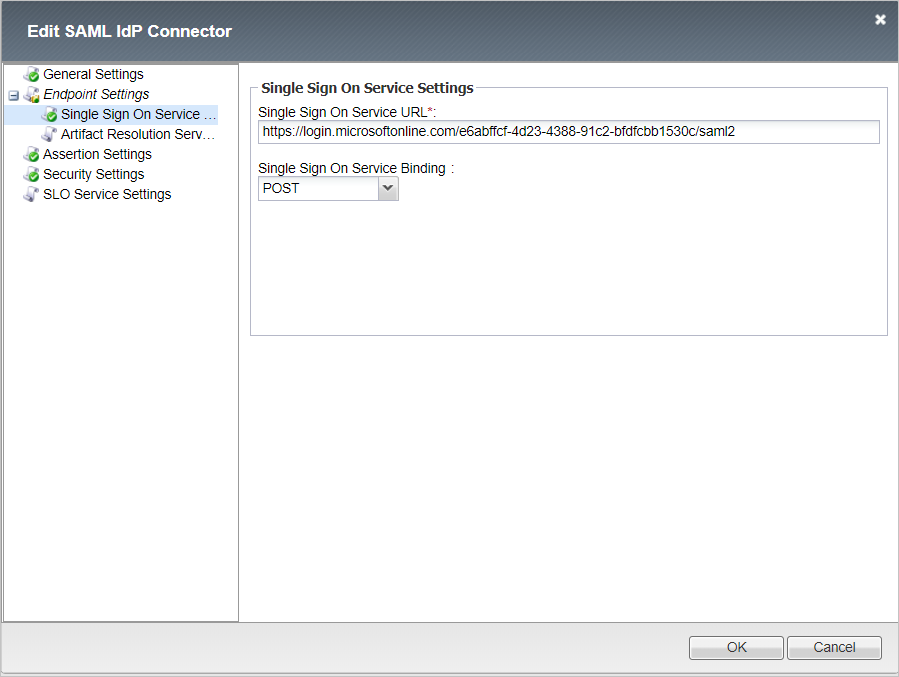
For setting up the SAML IDP, navigate to Access > Federation > SAML: Service Provider > External Idp Connectors, and click Create > From Metadata.
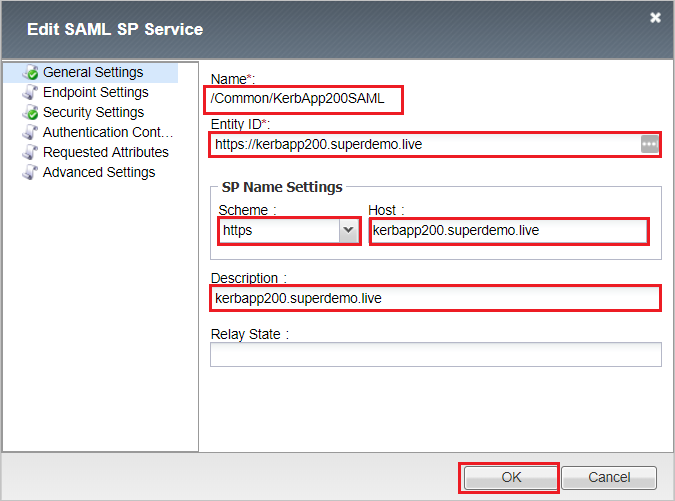
For setting up the SAML SP, navigate to Access > Federation > SAML Service Provider > Local SP Services and click Create. Complete the following information and click OK.
- Type Name: KerbApp200SAML
- Entity ID*: https://kerb-app.com.cutestat.com
- SP Name Settings
- Scheme: https
- Host: kerbapp200.superdemo.live
- Description: kerbapp200.superdemo.live
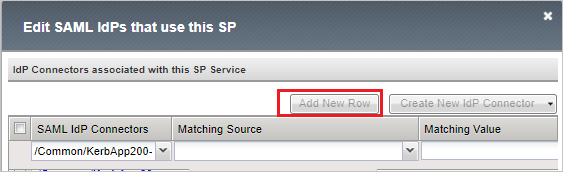
b. Select the SP Configuration, KerbApp200SAML, and Click Bind/UnBind IdP Connectors.


c. Click on Add New Row and Select the External IdP connector created in previous step, click Update, and then click OK.
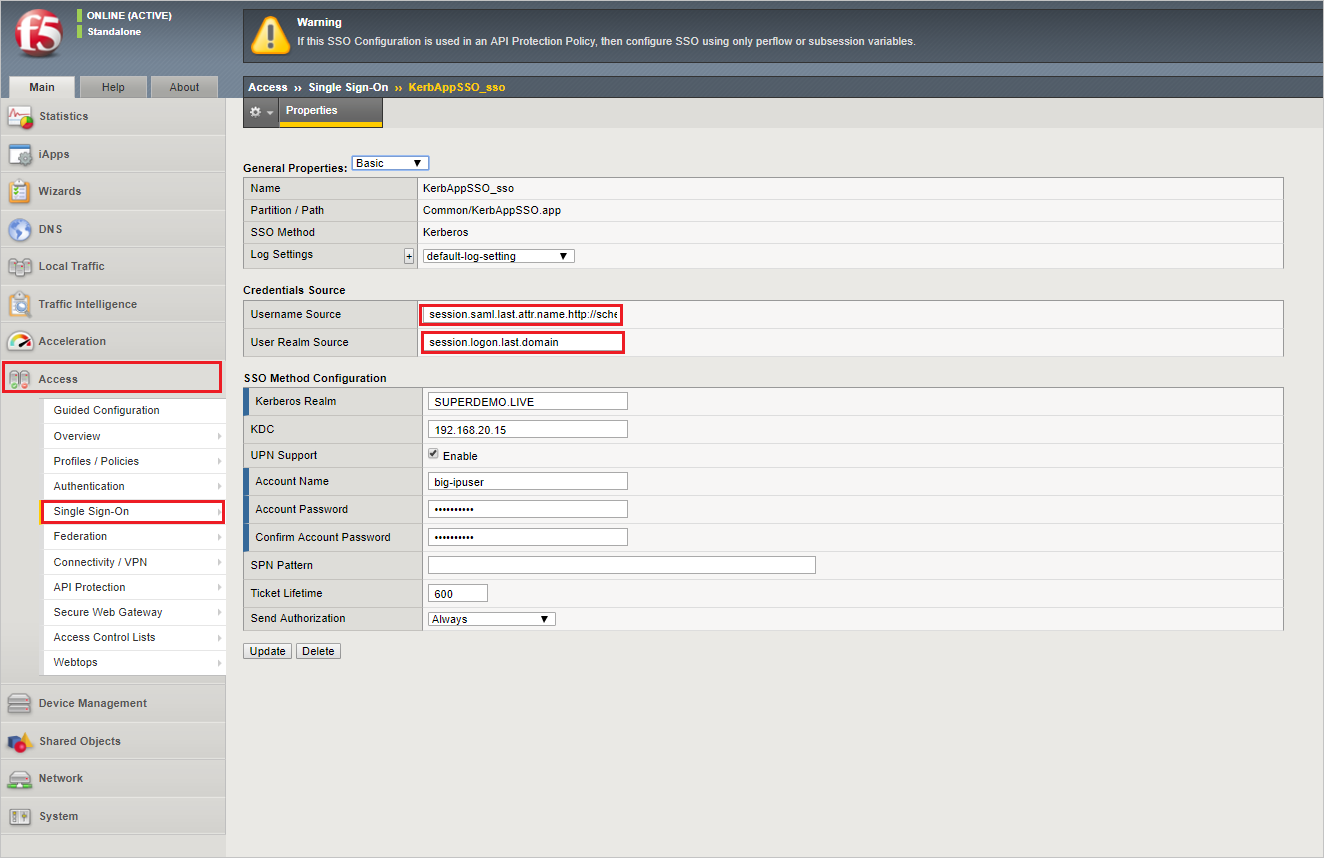
For configuring Kerberos SSO, navigate to Access > Single Sign-on > Kerberos, complete information and click Finished.
Note
You will need the Kerberos Delegation Account to be created and specified. Refer KCD Section (Refer Appendix for Variable References)
Username Source: session.saml.last.attr.name.http://schemas.xmlsoap.org/ws/2005/05/identity/claims/givenname
User Realm Source: session.logon.last.domain
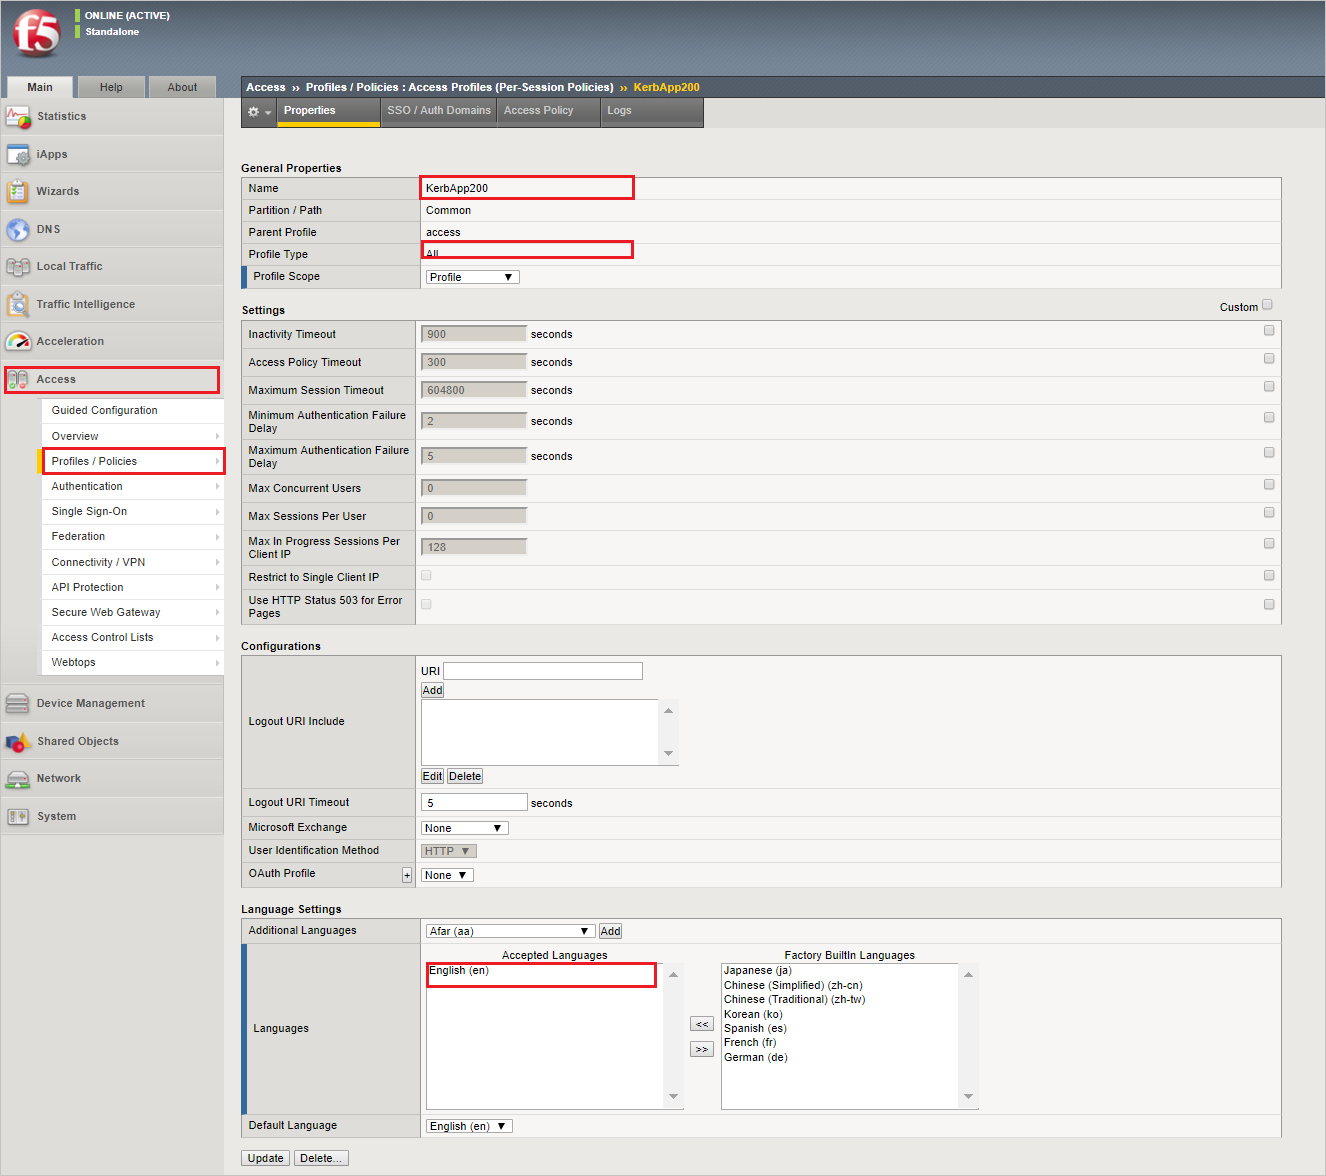
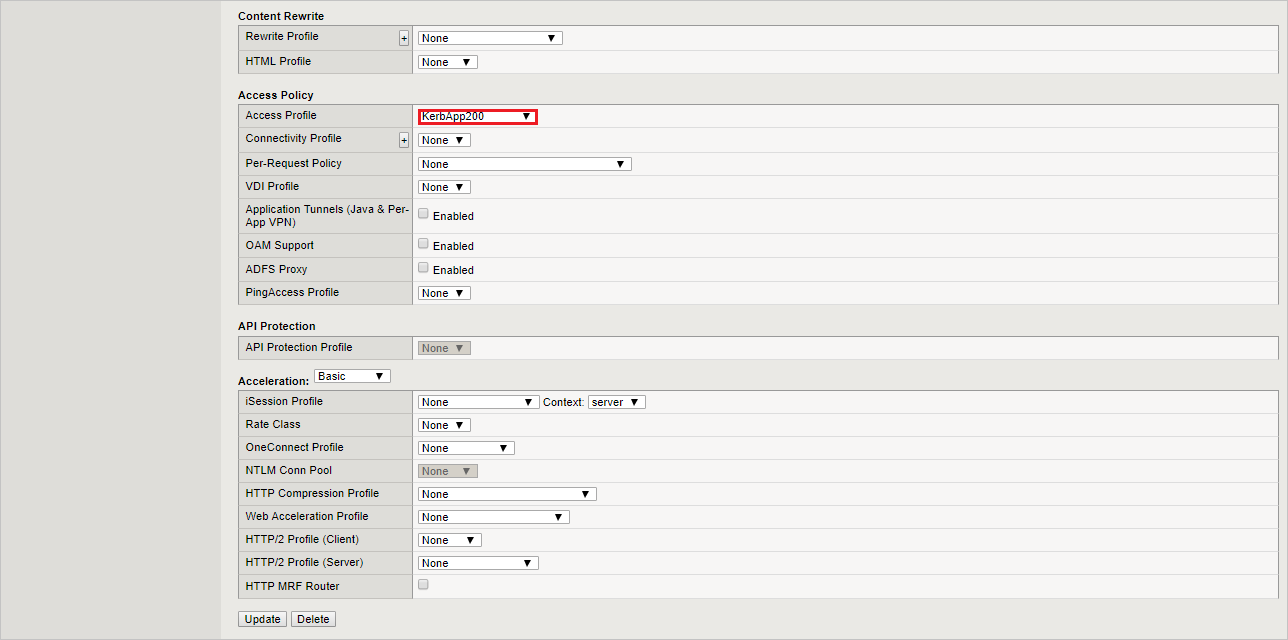
For configuring Access Profile, navigate to Access > Profile/Policies > Access Profile (per session policies), click Create, complete the following information and click Finished.
Name: KerbApp200
Profile Type: All
Profile Scope: Profile
Languages: English
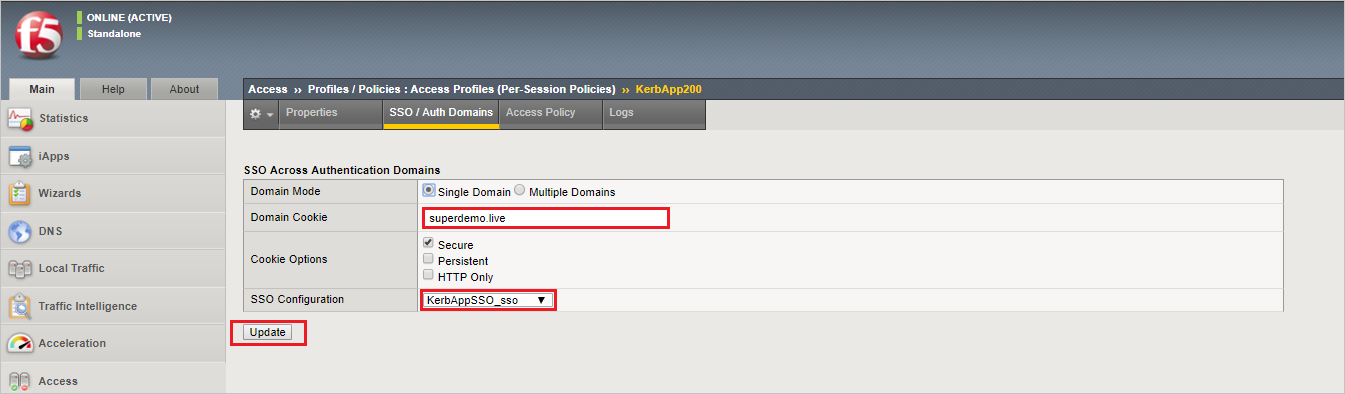
Click on the name, KerbApp200, complete the following information and click Update.
Domain Cookie: superdemo.live
SSO Configuration: KerAppSSO_sso
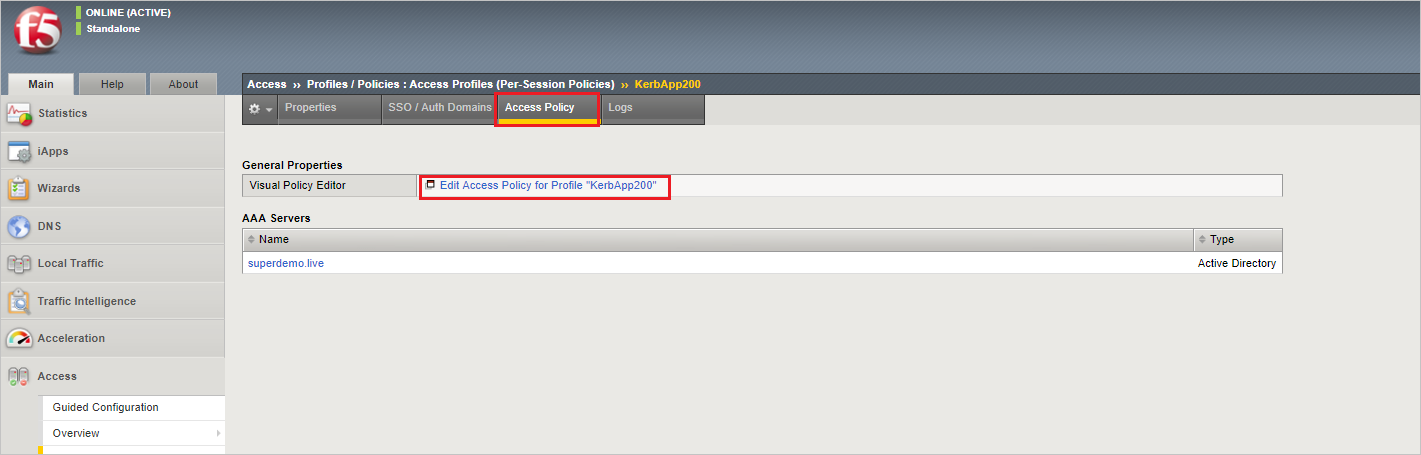
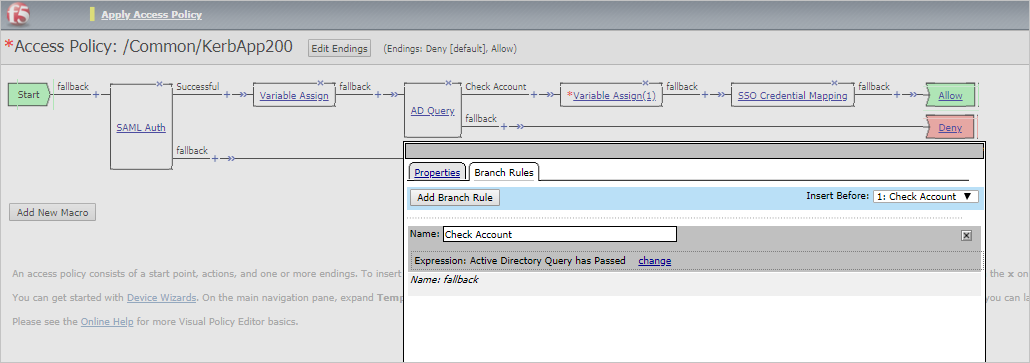
Click Access Policy and then click Edit Access Policy for Profile "KerbApp200".

session.logon.last.usernameUPN expr {[mcget {session.saml.last.identity}]}
session.ad.lastactualdomain TEXT superdemo.live
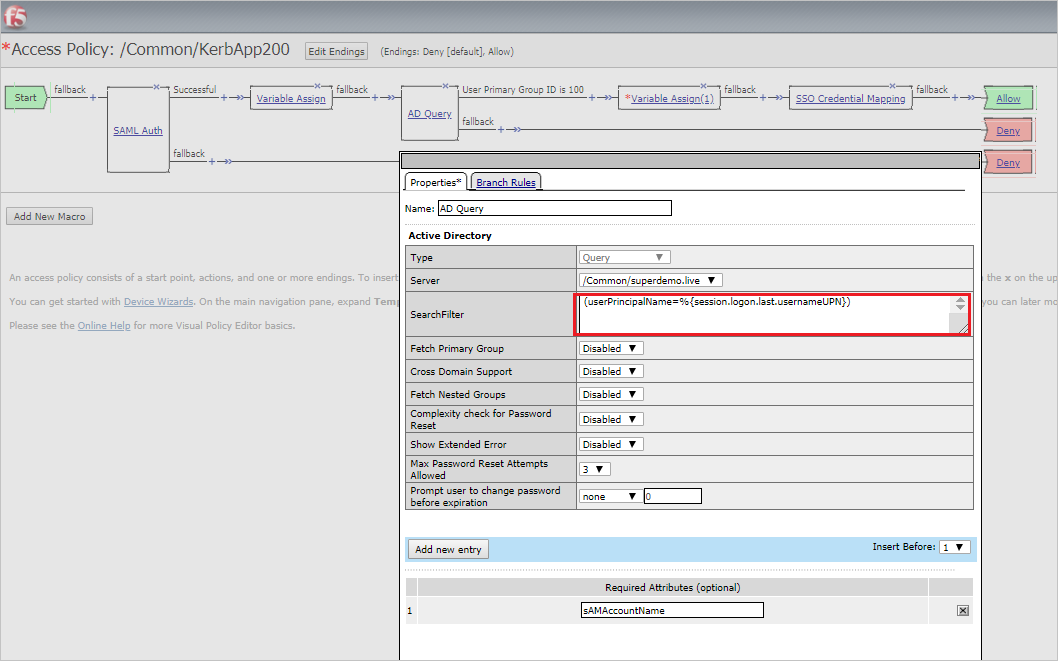
(userPrincipalName=%{session.logon.last.usernameUPN})
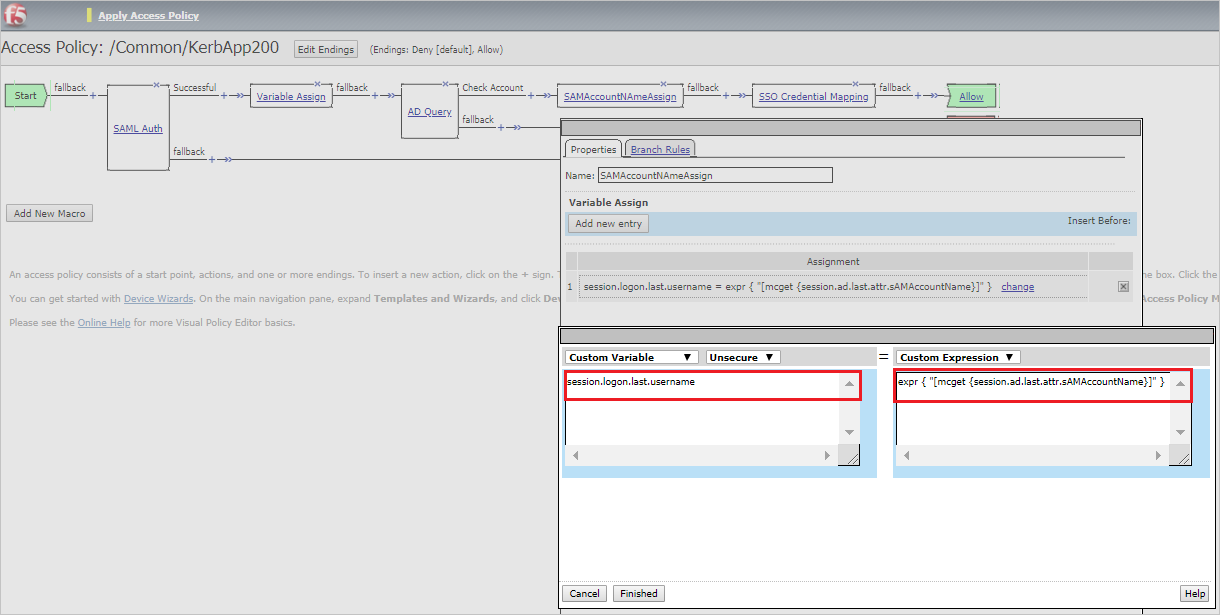
session.logon.last.username expr { "[mcget {session.ad.last.attr.sAMAccountName}]" }
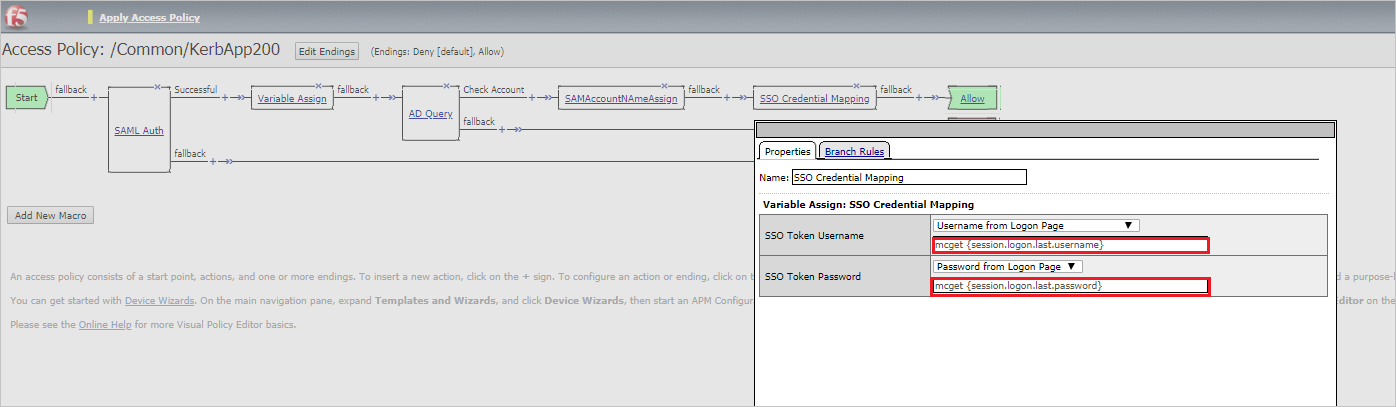
mcget {session.logon.last.username}
mcget {session.logon.last.password
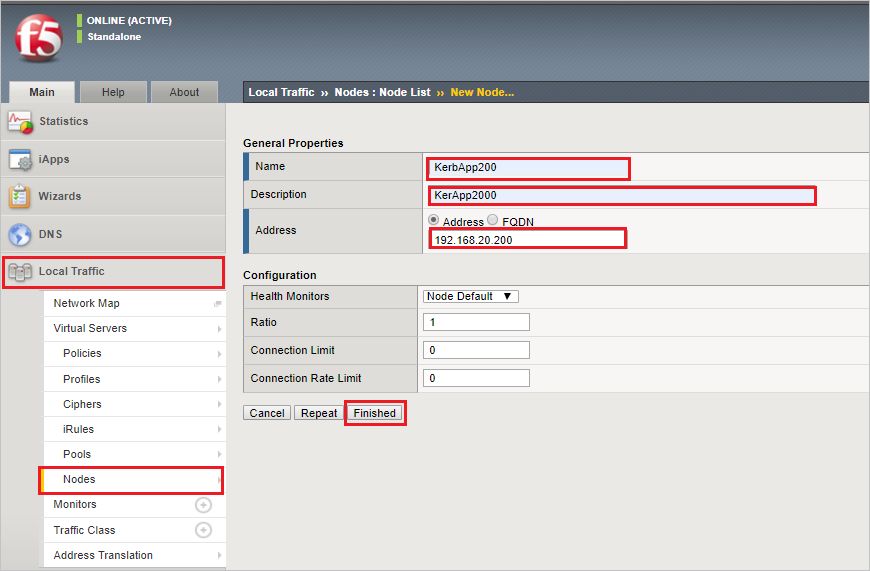
For adding New Node, navigate to Local Traffic > Nodes > Node List, click Create, complete the following information, and then click Finished.
Name: KerbApp200
Description: KerbApp200
Address: 192.168.20.200
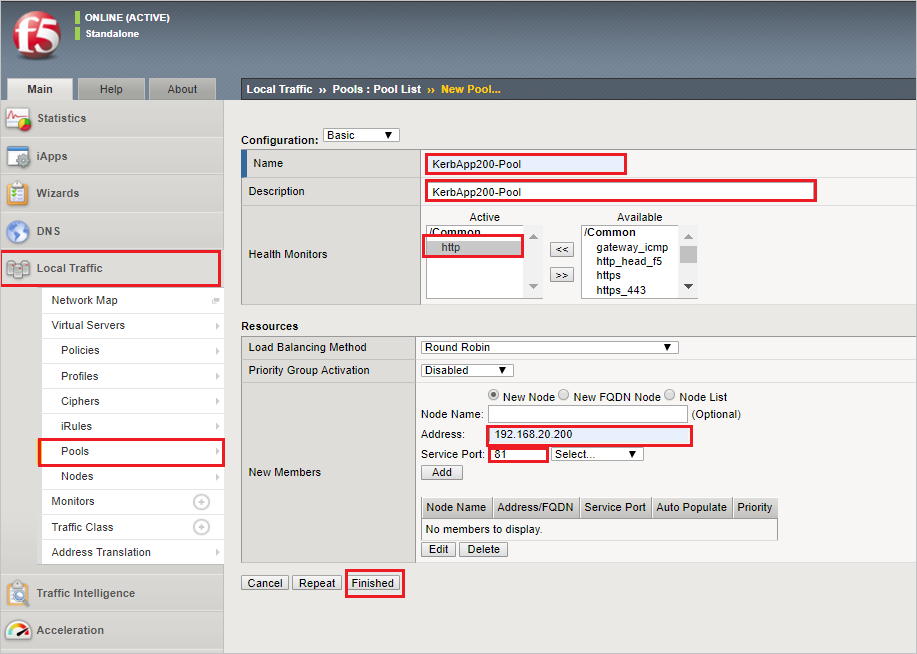
For creating a new Pool, navigate to Local Traffic > Pools > Pool List, click Create, complete the following information and click Finished.
Name: KerbApp200-Pool
Description: KerbApp200-Pool
Health Monitors: http
Address: 192.168.20.200
Service Port: 81
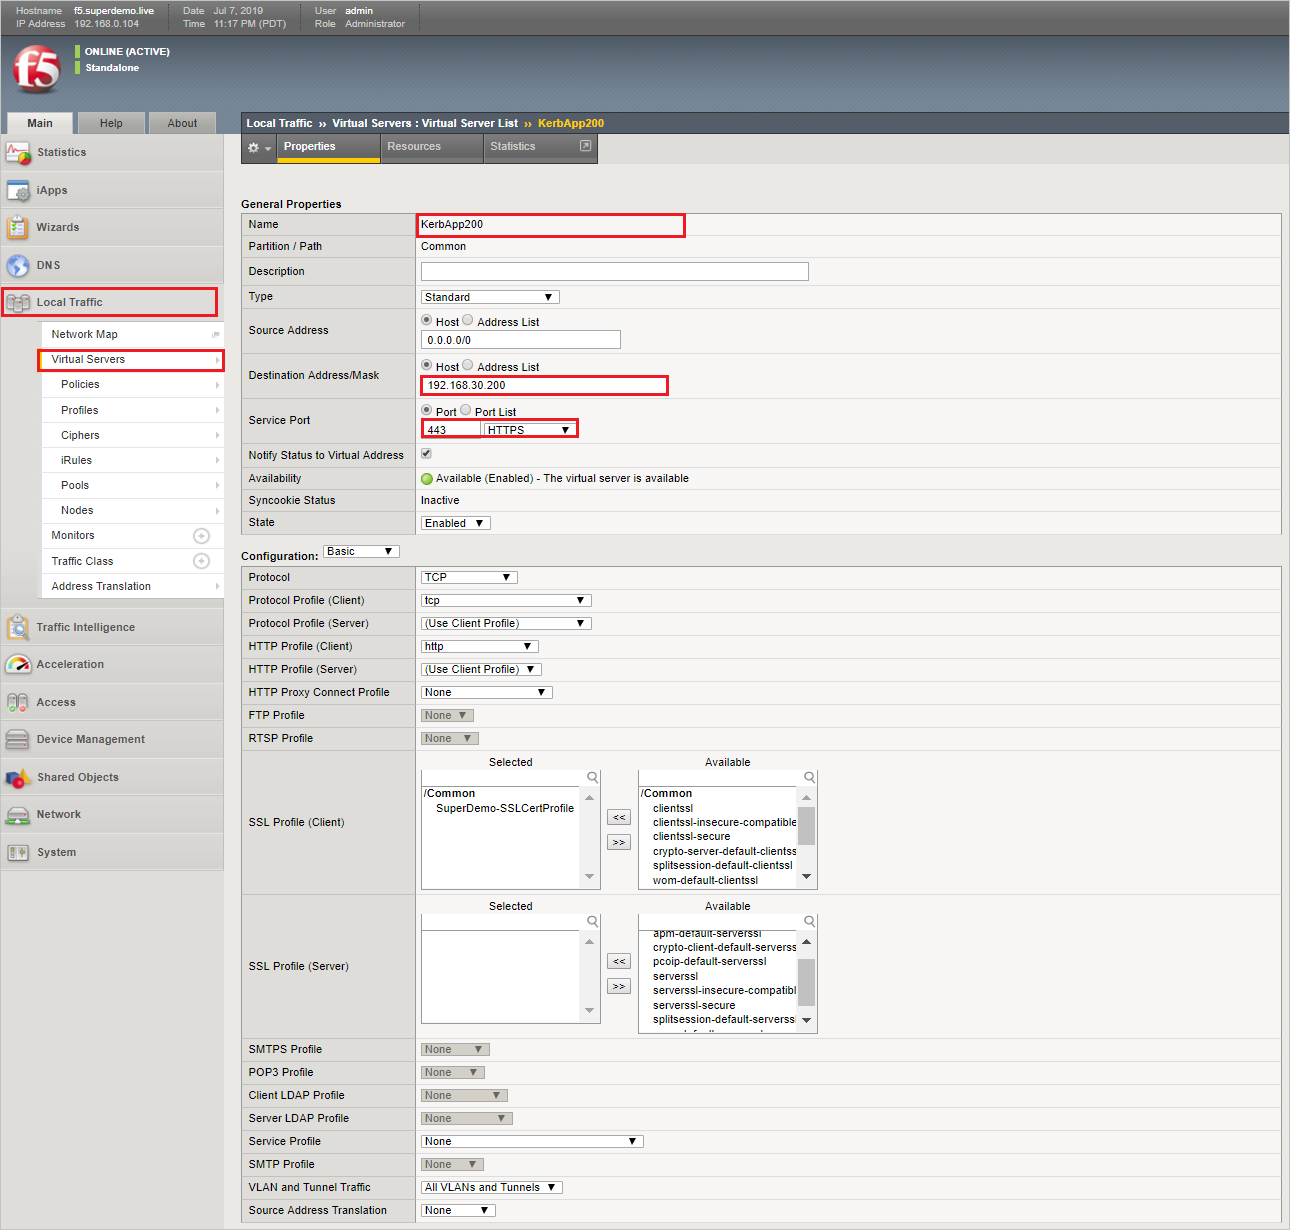
For creating Virtual Server, navigate to Local Traffic > Virtual Servers > Virtual Server List > +, complete the following information and click Finished.
Name: KerbApp200
Destination Address/Mask: Host 192.168.30.200
Service Port: Port 443 HTTPS
Access Profile: KerbApp200
Specify the Access Profile Created in Previous Step
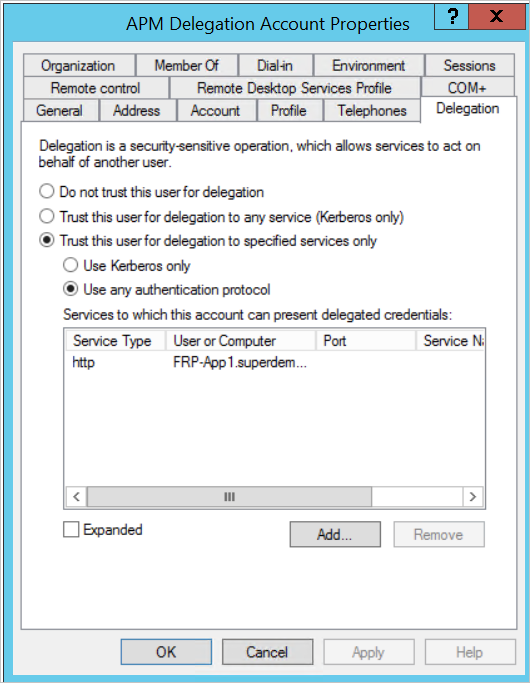
Setting up Kerberos Delegation
Note
For reference click here
Step 1: Create a Delegation Account
Example:
Domain Name: superdemo.live
Sam Account Name: big-ipuser
New-ADUser -Name "APM Delegation Account" -UserPrincipalName host/big-ipuser.superdemo.live@superdemo.live -SamAccountName "big-ipuser" -PasswordNeverExpires $true -Enabled $true -AccountPassword (Read-Host -AsSecureString "Password!1234")
Step 2: Set SPN (on the APM Delegation Account)
Example:
- setspn –A host/big-ipuser.superdemo.live big-ipuser
Step 3: SPN Delegation (for the App Service Account) Setup the appropriate Delegation for the F5 Delegation Account. In the example below, APM Delegation account is being configured for KCD for FRP-App1.superdemo. live app.
Provide the details as mentioned in the above reference document under this.
Create F5 test user
In this section, you create a user called B.Simon in F5. Work with F5 Client support team to add the users in the F5 platform. Users must be created and activated before you use single sign-on.
Test SSO
In this section, you test your Microsoft Entra single sign-on configuration using the Access Panel.
When you click the F5 tile in the Access Panel, you should be automatically signed in to the F5 for which you set up SSO. For more information about the Access Panel, see Introduction to the Access Panel.
Additional resources
List of Tutorials on How to Integrate SaaS Apps with Microsoft Entra ID
What is application access and single sign-on with Microsoft Entra ID?
Configure F5 single sign-on for Advanced Kerberos application
F5 BIG-IP APM and Microsoft Entra integration for secure hybrid access
Tutorial to deploy F5 BIG-IP Virtual Edition VM in Azure IaaS for secure hybrid access
Tutorial for Microsoft Entra single sign-on integration with F5 BIG-IP for Password-less VPN
Feedback
Coming soon: Throughout 2024 we will be phasing out GitHub Issues as the feedback mechanism for content and replacing it with a new feedback system. For more information see: https://aka.ms/ContentUserFeedback.
Submit and view feedback for