Manage an App Service Environment
Important
This article is about App Service Environment v2 which is used with Isolated App Service plans. App Service Environment v2 will be retired on 31 August 2024. There's a new version of App Service Environment that is easier to use and runs on more powerful infrastructure. To learn more about the new version, start with the Introduction to the App Service Environment. If you're currently using App Service Environment v2, please follow the steps in this article to migrate to the new version.
As of 29 January 2024, you can no longer create new App Service Environment v2 resources using any of the available methods including ARM/Bicep templates, Azure Portal, Azure CLI, or REST API. You must migrate to App Service Environment v3 before 31 August 2024 to prevent resource deletion and data loss.
An App Service Environment (ASE) is a deployment of Azure App Service into a subnet in a customer's Azure Virtual Network instance. An ASE consists of:
- Front ends: Where HTTP or HTTPS terminates in an App Service Environment
- Workers: The resources that host your apps
- Database: Holds information that defines the environment
- Storage: Used to host the customer-published apps
You can deploy an ASE with an external or internal virtual IP (VIP) for app access. A deployment with an external VIP is commonly called an External ASE. A deployment with an internal VIP is called an ILB ASE because it uses an internal load balancer (ILB). To learn more about the ILB ASE, see Create and use an ILB ASE.
Create an app in an ASE
To create an app in an ASE, you use the same process as when you normally create an app, but with a few small differences. When you create a new App Service plan:
- Instead of choosing a geographic location in which to deploy your app, you choose an ASE as your location.
- All App Service plans created in an ASE can only be in an Isolated pricing tier.
If you don't have an ASE, you can create one by following the instructions in Create an App Service Environment.
To create an app in an ASE:
Select Create a resource > Web + Mobile > Web App.
Enter a name for the app. If you already selected an App Service plan in an ASE, the domain name for the app reflects the domain name of the ASE:

Select a subscription.
Enter a name for a new resource group, or select Use existing and select one from the drop-down list.
Select your OS.
Select an existing App Service plan in your ASE, or create a new one by following these steps:
a. From the Azure portal left-side menu, select Create a resource > Web App.
b. Select the subscription.
c. Select or create the resource group.
d. Enter the name of your web app.
e. Select Code or DockerContainer.
f. Select a runtime stack.
g. Select Linux or Windows.
h. Select your ASE in the Region drop-down list.
i. Select or create a new App Service plan. If creating a new App Service plan, select the appropriate Isolated SKU size.
Note
Linux apps and Windows apps cannot be in the same App Service plan, but they can be in the same App Service Environment.
Select Review + create, make sure the information is correct, and then select Create.
How scale works
Every App Service app runs in an App Service plan. App Service Environments hold App Service plans, and App Service plans hold apps. When you scale an app, you also scale the App Service plan and all the apps in that same plan.
When you scale an App Service plan, the needed infrastructure is added automatically. There's a time delay to scale operations while the infrastructure is being added. If you do several scale operations in sequence, the first infrastructure scale request is acted on and the others are queued. When the first scale operation finishes, the other infrastructure requests all operate together. And when the infrastructure is added, the App Service plans are assigned as appropriate. Creating a new App Service plan is itself a scale operation because it requests additional hardware. A scale operation usually takes 30-60 minutes to complete. Upgrades are also operations that block scaling while in progress.
In the multitenant App Service, scaling is immediate because a pool of resources is readily available to support it. In an ASE, there's no such buffer, and resources are allocated based on need.
In an ASE, you can scale an App Service plan up to 100 instances. An ASE can have up to 201 total instances across all the App Service plans in that ASE.
IP addresses
App Service can allocate a dedicated IP address to an app. This capability is available after you configure a IP-based TLS/SSL binding, as described in Bind an existing custom TLS/SSL certificate to Azure App Service. In an ILB ASE, you can't add more IP addresses to be used for the IP-based TLS/SSL binding.
With an External ASE, you can configure a IP-based TLS/SSL binding for your app in the same way as in the multitenant App Service. There's always one spare address in the ASE, up to 30 IP addresses. Each time you use one, another is added so that an address is always readily available. A time delay is required to allocate another IP address. That delay prevents adding IP addresses in quick succession.
Front-end scaling
When you scale out your App Service plans, workers are automatically added to support them. Every ASE is created with two front ends. The front ends automatically scale out at a rate of one front end for every set of 15 App Service plan instances. For example, if you have three App Service plans with five instances each, you'd have a total of 15 instances and three front ends. If you scale to a total of 30 instances, you have four front ends. This pattern continues as you scale out.
The number of front ends that are allocated by default is good for a moderate load. You can lower the ratio to as little as one front end for every five instances. You can also change the size of the front ends. By default, they're single core. In the Azure portal, you can change their size to two or four cores instead.
There's a charge for changing the ratio or the front-end sizes. For more information, see Azure App Service pricing. If you want to improve the load capacity of your ASE, you'll get more improvement by first scaling to two-core front ends before you adjust the scale ratio. Changing the core size of your front ends will cause an upgrade of your ASE and should be done outside of regular business hours.
Front-end resources are the HTTP/HTTPS endpoint for the ASE. With the default front-end configuration, memory usage per front end is consistently around 60 percent. The primary reason to scale your front ends is CPU usage, which is primarily driven by HTTPS traffic.
App access
In an External ASE, the domain suffix used for app creation is .<asename>.p.azurewebsites.net. If your ASE is named external-ase and you host an app called contoso in that ASE, you reach it at these URLs:
- contoso.external-ase.p.azurewebsites.net
- contoso.scm.external-ase.p.azurewebsites.net
For information about how to create an External ASE, see Create an App Service Environment.
In an ILB ASE, the domain suffix used for app creation is .<asename>.appserviceenvironment.net. If your ASE is named ilb-ase and you host an app called contoso in that ASE, you reach it at these URLs:
- contoso.ilb-ase.appserviceenvironment.net
- contoso.scm.ilb-ase.appserviceenvironment.net
For information about how to create an ILB ASE, see Create and use an ILB ASE.
The SCM URL is used to access the Kudu console or for publishing your app by using Web Deploy. The Kudu console gives you a web UI for debugging, uploading files, editing files, and much more.
DNS configuration
When you use an External ASE, apps made in your ASE are registered with Azure DNS. There are no additional steps then in an External ASE for your apps to be publicly available. With an ILB ASE, you must manage your own DNS. You can do this in your own DNS server or with Azure DNS private zones.
To configure DNS in your own DNS server with your ILB ASE:
- create a zone for <ASE name>.appserviceenvironment.net
- create an A record in that zone that points * to the ILB IP address
- create an A record in that zone that points @ to the ILB IP address
- create a zone in <ASE name>.appserviceenvironment.net named scm
- create an A record in the scm zone that points * to the ILB IP address
To configure DNS in Azure DNS Private zones:
- create an Azure DNS private zone named <ASE name>.appserviceenvironment.net
- create an A record in that zone that points * to the ILB IP address
- create an A record in that zone that points @ to the ILB IP address
- create an A record in that zone that points *.scm to the ILB IP address
The DNS settings for your ASE default domain suffix do not restrict your apps to only being accessible by those names. You can set a custom domain name without any validation on your apps in an ILB ASE. If you then want to create a zone named contoso.net, you could do so and point it to the ILB IP address. The custom domain name works for app requests but doesn't for the scm site. The scm site is only available at <appname>.scm.<asename>.appserviceenvironment.net.
The zone named .<asename>.appserviceenvironment.net is globally unique. Before May 2019, customers were able to specify the domain suffix of the ILB ASE. If you wanted to use .contoso.com for the domain suffix, you were able do so and that would include the scm site. There were challenges with that model including; managing the default TLS/SSL certificate, lack of single sign-on with the scm site, and the requirement to use a wildcard certificate. The ILB ASE default certificate upgrade process was also disruptive and caused application restarts. To solve these problems, the ILB ASE behavior was changed to use a domain suffix based on the name of the ASE and with a Microsoft owned suffix. The change to the ILB ASE behavior only affects ILB ASEs made after May 2019. Pre-existing ILB ASEs must still manage the default certificate of the ASE and their DNS configuration. If your ILB ASE V2 was created after May 2019, you do not need to manage the ILB default certificate as it is managed by Microsoft.
Publishing
In an ASE, as with the multitenant App Service, you can publish by these methods:
- Web deployment
- FTP
- Continuous integration (CI)
- Drag and drop in the Kudu console
- An IDE, such as Visual Studio, Eclipse, or IntelliJ IDEA
With an External ASE, these publishing options all work the same way. For more information, see Deployment in Azure App Service.
With an ILB ASE, the publishing endpoints are only available through the ILB. The ILB is on a private IP in the ASE subnet in the virtual network. If you don't have network access to the ILB, you can't publish any apps on that ASE. As noted in Create and use an ILB ASE, you must configure DNS for the apps in the system. That requirement includes the SCM endpoint. If the endpoints aren't defined properly, you can't publish. Your IDEs must also have network access to the ILB to publish directly to it.
Without additional changes, internet-based CI systems like GitHub and Azure DevOps don't work with an ILB ASE because the publishing endpoint isn't internet accessible. You can enable publishing to an ILB ASE from Azure DevOps by installing a self-hosted release agent in the virtual network that contains the ILB ASE. Alternatively, you can also use a CI system that uses a pull model, such as Dropbox.
The publishing endpoints for apps in an ILB ASE use the domain that the ILB ASE was created with. You can see it in the app's publishing profile and in the app's portal pane (in Overview > Essentials and also in Properties).
Storage
An ASE has 1 TB of storage for all the apps in the ASE. An App Service plan in the Isolated pricing SKU has a limit of 250 GB. In an ASE, 250 GB of storage is added per App Service plan up to the 1 TB limit. You can have more App Service plans than just four, but there is no more storage added beyond the 1 TB limit.
Monitoring
As a customer, you should monitor the App Service plans and the individual apps running and take appropriate actions. For App Service Environment v2, you should also pay attention to the metrics around the platform infrastructure. These metrics will give you insights into how the platform infrastructure and frontend servers (multiRole) are doing, and you can take action if they're heavily utilized and you aren't getting maximum throughput.
Through Azure portal and CLI, you can configure the scale ratio of your frontend servers between 5 and 15 (default 15) App Service plan instances per frontend server. An App Service Environment will always have a minimum of two frontend servers. You can also increase the size of the frontend servers.
The metrics scope used to monitor the platform infrastructure is called Microsoft.Web/hostingEnvironments/multiRolePools.
You'll see a scope called Microsoft.Web/hostingEnvironments/workerPools. The metrics here are only applicable to App Service Environment v1.
Logging
You can integrate your ASE with Azure Monitor to send logs about the ASE to Azure Storage, Azure Event Hubs, or Log Analytics. These items are logged today:
| Situation | Message |
|---|---|
| ASE is unhealthy | The specified ASE is unhealthy due to an invalid virtual network configuration. The ASE will be suspended if the unhealthy state continues. Ensure the guidelines defined here are followed: Networking considerations for an App Service Environment. |
| ASE subnet is almost out of space | The specified ASE is in a subnet that is almost out of space. There are {0} remaining addresses. Once these addresses are exhausted, the ASE won't be able to scale. |
| ASE is approaching total instance limit | The specified ASE is approaching the total instance limit of the ASE. It currently contains {0} App Service Plan instances of a maximum 201 instances. |
| ASE is unable to reach a dependency | The specified ASE isn't able to reach {0}. Ensure the guidelines defined here are followed: Networking considerations for an App Service Environment. |
| ASE is suspended | The specified ASE is suspended. The ASE suspension may be due to an account shortfall or an invalid virtual network configuration. Resolve the root cause and resume the ASE to continue serving traffic. |
| ASE upgrade has started | A platform upgrade to the specified ASE has begun. Expect delays in scaling operations. |
| ASE upgrade has completed | A platform upgrade to the specified ASE has finished. |
| Scale operations have started | An App Service plan ({0}) has begun scaling. Desired state: {1} I{2} workers. |
| Scale operations have completed | An App Service plan ({0}) has finished scaling. Current state: {1} I{2} workers. |
| Scale operations have failed | An App Service plan ({0}) has failed to scale. Current state: {1} I{2} workers. |
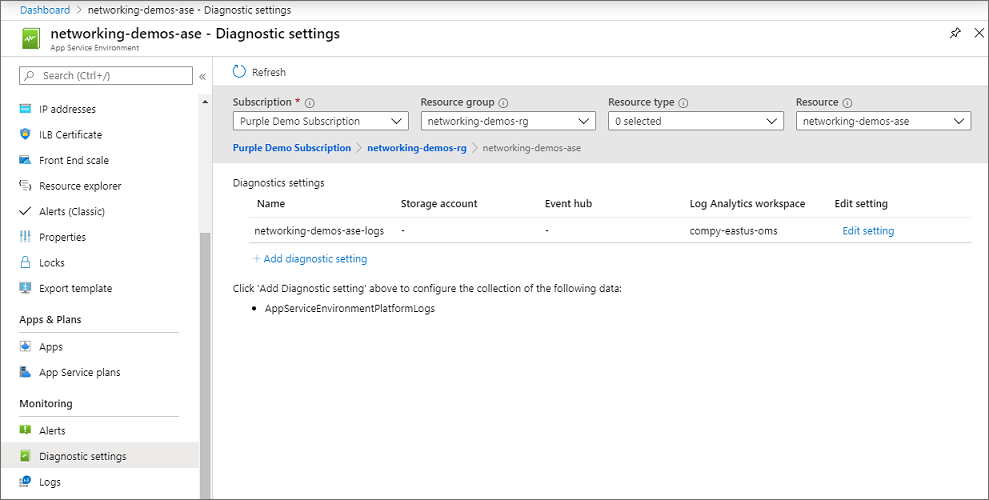
To enable logging on your ASE:
- In the portal, go to Diagnostics settings.
- Select Add diagnostic setting.
- Provide a name for the log integration.
- Select and configure the log destinations that you want.
- Select AppServiceEnvironmentPlatformLogs.
If you integrate with Log Analytics, you can see the logs by selecting Logs from the ASE portal and creating a query against AppServiceEnvironmentPlatformLogs. Logs are only emitted when your ASE has an event that will trigger it. If your ASE doesn't have such an event, there won't be any logs. To quickly see an example of logs in your Log Analytics workspace, perform a scale operation with one of the App Service plans in your ASE. You can then run a query against AppServiceEnvironmentPlatformLogs to see those logs.
Creating an alert
To create an alert against your logs, follow the instructions in Create, view, and manage log alerts using Azure Monitor. In brief:
- Open the Alerts page in your ASE portal
- Select New alert rule
- Select your Resource to be your Log Analytics workspace
- Set your condition with a custom log search to use a query like, "AppServiceEnvironmentPlatformLogs | where ResultDescription contains "has begun scaling" or whatever you want. Set the threshold as appropriate.
- Add or create an action group as desired. The action group is where you define the response to the alert such as sending an email or an SMS message
- Name your alert and save it.
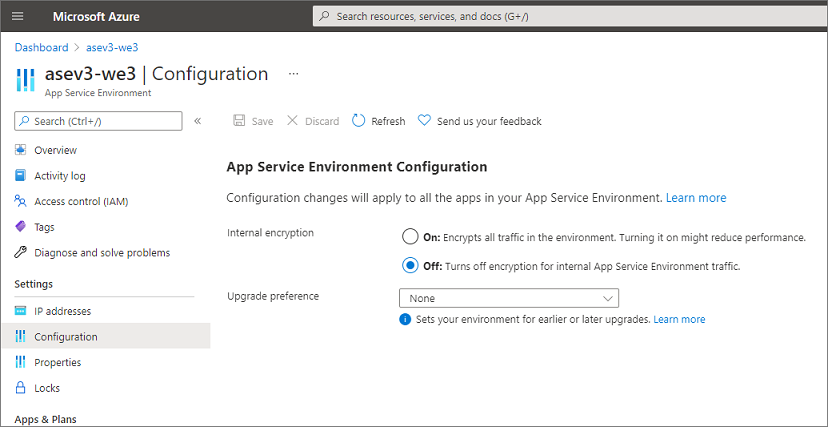
Upgrade preference
If you have multiple ASEs, you might want some ASEs to be upgraded before others. This behavior can be enabled through your ASE portal. Under Configuration you have the option to set Upgrade preference. The three possible values are:
- None: Azure will upgrade your ASE in no particular batch. This value is the default.
- Early: Your ASE will be upgraded in the first half of the App Service upgrades.
- Late: Your ASE will be upgraded in the second half of the App Service upgrades.
Select the value desired and select Save. The default for any ASE is None.
The upgradePreferences feature makes the most sense when you have multiple ASEs because your "Early" ASEs will be upgraded before your "Late" ASEs. When you have multiple ASEs, you should set your development and test ASEs to be "Early" and your production ASEs to be "Late".
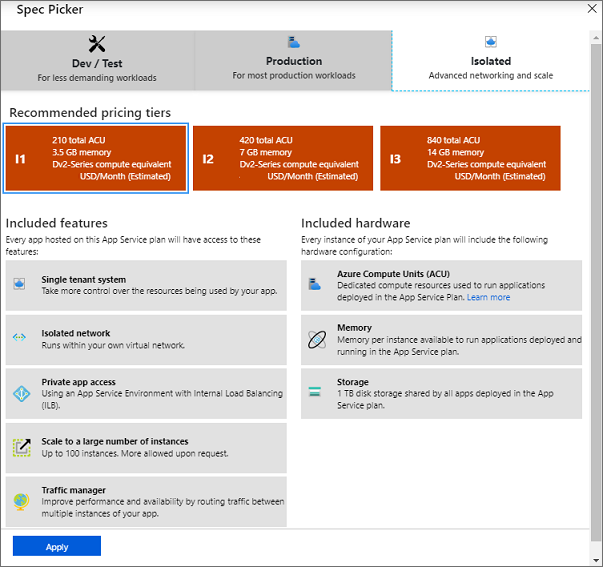
Pricing
The pricing SKU called Isolated is for use only with ASEs. All App Service plans that are hosted in the ASE are in the Isolated pricing SKU. Isolated rates for App Service plans can vary by region.
In addition to the price of your App Service plans, there's a flat rate for the ASE itself. The flat rate doesn't change with the size of your ASE. It pays for the ASE infrastructure at a default scale rate of one additional front end for every 15 App Service plan instances.
If the default scale rate of one front end for every 15 App Service plan instances isn't fast enough, you can adjust the ratio at which front ends are added or the size of the front ends. When you adjust the ratio or size, you pay for the front-end cores that wouldn't be added by default.
For example, if you adjust the scale ratio to 10, a front end is added for every 10 instances in your App Service plans. The flat fee covers a scale rate of one front end for every 15 instances. With a scale ratio of 10, you pay a fee for the third front end that's added for the 10 App Service plan instances. You don't need to pay for it when you reach 15 instances because it was added automatically.
If you adjust the size of the front ends to two cores but don't adjust the ratio, you pay for the extra cores. An ASE is created with two front ends, so even below the automatic scaling threshold you would pay for two extra cores if you increased the size to two-core front ends.
For more information, see Azure App Service pricing.
Delete an ASE
To delete an ASE:
Select Delete at the top of the App Service Environment pane.
Enter the name of your ASE to confirm that you want to delete it. When you delete an ASE, you also delete all the content within it.
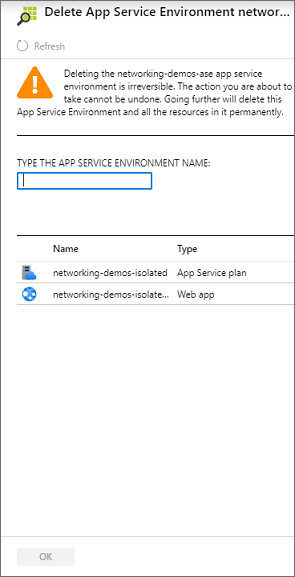
Select OK.
ASE CLI
There are command line capabilities to administer to an ASE. The Azure CLI commands are noted below.
C:\>az appservice ase --help

Group
    az appservice ase : Manage App Service Environments v2.
        This command group is in preview. It may be changed/removed in a future release.
Commands:
    create         : Create app service environment.
    delete         : Delete app service environment.
    list           : List app service environments.
    list-addresses : List VIPs associated with an app service environment.
    list-plans     : List app service plans associated with an app service environment.
    show           : Show details of an app service environment.
    update         : Update app service environment.

For more specific examples, use: az find "az appservice ase"
Feedback
Coming soon: Throughout 2024 we will be phasing out GitHub Issues as the feedback mechanism for content and replacing it with a new feedback system. For more information see: https://aka.ms/ContentUserFeedback.
Submit and view feedback for