Events
Sep 16, 11 PM - Oct 18, 11 PM
Join us on a learning journey combining AI, apps and cloud-scale data to build unique solutions.
Learn moreThis browser is no longer supported.
Upgrade to Microsoft Edge to take advantage of the latest features, security updates, and technical support.
Learn how to access Microsoft Graph from a web app running on Azure App Service.

You want to add access to Microsoft Graph from your web app and perform some action as the signed-in user. This section describes how to grant delegated permissions to the web app and get the signed-in user's profile information from Microsoft Entra ID.
In this tutorial, you learn how to:
If you don't have an Azure subscription, create an Azure free account before you begin.
Now that you've enabled authentication and authorization on your web app, the web app is registered with the Microsoft identity platform and is backed by a Microsoft Entra application. In this step, you give the web app permissions to access Microsoft Graph for the user. (Technically, you give the web app's Microsoft Entra application the permissions to access the Microsoft Graph Microsoft Entra application for the user.)
In the Microsoft Entra admin center, select Applications.
Select App registrations > Owned applications > View all applications in this directory. Select your web app name, and then select API permissions.
Select Add a permission, and then select Microsoft APIs and Microsoft Graph.
Select Delegated permissions, and then select User.Read from the list. Select Add permissions.
The web app now has the required permissions to access Microsoft Graph as the signed-in user. In this step, you configure App Service authentication and authorization to give you a usable access token for accessing Microsoft Graph. For this step, you need to add the User.Read scope for the downstream service (Microsoft Graph): https://graph.microsoft.com/User.Read.
Important
If you don't configure App Service to return a usable access token, you receive a CompactToken parsing failed with error code: 80049217 error when you call Microsoft Graph APIs in your code.
Go to Azure Resource Explorer and using the resource tree, locate your web app. The resource URL should be similar to https://resources.azure.com/subscriptions/subscriptionId/resourceGroups/SecureWebApp/providers/Microsoft.Web/sites/SecureWebApp20200915115914.
The Azure Resource Explorer is now opened with your web app selected in the resource tree.
At the top of the page, select Read/Write to enable editing of your Azure resources.
In the left browser, drill down to config > authsettingsV2.
In the authsettingsV2 view, select Edit.
Find the login section of identityProviders -> azureActiveDirectory and add the following loginParameters settings: "loginParameters":[ "response_type=code id_token","scope=openid offline_access profile https://graph.microsoft.com/User.Read" ] .
"identityProviders": {
    "azureActiveDirectory": {
      "enabled": true,
      "login": {
        "loginParameters":[
          "response_type=code id_token",
          "scope=openid offline_access profile https://graph.microsoft.com/User.Read"
        ]
      }
    }
  }
},
Save your settings by selecting PUT. This setting can take several minutes to take effect. Your web app is now configured to access Microsoft Graph with a proper access token. If you don't, Microsoft Graph returns an error saying that the format of the compact token is incorrect.
Your web app now has the required permissions and also adds Microsoft Graph's client ID to the login parameters.
Using the Microsoft.Identity.Web library, the web app gets an access token for authentication with Microsoft Graph. In version 1.2.0 and later, the Microsoft.Identity.Web library integrates with and can run alongside the App Service authentication/authorization module. Microsoft.Identity.Web detects that the web app is hosted in App Service and gets the access token from the App Service authentication/authorization module. The access token is then passed along to authenticated requests with the Microsoft Graph API.
To see this code as part of a sample application, see the:
Note
The Microsoft.Identity.Web library isn't required in your web app for basic authentication/authorization or to authenticate requests with Microsoft Graph. It's possible to securely call downstream APIs with only the App Service authentication/authorization module enabled.
However, the App Service authentication/authorization is designed for more basic authentication scenarios. For more complex scenarios (handling custom claims, for example), you need the Microsoft.Identity.Web library or Microsoft Authentication Library. There's a little more setup and configuration work in the beginning, but the Microsoft.Identity.Web library can run alongside the App Service authentication/authorization module. Later, when your web app needs to handle more complex scenarios, you can disable the App Service authentication/authorization module and Microsoft.Identity.Web will already be a part of your app.
Install the Microsoft.Identity.Web and Microsoft.Identity.Web.MicrosoftGraph NuGet packages in your project by using the .NET Core command-line interface or the Package Manager Console in Visual Studio.
Open a command line, and switch to the directory that contains your project file.
Run the install commands.
dotnet add package Microsoft.Identity.Web.MicrosoftGraph

dotnet add package Microsoft.Identity.Web
Open the project/solution in Visual Studio, and open the console by using the Tools > NuGet Package Manager > Package Manager Console command.
Run the install commands.
Install-Package Microsoft.Identity.Web.GraphServiceClient

Install-Package Microsoft.Identity.Web
In the Startup.cs file, the AddMicrosoftIdentityWebApp method adds Microsoft.Identity.Web to your web app. The AddMicrosoftGraph method adds Microsoft Graph support. For info on managing incremental consent and conditional access, read this.
using Microsoft.AspNetCore.Builder;
using Microsoft.AspNetCore.Hosting;
using Microsoft.Extensions.Configuration;
using Microsoft.Extensions.DependencyInjection;
using Microsoft.Extensions.Hosting;
using Microsoft.Identity.Web;
using Microsoft.AspNetCore.Authentication.OpenIdConnect;

// Some code omitted for brevity.
public class Startup
{
    // This method gets called by the runtime. Use this method to add services to the container.
    public void ConfigureServices(IServiceCollection services)
    {
      services.AddOptions();
      string[] initialScopes = Configuration.GetValue<string>("DownstreamApi:Scopes")?.Split(' ');

      services.AddAuthentication(OpenIdConnectDefaults.AuthenticationScheme)
              .AddMicrosoftIdentityWebApp(Configuration.GetSection("AzureAd"))
              .EnableTokenAcquisitionToCallDownstreamApi(initialScopes)
                      .AddMicrosoftGraph(Configuration.GetSection("DownstreamApi"))
                      .AddInMemoryTokenCaches();

      services.AddAuthorization(options =>
      {
          // By default, all incoming requests will be authorized according to the default policy
          options.FallbackPolicy = options.DefaultPolicy;
      });
      services.AddRazorPages()
          .AddMvcOptions(options => {})
          .AddMicrosoftIdentityUI();

      services.AddControllersWithViews()
              .AddMicrosoftIdentityUI();
    }
}
AzureAd specifies the configuration for the Microsoft.Identity.Web library. In the Microsoft Entra admin center, select Applications from the portal menu and then select App registrations. Select the app registration created when you enabled the App Service authentication/authorization module. (The app registration should have the same name as your web app.) You can find the tenant ID and client ID in the app registration overview page. The domain name can be found in the Microsoft Entra overview page for your tenant.
Graph specifies the Microsoft Graph endpoint and the initial scopes needed by the app.
{
  "AzureAd": {
    "Instance": "https://login.microsoftonline.com/",
    "Domain": "[Enter the domain of your tenant, e.g. contoso.onmicrosoft.com]",
    "TenantId": "[Enter 'common', or 'organizations' or the Tenant Id (Obtained from the Microsoft Entra admin center. Select 'Endpoints' from the 'App registrations' blade and use the GUID in any of the URLs), e.g. da41245a5-11b3-996c-00a8-4d99re19f292]",
    "ClientId": "[Enter the Client Id (Application ID obtained from the Microsoft Entra admin center), e.g. ba74781c2-53c2-442a-97c2-3d60re42f403]",
    "ClientSecret": "[Copy the client secret added to the app from the Microsoft Entra admin center]",
    "ClientCertificates": [
    ],
    // the following is required to handle Continuous Access Evaluation challenges
    "ClientCapabilities": [ "cp1" ],
    "CallbackPath": "/signin-oidc"
  },
  "DownstreamApis": {
    "MicrosoftGraph": {
      // Specify BaseUrl if you want to use Microsoft graph in a national cloud.
      // See https://learn.microsoft.com/graph/deployments#microsoft-graph-and-graph-explorer-service-root-endpoints
      // "BaseUrl": "https://graph.microsoft.com/v1.0",

      // Set RequestAppToken this to "true" if you want to request an application token (to call graph on
      // behalf of the application). The scopes will then automatically
      // be ['https://graph.microsoft.com/.default'].
      // "RequestAppToken": false

      // Set Scopes to request (unless you request an app token).
      "Scopes": [ "User.Read" ]

      // See https://aka.ms/ms-id-web/downstreamApiOptions for all the properties you can set.
    }
  },
  "Logging": {
    "LogLevel": {
      "Default": "Information",
      "Microsoft": "Warning",
      "Microsoft.Hosting.Lifetime": "Information"
    }
  },
  "AllowedHosts": "*"
}
The following example shows how to call Microsoft Graph as the signed-in user and get some user information. The GraphServiceClient object is injected into the controller, and authentication has been configured for you by the Microsoft.Identity.Web library.
// Index.cshtml.cs
using System.Threading.Tasks;
using Microsoft.AspNetCore.Mvc.RazorPages;
using Microsoft.Graph;
using System.IO;
using Microsoft.Identity.Web;
using Microsoft.Extensions.Logging;

// Some code omitted for brevity.

[AuthorizeForScopes(Scopes = new[] { "User.Read" })]
public class IndexModel : PageModel
{
    private readonly ILogger<IndexModel> _logger;
    private readonly GraphServiceClient _graphServiceClient;

    public IndexModel(ILogger<IndexModel> logger, GraphServiceClient graphServiceClient)
    {
        _logger = logger;
        _graphServiceClient = graphServiceClient;
    }

    public async Task OnGetAsync()
    {
        try
        {
            var user = await _graphServiceClient.Me.GetAsync();
            ViewData["Me"] = user;
            ViewData["name"] = user.DisplayName;

            using (var photoStream = await _graphServiceClient.Me.Photo.Content.GetAsync())
            {
                byte[] photoByte = ((MemoryStream)photoStream).ToArray();
                ViewData["photo"] = Convert.ToBase64String(photoByte);
            }
        }
        catch (Exception ex)
        {
            ViewData["photo"] = null;
        }
    }
}
If you completed all the steps in this multipart tutorial, you created an App Service, App Service hosting plan, and a storage account in a resource group. You also created an app registration in Microsoft Entra ID. If you chose external configuration, you may have created a new external tenant. When no longer needed, delete these resources and app registration so that you don't continue to accrue charges.
In this tutorial, you learn how to:
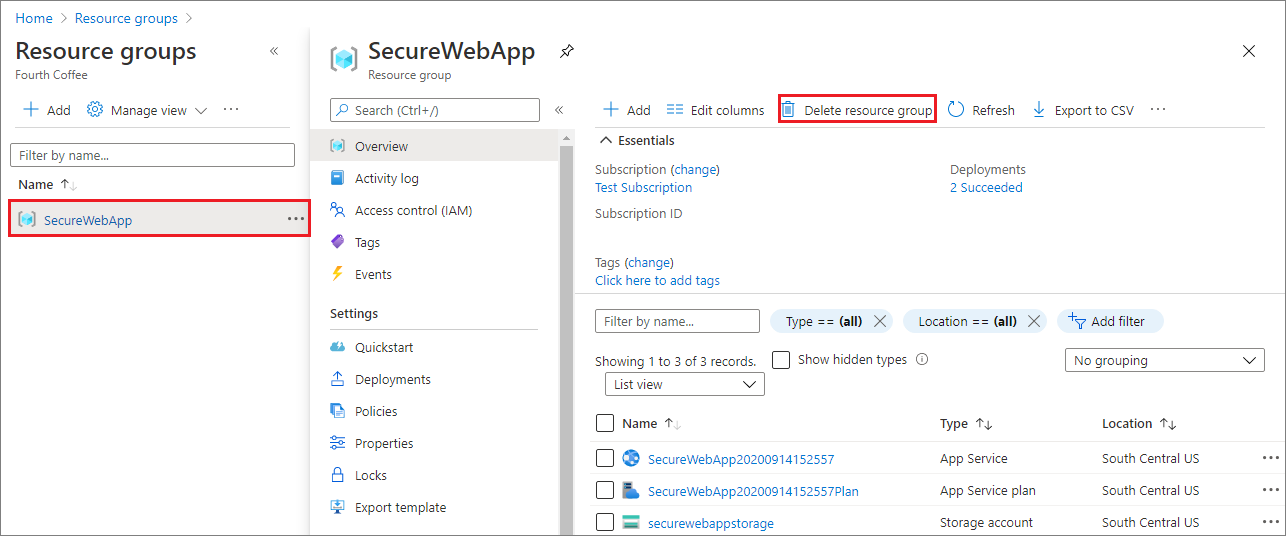
In the Azure portal, select Resource groups from the portal menu and select the resource group that contains your App Service and App Service plan.
Select Delete resource group to delete the resource group and all the resources.
This command might take several minutes to run.
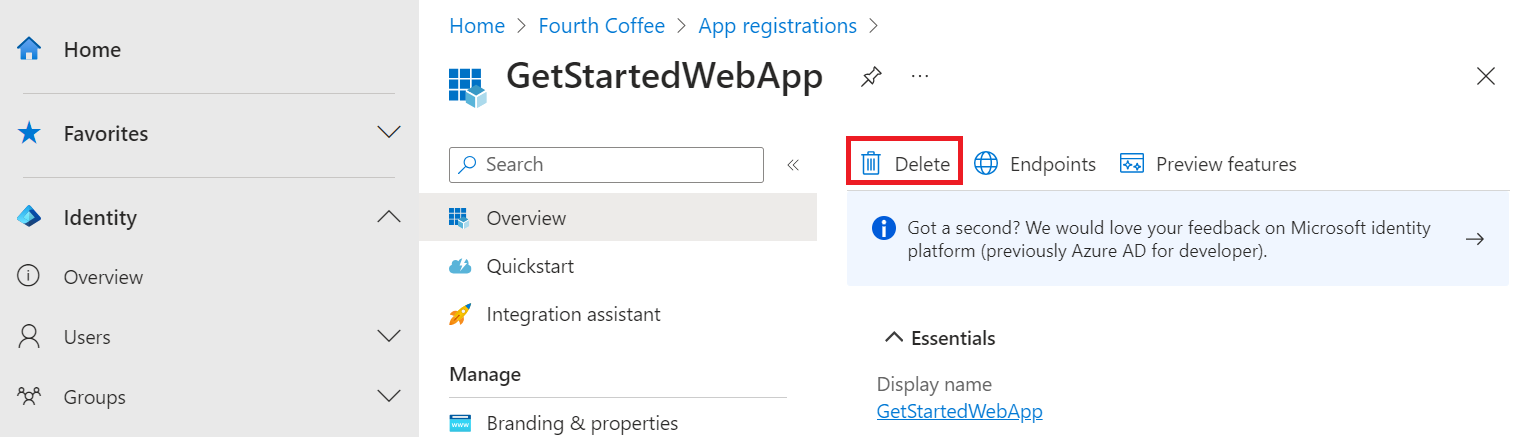
In the Microsoft Entra admin center, select Applications > App registrations. Then select the application you created.
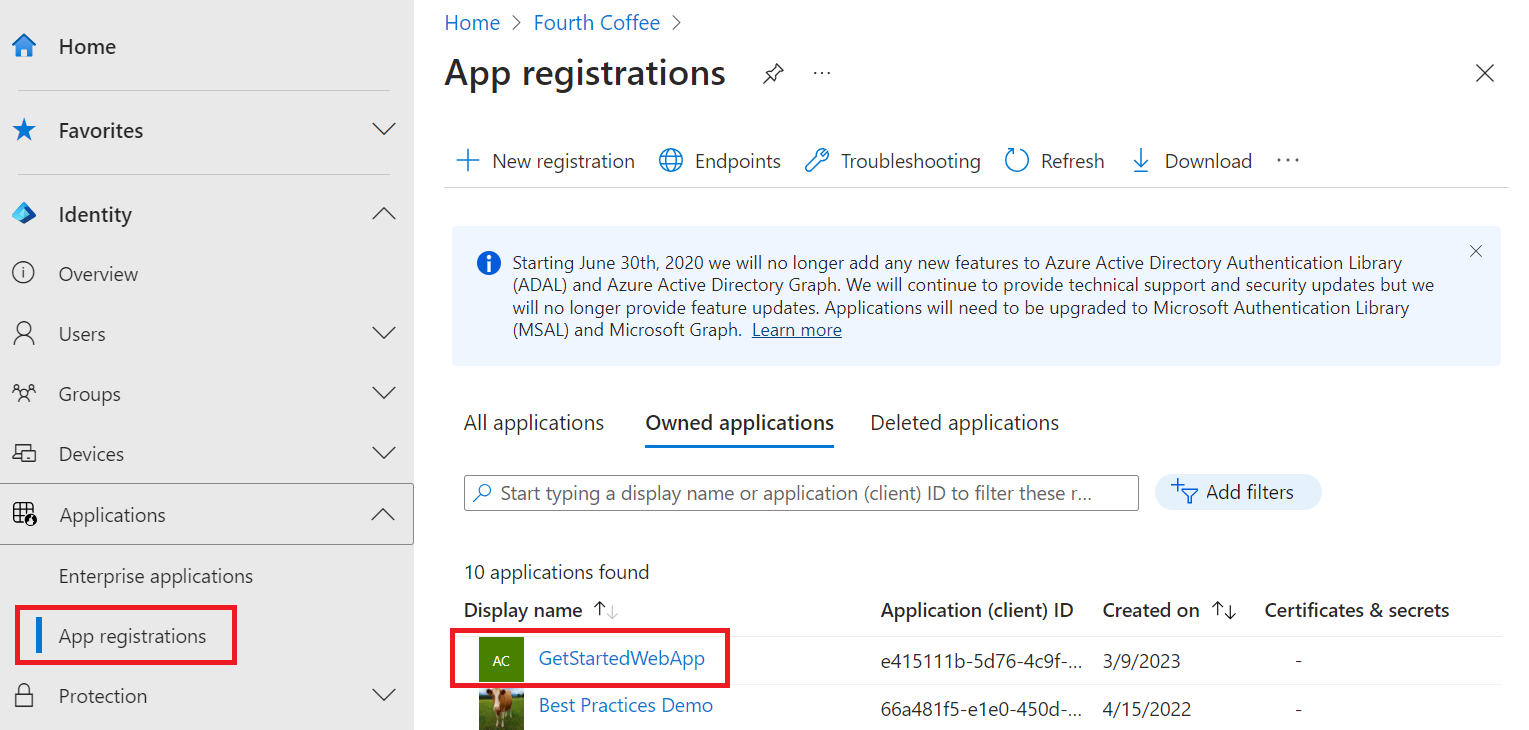
In the app registration overview, select Delete.
If you created a new external tenant, you can delete it. In to the Microsoft Entra admin center, browse to Identity > Overview > Manage tenants.
Select the tenant you want to delete, and then select Delete.
You might need to complete required actions before you can delete the tenant. For example, you might need to delete all user flows and app registrations in the tenant.
If you're ready to delete the tenant, select Delete.
In this tutorial, you learned how to:
Events
Sep 16, 11 PM - Oct 18, 11 PM
Join us on a learning journey combining AI, apps and cloud-scale data to build unique solutions.
Learn moreTraining
Module
Discover how Microsoft Entra External ID can provide secure, seamless sign-in experiences for your consumers and business customers. Explore tenant creation, app registration, flow customization, and account security.
Certification
Microsoft Certified: Identity and Access Administrator Associate - Certifications
Demonstrate the features of Microsoft Entra ID to modernize identity solutions, implement hybrid solutions, and implement identity governance.