Build and train a custom extraction model
This content applies to:![]() v4.0 (preview) | Previous versions:
v4.0 (preview) | Previous versions: ![]() v3.1 (GA)
v3.1 (GA) ![]() v3.0 (GA)
v3.0 (GA) ![]() v2.1
v2.1
Document Intelligence models require as few as five training documents to get started. If you have at least five documents, you can get started training a custom model. You can train either a custom template model (custom form) or a custom neural model (custom document). The training process is identical for both models and this document walks you through the process of training either model.
Custom model input requirements
First, make sure your training data set follows the input requirements for Document Intelligence.
For best results, provide one clear photo or high-quality scan per document.
Supported file formats:
Model PDF Image:
JPEG/JPG, PNG, BMP, TIFF, HEIFMicrosoft Office:
Word (DOCX), Excel (XLSX), PowerPoint (PPTX), and HTMLRead ✔ ✔ ✔ Layout ✔ ✔ ✔ (2024-02-29-preview, 2023-10-31-preview) General Document ✔ ✔ Prebuilt ✔ ✔ Custom extraction ✔ ✔ Custom classification ✔ ✔ ✔ (2024-02-29-preview) For PDF and TIFF, up to 2000 pages can be processed (with a free tier subscription, only the first two pages are processed).
The file size for analyzing documents is 500 MB for paid (S0) tier and 4 MB for free (F0) tier.
Image dimensions must be between 50 x 50 pixels and 10,000 px x 10,000 pixels.
If your PDFs are password-locked, you must remove the lock before submission.
The minimum height of the text to be extracted is 12 pixels for a 1024 x 768 pixel image. This dimension corresponds to about
8-point text at 150 dots per inch (DPI).For custom model training, the maximum number of pages for training data is 500 for the custom template model and 50,000 for the custom neural model.
For custom extraction model training, the total size of training data is 50 MB for template model and 1G-MB for the neural model.
For custom classification model training, the total size of training data is
1GBwith a maximum of 10,000 pages.
Training data tips
Follow these tips to further optimize your data set for training:
- Use text-based PDF documents instead of image-based documents. Scanned PDFs are handled as images.
- Use examples that have all of the fields completed for forms with input fields.
- Use forms with different values in each field.
- Use a larger data set (10-15 images) if your form images are of lower quality.
Upload your training data
Once you gather a set of forms or documents for training, you need to upload it to an Azure blob storage container. If you don't know how to create an Azure storage account with a container, following the Azure Storage quickstart for Azure portal. You can use the free pricing tier (F0) to try the service, and upgrade later to a paid tier for production.
Video: Train your custom model
- Once you gather and upload your training dataset, you're ready to train your custom model. In the following video, we create a project and explore some of the fundamentals for successfully labeling and training a model.
Create a project in the Document Intelligence Studio
The Document Intelligence Studio provides and orchestrates all the API calls required to complete your dataset and train your model.
Start by navigating to the Document Intelligence Studio. The first time you use the Studio, you need to initialize your subscription, resource group, and resource. Then, follow the prerequisites for custom projects to configure the Studio to access your training dataset.
In the Studio, select the Custom models tile, on the custom models page and select the Create a project button.
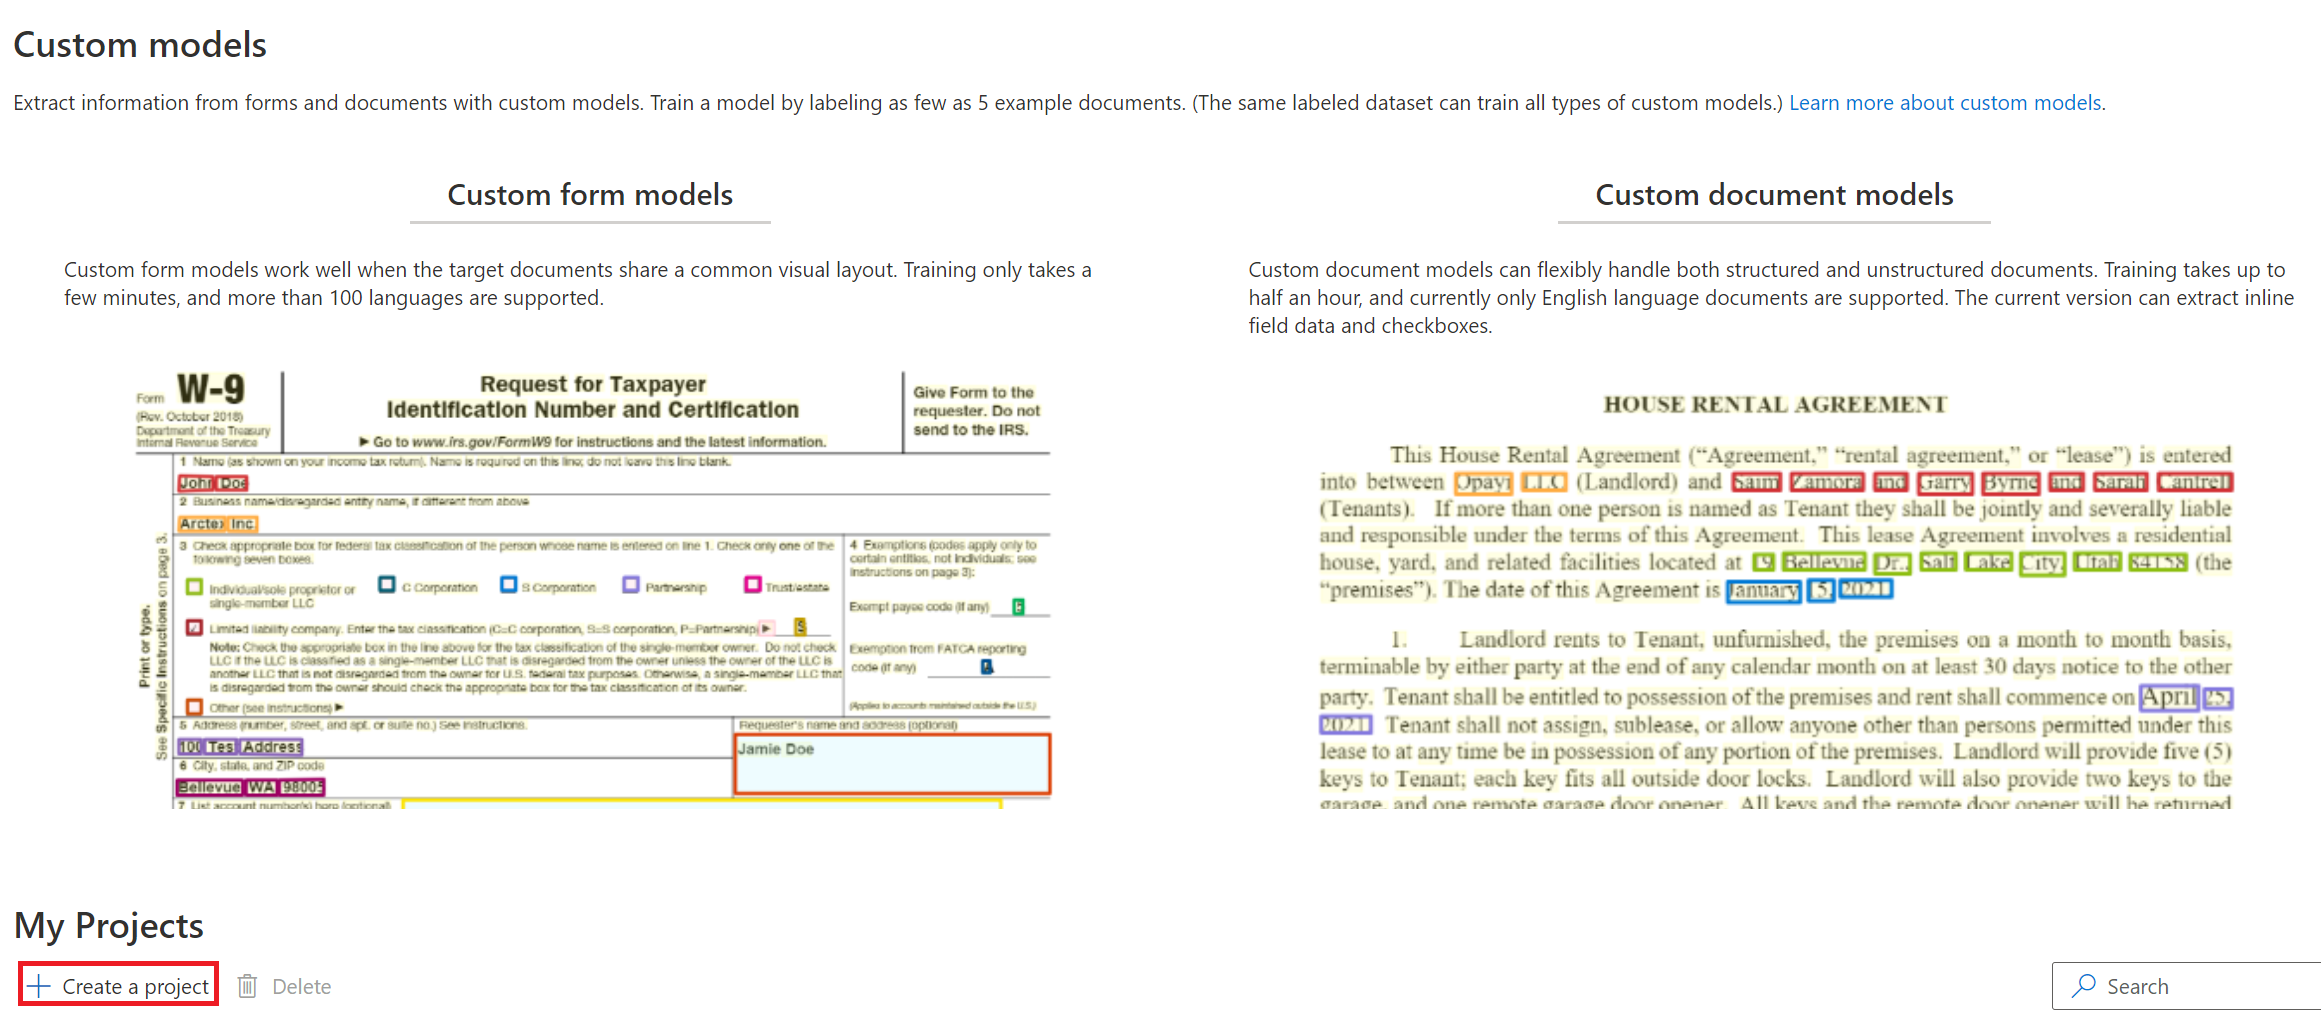
On the create project dialog, provide a name for your project, optionally a description, and select continue.
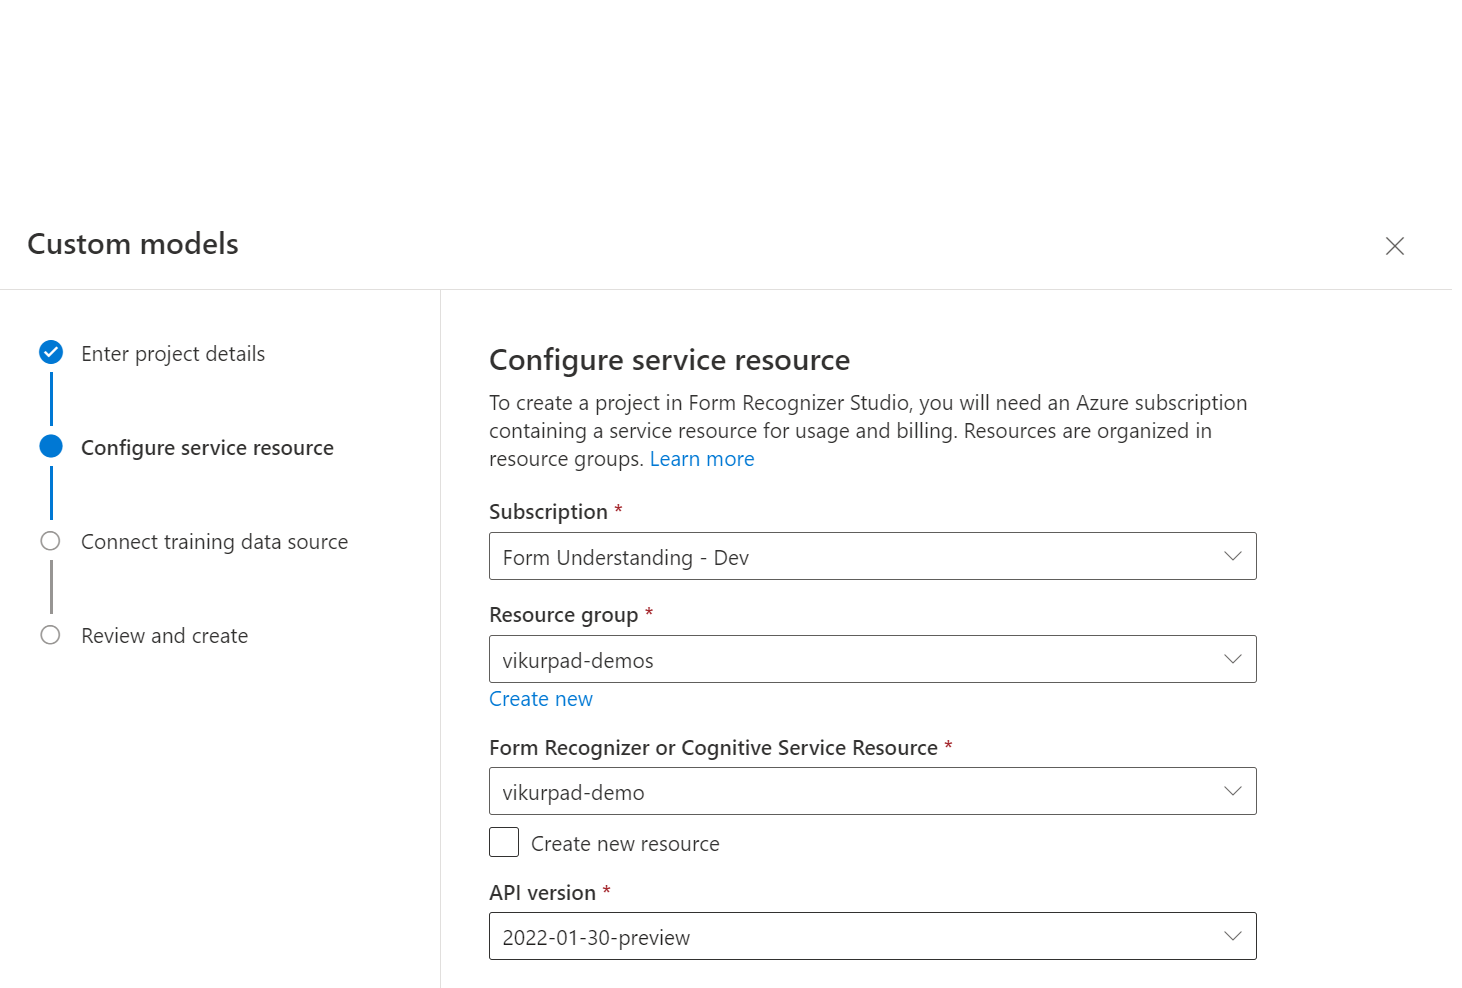
On the next step in the workflow, choose or create a Document Intelligence resource before you select continue.
Important
Custom neural models are only available in a few regions. If you plan on training a neural model, please select or create a resource in one of these supported regions.
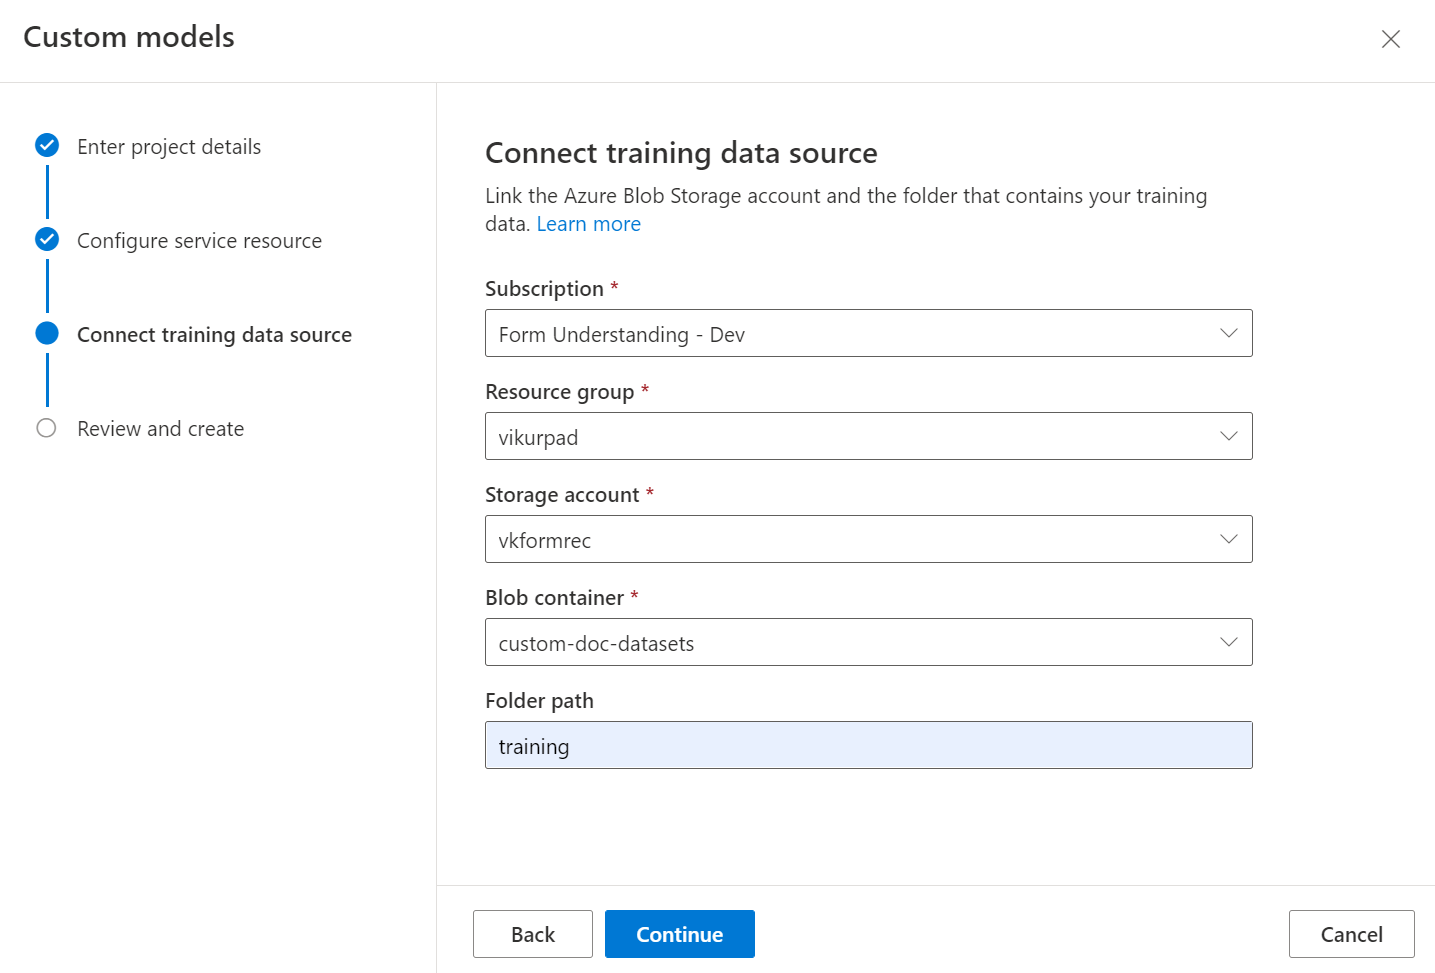
Next select the storage account you used to upload your custom model training dataset. The Folder path should be empty if your training documents are in the root of the container. If your documents are in a subfolder, enter the relative path from the container root in the Folder path field. Once your storage account is configured, select continue.
Finally, review your project settings and select Create Project to create a new project. You should now be in the labeling window and see the files in your dataset listed.
Label your data
In your project, your first task is to label your dataset with the fields you wish to extract.
The files you uploaded to storage are listed on the left of your screen, with the first file ready to be labeled.
Start labeling your dataset and creating your first field by selecting the plus (➕) button on the top-right of the screen.

Enter a name for the field.
Assign a value to the field by choosing a word or words in the document. Select the field in either the dropdown or the field list on the right navigation bar. The labeled value is below the field name in the list of fields.
Repeat the process for all the fields you wish to label for your dataset.
Label the remaining documents in your dataset by selecting each document and selecting the text to be labeled.
You now have all the documents in your dataset labeled. The .labels.json and .ocr.json files correspond to each document in your training dataset and a new fields.json file. This training dataset is submitted to train the model.
Train your model
With your dataset labeled, you're now ready to train your model. Select the train button in the upper-right corner.
On the train model dialog, provide a unique model ID and, optionally, a description. The model ID accepts a string data type.
For the build mode, select the type of model you want to train. Learn more about the model types and capabilities.
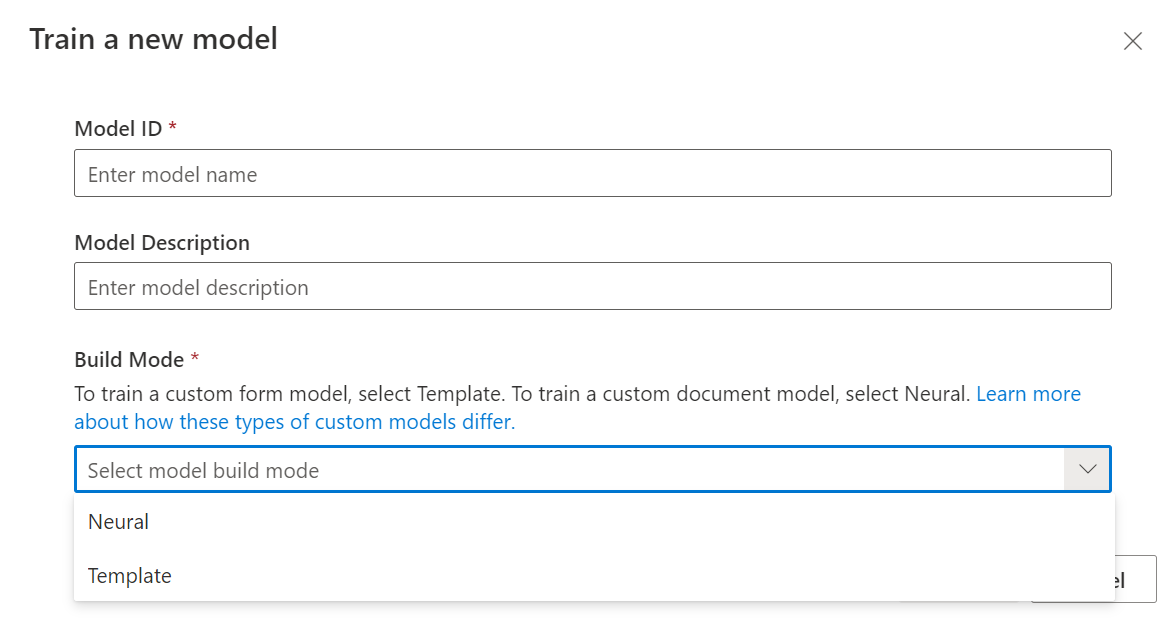
Select Train to initiate the training process.
Template models train in a few minutes. Neural models can take up to 30 minutes to train.
Navigate to the Models menu to view the status of the train operation.
Test the model
Once the model training is complete, you can test your model by selecting the model on the models list page.
Select the model and select on the Test button.
Select the
+ Addbutton to select a file to test the model.With a file selected, choose the Analyze button to test the model.
The model results are displayed in the main window and the fields extracted are listed in the right navigation bar.
Validate your model by evaluating the results for each field.
The right navigation bar also has the sample code to invoke your model and the JSON results from the API.
Congratulations you learned to train a custom model in the Document Intelligence Studio! Your model is ready for use with the REST API or the SDK to analyze documents.
Applies to: ![]() v2.1. Other versions: v3.0
v2.1. Other versions: v3.0
When you use the Document Intelligence custom model, you provide your own training data to the Train Custom Model operation, so that the model can train to your industry-specific forms. Follow this guide to learn how to collect and prepare data to train the model effectively.
You need at least five completed forms of the same type.
If you want to use manually labeled training data, you must start with at least five completed forms of the same type. You can still use unlabeled forms in addition to the required data set.
Custom model input requirements
First, make sure your training data set follows the input requirements for Document Intelligence.
For best results, provide one clear photo or high-quality scan per document.
Supported file formats:
Model PDF Image:
JPEG/JPG, PNG, BMP, TIFF, HEIFMicrosoft Office:
Word (DOCX), Excel (XLSX), PowerPoint (PPTX), and HTMLRead ✔ ✔ ✔ Layout ✔ ✔ ✔ (2024-02-29-preview, 2023-10-31-preview) General Document ✔ ✔ Prebuilt ✔ ✔ Custom extraction ✔ ✔ Custom classification ✔ ✔ ✔ (2024-02-29-preview) For PDF and TIFF, up to 2000 pages can be processed (with a free tier subscription, only the first two pages are processed).
The file size for analyzing documents is 500 MB for paid (S0) tier and 4 MB for free (F0) tier.
Image dimensions must be between 50 x 50 pixels and 10,000 px x 10,000 pixels.
If your PDFs are password-locked, you must remove the lock before submission.
The minimum height of the text to be extracted is 12 pixels for a 1024 x 768 pixel image. This dimension corresponds to about
8-point text at 150 dots per inch (DPI).For custom model training, the maximum number of pages for training data is 500 for the custom template model and 50,000 for the custom neural model.
For custom extraction model training, the total size of training data is 50 MB for template model and 1G-MB for the neural model.
For custom classification model training, the total size of training data is
1GBwith a maximum of 10,000 pages.
Training data tips
Follow these tips to further optimize your data set for training.
- Use text-based PDF documents instead of image-based documents. Scanned PDFs are handled as images.
- Use examples that have all of their fields filled in for completed forms.
- Use forms with different values in each field.
- Use a larger data set (10-15 images) for completed forms.
Upload your training data
Once you gather the set of documents for training, you need to upload it to an Azure blob storage container. If you don't know how to create an Azure storage account with a container, follow the Azure Storage quickstart for Azure portal. Use the standard performance tier.
If you want to use manually labeled data, upload the .labels.json and .ocr.json files that correspond to your training documents. You can use the Sample Labeling tool (or your own UI) to generate these files.
Organize your data in subfolders (optional)
By default, the Train Custom Model API only uses documents that are located at the root of your storage container. However, you can train with data in subfolders if you specify it in the API call. Normally, the body of the Train Custom Model call has the following format, where <SAS URL> is the Shared access signature URL of your container:
{
  "source":"<SAS URL>"
}
If you add the following content to the request body, the API trains with documents located in subfolders. The "prefix" field is optional and limits the training data set to files whose paths begin with the given string. So a value of "Test", for example, causes the API to look at only the files or folders that begin with the word Test.
{
  "source": "<SAS URL>",
  "sourceFilter": {
    "prefix": "<prefix string>",
    "includeSubFolders": true
  },
  "useLabelFile": false
}
Next steps
Now that you learned how to build a training data set, follow a quickstart to train a custom Document Intelligence model and start using it on your forms.
See also
Feedback
Coming soon: Throughout 2024 we will be phasing out GitHub Issues as the feedback mechanism for content and replacing it with a new feedback system. For more information see: https://aka.ms/ContentUserFeedback.
Submit and view feedback for