How to: Use audience features in the Fluid Framework
In this tutorial, you'll learn about using the Fluid Framework Audience with React to create a visual demonstration of users connecting to a container. The audience object holds information related to all users connected to the container. In this example, the Azure Client library will be used to create the container and audience.
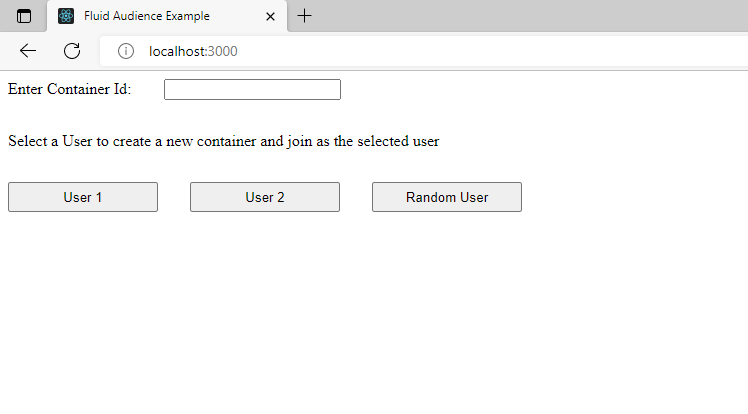
The following image shows ID buttons and a container ID input field. Leaving the container ID field blank and clicking a user ID button will create a new container and join as the selected user. Alternatively, the end-user can input a container ID and choose a user ID to join an existing container as the selected user.
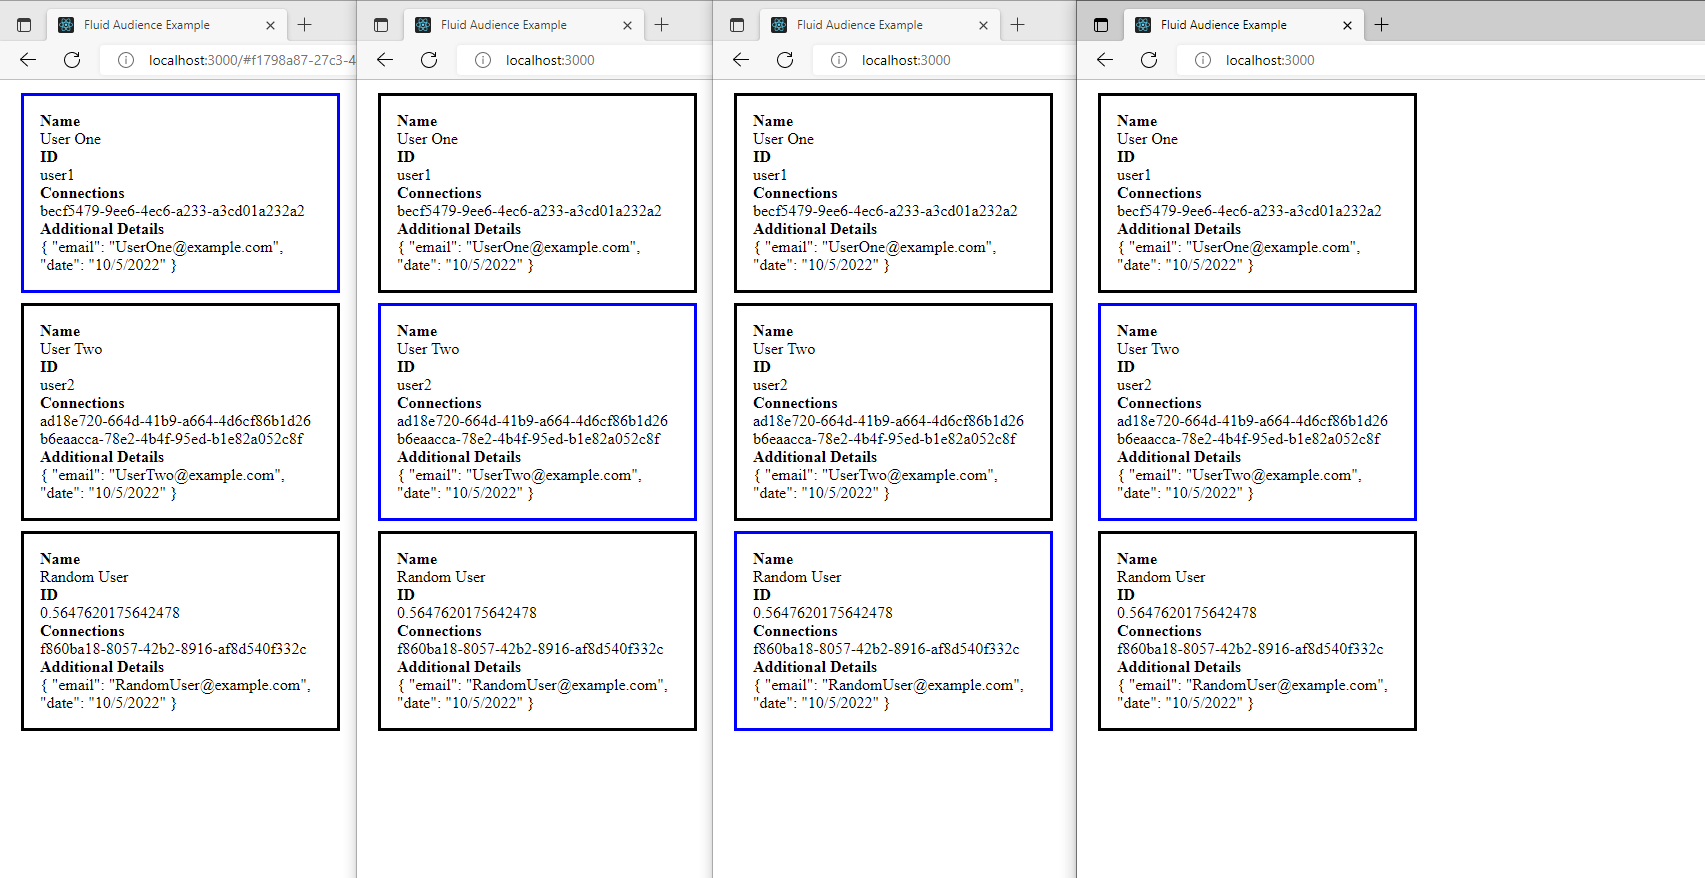
The next image shows multiple users connected to a container represented by boxes. The box outlined in blue represents the user who is viewing the client while the boxes outlined in black represents the other connected users. As new users attach to the container with unique ID's, the number of boxes will increase.
Note
This tutorial assumes that you are familiar with the Fluid Framework Overview and that you have completed the QuickStart. You should also be familiar with the basics of React, creating React projects, and React Hooks.
Create the project
Open a Command Prompt and navigate to the parent folder where you want to create the project; e.g.,
C:\My Fluid Projects.Run the following command at the prompt. (Note that the CLI is npx, not npm. It was installed when you installed Node.js.)
npx create-react-app fluid-audience-tutorialThe project is created in a subfolder named
fluid-audience-tutorial. Navigate to it with the commandcd fluid-audience-tutorial.The project uses the following Fluid libraries:
Library Description fluid-frameworkContains the SharedMap distributed data structure that synchronizes data across clients. @fluidframework/azure-clientDefines the connection to a Fluid service server and defines the starting schema for the Fluid container. @fluidframework/test-client-utilsDefines the InsecureTokenProvider needed to create the connection to a Fluid Service. Run the following command to install the libraries.
npm install @fluidframework/azure-client @fluidframework/test-client-utils fluid-framework
Code the project
Set up state variables and component view
Open the file
\src\App.jsin the code editor. Delete all the defaultimportstatements. Then delete all the markup from thereturnstatement. Then add import statements for components and React hooks. Note that we'll be implementing the imported AudienceDisplay and UserIdSelection components in the later steps. The file should look like the following:import { useState, useCallback } from "react"; import { AudienceDisplay } from "./AudienceDisplay"; import { UserIdSelection } from "./UserIdSelection"; export const App = () => { // TODO 1: Define state variables to handle view changes and user input return ( // TODO 2: Return view components ); }Replace
TODO 1with the following code. This code initializes local state variables that will be used within the application. ThedisplayAudiencevalue determines if we render the AudienceDisplay component or the UserIdSelection component (seeTODO 2). TheuserIdvalue is the user identifier to connect to the container with and thecontainerIdvalue is the container to load. ThehandleSelectUserandhandleContainerNotFoundfunctions are passed in as callbacks to the two views and manage state transitions.handleSelectUseris called when attempting to create/load a container.handleContainerNotFoundis called when creating/loading a container fails.Note, the values userId and containerId will come from a UserIdSelection component through the
handleSelectUserfunction.const [displayAudience, setDisplayAudience] = useState(false); const [userId, setUserId] = useState(); const [containerId, setContainerId] = useState(); const handleSelectUser = useCallback((userId, containerId) => { setDisplayAudience(true) setUserId(userId); setContainerId(containerId); }, [displayAudience, userId, containerId]); const handleContainerNotFound = useCallback(() => { setDisplayAudience(false) }, [setDisplayAudience]);Replace
TODO 2with the following code. As stated above, thedisplayAudiencevariable will determine if we render the AudienceDisplay component or the UserIdSelection component. Also, functions to update the state variables are passed into components as properties.(displayAudience) ? <AudienceDisplay userId={userId} containerId={containerId} onContainerNotFound={handleContainerNotFound}/> : <UserIdSelection onSelectUser={handleSelectUser}/>
Set up AudienceDisplay component
Create and open a file
\src\AudienceDisplay.jsin the code editor. Add the followingimportstatements:import { useEffect, useState } from "react"; import { SharedMap } from "fluid-framework"; import { AzureClient } from "@fluidframework/azure-client"; import { InsecureTokenProvider } from "@fluidframework/test-client-utils";Note that the objects imported from the Fluid Framework library are required for defining users and containers. In the following steps, AzureClient and InsecureTokenProvider will be used to configure the client service (see
TODO 1) while the SharedMap will be used to configure acontainerSchemaneeded to create a container (seeTODO 2).Add the following functional components and helper functions:
    const tryGetAudienceObject = async (userId, userName, containerId) => {
    // TODO 1: Create container and return audience object
    }

    export const AudienceDisplay = (props) => {
    //TODO 2: Configure user ID, user name, and state variables
    //TODO 3: Set state variables and set event listener on component mount
    //TODO 4: Return list view
    }

    const AudienceList = (data) => {
    //TODO 5: Append view elements to list array for each member
    //TODO 6: Return list of member elements
    }
Note that the AudienceDisplay and AudienceList are functional components which handle getting and rendering audience data while the
tryGetAudienceObjectmethod handles the creation of container and audience services.
Getting container and audience
You can use a helper function to get the Fluid data, from the Audience object, into the view layer (the React state). The tryGetAudienceObject method is called when the view component loads after a user ID is selected. The returned value is assigned to a React state property.
Replace
TODO 1with the following code. Note that the values foruserIduserNamecontainerIdwill be passed in from the App component. If there's nocontainerId, a new container is created. Also, note that thecontainerIdis stored on the URL hash. A user entering a session from a new browser may copy the URL from an existing session browser or navigate tolocalhost:3000and manually input the container ID. With this implementation, we want to wrap thegetContainercall in a try catch in the case that the user inputs a container ID which doesn't exist. Visit the Containers documentation for more information.const userConfig = { id: userId, name: userName, additionalDetails: { email: userName.replace(/\s/g, "") + "@example.com", date: new Date().toLocaleDateString("en-US"), }, }; const serviceConfig = { connection: { type: "local", tokenProvider: new InsecureTokenProvider("", userConfig), endpoint: "http://localhost:7070", }, }; const client = new AzureClient(serviceConfig); const containerSchema = { initialObjects: { myMap: SharedMap }, }; let container; let services; if (!containerId) { ({ container, services } = await client.createContainer(containerSchema)); const id = await container.attach(); location.hash = id; } else { try { ({ container, services } = await client.getContainer(containerId, containerSchema)); } catch (e) { return; } } return services.audience;
Getting the audience on component mount
Now that we've defined how to get the Fluid audience, we need to tell React to call tryGetAudienceObject when the Audience Display component is mounted.
Replace
TODO 2with the following code. Note that the user ID will come from the parent component as eitheruser1user2orrandom. If the ID israndomwe useMath.random()to generate a random number as the ID. Additionally, a name will be mapped to the user based on their ID as specified inuserNameList. Lastly, we define the state variables which will store the connected members as well as the current user.fluidMemberswill store a list of all members connected to the container whereascurrentMemberwill contain the member object representing the current user viewing the browser context.const userId = props.userId == "random" ? Math.random() : props.userId; const userNameList = { "user1" : "User One", "user2" : "User Two", "random" : "Random User" }; const userName = userNameList[props.userId]; const [fluidMembers, setFluidMembers] = useState(); const [currentMember, setCurrentMember] = useState();Replace
TODO 3with the following code. This will call thetryGetAudienceObjectwhen the component is mounted and set the returned audience members tofluidMembersandcurrentMember. Note, we check if an audience object is returned in case a user inputs a containerId which doesn't exist and we need to return them to the UserIdSelection view (props.onContainerNotFound()will handle switching the view). Also, it is good practice to deregister event handlers when the React component dismounts by returningaudience.off.useEffect(() => { tryGetAudienceObject(userId, userName, props.containerId).then(audience => { if(!audience) { props.onContainerNotFound(); alert("error: container id not found."); return; } const updateMembers = () => { setFluidMembers(audience.getMembers()); setCurrentMember(audience.getMyself()); } updateMembers(); audience.on("membersChanged", updateMembers); return () => { audience.off("membersChanged", updateMembers) }; }); }, []);Replace
TODO 4with the following code. Note, if thefluidMembersorcurrentMemberhas not been initialized, a blank screen is rendered. The AudienceList component will render the member data with styling (to be implemented in the next section).if (!fluidMembers || !currentMember) return (<div/>); return ( <AudienceList fluidMembers={fluidMembers} currentMember={currentMember}/> )Note
Connection transitions can result in short timing windows where
getMyselfreturnsundefined. This is because the current client connection will not have been added to the audience yet, so a matching connection ID cannot be found. To prevent React from rendering a page with no audience members, we add a listener to callupdateMembersonmembersChanged. This works since the service audience emits amembersChangedevent when the container is connected.
Create the view
Replace
TODO 5with the following code. Note we are rendering a list component for each member passed from the AudienceDisplay component. For each member, we first comparemember.userIdtocurrentMember.userIdto check if that memberisSelf. This way, we can differentiate the client user from the other users and display the component with a different color. We then push the list component to alistarray. Each component will display member data such asuserIduserNameandadditionalDetails.const currentMember = data.currentMember; const fluidMembers = data.fluidMembers; const list = []; fluidMembers.forEach((member, key) => { const isSelf = (member.userId === currentMember.userId); const outlineColor = isSelf ? 'blue' : 'black'; list.push( <div style={{ padding: '1rem', margin: '1rem', display: 'flex', outline: 'solid', flexDirection: 'column', maxWidth: '25%', outlineColor }} key={key}> <div style={{fontWeight: 'bold'}}>Name</div> <div> {member.userName} </div> <div style={{fontWeight: 'bold'}}>ID</div> <div> {member.userId} </div> <div style={{fontWeight: 'bold'}}>Connections</div> { member.connections.map((data, key) => { return (<div key={key}>{data.id}</div>); }) } <div style={{fontWeight: 'bold'}}>Additional Details</div> { JSON.stringify(member.additionalDetails, null, '\t') } </div> ); });Replace
TODO 6with the following code. This will render all each of the member elements we pushed into thelistarray.return ( <div> {list} </div> );
Setup UserIdSelection component
Create and open a file
\src\UserIdSelection.jsin the code editor. This component will include user ID buttons and container ID input fields which allow end-users to choose their user ID and collaborative session. Add the followingimportstatements and functional components:import { useState } from 'react'; export const UserIdSelection = (props) => { // TODO 1: Define styles and handle user inputs return ( // TODO 2: Return view components ); }Replace
TODO 1with the following code. Note that theonSelectUserfunction will update the state variables in the parent App component and prompt a view change. ThehandleSubmitmethod is triggered by button elements which will be implemented inTODO 2. Also, thehandleChangemethod is used to update thecontainerIdstate variable. This method will be called from an input element event listener implemented inTODO 2. Also, note that we update thecontainerIdbe getting the value from an HTML element with the idcontainerIdInput(defined inTODO 2).const selectionStyle = { marginTop: '2rem', marginRight: '2rem', width: '150px', height: '30px', }; const [containerId, setContainerId] = (location.hash.substring(1)); const handleSubmit = (userId) => { props.onSelectUser(userId, containerId); } const handleChange = () => { setContainerId(document.getElementById("containerIdInput").value); };Replace
TODO 2with the following code. This will render the user ID buttons as well as the container ID input field.<div style={{display: 'flex', flexDirection:'column'}}> <div style={{marginBottom: '2rem'}}> Enter Container Id: <input type="text" id="containerIdInput" value={containerId} onChange={() => handleChange()} style={{marginLeft: '2rem'}}></input> </div> { (containerId) ? (<div style={{}}>Select a User to join container ID: {containerId} as the user</div>) : (<div style={{}}>Select a User to create a new container and join as the selected user</div>) } <nav> <button type="submit" style={selectionStyle} onClick={() => handleSubmit("user1")}>User 1</button> <button type="submit" style={selectionStyle} onClick={() => handleSubmit("user2")}>User 2</button> <button type="submit" style={selectionStyle} onClick={() => handleSubmit("random")}>Random User</button> </nav> </div>
Start the Fluid server and run the application
Note
To match the rest of this how-to, this section uses npx and npm commands to start a Fluid server. However, the code in this article can also run against an Azure Fluid Relay server. For more information, see How to: Provision an Azure Fluid Relay service and How to: Connect to an Azure Fluid Relay service
In the Command Prompt, run the following command to start the Fluid service.
npx @fluidframework/azure-local-service@latest
Open a new Command Prompt and navigate to the root of the project; for example, C:/My Fluid Projects/fluid-audience-tutorial. Start the application server with the following command. The application opens in the browser. This may take a few minutes.
npm run start
Navigate to localhost:3000 on a browser tab to view the running application. To create a new container, select a user ID button while leaving the container ID input blank. To simulate a new user joining the container session, open a new browser tab and navigate to localhost:3000. This time, input the container ID value which can be found from first browser tab's url proceeding http://localhost:3000/#.
Note
You may need to install an additional dependency to make this demo compatible with Webpack 5. If you receive a compilation error related to a "buffer" or "url" package, please run npm install -D buffer url and try again. This will be resolved in a future release of Fluid Framework.
Next steps
- Try extending the demo with more key/value pairs in the
additionalDetailsfield inuserConfig. - Consider integrating audience into a collaborative application which utilizes distributed data structures such as SharedMap or SharedString.
- Learn more about Audience.
Tip
When you make changes to the code the project will automatically rebuild and the application server will reload. However, if you make changes to the container schema, they will only take effect if you close and restart the application server. To do this, give focus to the Command Prompt and press Ctrl-C twice. Then run npm run start again.
Feedback
Coming soon: Throughout 2024 we will be phasing out GitHub Issues as the feedback mechanism for content and replacing it with a new feedback system. For more information see: https://aka.ms/ContentUserFeedback.
Submit and view feedback for