Connect Azure Functions to Azure Storage using Visual Studio Code
Azure Functions lets you connect Azure services and other resources to functions without having to write your own integration code. These bindings, which represent both input and output, are declared within the function definition. Data from bindings is provided to the function as parameters. A trigger is a special type of input binding. Although a function has only one trigger, it can have multiple input and output bindings. To learn more, see Azure Functions triggers and bindings concepts.
In this article, you learn how to use Visual Studio Code to connect Azure Storage to the function you created in the previous quickstart article. The output binding that you add to this function writes data from the HTTP request to a message in an Azure Queue storage queue.
Most bindings require a stored connection string that Functions uses to access the bound service. To make it easier, you use the storage account that you created with your function app. The connection to this account is already stored in an app setting named AzureWebJobsStorage.
Note
This article currently only supports Node.js v3 for Functions.
Configure your local environment
Before you begin, you must meet the following requirements:
Install the Azure Storage extension for Visual Studio Code.
Install Azure Storage Explorer. Storage Explorer is a tool that you'll use to examine queue messages generated by your output binding. Storage Explorer is supported on macOS, Windows, and Linux-based operating systems.
Install .NET Core CLI tools.
Complete the steps in part 1 of the Visual Studio Code quickstart.
- Complete the steps in part 1 of the Visual Studio Code quickstart.
- Complete the steps in part 1 of the Visual Studio Code quickstart.
- Complete the steps in part 1 of the Visual Studio Code quickstart.
- Complete the steps in part 1 of the Visual Studio Code quickstart.
- Complete the steps in part 1 of the Visual Studio Code quickstart.
This article assumes that you're already signed in to your Azure subscription from Visual Studio Code. You can sign in by running Azure: Sign In from the command palette.
Download the function app settings
In the previous quickstart article, you created a function app in Azure along with the required storage account. The connection string for this account is stored securely in the app settings in Azure. In this article, you write messages to a Storage queue in the same account. To connect to your storage account when running the function locally, you must download app settings to the local.settings.json file.
Press F1 to open the command palette, then search for and run the command
Azure Functions: Download Remote Settings....Choose the function app you created in the previous article. Select Yes to all to overwrite the existing local settings.
Important
Because the local.settings.json file contains secrets, it never gets published, and is excluded from the source control.
Copy the value
AzureWebJobsStorage, which is the key for the storage account connection string value. You use this connection to verify that the output binding works as expected.
Register binding extensions
Because you're using a Queue storage output binding, you must have the Storage bindings extension installed before you run the project.
Your project has been configured to use extension bundles, which automatically installs a predefined set of extension packages.
Extension bundles is already enabled in the host.json file at the root of the project, which should look like the following example:
{
  "version": "2.0",
  "extensionBundle": {
    "id": "Microsoft.Azure.Functions.ExtensionBundle",
    "version": "[3.*, 4.0.0)"
  }
}
Now, you can add the storage output binding to your project.
Except for HTTP and timer triggers, bindings are implemented as extension packages. Run the following dotnet add package command in the Terminal window to add the Storage extension package to your project.
dotnet add package Microsoft.Azure.Functions.Worker.Extensions.Storage.Queues --prerelease
Now, you can add the storage output binding to your project.
Add an output binding
In Functions, each type of binding requires a direction, type, and unique name. The way you define these attributes depends on the language of your function app.
Binding attributes are defined in the function.json file for a given function. Depending on the binding type, additional properties may be required. The queue output configuration describes the fields required for an Azure Storage queue binding. The extension makes it easy to add bindings to the function.json file.
To create a binding, right-click (Ctrl+click on macOS) the function.json file in your HttpTrigger folder and choose Add binding.... Follow the prompts to define the following binding properties for the new binding:
| Prompt | Value | Description |
|---|---|---|
| Select binding direction | out |
The binding is an output binding. |
| Select binding with direction... | Azure Queue Storage |
The binding is an Azure Storage queue binding. |
| The name used to identify this binding in your code | msg |
Name that identifies the binding parameter referenced in your code. |
| The queue to which the message will be sent | outqueue |
The name of the queue that the binding writes to. When the queueName doesn't exist, the binding creates it on first use. |
| Select setting from "local.setting.json" | AzureWebJobsStorage |
The name of an application setting that contains the connection string for the Storage account. The AzureWebJobsStorage setting contains the connection string for the Storage account you created with the function app. |
A binding is added to the bindings array in your function.json, which should look like the following:
{
  "type": "queue",
  "direction": "out",
  "name": "msg",
  "queueName": "outqueue",
  "connection": "AzureWebJobsStorage"
}
Binding attributes are defined by decorating specific function code in the function_app.py file. You use the queue_output decorator to add an Azure Queue storage output binding.
By using the queue_output decorator, the binding direction is implicitly 'out' and type is Azure Storage Queue. Add the following decorator to your function code in HttpExample\function_app.py:
@app.queue_output(arg_name="msg", queue_name="outqueue", connection="AzureWebJobsStorage")
In this code, arg_name identifies the binding parameter referenced in your code, queue_name is name of the queue that the binding writes to, and connection is the name of an application setting that contains the connection string for the Storage account. In quickstarts you use the same storage account as the function app, which is in the AzureWebJobsStorage setting. When the queue_name doesn't exist, the binding creates it on first use.
In a C# project, the bindings are defined as binding attributes on the function method. Specific definitions depend on whether your app runs in-process (C# class library) or in an isolated worker process.
Open the HttpExample.cs project file and add the following MultiResponse class:
public class MultiResponse
{
    [QueueOutput("outqueue",Connection = "AzureWebJobsStorage")]
    public string[] Messages { get; set; }
    public HttpResponseData HttpResponse { get; set; }
}
The MultiResponse class allows you to write to a storage queue named outqueue and an HTTP success message. Multiple messages could be sent to the queue because the QueueOutput attribute is applied to a string array.
The Connection property sets the connection string for the storage account. In this case, you could omit Connection because you're already using the default storage account.
In a Java project, the bindings are defined as binding annotations on the function method. The function.json file is then autogenerated based on these annotations.
Browse to the location of your function code under src/main/java, open the Function.java project file, and add the following parameter to the run method definition:
@QueueOutput(name = "msg", queueName = "outqueue",
connection = "AzureWebJobsStorage") OutputBinding<String> msg,
The msg parameter is an OutputBinding<T> type, which represents a collection of strings that are written as messages to an output binding when the function completes. In this case, the output is a storage queue named outqueue. The connection string for the Storage account is set by the connection method. Rather than the connection string itself, you pass the application setting that contains the Storage account connection string.
The run method definition should now look like the following example:
@FunctionName("HttpExample")
public HttpResponseMessage run(
        @HttpTrigger(name = "req", methods = {HttpMethod.GET, HttpMethod.POST}, authLevel = AuthorizationLevel.ANONYMOUS)
        HttpRequestMessage<Optional<String>> request,
        @QueueOutput(name = "msg", queueName = "outqueue",
        connection = "AzureWebJobsStorage") OutputBinding<String> msg,
        final ExecutionContext context) {
Add code that uses the output binding
After the binding is defined, you can use the name of the binding to access it as an attribute in the function signature. By using an output binding, you don't have to use the Azure Storage SDK code for authentication, getting a queue reference, or writing data. The Functions runtime and queue output binding do those tasks for you.
Add code that uses the msg output binding object on context.bindings to create a queue message. Add this code before the context.res statement.
// Add a message to the Storage queue,
// which is the name passed to the function.
context.bindings.msg = (req.query.name || req.body.name);
At this point, your function could look as follows:
module.exports = async function (context, req) {
    context.log('JavaScript HTTP trigger function processed a request.');

    if (req.query.name || (req.body && req.body.name)) {
        // Add a message to the Storage queue,
        // which is the name passed to the function.
        context.bindings.msg = (req.query.name || req.body.name);
        context.res = {
            // status: 200, /* Defaults to 200 */
            body: "Hello " + (req.query.name || req.body.name)
        };
    }
    else {
        context.res = {
            status: 400,
            body: "Please pass a name on the query string or in the request body"
        };
    }
};
Add code that uses the msg output binding object on context.bindings to create a queue message. Add this code before the context.res statement.
context.bindings.msg = name;
At this point, your function must look as follows:
import { AzureFunction, Context, HttpRequest } from "@azure/functions"

const httpTrigger: AzureFunction = async function (context: Context, req: HttpRequest): Promise<void> {
    context.log('HTTP trigger function processed a request.');
    const name = (req.query.name || (req.body && req.body.name));

    if (name) {
        // Add a message to the storage queue,
        // which is the name passed to the function.
        context.bindings.msg = name;
        // Send a "hello" response.
        context.res = {
            // status: 200, /* Defaults to 200 */
            body: "Hello " + (req.query.name || req.body.name)
        };
    }
    else {
        context.res = {
            status: 400,
            body: "Please pass a name on the query string or in the request body"
        };
    }
};

export default httpTrigger;
Add code that uses the Push-OutputBinding cmdlet to write text to the queue using the msg output binding. Add this code before you set the OK status in the if statement.
$outputMsg = $name
Push-OutputBinding -name msg -Value $outputMsg
At this point, your function must look as follows:
using namespace System.Net

# Input bindings are passed in via param block.
param($Request, $TriggerMetadata)

# Write to the Azure Functions log stream.
Write-Host "PowerShell HTTP trigger function processed a request."

# Interact with query parameters or the body of the request.
$name = $Request.Query.Name
if (-not $name) {
    $name = $Request.Body.Name
}

if ($name) {
    # Write the $name value to the queue,
    # which is the name passed to the function.
    $outputMsg = $name
    Push-OutputBinding -name msg -Value $outputMsg

    $status = [HttpStatusCode]::OK
    $body = "Hello $name"
}
else {
    $status = [HttpStatusCode]::BadRequest
    $body = "Please pass a name on the query string or in the request body."
}

# Associate values to output bindings by calling 'Push-OutputBinding'.
Push-OutputBinding -Name Response -Value ([HttpResponseContext]@{
    StatusCode = $status
    Body = $body
})
Update HttpExample\function_app.py to match the following code, add the msg parameter to the function definition and msg.set(name) under the if name: statement:
import azure.functions as func
import logging

app = func.FunctionApp(http_auth_level=func.AuthLevel.ANONYMOUS)

@app.route(route="HttpExample")
@app.queue_output(arg_name="msg", queue_name="outqueue", connection="AzureWebJobsStorage")
def HttpExample(req: func.HttpRequest, msg: func.Out [func.QueueMessage]) -> func.HttpResponse:
    logging.info('Python HTTP trigger function processed a request.')

    name = req.params.get('name')
    if not name:
        try:
            req_body = req.get_json()
        except ValueError:
            pass
        else:
            name = req_body.get('name')

    if name:
        msg.set(name)
        return func.HttpResponse(f"Hello, {name}. This HTTP triggered function executed successfully.")
    else:
        return func.HttpResponse(
             "This HTTP triggered function executed successfully. Pass a name in the query string or in the request body for a personalized response.",
             status_code=200
        )
The msg parameter is an instance of the azure.functions.Out class. The set method writes a string message to the queue. In this case, it's the name passed to the function in the URL query string.
Replace the existing HttpExample class with the following code:
    [Function("HttpExample")]
    public static MultiResponse Run([HttpTrigger(AuthorizationLevel.Function, "get", "post")] HttpRequestData req,
        FunctionContext executionContext)
    {
        var logger = executionContext.GetLogger("HttpExample");
        logger.LogInformation("C# HTTP trigger function processed a request.");

        var message = "Welcome to Azure Functions!";

        var response = req.CreateResponse(HttpStatusCode.OK);
        response.Headers.Add("Content-Type", "text/plain; charset=utf-8");
        response.WriteString(message);

        // Return a response to both HTTP trigger and storage output binding.
        return new MultiResponse()
        {
            // Write a single message.
            Messages = new string[] { message },
            HttpResponse = response
        };
    }
}
Now, you can use the new msg parameter to write to the output binding from your function code. Add the following line of code before the success response to add the value of name to the msg output binding.
msg.setValue(name);
When you use an output binding, you don't have to use the Azure Storage SDK code for authentication, getting a queue reference, or writing data. The Functions runtime and queue output binding do those tasks for you.
Your run method should now look like the following example:
@FunctionName("HttpExample")
public HttpResponseMessage run(
        @HttpTrigger(name = "req", methods = {HttpMethod.GET, HttpMethod.POST}, authLevel = AuthorizationLevel.ANONYMOUS)
        HttpRequestMessage<Optional<String>> request,
        @QueueOutput(name = "msg", queueName = "outqueue",
        connection = "AzureWebJobsStorage") OutputBinding<String> msg,
        final ExecutionContext context) {
    context.getLogger().info("Java HTTP trigger processed a request.");

    // Parse query parameter
    String query = request.getQueryParameters().get("name");
    String name = request.getBody().orElse(query);

    if (name == null) {
        return request.createResponseBuilder(HttpStatus.BAD_REQUEST)
        .body("Please pass a name on the query string or in the request body").build();
    } else {
        // Write the name to the message queue.
        msg.setValue(name);

        return request.createResponseBuilder(HttpStatus.OK).body("Hello, " + name).build();
    }
}
Update the tests
Because the archetype also creates a set of tests, you need to update these tests to handle the new msg parameter in the run method signature.
Browse to the location of your test code under src/test/java, open the Function.java project file, and replace the line of code under //Invoke with the following code.
@SuppressWarnings("unchecked")
final OutputBinding<String> msg = (OutputBinding<String>)mock(OutputBinding.class);
final HttpResponseMessage ret = new Function().run(req, msg, context);
Run the function locally
Visual Studio Code integrates with Azure Functions Core tools to let you run this project on your local development computer before you publish to Azure. If you don't already have Core Tools installed locally, you are prompted to install it the first time you run your project.
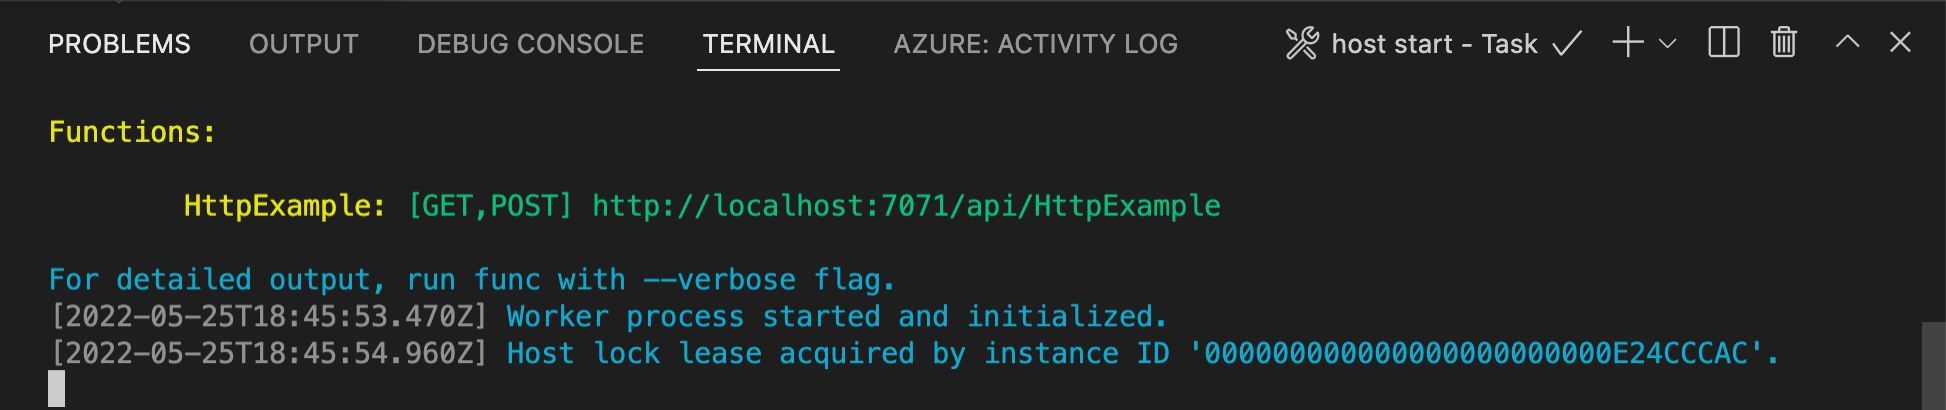
To call your function, press F5 to start the function app project. The Terminal panel displays the output from Core Tools. Your app starts in the Terminal panel. You can see the URL endpoint of your HTTP-triggered function running locally.
If you don't already have Core Tools installed, select Install to install Core Tools when prompted to do so.
If you have trouble running on Windows, make sure that the default terminal for Visual Studio Code isn't set to WSL Bash.With the Core Tools running, go to the Azure: Functions area. Under Functions, expand Local Project > Functions. Right-click (Windows) or Ctrl - click (macOS) the
HttpExamplefunction and choose Execute Function Now....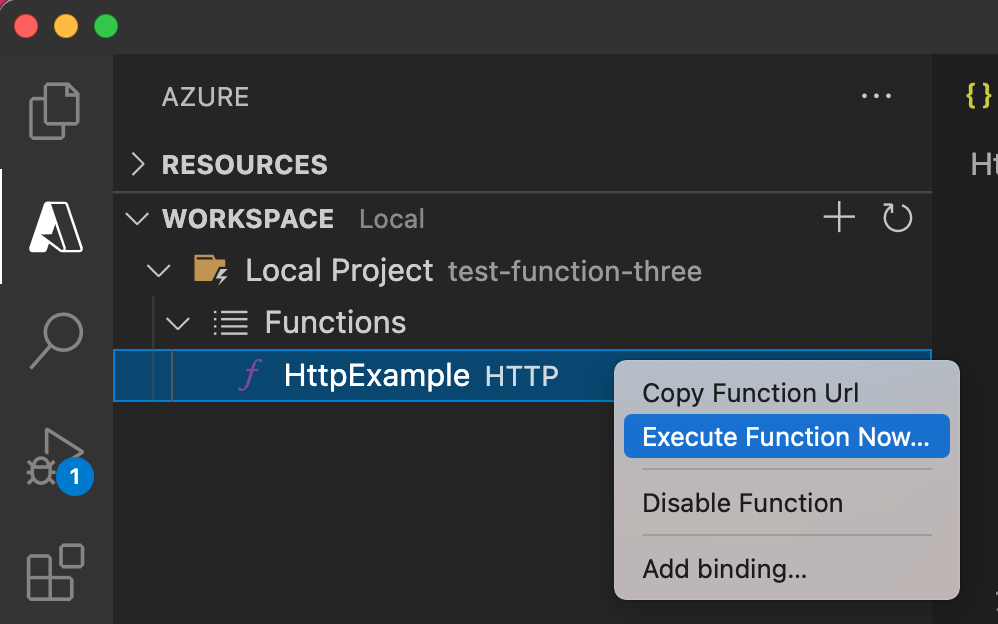
In the Enter request body, press Enter to send a request message to your function.
When the function executes locally and returns a response, a notification is raised in Visual Studio Code. Information about the function execution is shown in the Terminal panel.
Press Ctrl + C to stop Core Tools and disconnect the debugger.
Run the function locally
As in the previous article, press F5 to start the function app project and Core Tools.
With the Core Tools running, go to the Azure: Functions area. Under Functions, expand Local Project > Functions. Right-click (Ctrl-click on Mac) the
HttpExamplefunction and select Execute Function Now....
In the Enter request body, you see the request message body value of
{ "name": "Azure" }. Press Enter to send this request message to your function.After a response is returned, press Ctrl + C to stop Core Tools.
Because you're using the storage connection string, your function connects to the Azure storage account when running locally. A new queue named outqueue is created in your storage account by the Functions runtime when the output binding is first used. You'll use Storage Explorer to verify that the queue was created along with the new message.
Connect Storage Explorer to your account
Skip this section if you've already installed Azure Storage Explorer and connected it to your Azure account.
Run the Azure Storage Explorer tool, select the connect icon on the left, and select Add an account.
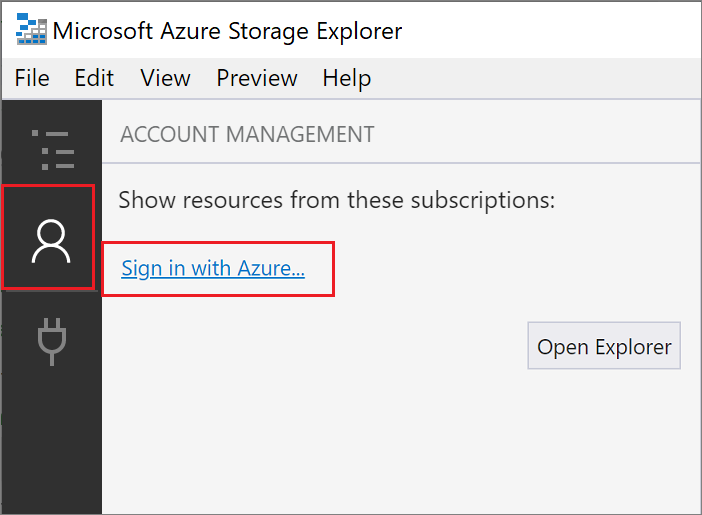
In the Connect dialog, choose Add an Azure account, choose your Azure environment, and then select Sign in....

After you successfully sign in to your account, you see all of the Azure subscriptions associated with your account. Choose your subscription and select Open Explorer.
Examine the output queue
In Visual Studio Code, press F1 to open the command palette, then search for and run the command
Azure Storage: Open in Storage Explorerand choose your storage account name. Your storage account opens in the Azure Storage Explorer.Expand the Queues node, and then select the queue named outqueue.
The queue contains the message that the queue output binding created when you ran the HTTP-triggered function. If you invoked the function with the default
namevalue of Azure, the queue message is Name passed to the function: Azure.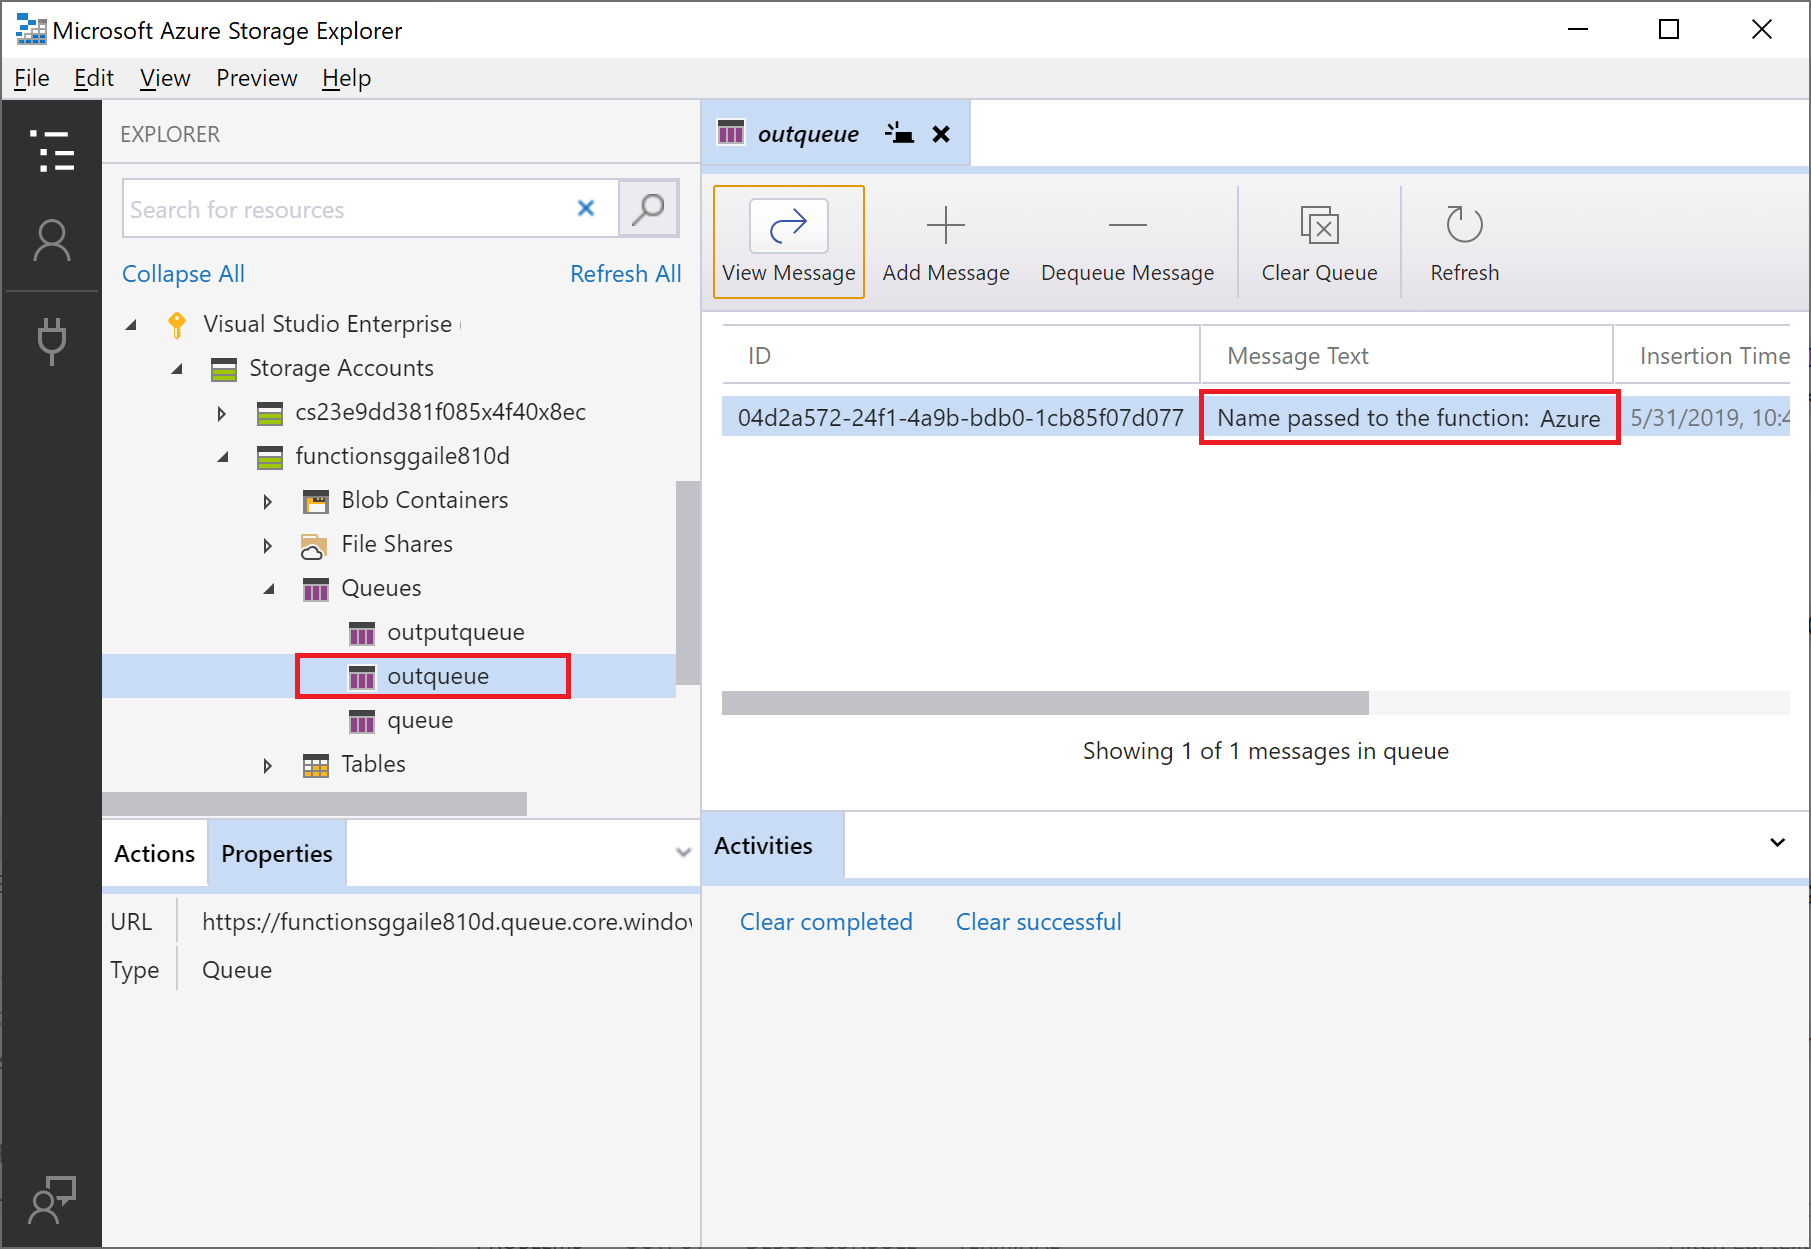
Run the function again, send another request, and you see a new message in the queue.
Now, it's time to republish the updated function app to Azure.
Redeploy and verify the updated app
In Visual Studio Code, press F1 to open the command palette. In the command palette, search for and select
Azure Functions: Deploy to function app....Choose the function app that you created in the first article. Because you're redeploying your project to the same app, select Deploy to dismiss the warning about overwriting files.
After the deployment completes, you can again use the Execute Function Now... feature to trigger the function in Azure.
Again view the message in the storage queue to verify that the output binding generates a new message in the queue.
Clean up resources
In Azure, resources refer to function apps, functions, storage accounts, and so forth. They're grouped into resource groups, and you can delete everything in a group by deleting the group.
You've created resources to complete these quickstarts. You may be billed for these resources, depending on your account status and service pricing. If you don't need the resources anymore, here's how to delete them:
In Visual Studio Code, press F1 to open the command palette. In the command palette, search for and select
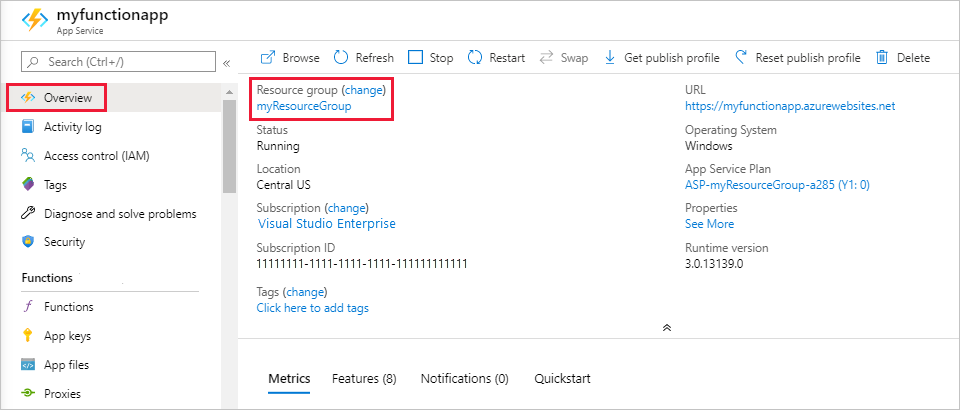
Azure: Open in portal.Choose your function app and press Enter. The function app page opens in the Azure portal.
In the Overview tab, select the named link next to Resource group.
On the Resource group page, review the list of included resources, and verify that they're the ones you want to delete.
Select Delete resource group, and follow the instructions.
Deletion may take a couple of minutes. When it's done, a notification appears for a few seconds. You can also select the bell icon at the top of the page to view the notification.
Next steps
You've updated your HTTP triggered function to write data to a Storage queue. Now you can learn more about developing Functions using Visual Studio Code:
Feedback
Coming soon: Throughout 2024 we will be phasing out GitHub Issues as the feedback mechanism for content and replacing it with a new feedback system. For more information see: https://aka.ms/ContentUserFeedback.
Submit and view feedback for