Install Azure Monitor agent on Windows client devices using the client installer
Use the client installer to install Azure Monitor Agent on Windows client devices and send monitoring data to your Log Analytics workspace. The Azure Monitor Agent extension and the installer install the same underlying agent and use data collection rules to configure data collection. This article explains how to install Azure Monitor Agent on Windows client devices using the client installer and how to associate data collection rules to your Windows client devices.
Note
This article provides specific guidance for installing the Azure Monitor agent on Windows client devices, subject to the limitations. For standard installation and management guidance for the agent, refer the agent extension management guidance here
Comparison with virtual machine extension
Here is a comparison between client installer and VM extension for Azure Monitor Agent:
| Functional component | For VMs/servers via extension | For clients via installer |
|---|---|---|
| Agent installation method | Via VM extension | Via client installer |
| Agent installed | Azure Monitor Agent | Same |
| Authentication | Using Managed Identity | Using Microsoft Entra device token |
| Central configuration | Via Data collection rules | Same |
| Associating config rules to agents | DCRs associates directly to individual VM resources | DCRs associate to a monitored object (MO), which maps to all devices within the Microsoft Entra tenant |
| Data upload to Log Analytics | Via Log Analytics endpoints | Same |
| Feature support | All features documented here | Features dependent on AMA agent extension that don't require more extensions. This includes support for Sentinel Windows Event filtering |
| Networking options | Proxy support, Private link support | Proxy support only |
Supported device types
| Device type | Supported? | Installation method | Additional information |
|---|---|---|---|
| Windows 10, 11 desktops, workstations | Yes | Client installer | Installs the agent using a Windows MSI installer |
| Windows 10, 11 laptops | Yes | Client installer | Installs the agent using a Windows MSI installer. The installs works on laptops but the agent is not optimized yet for battery, network consumption |
| Virtual machines, scale sets | No | Virtual machine extension | Installs the agent using Azure extension framework |
| On-premises servers | No | Virtual machine extension (with Azure Arc agent) | Installs the agent using Azure extension framework, provided for on-premises by installing Arc agent |
Prerequisites
- The machine must be running Windows client OS version 10 RS4 or higher.
- To download the installer, the machine should have C++ Redistributable version 2015) or higher
- The machine must be domain joined to a Microsoft Entra tenant (AADj or Hybrid AADj machines), which enables the agent to fetch Microsoft Entra device tokens used to authenticate and fetch data collection rules from Azure.
- You might need tenant admin permissions on the Microsoft Entra tenant.
- The device must have access to the following HTTPS endpoints:
- global.handler.control.monitor.azure.com
<virtual-machine-region-name>.handler.control.monitor.azure.com (example: westus.handler.control.azure.com)<log-analytics-workspace-id>.ods.opinsights.azure.com (example: 12345a01-b1cd-1234-e1f2-1234567g8h99.ods.opinsights.azure.com) (If using private links on the agent, you must also add the data collection endpoints)
- A data collection rule you want to associate with the devices. If it doesn't exist already, create a data collection rule. Do not associate the rule to any resources yet.
- Before using any PowerShell cmdlet, ensure cmdlet related PowerShell module is installed and imported.
Limitations
- The data collection rules you create for Windows client machines can only target the entire Microsoft Entra tenant scope. That is, a data collection rule you associate to a monitored object applies to all Windows client machines on which you install Azure Monitor Agent using this client installer within the tenant. Granular targeting using data collection rules is not supported for Windows client devices yet.
- Azure Monitor Agent doesn't support monitoring of Windows machines connected via Azure private links.
- The agent installed using the Windows client installer is designed mainly for Windows desktops or workstations that are always connected. Although you can install Azure Monitor Agent on laptops using the installer, the agent isn't optimized for battery consumption and network limitations on a laptop.
Install the agent
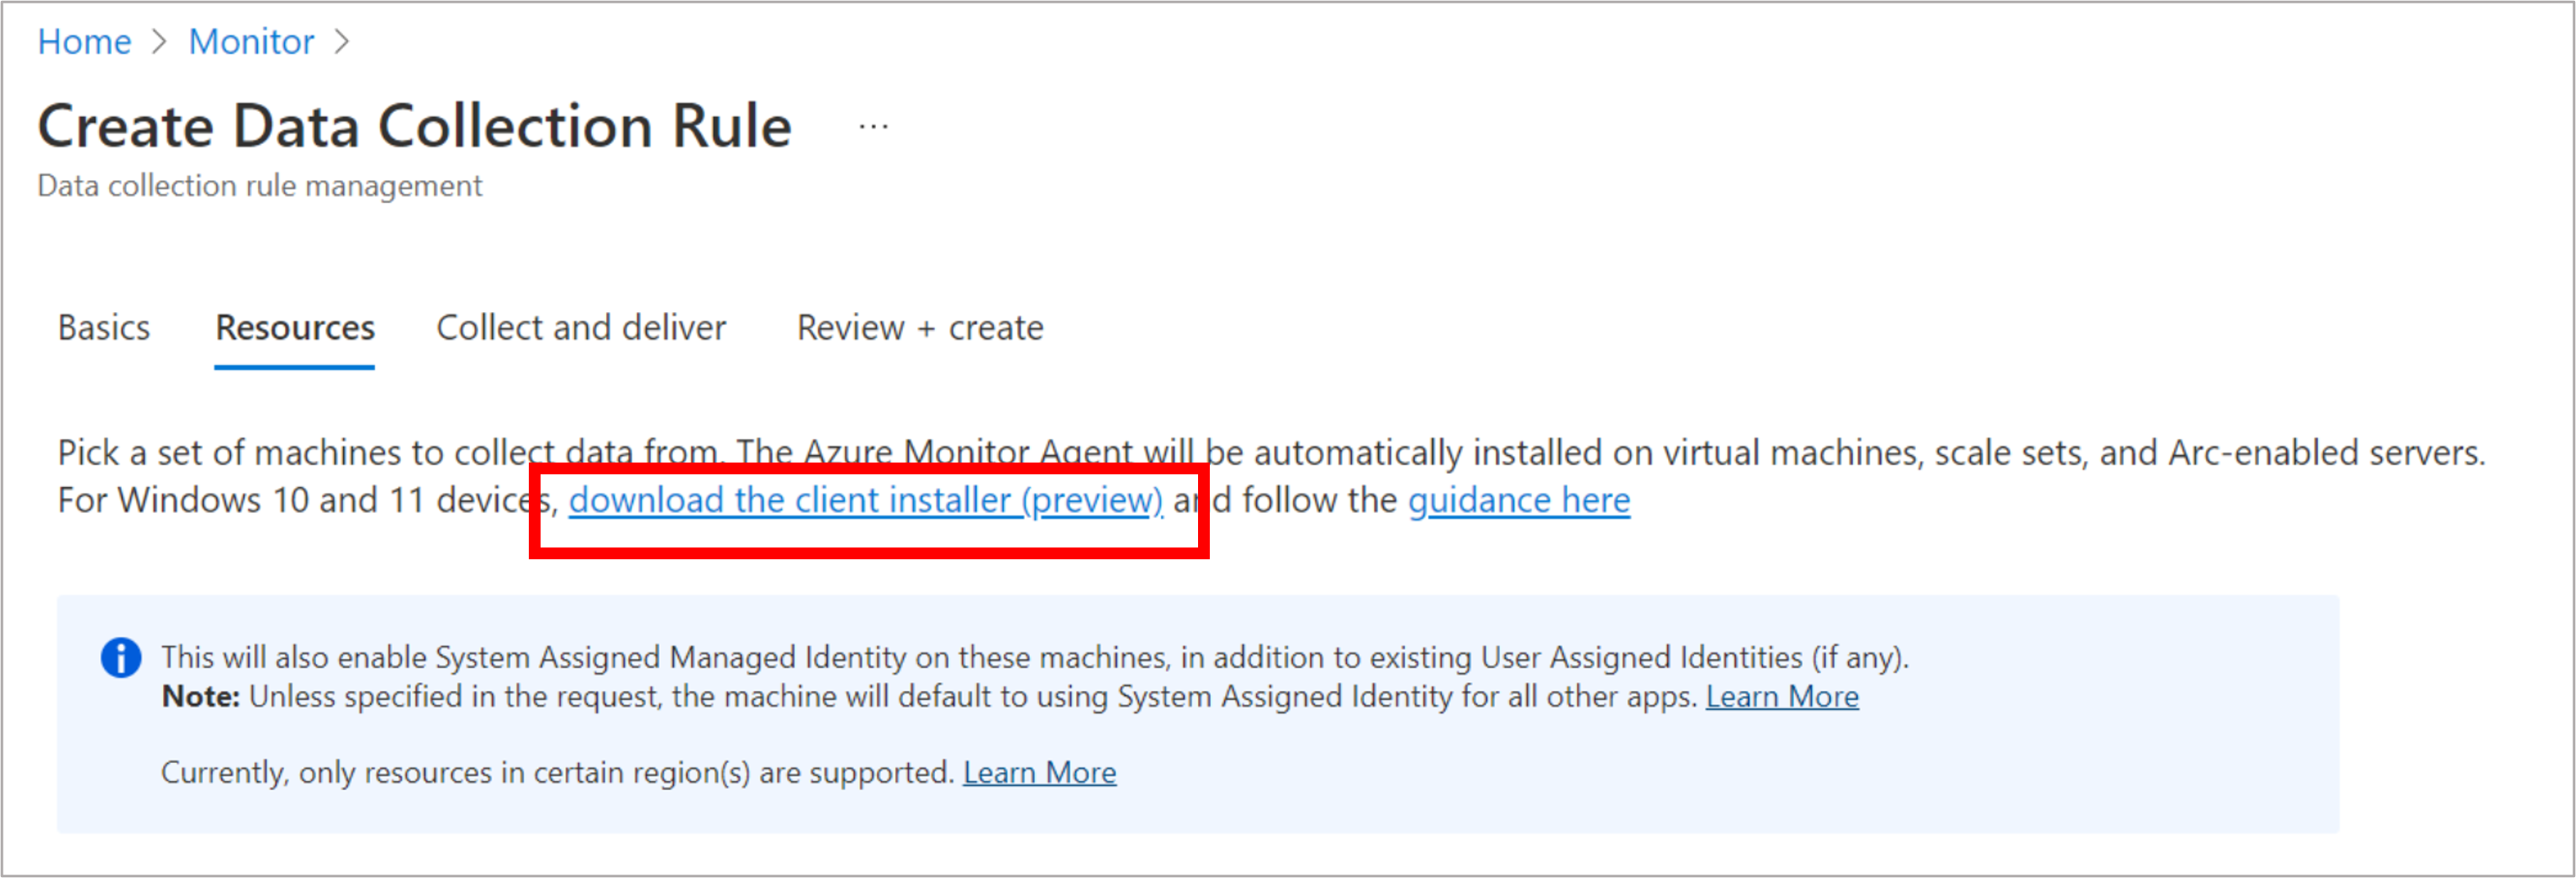
Download the Windows MSI installer for the agent using this link. You can also download it from Monitor > Data Collection Rules > Create experience on Azure portal (shown in the following screenshot):
Open an elevated admin command prompt window and change directory to the location where you downloaded the installer.
To install with default settings, run the following command:
msiexec /i AzureMonitorAgentClientSetup.msi /qnTo install with custom file paths, network proxy settings, or on a Non-Public Cloud use the following command with the values from the following table:
msiexec /i AzureMonitorAgentClientSetup.msi /qn DATASTOREDIR="C:\example\folder"Parameter Description INSTALLDIR Directory path where the agent binaries are installed DATASTOREDIR Directory path where the agent stores its operational logs and data PROXYUSE Must be set to "true" to use proxy PROXYADDRESS Set to Proxy Address. PROXYUSE must be set to "true" to be correctly applied PROXYUSEAUTH Set to "true" if proxy requires authentication PROXYUSERNAME Set to Proxy username. PROXYUSE and PROXYUSEAUTH must be set to "true" PROXYPASSWORD Set to Proxy password. PROXYUSE and PROXYUSEAUTH must be set to "true" CLOUDENV Set to Cloud. "Azure Commercial", "Azure China", "Azure US Gov", "Azure USNat", or "Azure USSec Verify successful installation:
- Open Control Panel -> Programs and Features OR Settings -> Apps -> Apps & Features and ensure you see ‘Azure Monitor Agent’ listed
- Open Services and confirm ‘Azure Monitor Agent’ is listed and shows as Running.
Proceed to create the monitored object that you'll associate data collection rules to, for the agent to actually start operating.

Note
The agent installed with the client installer currently doesn't support updating local agent settings once it is installed. Uninstall and reinstall AMA to update above settings.
Create and associate a monitored object
You need to create a monitored object (MO), which represents the Microsoft Entra tenant within Azure Resource Manager (ARM). This ARM entity is what Data Collection Rules are then associated with. Azure associates a monitored object to all Windows client machines in the same Microsoft Entra tenant.
Currently this association is only limited to the Microsoft Entra tenant scope, which means configuration applied to the Microsoft Entra tenant will be applied to all devices that are part of the tenant and running the agent installed via the client installer. Agents installed as virtual machine extension will not be impacted by this. The following image demonstrates how this works:

Then, proceed with the following instructions to create and associate them to a monitored object, using REST APIs or PowerShell commands.
Permissions required
Since MO is a tenant level resource, the scope of the permission would be higher than a subscription scope. Therefore, an Azure tenant admin might be needed to perform this step. Follow these steps to elevate Microsoft Entra tenant admin as Azure Tenant Admin. It gives the Microsoft Entra admin 'owner' permissions at the root scope. This is needed for all methods described in the following section.
Using REST APIs
1. Assign the Monitored Objects Contributor role to the operator
This step grants the ability to create and link a monitored object to a user or group.
Request URI
PUT https://management.azure.com/providers/microsoft.insights/providers/microsoft.authorization/roleassignments/{roleAssignmentGUID}?api-version=2021-04-01-preview
URI Parameters
| Name | In | Type | Description |
|---|---|---|---|
roleAssignmentGUID |
path | string | Provide any valid guid (you can generate one using https://guidgenerator.com/) |
Headers
- Authorization: ARM Bearer Token (using ‘Get-AzAccessToken’ or other method)
- Content-Type: Application/json
Request Body
{
    "properties":
    {
        "roleDefinitionId":"/providers/Microsoft.Authorization/roleDefinitions/56be40e24db14ccf93c37e44c597135b",
        "principalId":"aaaaaaaa-aaaa-aaaa-aaaa-aaaaaaaaaaaa"
    }
}
Body parameters
| Name | Description |
|---|---|
| roleDefinitionId | Fixed value: Role definition ID of the Monitored Objects Contributor role: /providers/Microsoft.Authorization/roleDefinitions/56be40e24db14ccf93c37e44c597135b |
| principalId | Provide the Object Id of the identity of the user to which the role needs to be assigned. It might be the user who elevated at the beginning of step 1, or another user or group who will perform later steps. |
After this step is complete, reauthenticate your session and reacquire your ARM bearer token.
2. Create monitored object
This step creates the monitored object for the Microsoft Entra tenant scope. It's used to represent client devices that are signed with that Microsoft Entra tenant identity.
Permissions required: Anyone who has 'Monitored Object Contributor' at an appropriate scope can perform this operation, as assigned in step 1.
Request URI
PUT https://management.azure.com/providers/Microsoft.Insights/monitoredObjects/{AADTenantId}?api-version=2021-09-01-preview
URI Parameters
| Name | In | Type | Description |
|---|---|---|---|
AADTenantId |
path | string | ID of the Microsoft Entra tenant that the device(s) belong to. The MO is created with the same ID |
Headers
- Authorization: ARM Bearer Token
- Content-Type: Application/json
Request Body
{
    "properties":
    {
        "location":"eastus"
    }
}
Body parameters
| Name | Description |
|---|---|
location |
The Azure region where the MO object would be stored. It should be the same region where you created the Data Collection Rule. This region is the location where agent communications would happen. |
3. Associate DCR to monitored object
Now we associate the Data Collection Rules (DCR) to the monitored object by creating Data Collection Rule Associations.
Permissions required: Anyone who has ‘Monitored Object Contributor’ at an appropriate scope can perform this operation, as assigned in step 1.
Request URI
PUT https://management.azure.com/{MOResourceId}/providers/microsoft.insights/datacollectionruleassociations/{associationName}?api-version=2021-09-01-preview
Sample Request URI
PUT https://management.azure.com/providers/Microsoft.Insights/monitoredObjects/{AADTenantId}/providers/microsoft.insights/datacollectionruleassociations/{associationName}?api-version=2021-09-01-preview
URI Parameters
| Name | In | Type | Description |
|---|---|---|---|
| ``MOResourceId` | path | string | Full resource ID of the MO created in step 2. Example: 'providers/Microsoft.Insights/monitoredObjects/{AADTenantId}' |
Headers
- Authorization: ARM Bearer Token
- Content-Type: Application/json
Request Body
{
    "properties":
    {
        "dataCollectionRuleId": "/subscriptions/{subscriptionId}/resourceGroups/{resourceGroupName}/providers/Microsoft.Insights/dataCollectionRules/{DCRName}"
    }
}
Body parameters
| Name | Description |
|---|---|
dataCollectionRuleID |
The resource ID of an existing Data Collection Rule that you created in the same region as the monitored object. |
4. List associations to the monitored object
If you need to view the associations, you can list them for the monitored object.
Permissions required: Anyone who has ‘Reader’ at an appropriate scope can perform this operation, similar to that assigned in step 1.
Request URI
GET https://management.azure.com/{MOResourceId}/providers/microsoft.insights/datacollectionruleassociations/?api-version=2021-09-01-preview
Sample Request URI
GET https://management.azure.com/providers/Microsoft.Insights/monitoredObjects/{AADTenantId}/providers/microsoft.insights/datacollectionruleassociations/?api-version=2021-09-01-preview
{
  "value": [
    {
      "id": "/subscriptions/703362b3-f278-4e4b-9179-c76eaf41ffc2/resourceGroups/myResourceGroup/providers/Microsoft.Compute/virtualMachines/myVm/providers/Microsoft.Insights/dataCollectionRuleAssociations/myRuleAssociation",
      "name": "myRuleAssociation",
      "type": "Microsoft.Insights/dataCollectionRuleAssociations",
      "properties": {
        "dataCollectionRuleId": "/subscriptions/703362b3-f278-4e4b-9179-c76eaf41ffc2/resourceGroups/myResourceGroup/providers/Microsoft.Insights/dataCollectionRules/myCollectionRule",
        "provisioningState": "Succeeded"
      },
      "systemData": {
        "createdBy": "user1",
        "createdByType": "User",
        "createdAt": "2021-04-01T12:34:56.1234567Z",
        "lastModifiedBy": "user2",
        "lastModifiedByType": "User",
        "lastModifiedAt": "2021-04-02T12:34:56.1234567Z"
      },
      "etag": "070057da-0000-0000-0000-5ba70d6c0000"
    }
  ],
  "nextLink": null
}
5. Disassociate DCR from the monitored object
If you need to remove an association of a Data Collection Rule (DCR) to the monitored object.
Permissions required: Anyone who has ‘Monitored Object Contributor’ at an appropriate scope can perform this operation, as assigned in step 1.
Request URI
DELETE https://management.azure.com/{MOResourceId}/providers/microsoft.insights/datacollectionruleassociations/{associationName}?api-version=2021-09-01-preview
Sample Request URI
DELETE https://management.azure.com/providers/Microsoft.Insights/monitoredObjects/{AADTenantId}/providers/microsoft.insights/datacollectionruleassociations/{associationName}?api-version=2021-09-01-preview
URI Parameters
| Name | In | Type | Description |
|---|---|---|---|
MOResourceId |
path | string | Full resource ID of the MO created in step 2. Example: 'providers/Microsoft.Insights/monitoredObjects/{AADTenantId}' |
associationName |
path | string | The name of the association. The name is case insensitive. Example: 'assoc01' |
Headers
- Authorization: ARM Bearer Token
- Content-Type: Application/json
Using PowerShell for onboarding
$TenantID = "xxxxxxxxx-xxxx-xxx"  #Your Tenant ID
$SubscriptionID = "xxxxxx-xxxx-xxxxx" #Your Subscription ID
$ResourceGroup = "rg-yourResourseGroup" #Your resroucegroup

Connect-AzAccount -Tenant $TenantID

#Select the subscription
Select-AzSubscription -SubscriptionId $SubscriptionID

#Grant Access to User at root scope "/"
$user = Get-AzADUser -UserPrincipalName (Get-AzContext).Account

New-AzRoleAssignment -Scope '/' -RoleDefinitionName 'Owner' -ObjectId $user.Id

#Create Auth Token
$auth = Get-AzAccessToken

$AuthenticationHeader = @{
    "Content-Type" = "application/json"
    "Authorization" = "Bearer " + $auth.Token
    }


#1. Assign the Monitored Object Contributor role to the operator
$newguid = (New-Guid).Guid
$UserObjectID = $user.Id

$body = @"
{
            "properties": {
                "roleDefinitionId":"/providers/Microsoft.Authorization/roleDefinitions/56be40e24db14ccf93c37e44c597135b",
                "principalId": `"$UserObjectID`"
        }
}
"@

$requestURL = "https://management.azure.com/providers/microsoft.insights/providers/microsoft.authorization/roleassignments/$newguid`?api-version=2021-04-01-preview"


Invoke-RestMethod -Uri $requestURL -Headers $AuthenticationHeader -Method PUT -Body $body


##########################

#2. Create a monitored object

# "location" property value under the "body" section should be the Azure region where the MO object would be stored. It should be the "same region" where you created the Data Collection Rule. This is the location of the region from where agent communications would happen.
$Location = "eastus" #Use your own loacation
$requestURL = "https://management.azure.com/providers/Microsoft.Insights/monitoredObjects/$TenantID`?api-version=2021-09-01-preview"
$body = @"
{
    "properties":{
        "location":`"$Location`"
    }
}
"@

$Respond = Invoke-RestMethod -Uri $requestURL -Headers $AuthenticationHeader -Method PUT -Body $body -Verbose
$RespondID = $Respond.id

##########################

#3. Associate DCR to monitored object
#See reference documentation https://learn.microsoft.com/en-us/rest/api/monitor/data-collection-rule-associations/create?tabs=HTTP
$associationName = "assoc01" #You can define your custom associationname, must change the association name to a unique name, if you want to associate multiple DCR to monitored object
$DCRName = "dcr-WindowsClientOS" #Your Data collection rule name

$requestURL = "https://management.azure.com$RespondId/providers/microsoft.insights/datacollectionruleassociations/$associationName`?api-version=2021-09-01-preview"
$body = @"
        {
            "properties": {
                "dataCollectionRuleId": "/subscriptions/$SubscriptionID/resourceGroups/$ResourceGroup/providers/Microsoft.Insights/dataCollectionRules/$DCRName"
            }
        }

"@

Invoke-RestMethod -Uri $requestURL -Headers $AuthenticationHeader -Method PUT -Body $body

#(Optional example). Associate another DCR to monitored object
#See reference documentation https://learn.microsoft.com/en-us/rest/api/monitor/data-collection-rule-associations/create?tabs=HTTP
$associationName = "assoc02" #You must change the association name to a unique name, if you want to associate multiple DCR to monitored object
$DCRName = "dcr-PAW-WindowsClientOS" #Your Data collection rule name

$requestURL = "https://management.azure.com$RespondId/providers/microsoft.insights/datacollectionruleassociations/$associationName`?api-version=2021-09-01-preview"
$body = @"
        {
            "properties": {
                "dataCollectionRuleId": "/subscriptions/$SubscriptionID/resourceGroups/$ResourceGroup/providers/Microsoft.Insights/dataCollectionRules/$DCRName"
            }
        }

"@

Invoke-RestMethod -Uri $requestURL -Headers $AuthenticationHeader -Method PUT -Body $body

#4. (Optional) Get all the associatation.
$requestURL = "https://management.azure.com$RespondId/providers/microsoft.insights/datacollectionruleassociations?api-version=2021-09-01-preview"
(Invoke-RestMethod -Uri $requestURL -Headers $AuthenticationHeader -Method get).value
Verify successful setup
Check the ‘Heartbeat’ table (and other tables you configured in the rules) in the Log Analytics workspace that you specified as a destination in the data collection rule(s).
The SourceComputerId, Computer, ComputerIP columns should all reflect the client device information respectively, and the Category column should say 'Azure Monitor Agent'. See the following example:

Using PowerShell for offboarding
#This will remove the monitor object
$TenantID = "xxxxxxxx-xxxx-xxxx-xxxx-xxxxxxxxxxxx"  #Your Tenant ID

Connect-AzAccount -Tenant $TenantID

#Create Auth Token
$auth = Get-AzAccessToken

$AuthenticationHeader = @{
    "Content-Type" = "application/json"
    "Authorization" = "Bearer " + $auth.Token
}

#Get monitored object
$requestURL = "https://management.azure.com/providers/Microsoft.Insights/monitoredObjects/$TenantID`?api-version=2021-09-01-preview"
$MonitoredObject =  Invoke-RestMethod -Uri $requestURL -Headers $AuthenticationHeader -Method Get

#Get data collection rule associations to monitored object
$requestURL = "https://management.azure.com$($MonitoredObject.id)/providers/microsoft.insights/datacollectionruleassociations?api-version=2021-09-01-preview"
$MonitoredObjectAssociations = Invoke-RestMethod -Uri $requestURL -Headers $AuthenticationHeader -Method Get

#Disassociate from all Data Collection Rule
foreach ($Association in $MonitoredObjectAssociations.value){
    $requestURL = "https://management.azure.com$($Association.id)?api-version=2022-06-01"
    Invoke-RestMethod -Uri $requestURL -Headers $AuthenticationHeader -Method Delete
}

#Delete monitored object
$requestURL = "https://management.azure.com/providers/Microsoft.Insights/monitoredObjects/$TenantID`?api-version=2021-09-01-preview"
Invoke-AzRestMethod -Uri $requestURL -Method Delete
Manage the agent
Check the agent version
You can use any of the following options to check the installed version of the agent:
- Open Control Panel > Programs and Features > Azure Monitor Agent and see the 'Version' listed
- Open Settings > Apps > Apps and Features > Azure Monitor Agent and see the 'Version' listed
Uninstall the agent
You can use any of the following options to check the installed version of the agent:
- Open Control Panel > Programs and Features > Azure Monitor Agent and click 'Uninstall'
- Open Settings > Apps > Apps and Features > Azure Monitor Agent and click 'Uninstall'
If you face issues during 'Uninstall', refer to the troubleshooting guidance.
Update the agent
In order to update the version, install the new version you wish to update to.
Troubleshoot
View agent diagnostic logs
- Rerun the installation with logging turned on and specify the log file name:
Msiexec /I AzureMonitorAgentClientSetup.msi /L*V <log file name> - Runtime logs are collected automatically either at the default location
C:\Resources\Azure Monitor Agent\or at the file path mentioned during installation.- If you can't locate the path, the exact location can be found on the registry as
AMADataRootDirPathonHKEY_LOCAL_MACHINE\SOFTWARE\Microsoft\AzureMonitorAgent.
- If you can't locate the path, the exact location can be found on the registry as
- The 'ServiceLogs' folder contains log from AMA Windows Service, which launches and manages AMA processes
- 'AzureMonitorAgent.MonitoringDataStore' contains data/logs from AMA processes.
Common installation issues
Missing DLL
- Error message: "There's a problem with this Windows Installer package. A DLL required for this installer to complete could not be run. …"
- Ensure you have installed C++ Redistributable (>2015) before installing AMA:
Not Microsoft Entra joined
Error message: "Tenant and device ids retrieval failed"
- Run the command
dsregcmd /status. This should produce the output asAzureAdJoined : YESin the 'Device State' section. If not, join the device with a Microsoft Entra tenant and try installation again.
Silent install from command prompt fails
Make sure to start the installer on administrator command prompt. Silent install can only be initiated from the administrator command prompt.
Uninstallation fails due to the uninstaller being unable to stop the service
- If There's an option to try again, do try it again
- If retry from uninstaller doesn't work, cancel the uninstall and stop Azure Monitor Agent service from Services (Desktop Application)
- Retry uninstall
Force uninstall manually when uninstaller doesn't work
- Stop Azure Monitor Agent service. Then try uninstalling again. If it fails, then proceed with the following steps
- Delete AMA service with "sc delete AzureMonitorAgent" from admin cmd
- Download this tool and uninstall AMA
- Delete AMA binaries. They're stored in
Program Files\Azure Monitor Agentby default - Delete AMA data/logs. They're stored in
C:\Resources\Azure Monitor Agentby default - Open Registry. Check
HKEY_LOCAL_MACHINE\SOFTWARE\Microsoft\Azure Monitor Agent. If it exists, delete the key.
Post installation/Operational issues
Once the agent is installed successfully (i.e. you see the agent service running but don't see data as expected), you can follow standard troubleshooting steps listed here for Windows VM and Windows Arc-enabled server respectively.
Frequently asked questions
This section provides answers to common questions.
Is Azure Arc required for Microsoft Entra joined machines?
No. Microsoft Entra joined (or Microsoft Entra hybrid joined) machines running Windows 10 or 11 (client OS) do not require Azure Arc to be installed. Instead, you can use the Windows MSI installer for Azure Monitor Agent, which is currently available in preview.
Questions and feedback
Take this quick survey or share your feedback/questions regarding the client installer.
Feedback
Coming soon: Throughout 2024 we will be phasing out GitHub Issues as the feedback mechanism for content and replacing it with a new feedback system. For more information see: https://aka.ms/ContentUserFeedback.
Submit and view feedback for