Configure your Azure Percept voice assistant application
Important
Retirement of Azure Percept DK:
Update 22 February 2023: A firmware update for the Percept DK Vision and Audio accessory components (also known as Vision and Audio SOM) is now available here, and will enable the accessory components to continue functioning beyond the retirement date.
The Azure Percept public preview will be evolving to support new edge device platforms and developer experiences. As part of this evolution the Azure Percept DK and Audio Accessory and associated supporting Azure services for the Percept DK will be retired March 30th, 2023.
Effective March 30th, 2023, the Azure Percept DK and Audio Accessory will no longer be supported by any Azure services including Azure Percept Studio, OS updates, containers updates, view web stream, and Custom Vision integration. Microsoft will no longer provide customer success support and any associated supporting services. For more information, please visit the Retirement Notice Blog Post.
This article describes how to configure your voice assistant application using IoT Hub. For a step-by-step tutorial for the process of creating a voice assistant, see Build a no-code voice assistant with Azure Percept Studio and Azure Percept Audio.
Update your voice assistant configuration
Open the Azure portal and type IoT Hub into the search bar. Select the icon to open the IoT Hub page.
On the IoT Hub page, select the IoT Hub to which your device was provisioned.
Select IoT Edge under Automatic Device Management in the left navigation menu to view all devices connected to your IoT Hub.
Select the device to which your voice assistant application was deployed.
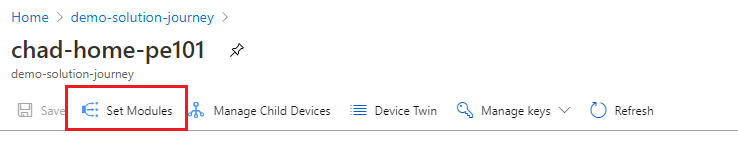
Select Set Modules.
Verify that the following entry is present under the Container Registry Credentials section. Add credentials if necessary.
Name Address Username Password azureedgedevices azureedgedevices.azurecr.io devkitprivatepreviewpull In the IoT Edge Modules section, select azureearspeechclientmodule.
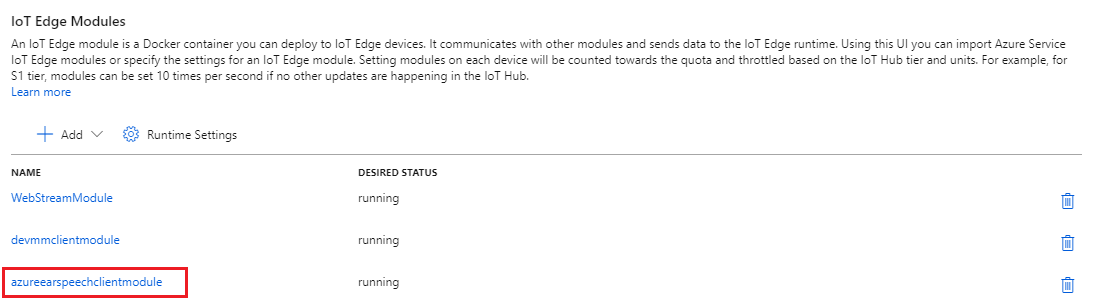
Select the Module Settings tab. Verify the following configuration:
Image URI Restart Policy Desired Status mcr.microsoft.com/azureedgedevices/azureearspeechclientmodule: preload-devkit always running If your settings don't match, edit them and select Update.
Select the Environment Variables tab. Verify that there are no environment variables defined.
Select the Module Twin Settings tab. Update the speechConfigs section as follows:
"speechConfigs": {
    "appId": "<Application id for custom command project>",
    "key": "<Speech Resource key for custom command project>",
    "region": "<Region for the speech service>",
    "keywordModelUrl": "https://aedsamples.blob.core.windows.net/speech/keyword-tables/computer.table",
    "keyword": "computer"
}
Note
The keyword used above is a default publicly available keyword. If you wish to use your own, you can add your own custom keyword by uploading a created table file to blob storage. Blob storage needs to be configured with either anonymous container access or anonymous blob access.
How to find out appId, key and region
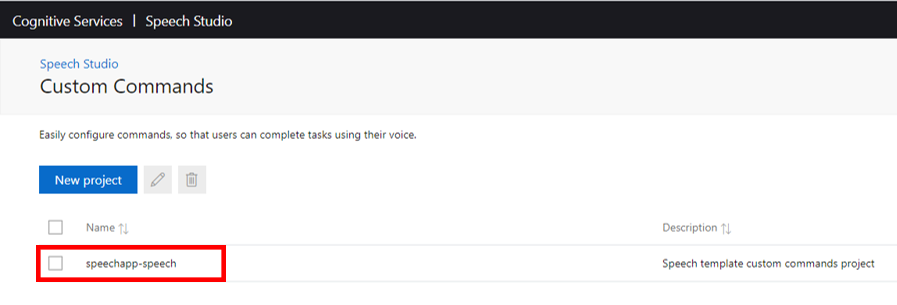
To locate your appID, key, and region, go to Speech Studio:
Sign in and select the appropriate speech resource.
On the Speech Studio home page, select Custom Commands under Voice Assistants.
Select your target project.
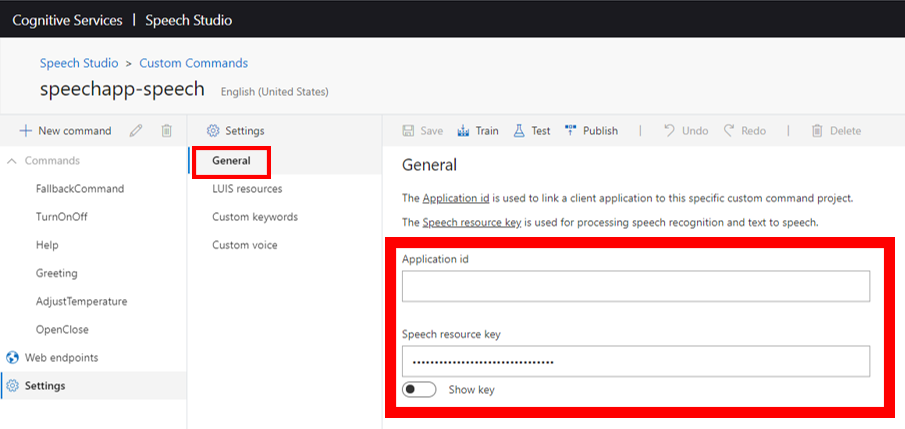
Select Settings on the left-hand menu panel.
The appID and key will be located under the General settings tab.
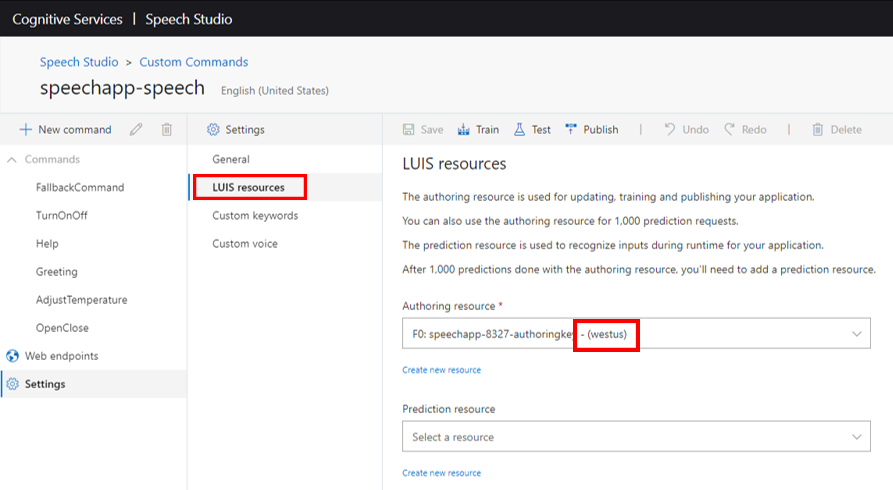
To find your region, open the LUIS resources tab within the settings. The Authoring resource selection will contain region information.
After entering your speechConfigs information, select Update.
Select the Routes tab at the top of the Set modules page. Ensure you have a route with the following value:
FROM /messages/modules/azureearspeechclientmodule/outputs/* INTO $upstreamAdd the route if it doesn't exist.
Select Review + Create.
Select Create.
Next steps
After updating your voice assistant configuration, return to the demo in Azure Percept Studio to interact with the application.