Connect to Azure Percept DK over SSH
Important
Retirement of Azure Percept DK:
Update 22 February 2023: A firmware update for the Percept DK Vision and Audio accessory components (also known as Vision and Audio SOM) is now available here, and will enable the accessory components to continue functioning beyond the retirement date.
The Azure Percept public preview will be evolving to support new edge device platforms and developer experiences. As part of this evolution the Azure Percept DK and Audio Accessory and associated supporting Azure services for the Percept DK will be retired March 30th, 2023.
Effective March 30th, 2023, the Azure Percept DK and Audio Accessory will no longer be supported by any Azure services including Azure Percept Studio, OS updates, containers updates, view web stream, and Custom Vision integration. Microsoft will no longer provide customer success support and any associated supporting services. For more information, please visit the Retirement Notice Blog Post.
Follow the steps below to set up an SSH connection to your Azure Percept DK through OpenSSH or PuTTY.
Prerequisites
- A Windows, Linux, or OS X based host computer with Wi-Fi capability
- An SSH client (see the next section for installation guidance)
- An Azure Percept DK (dev kit)
- An SSH account, created during the Azure Percept DK setup experience
Install your preferred SSH client
If your host computer runs Linux or OS X, SSH services are included in those operating systems and can be run without a separate client application. Check your operating system product documentation for more information on how to run SSH services.
If your host computer runs Windows, you may have two SSH client options to choose from: OpenSSH and PuTTY.
OpenSSH
Windows 10 includes a built-in SSH client called OpenSSH that can be run with a simple command in a command prompt. We recommend using OpenSSH with Azure Percept if it's available to you. To check if your Windows computer has OpenSSH installed, follow these steps:
Go to Start -> Settings.
Select Apps.
Under Apps & features, select Optional features.
Type OpenSSH Client into the Installed features search bar. If OpenSSH appears, the client is already installed, and you may move on to the next section. If you do not see OpenSSH, select Add a feature.
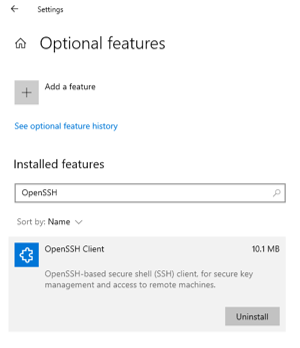
Select OpenSSH Client and select Install. You may now move on to the next section. If OpenSSH is not available to install on your computer, follow the steps below to install PuTTY, a third-party SSH client.
PuTTY
If your Windows computer does not include OpenSSH, we recommend using PuTTY. To download and install PuTTY, complete the following steps:
Go to the PuTTY download page.
Under Package files, select the 32-bit or 64-bit .msi file to download the installer. If you are unsure of which version to choose, check out the FAQs.
Select the installer to start the installation process. Follow the prompts as required.
Congratulations! You have successfully installed the PuTTY SSH client.
Initiate the SSH connection
Note
You may receive a warning message from your SSH client that says your cached/stored key does not match. This can happen after flashing your device or when the IP/hostname has changed and is now provisioned to a new target. Follow your SSH client’s instructions for how to remedy this.
Power on your Azure Percept DK.
If your dev kit is already connected to a network over Ethernet or Wi-Fi, skip to the next step. Otherwise, connect your host computer directly to the dev kit’s Wi-Fi access point. Like connecting to any other Wi-Fi network, open the network and internet settings on your computer, select the following network, and enter the network password when prompted:
- Network name: depending on your dev kit's operating system version, the name of the Wi-Fi access point is either scz-xxxx or apd-xxxx (where “xxxx” is the last four digits of the dev kit’s MAC address)
- Password: can be found on the Welcome Card that came with the dev kit
Warning
While connected to the Azure Percept DK Wi-Fi access point, your host computer will temporarily lose its connection to the Internet. Active video conference calls, web streaming, or other network-based experiences will be interrupted.
Complete the SSH connection process according to your SSH client.
Using OpenSSH
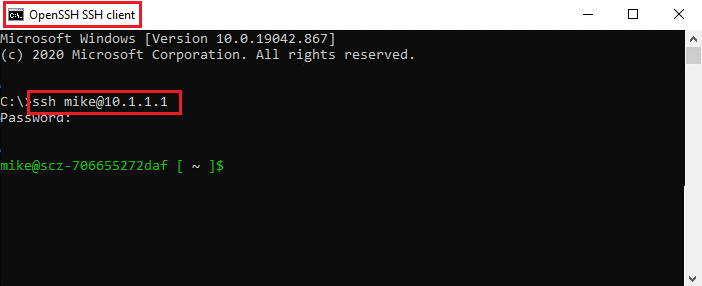
Open a command prompt (Start -> Command Prompt).
Enter the following into the command prompt:
ssh [your ssh user name]@[IP address]If your computer is connected to the dev kit's Wi-Fi access point, the IP address will be 10.1.1.1. If your dev kit is connected over Ethernet, use the local IP address of the device, which you can get from the Ethernet router or hub. If your dev kit is connected over Wi-Fi, you must use the IP address that was assigned to your dev kit during the Azure Percept DK setup experience.
Tip
If your dev kit is connected to a Wi-Fi network but you do not know its IP address, go to Azure Percept Studio and open your device's video stream. The address bar in the video stream browser tab will show your device's IP address.
Enter your SSH password when prompted.
If this is the first time connecting to your dev kit through OpenSSH, you may also be prompted to accept the host's key. Enter yes to accept the key.
Congratulations! You have successfully connected to your dev kit over SSH.
Using PuTTY
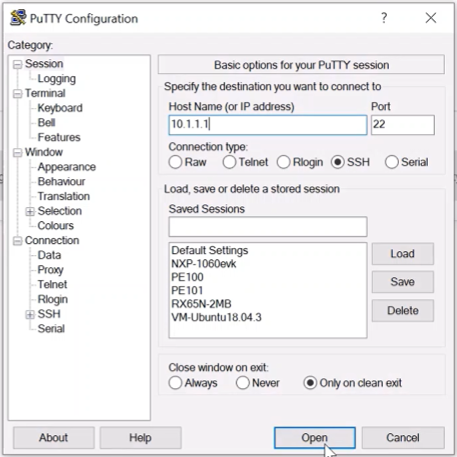
Open PuTTY. Enter the following into the PuTTY Configuration window and select Open to SSH into your dev kit:
- Host Name: [IP address]
- Port: 22
- Connection Type: SSH
The Host Name is your dev kit's IP address. If your computer is connected to the dev kit's Wi-Fi access point, the IP address will be 10.1.1.1. If your dev kit is connected over Ethernet, use the local IP address of the device, which you can get from the Ethernet router or hub. If your dev kit is connected over Wi-Fi, you must use the IP address that was assigned to your dev kit during the Azure Percept DK setup experience.
Tip
If your dev kit is connected to a Wi-Fi network but you do not know its IP address, go to Azure Percept Studio and open your device's video stream. The address bar in the video stream browser tab will show your device's IP address.
A PuTTY terminal will open. When prompted, enter your SSH username and password into the terminal.
Congratulations! You have successfully connected to your dev kit over SSH.
Next steps
After connecting to your Azure Percept DK through SSH, you may perform a variety of tasks, including device troubleshooting and USB updates.