Quickstart: Create a chat room by using SignalR Service
Azure SignalR Service is an Azure service that helps developers easily build web applications with real-time features.
This article shows you how to get started with the Azure SignalR Service. In this quickstart, you'll create a chat application by using an ASP.NET Core web app. This app will make a connection with your Azure SignalR Service resource to enable real-time content updates. You'll host the web application locally and connect with multiple browser clients. Each client will be able to push content updates to all other clients.
You can use any code editor to complete the steps in this quickstart. One option is Visual Studio Code, which is available on the Windows, macOS, and Linux platforms.
The code for this tutorial is available for download in the AzureSignalR-samples GitHub repository. You can create the Azure resources used in this quickstart by following Create a SignalR Service script.
If you don't have an Azure subscription, create a free account before you begin.
Ready to start?
Prerequisites
- Install the latest .NET Core SDK.
- Download or clone the AzureSignalR-sample GitHub repository.
Having issues? Try the troubleshooting guide or let us know.
Create an Azure SignalR resource
In this section, you create a basic Azure SignalR instance to use for your app. The following steps use the Azure portal to create a new instance, but you can also use the Azure CLI. For more information, see the az signalr create command in the Azure SignalR Service CLI Reference.
- Sign in to the Azure portal.
- In the upper-left side of the page, select + Create a resource.
- On the Create a resource page, in the Search services and marketplace text box, enter signalr and then select SignalR Service from the list.
- On the SignalR Service page, select Create.
- On the Basics tab, you enter the essential information for your new SignalR Service instance. Enter the following values:
| Field | Suggested Value | Description |
|---|---|---|
| Subscription | Choose your subscription | Select the subscription you want to use to create a new SignalR Service instance. |
| Resource group | Create a resource group named SignalRTestResources | Select or create a resource group for your SignalR resource. It's useful to create a new resource group for this tutorial instead of using an existing resource group. To free resources after completing the tutorial, delete the resource group. Deleting a resource group also deletes all of the resources that belong to the group. This action can't be undone. Before you delete a resource group, make certain that it doesn't contain resources you want to keep. For more information, see Using resource groups to manage your Azure resources. |
| Resource name | testsignalr | Enter a unique resource name to use for the SignalR resource. If testsignalr is already taken in your region, add a digit or character until the name is unique. The name must be a string of 1 to 63 characters and contain only numbers, letters, and the hyphen ( -) character. The name can't start or end with the hyphen character, and consecutive hyphen characters aren't valid. |
| Region | Choose your region | Select the appropriate region for your new SignalR Service instance. Azure SignalR Service isn't currently available in all regions. For more information, see Azure SignalR Service region availability |
| Pricing tier | Select Change and then choose Free (Dev/Test Only). Choose Select to confirm your choice of pricing tier. | Azure SignalR Service has three pricing tiers: Free, Standard, and Premium. Tutorials use the Free tier, unless noted otherwise in the prerequisites. For more information about the functionality differences between tiers and pricing, see Azure SignalR Service pricing |
| Service mode | Choose the appropriate service mode | Use Default when you host the SignalR hub logic in your web apps and use SignalR service as a proxy. Use Serverless when you use Serverless technologies such as Azure Functions to host the SignalR hub logic. Classic mode is only for backward compatibility and isn't recommended to use. For more information, see Service mode in Azure SignalR Service. |
You don't need to change the settings on the Networking and Tags tabs for the SignalR tutorials.
- Select the Review + create button at the bottom of the Basics tab.
- On the Review + create tab, review the values and then select Create. It takes a few moments for deployment to complete.
- When the deployment is complete, select the Go to resource button.
- On the SignalR resource page, select Keys from the menu on the left, under Settings.
- Copy the Connection string for the primary key. You need this connection string to configure your app later in this tutorial.
Create an ASP.NET Core web app
In this section, you use the .NET Core command-line interface (CLI) to create an ASP.NET Core MVC web app project. The advantage of using the .NET Core CLI over Visual Studio is that it's available across the Windows, macOS, and Linux platforms.
Create a folder for your project. This quickstart uses the chattest folder.
In the new folder, run the following command to create the project:
dotnet new web
Add Secret Manager to the project
In this section, you'll add the Secret Manager tool to your project. The Secret Manager tool stores sensitive data for development work outside your project tree. This approach helps prevent the accidental sharing of app secrets in source code.
In the folder, init
UserSecretsIdby running the following command:dotnet user-secrets initAdd a secret named Azure:SignalR:ConnectionString to Secret Manager.
This secret will contain the connection string to access your SignalR Service resource. Azure:SignalR:ConnectionString is the default configuration key that SignalR looks for to establish a connection. Replace the value in the following command with the connection string for your SignalR Service resource.
You must run this command in the same directory as the
csprojfile.dotnet user-secrets set Azure:SignalR:ConnectionString "<Your connection string>"Secret Manager will be used only for testing the web app while it's hosted locally. In a later tutorial, you'll deploy the chat web app to Azure. After the web app is deployed to Azure, you'll use an application setting instead of storing the connection string with Secret Manager.
This secret is accessed with the Configuration API. A colon (:) works in the configuration name with the Configuration API on all supported platforms. See Configuration by environment.
Add Azure SignalR to the web app
Add a reference to the
Microsoft.Azure.SignalRNuGet package by running the following command:dotnet add package Microsoft.Azure.SignalROpen Program.cs and update the code to the following, it calls the
AddSignalR()andAddAzureSignalR()methods to use Azure SignalR Service:var builder = WebApplication.CreateBuilder(args); builder.Services.AddSignalR().AddAzureSignalR(); var app = builder.Build(); app.UseDefaultFiles(); app.UseRouting(); app.UseStaticFiles(); app.MapHub<ChatSampleHub>("/chat"); app.Run();Not passing a parameter to
AddAzureSignalR()means it uses the default configuration key for the SignalR Service resource connection string. The default configuration key is Azure:SignalR:ConnectionString. It also usesChatSampleHubwhich we will create in the below section.
Add a hub class
In SignalR, a hub is a core component that exposes a set of methods that can be called by the client. In this section, you define a hub class with two methods:
BroadcastMessage: This method broadcasts a message to all clients.Echo: This method sends a message back to the caller.
Both methods use the Clients interface that the ASP.NET Core SignalR SDK provides. This interface gives you access to all connected clients, so you can push content to your clients.
In your project directory, add a new folder named Hub. Add a new hub code file named ChatSampleHub.cs to the new folder.
Add the following code to ChatSampleHub.cs to define your hub class and save the file.
using Microsoft.AspNetCore.SignalR;

public class ChatSampleHub : Hub
{
    public Task BroadcastMessage(string name, string message) =>
        Clients.All.SendAsync("broadcastMessage", name, message);

    public Task Echo(string name, string message) =>
        Clients.Client(Context.ConnectionId)
                .SendAsync("echo", name, $"{message} (echo from server)");
}
Add the client interface for the web app
The client user interface for this chat room app will consist of HTML and JavaScript in a file named index.html in the wwwroot directory.
Copy the css/site.css file from the wwwroot folder of the samples repository. Replace your project's css/site.css with the one you copied.
Create a new file in the wwwroot directory named index.html, copy and paste the following HTML into the newly created file.
<!DOCTYPE html>
<html>
<head>
<meta http-equiv="Cache-Control" content="no-cache, no-store, must-revalidate" />
<meta name="viewport" content="width=device-width">
<meta http-equiv="Pragma" content="no-cache" />
<meta http-equiv="Expires" content="0" />
<link href="https://cdn.jsdelivr.net/npm/bootstrap@3.3.7/dist/css/bootstrap.min.css" rel="stylesheet" />
<link href="css/site.css" rel="stylesheet" />
<title>Azure SignalR Group Chat</title>
</head>
<body>
<h2 class="text-center" style="margin-top: 0; padding-top: 30px; padding-bottom: 30px;">Azure SignalR Group Chat</h2>
<div class="container" style="height: calc(100% - 110px);">
<div id="messages" style="background-color: whitesmoke; "></div>
<div style="width: 100%; border-left-style: ridge; border-right-style: ridge;">
<textarea id="message" style="width: 100%; padding: 5px 10px; border-style: hidden;"
placeholder="Type message and press Enter to send..."></textarea>
</div>
<div style="overflow: auto; border-style: ridge; border-top-style: hidden;">
<button class="btn-warning pull-right" id="echo">Echo</button>
<button class="btn-success pull-right" id="sendmessage">Send</button>
</div>
</div>
<div class="modal alert alert-danger fade" id="myModal" tabindex="-1" role="dialog" aria-labelledby="myModalLabel">
<div class="modal-dialog" role="document">
<div class="modal-content">
<div class="modal-header">
<div>Connection Error...</div>
<div><strong style="font-size: 1.5em;">Hit Refresh/F5</strong> to rejoin. ;)</div>
</div>
</div>
</div>
</div>
<!--Reference the SignalR library. -->
<script src="https://cdnjs.cloudflare.com/ajax/libs/microsoft-signalr/6.0.1/signalr.js"></script>
<!--Add script to update the page and send messages.-->
<script type="text/javascript">
document.addEventListener("DOMContentLoaded", function () {
function getUserName() {
function generateRandomName() {
return Math.random().toString(36).substring(2, 10);
}
// Get the user name and store it to prepend to messages.
var username = generateRandomName();
var promptMessage = "Enter your name:";
do {
username = prompt(promptMessage, username);
if (!username || username.startsWith("_") || username.indexOf("<") > -1 || username.indexOf(">") > -1) {
username = "";
promptMessage = "Invalid input. Enter your name:";
}
} while (!username)
return username;
}
username = getUserName();
// Set initial focus to message input box.
var messageInput = document.getElementById("message");
messageInput.focus();
function createMessageEntry(encodedName, encodedMsg) {
var entry = document.createElement("div");
entry.classList.add("message-entry");
if (encodedName === "_SYSTEM_") {
entry.innerHTML = encodedMsg;
entry.classList.add("text-center");
entry.classList.add("system-message");
} else if (encodedName === "_BROADCAST_") {
entry.classList.add("text-center");
entry.innerHTML = `<div class="text-center broadcast-message">${encodedMsg}</div>`;
} else if (encodedName === username) {
entry.innerHTML = `<div class="message-avatar pull-right">${encodedName}</div>` +
`<div class="message-content pull-right">${encodedMsg}<div>`;
} else {
entry.innerHTML = `<div class="message-avatar pull-left">${encodedName}</div>` +
`<div class="message-content pull-left">${encodedMsg}<div>`;
}
return entry;
}
function appendMessage(encodedName, encodedMsg) {
var messageEntry = createMessageEntry(encodedName, encodedMsg);
var messageBox = document.getElementById("messages");
messageBox.appendChild(messageEntry);
messageBox.scrollTop = messageBox.scrollHeight;
}
function bindConnectionMessage(connection) {
var messageCallback = function (name, message) {
if (!message) return;
// Html encode display name and message.
var encodedName = name;
var encodedMsg = message.replace(/&/g, "&").replace(/</g, "<").replace(/>/g, ">");
appendMessage(encodedName, encodedMsg);
};
// Create a function that the hub can call to broadcast messages.
connection.on("broadcastMessage", messageCallback);
connection.on("echo", messageCallback);
connection.onclose(onConnectionError);
}
function onConnected(connection) {
console.log("connection started");
connection.send("broadcastMessage", "_SYSTEM_", username + " JOINED");
document.getElementById("sendmessage").addEventListener("click", function (event) {
// Call the broadcastMessage method on the hub.
if (messageInput.value) {
connection.send("broadcastMessage", username, messageInput.value)
.catch((e) => appendMessage("_BROADCAST_", e.message));
}
// Clear text box and reset focus for next comment.
messageInput.value = "";
messageInput.focus();
event.preventDefault();
});
document.getElementById("message").addEventListener("keypress", function (event) {
if (event.keyCode === 13) {
event.preventDefault();
document.getElementById("sendmessage").click();
return false;
}
});
document.getElementById("echo").addEventListener("click", function (event) {
// Call the echo method on the hub.
connection.send("echo", username, messageInput.value);
// Clear text box and reset focus for next comment.
messageInput.value = "";
messageInput.focus();
event.preventDefault();
});
}
function onConnectionError(error) {
if (error && error.message) {
console.error(error.message);
}
var modal = document.getElementById("myModal");
modal.classList.add("in");
modal.style = "display: block;";
}
var connection = new signalR.HubConnectionBuilder()
.withUrl("/chat")
.build();
bindConnectionMessage(connection);
connection.start()
.then(function () {
onConnected(connection);
})
.catch(function (error) {
console.error(error.message);
});
});
</script>
</body>
</html>
The code in index.html calls HubConnectionBuilder.build() to make an HTTP connection to the Azure SignalR resource.
If the connection is successful, that connection is passed to bindConnectionMessage, which adds event handlers for incoming content pushes to the client.
HubConnection.start() starts communication with the hub. Then, onConnected() adds the button event handlers. These handlers use the connection to allow this client to push content updates to all connected clients.
Build and run the app locally
Run the following command to run the web app locally:
dotnet runThe app will be hosted locally with output containing the localhost URL, for example, as the following:
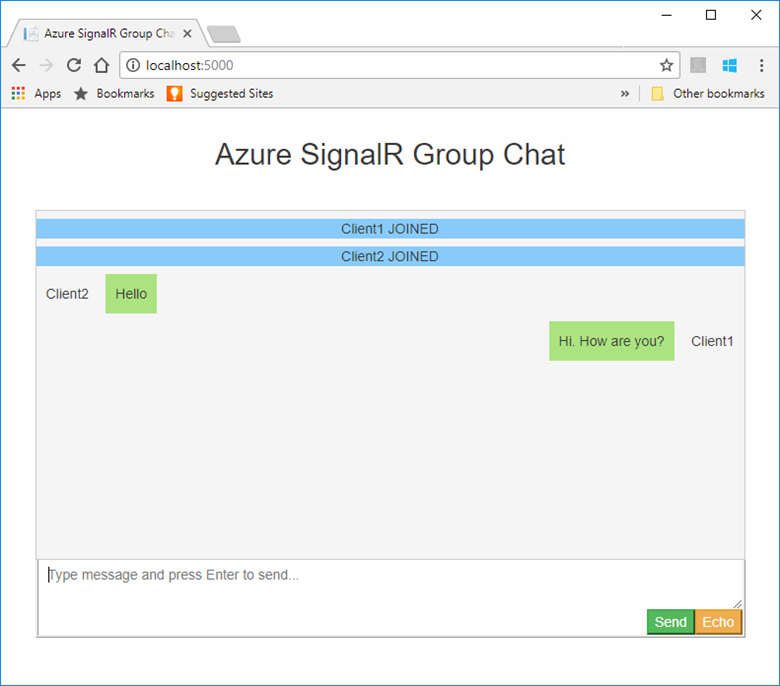
Building...
info: Microsoft.Hosting.Lifetime[14]
      Now listening on: http://localhost:5000
info: Microsoft.Hosting.Lifetime[0]
      Application started. Press Ctrl+C to shut down.
info: Microsoft.Hosting.Lifetime[0]
      Hosting environment: Development
Open two browser windows. In each browser, go to the localhost URL shown in the output window, for example, http://localhost:5000/ as the above output window shows. You're prompted to enter your name. Enter a client name for both clients and test pushing message content between both clients by using the Send button.
Clean up resources
If you'll continue to the next tutorial, you can keep the resources created in this quickstart and reuse them.
If you're finished with the quickstart sample application, you can delete the Azure resources created in this quickstart to avoid charges.
Important
Deleting a resource group is irreversible and includes all the resources in that group. Make sure that you don't accidentally delete the wrong resource group or resources. If you created the resources in this sample in an existing resource group that contains resources you want to keep, you can delete each resource individually from its blade instead of deleting the resource group.
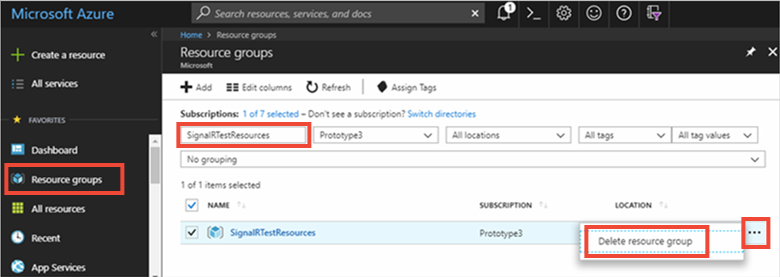
Sign in to the Azure portal and select Resource groups.
In the Filter by name text box, type the name of your resource group. The instructions for this quickstart used a resource group named SignalRTestResources. On your resource group in the result list, select the ellipsis (...) > Delete resource group.
You're asked to confirm the deletion of the resource group. Enter the name of your resource group to confirm, and select Delete.
After a few moments, the resource group and all of its resources are deleted.
Having issues? Try the troubleshooting guide or let us know.
Next steps
In this quickstart, you created a new Azure SignalR Service resource. You then used it with an ASP.NET Core web app to push content updates in real-time to multiple connected clients. To learn more about using Azure SignalR Service, continue to the tutorial that demonstrates authentication.
Feedback
Coming soon: Throughout 2024 we will be phasing out GitHub Issues as the feedback mechanism for content and replacing it with a new feedback system. For more information see: https://aka.ms/ContentUserFeedback.
Submit and view feedback for