Migrate to Innovate Summit:
Learn how migrating and modernizing to Azure can boost your business's performance, resilience, and security, enabling you to fully embrace AI.Register now
This browser is no longer supported.
Upgrade to Microsoft Edge to take advantage of the latest features, security updates, and technical support.
This quickstart describes how to connect an application to a database in Azure SQL Database and perform queries using Node.js and mssql. This quickstart follows the recommended passwordless approach to connect to the database.
Passwordless connections for developers
Passwordless connections offer a more secure mechanism for accessing Azure resources. The following high-level steps are used to connect to Azure SQL Database using passwordless connections in this article:
Prepare your environment for password-free authentication.
For a local environment: Your personal identity is used. This identity can be pulled from an IDE, CLI, or other local development tools.
Secure, passwordless connections to Azure SQL Database require certain database configurations. Verify the following settings on your logical server in Azure to properly connect to Azure SQL Database in both local and hosted environments:
For local development connections, make sure your logical server is configured to allow your local machine IP address and other Azure services to connect:
Navigate to the Networking page of your server.
Toggle the Selected networks radio button to show additional configuration options.
Select Add your client IPv4 address(xx.xx.xx.xx) to add a firewall rule that will enable connections from your local machine IPv4 address. Alternatively, you can also select + Add a firewall rule to enter a specific IP address of your choice.
Make sure the Allow Azure services and resources to access this server checkbox is selected.
Warning
Enabling the Allow Azure services and resources to access this server setting is not a recommended security practice for production scenarios. Real applications should implement more secure approaches, such as stronger firewall restrictions or virtual network configurations.
You can read more about database security configurations on the following resources:
The server must also have Microsoft Entra authentication enabled and have a Microsoft Entra admin account assigned. For local development connections, the Microsoft Entra admin account should be an account you can also log into Visual Studio or the Azure CLI with locally. You can verify whether your server has Microsoft Entra authentication enabled on the Microsoft Entra ID page of your logical server.
If you're using a personal Azure account, make sure you have Microsoft Entra setup and configured for Azure SQL Database in order to assign your account as a server admin. If you're using a corporate account, Microsoft Entra ID will most likely already be configured for you.
Create the project
The steps in this section create a Node.js REST API.
Create a new directory for the project and navigate into it.
Initialize the project by running the following command in the terminal:
Bash
npm init -y
Install the required packages used in the sample code in this article:
Passwordless configuration objects are safe to commit to source control, since they do not contain any secrets such as usernames, passwords, or access keys.
Add the following text and update with your values for <YOURSERVERNAME>, <YOURDATABASENAME>, <YOURUSERNAME>, and <YOURPASSWORD>.
Use caution when managing connection objects that contain secrets such as usernames, passwords, or access keys. These secrets shouldn't be committed to source control or placed in unsecure locations where they might be accessed by unintended users.
Add the code to connect to Azure SQL Database
Create a database.js file and add the following code:
JavaScript
import sql from'mssql';
let database = null;
exportdefaultclassDatabase{
config = {};
poolconnection = null;
connected = false;
constructor(config) {
this.config = config;
}
async connect() {
try {
this.poolconnection = await sql.connect(this.config);
this.connected = true;
console.log('Database connected successfully.');
returnthis.poolconnection;
} catch (error) {
console.error('Error connecting to the database:', error);
this.connected = false;
}
}
async disconnect() {
try {
if (this.connected) {
awaitthis.poolconnection.close();
this.connected = false;
console.log('Database disconnected successfully.');
}
} catch (error) {
console.error('Error disconnecting from the database:', error);
}
}
async executeQuery(query) {
const request = this.poolconnection.request();
const result = await request.query(query);
return result.rowsAffected[0];
}
async create(data) {
const request = this.poolconnection.request();
request.input('firstName', sql.NVarChar(255), data.firstName);
request.input('lastName', sql.NVarChar(255), data.lastName);
const result = await request.query(
`INSERT INTO Person (firstName, lastName) VALUES (@firstName, @lastName)`
);
return result.rowsAffected[0];
}
async readAll() {
const request = this.poolconnection.request();
const result = await request.query(`SELECT * FROM Person`);
return result.recordsets[0];
}
async read(id) {
const request = this.poolconnection.request();
const result = await request
.input('id', sql.Int, +id)
.query(`SELECT * FROM Person WHERE id = @id`);
return result.recordset[0];
}
async update(id, data) {
const request = this.poolconnection.request();
request.input('id', sql.Int, +id);
request.input('firstName', sql.NVarChar(255), data.firstName);
request.input('lastName', sql.NVarChar(255), data.lastName);
const result = await request.query(
`UPDATE Person SET firstName=@firstName, lastName=@lastName WHERE id = @id`
);
return result.rowsAffected[0];
}
asyncdelete(id) {
const idAsNumber = Number(id);
const request = this.poolconnection.request();
const result = await request
.input('id', sql.Int, idAsNumber)
.query(`DELETE FROM Person WHERE id = @id`);
return result.rowsAffected[0];
}
async createTable() {
if (process.env.NODE_ENV === 'development') {
this.executeQuery(
`IF NOT EXISTS (SELECT * FROM INFORMATION_SCHEMA.TABLES WHERE TABLE_NAME = 'Person')
BEGIN
CREATE TABLE Person (
id int NOT NULL IDENTITY,
firstName varchar(255),
lastName varchar(255)
);
END`
)
.then(() => {
console.log('Table created');
})
.catch((err) => {
// Table may already existconsole.error(`Error creating table: ${err}`);
});
}
}
}
exportconst createDatabaseConnection = async (passwordConfig) => {
database = new Database(passwordConfig);
await database.connect();
await database.createTable();
return database;
};
Test the app locally
The app is ready to be tested locally. Make sure you're signed in to the Azure Cloud in Visual Studio Code with the same account you set as the admin for your database.
Run the application with the following command. The app starts on port 3000.
Bash
NODE_ENV=development node index.js
The Person table is created in the database when you run this application.
In a browser, navigate to the OpenAPI explorer at http://localhost:3000.
On the Swagger UI page, expand the POST method and select Try it.
Modify the sample JSON to include values for the properties. The ID property is ignored.
Select Execute to add a new record to the database. The API returns a successful response.
Expand the GET method on the Swagger UI page and select Try it. Select Execute, and the person you just created is returned.
Configure project for zip deployment
Create a .vscode folder and create a settings.json file in the folder.
Add the following to ignore environment variables and dependencies during the zip deployment.
The app is ready to be deployed to Azure. Visual Studio Code can create an Azure App Service and deploy your application in a single workflow.
Make sure the app is stopped.
Sign in to Azure, if you haven't already, by selecting the Azure: Sign In to Azure Cloud command in the Command Palette (Ctrl + Shift + P)
In Visual Studio Code's Azure Explorer window, right-click on the App Services node and select Create New Web App (Advanced).
Use the following table to create the App Service:
Prompt
Value
Enter a globally unique name for the new web app.
Enter a prompt such as azure-sql-passwordless. Post-pend a unique string such as 123.
Select a resource group for new resources.
Select +Create a new resource group then select the default name.
Select a runtime stack.
Select an LTS version of the Node.js stack.
Select an OS.
Select Linux.
Select a location for new resources.
Select a location close to you.
Select a Linux App Service plan.
Select Create new App Service plan. then select the default name.
Select a pricing tier.
Select Free (F1).
Select an Application Insights resource for your app.
Select Skip for now.
Wait until the notification that your app was created before continuing.
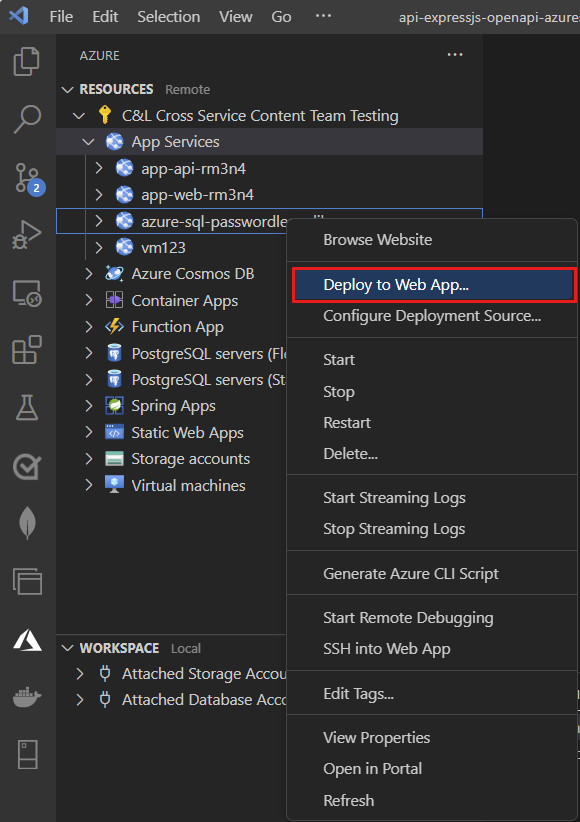
In the Azure Explorer, expand the App Services node and right-click your new app.
Select Deploy to Web App.
Select the root folder of the JavaScript project.
When the Visual Studio Code pop-up appears, select Deploy.
When the deployment finishes, the app doesn't work correctly on Azure. You still need to configure the secure connection between the App Service and the SQL database to retrieve your data.
Service Connector is a tool that streamlines authenticated connections between different services in Azure. Service Connector currently supports connecting an App Service to an Azure SQL database via the Azure CLI using the az webapp connection create sql command. This single command completes the three steps mentioned above for you.
Create the managed identity with Service Connector
Run the following command in the Azure portal's Cloud Shell. The Cloud Shell has the latest version of the Azure CLI. Replace the variables in <> with your own values.
You can verify the changes made by Service Connector on the App Service settings.
In Visual Studio Code, in the Azure explorer, right-click your App Service and select Open in portal.
Navigate to the Identity page for your App Service. Under the System assigned tab, the Status should be set to On. This value means that a system-assigned managed identity was enabled for your app.
Navigate to the Configuration page for your App Service. Under the Application Settings tab, you should see several environment variables, which were already in the mssql configuration object.
AZURE_SQL_SERVER
AZURE_SQL_DATABASE
AZURE_SQL_PORT
AZURE_SQL_AUTHENTICATIONTYPE
Don't delete or change the property names or values.
The Azure portal allows you to work with managed identities and run queries against Azure SQL Database. Complete the following steps to create a passwordless connection from your App Service instance to Azure SQL Database:
Create the managed identity
In the Azure portal, navigate to your App Service and select Identity on the left navigation.
On the identity page, change the System-assigned status to on and select Save.
When asked to enable the identity, select Yes.
When this setting is enabled, a system-assigned managed identity is created with the same name as your App Service. System-assigned identities are tied to the service instance and are destroyed with the app when it's deleted.
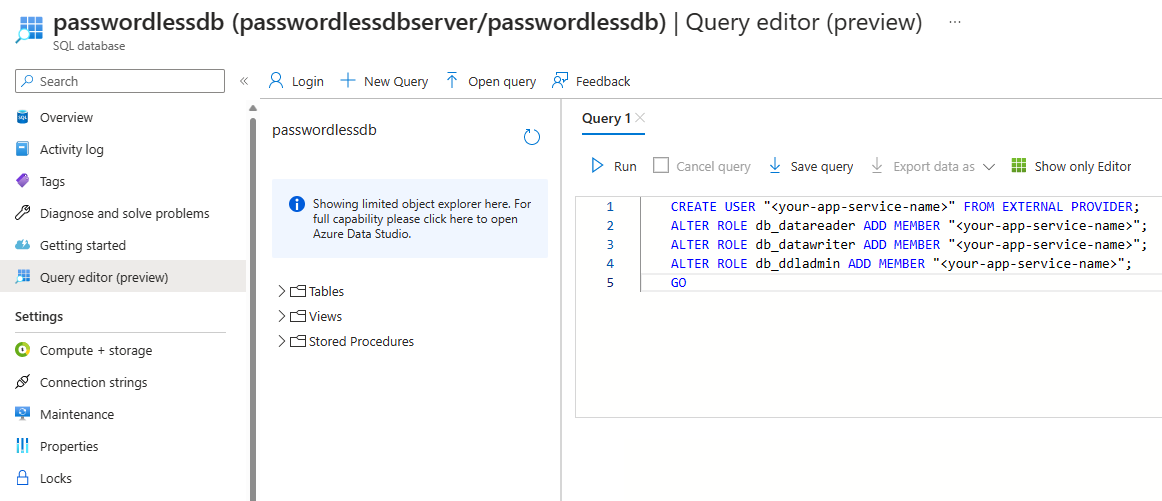
Create the database user and assign roles
In the Azure portal, browse to your SQL database and select Query editor (preview).
Select Continue as <your-username> on the right side of the screen to sign into the database using your account.
On the query editor view, run the following T-SQL commands. Replace <your-app-service-name> with your App Service resource's name.
This SQL script creates a SQL database user that maps back to the managed identity of your App Service instance. It also assigns the necessary SQL roles to the user to allow your app to read, write, and modify the data and schema of your database. After this step is completed, your services are connected.
Important
Although this solution provides a simple approach for getting started, it's not a best practice for production-grade environments. In those scenarios, the app shouldn't perform all operations using a single, elevated identity. You should try to implement the principle of least privilege by configuring multiple identities with specific permissions for specific tasks.
You can read more about configuring database roles and security on the following resources:
In the Azure portal, navigate to your App Service and select Configuration on the left navigation.
Select + New application setting for each environment variable below. Add your own appropriate value to create the required environment variables for your App Service instance to connect to your database.
In Visual Studio Code, in the Azure explorer, right-click your App Service and select Open in portal.
Navigate to the Configuration page for your App Service. Under the Application Settings tab, create environment variables for each property in the following table, with your own values.
Use caution when managing connection objects that contain secrets such as usernames, passwords, or access keys. These secrets shouldn't be committed to source control or placed in unsecure locations where they might be accessed by unintended users. For a real application in a production-grade Azure environment, you can store connection information in a secure location such as App Service configuration settings or Azure Key Vault. During local development, you'll generally connect to a local database that doesn't require storing secrets or connecting directly to Azure.
Test the deployed application
Browse to the URL of the app to test that the connection to Azure SQL Database is working. You can locate the URL of your app on the App Service overview page.
The person you created locally should display in the browser. Congratulations! Your application is now connected to Azure SQL Database in both local and hosted environments.
Tip
If you receive a 500 Internal Server error while testing, it may be due to your database networking configurations. Verify that your logical server is configured with the settings outlined in the Configure the database section.
Clean up the resources
When you are finished working with the Azure SQL Database, delete the resource to avoid unintended costs.
Administer an SQL Server database infrastructure for cloud, on-premises and hybrid relational databases using the Microsoft PaaS relational database offerings.
How to use Node.js to create a program that connects to a database in Azure SQL Database or Azure SQL Managed Instance, and query it using T-SQL statements.