Tutorial: Secure with Microsoft Entra logins - Azure SQL Managed Instance
Applies to: ![]() Azure SQL Managed Instance
Azure SQL Managed Instance
In this article, learn to use server principals (logins) backed by Microsoft Entra ID (formerly Azure Active Directory) to secure an Azure SQL Managed Instance.
In this tutorial, you learn how to:
- Create a Microsoft Entra login for a managed instance
- Grant permissions to logins in a managed instance
- Create Microsoft Entra users from logins
- Assign permissions to users and manage database security
- Use impersonation with users
- Use cross-database queries with users
- Learn about security features, such as threat protection, auditing, data masking, and encryption
Note
Microsoft Entra ID was previously known as Azure Active Directory (Azure AD).
Prerequisites
To complete the tutorial, make sure you have the following prerequisites:
- SQL Server Management Studio (SSMS)
- A managed instance
- Follow this article: Quickstart: Create a managed instance
- Able to access your managed instance and provisioned a Microsoft Entra administrator for the managed instance. To learn more, see:
Limit access
Managed instances can be accessed through a private IP address. Much like an isolated SQL Server environment, applications or users need access to the SQL Managed Instance network (VNet) before a connection can be established. For more information, see Connect your application to SQL Managed Instance.
It is also possible to configure a service endpoint on a managed instance, which allows for public connections in the same fashion as for Azure SQL Database. For more information, see Configure public endpoint in Azure SQL Managed Instance.
Create a Microsoft Entra login using SSMS
The first Microsoft Entra login can be created by the SQL admin, or the Microsoft Entra admin created during provisioning. For more information, see Provision a Microsoft Entra administrator for SQL Managed Instance.
See the following articles for examples of connecting to SQL Managed Instance:
- Quickstart: Configure Azure VM to connect to SQL Managed Instance
- Quickstart: Configure a point-to-site connection to SQL Managed Instance from on-premises
Connect to your managed instance with either a
sysadminSQL login or the Microsoft Entra admin by using SQL Server Management Studio (SSMS).In Object Explorer, right-click the server and choose New Query.
In the query window, use the following syntax to create a login for a local Microsoft Entra account:
USE master
GO
CREATE LOGIN login_name FROM EXTERNAL PROVIDER
GO
This example creates a login for the account nativeuser@aadsqlmi.onmicrosoft.com.
USE master
GO
CREATE LOGIN [nativeuser@aadsqlmi.onmicrosoft.com] FROM EXTERNAL PROVIDER
GO
On the toolbar, select Execute to create the login.
Check the newly added login, by executing the following T-SQL command:
SELECT *
FROM sys.server_principals;
GO
For more information, see CREATE LOGIN.
Grant permissions to create logins
Existing logins must have appropriate permissions or be part of appropriate server roles to create other Microsoft Entra logins.
SQL auth logins
- If the login is a SQL auth-based server principal, it must be assigned the
sysadminrole to create logins for Microsoft Entra accounts.
Microsoft Entra auth logins
- If the login is a Microsoft Entra server principal, it must be assigned either the
sysadminorsecurityadminserver role to create logins for other Microsoft Entra users, groups, and applications. - At a minimum, the ALTER ANY LOGIN permission must be granted to create other Microsoft Entra logins.
- By default, the standard permissions granted to newly created Microsoft Entra logins in
masterare: CONNECT SQL and VIEW ANY DATABASE. - The
sysadminserver role can be granted to many Microsoft Entra logins within a managed instance.
To add the login to the sysadmin server role:
Log into the managed instance again, or use the existing connection with the Microsoft Entra admin or SQL principal that is a
sysadmin.In Object Explorer, right-click the server and choose New Query.
Grant the Microsoft Entra login the
sysadminserver role by using the following T-SQL syntax:ALTER SERVER ROLE sysadmin ADD MEMBER login_name GOThe following example grants the
sysadminserver role to the login nativeuser@aadsqlmi.onmicrosoft.comALTER SERVER ROLE sysadmin ADD MEMBER [nativeuser@aadsqlmi.onmicrosoft.com] GO
Create additional Microsoft Entra logins using SSMS
Once the Microsoft Entra login has been created and granted sysadmin privileges, that login can create additional logins using the FROM EXTERNAL PROVIDER clause with CREATE LOGIN.
Connect to the managed instance with the Microsoft Entra login by selecting Connect to Server in SQL Server Management Studio (SSMS).
- Enter your SQL Managed Instance host name in Server name.
- For Authentication, select Active Directory - Universal with MFA support to bring up a multifactor authentication login window. Sign in. For more information, see Universal Authentication (SSMS support for multifactor authentication).
In Object Explorer, right-click the server and choose New Query.
In the query window, use the following syntax to create a login for another Microsoft Entra account:
USE master
GO
CREATE LOGIN login_name FROM EXTERNAL PROVIDER
GO
This example creates a login for the Microsoft Entra user bob@aadsqlmi.net, whose domain aadsqlmi.net is federated with the Microsoft Entra aadsqlmi.onmicrosoft.com domain.
Execute the following T-SQL command. Federated Microsoft Entra accounts are the SQL Managed Instance replacements for on-premises Windows logins and users.
USE master
GO
CREATE LOGIN [bob@aadsqlmi.net] FROM EXTERNAL PROVIDER
GO
Create a database in the managed instance using the CREATE DATABASE syntax. This database will be used to test user logins in the next section.
In Object Explorer, right-click the server and choose New Query.
In the query window, use the following syntax to create a database named MyMITestDB.
CREATE DATABASE MyMITestDB;
GO
Create a SQL Managed Instance login for a group in Microsoft Entra ID. The group needs to exist in Microsoft Entra ID before adding the login to SQL Managed Instance. See Create a basic group and add members using Microsoft Entra ID. Create a group mygroup and add members to this group.
Open a new query window in SQL Server Management Studio.
This example assumes there exists a group called mygroup in Microsoft Entra ID. Execute the following command:
USE master
GO
CREATE LOGIN [mygroup] FROM EXTERNAL PROVIDER
GO
As a test, log into the managed instance with the newly created login or group. Open a new connection to the managed instance, and use the new login when authenticating.
In Object Explorer, right-click the server and choose New Query for the new connection.
Check server permissions for the newly created Microsoft Entra login by executing the following command:
SELECT * FROM sys.fn_my_permissions (NULL, 'DATABASE')
GO
Azure SQL's support of Microsoft Entra principals as users and logins extends to Microsoft Entra External ID internal and external guest users. Guest users, both individually and as part of a group, can be used the same as any other Microsoft Entra user in Azure SQL. If you want guest users to be able to create other Microsoft Entra server logins or database users, they must have permissions to read other identities in the Microsoft Entra directory. This permission is configured at the directory-level. For more information, see guest access permissions in Microsoft Entra ID.
Create a Microsoft Entra user from the Microsoft Entra login
Authorization to individual databases works much the same way in SQL Managed Instance as with databases in SQL Server. You can create user from an existing login in a database that is granted permissions to that database, or added to a database role.
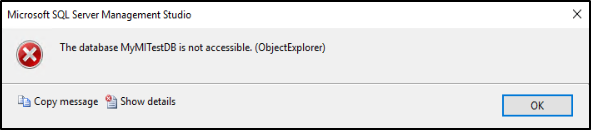
Now that we've created a database called MyMITestDB, and a login that only has default permissions, the next step is to create a user from that login. At the moment, the login can connect to the managed instance, and see all the databases, but can't interact with the databases. If you sign in with the Microsoft Entra account that has the default permissions, and try to expand the newly created database, you'll see the following error:
For more information on granting database permissions, see Getting Started with Database Engine Permissions.
Create a Microsoft Entra user and create a sample table
Note
There are some limitations when a user signs in as part of a Microsoft Entra group.
For example, a call to SUSER_SID returns NULL, since the given Microsoft Entra user is not part of the sys.server_principals table.
Therefore, access to certain stored procedures or a list of granted permissions may be limited in this case.
Log into your managed instance using a
sysadminaccount using SQL Server Management Studio.In Object Explorer, right-click the server and choose New Query.
In the query window, use the following syntax to create a user from a Microsoft Entra login:
USE <Database Name> -- provide your database name
GO
CREATE USER user_name FROM LOGIN login_name
GO
The following example creates a user bob@aadsqlmi.net from the login bob@aadsqlmi.net:
USE MyMITestDB
GO
CREATE USER [bob@aadsqlmi.net] FROM LOGIN [bob@aadsqlmi.net]
GO
It's also supported to create a Microsoft Entra user from a Microsoft Entra login that is a group.
The following example creates a login for the Microsoft Entra group mygroup that exists in your Microsoft Entra tenant.
USE MyMITestDB
GO
CREATE USER [mygroup] FROM LOGIN [mygroup]
GO
All users that belong to mygroup can access the MyMITestDB database.
Important
When creating a USER from a Microsoft Entra login, specify the user_name as the same login_name from LOGIN.
For more information, see CREATE USER.
In a new query window, create a test table using the following T-SQL command:
USE MyMITestDB
GO
CREATE TABLE TestTable
(
AccountNum varchar(10),
City varchar(255),
Name varchar(255),
State varchar(2)
);
Create a connection in SSMS with the user that was created. You'll notice that you cannot see the table TestTable that was created by the
sysadminearlier. We need to provide the user with permissions to read data from the database.You can check the current permission the user has by executing the following command:
SELECT * FROM sys.fn_my_permissions('MyMITestDB','DATABASE')
GO
Add users to database-level roles
For the user to see data in the database, we can provide database-level roles to the user.
Log into your managed instance using a
sysadminaccount using SQL Server Management Studio.In Object Explorer, right-click the server and choose New Query.
Grant the Microsoft Entra user the
db_datareaderdatabase role by using the following T-SQL syntax:Use <Database Name> -- provide your database name ALTER ROLE db_datareader ADD MEMBER user_name GOThe following example provides the user bob@aadsqlmi.net and the group mygroup with
db_datareaderpermissions on the MyMITestDB database:USE MyMITestDB GO ALTER ROLE db_datareader ADD MEMBER [bob@aadsqlmi.net] GO ALTER ROLE db_datareader ADD MEMBER [mygroup] GOCheck the Microsoft Entra user that was created in the database exists by executing the following command:
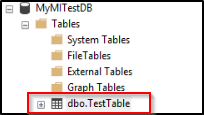
SELECT * FROM sys.database_principals
GO
Create a new connection to the managed instance with the user that has been added to the
db_datareaderrole.Expand the database in Object Explorer to see the table.
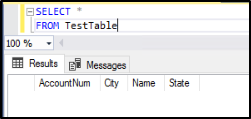
Open a new query window and execute the following SELECT statement:
SELECT *
FROM TestTable
Are you able to see data from the table? You should see the columns being returned.
Impersonate Microsoft Entra logins
SQL Managed Instance supports the impersonation of Microsoft Entra logins.
Test impersonation
Log into your managed instance using a
sysadminaccount using SQL Server Management Studio.In Object Explorer, right-click the server and choose New Query.
In the query window, use the following command to create a new stored procedure:
USE MyMITestDB
GO
CREATE PROCEDURE dbo.usp_Demo
WITH EXECUTE AS 'bob@aadsqlmi.net'
AS
SELECT user_name();
GO
Use the following command to see that the user you're impersonating when executing the stored procedure is bob@aadsqlmi.net.
Exec dbo.usp_DemoTest impersonation by using the EXECUTE AS LOGIN statement:
EXECUTE AS LOGIN = 'bob@aadsqlmi.net'
GO
SELECT SUSER_SNAME()
REVERT
GO
Note
Only SQL server-level logins that are part of the sysadmin role can execute the following operations targeting Microsoft Entra principals:
- EXECUTE AS USER
- EXECUTE AS LOGIN
Use cross-database queries
Cross-database queries are supported for Microsoft Entra accounts with Microsoft Entra logins. To test a cross-database query with a Microsoft Entra group, we need to create another database and table. You can skip creating another database and table if one already exists.
Log into your managed instance using a
sysadminaccount using SQL Server Management Studio.In Object Explorer, right-click the server and choose New Query.
In the query window, use the following command to create a database named MyMITestDB2 and table named TestTable2:
CREATE DATABASE MyMITestDB2;
GO
USE MyMITestDB2
GO
CREATE TABLE TestTable2
(
EmpId varchar(10),
FirstName varchar(255),
LastName varchar(255),
Status varchar(10)
);
In a new query window, execute the following command to create the user mygroup in the new database MyMITestDB2, and grant SELECT permissions on that database to mygroup:
USE MyMITestDB2
GO
CREATE USER [mygroup] FROM LOGIN [mygroup]
GO
GRANT SELECT TO [mygroup]
GO
Sign into the managed instance using SQL Server Management Studio as a member of the Microsoft Entra group mygroup. Open a new query window and execute the cross-database SELECT statement:
USE MyMITestDB
SELECT * FROM MyMITestDB2..TestTable2
GO
You should see the table results from TestTable2.
Additional supported scenarios
- SQL Agent management and job executions are supported for Microsoft Entra logins.
- Database backup and restore operations can be executed by Microsoft Entra logins.
- Auditing of all statements related to Microsoft Entra logins and authentication events.
- Dedicated administrator connection for Microsoft Entra logins that are members of the
sysadminserver-role. - Microsoft Entra logins are supported with using the sqlcmd utility and SQL Server Management Studio tool.
- Logon triggers are supported for logon events coming from Microsoft Entra logins.
- Service Broker and DB mail can be setup using Microsoft Entra logins.
Next steps
Enable security features
See the SQL Managed Instance security features article for a comprehensive list of ways to secure your database. The following security features are discussed:
- SQL Managed Instance auditing
- Always Encrypted
- Threat detection
- Dynamic data masking
- Row-level security
- Transparent data encryption (TDE)
SQL Managed Instance capabilities
For a complete overview of SQL Managed Instance capabilities, see:
Feedback
Coming soon: Throughout 2024 we will be phasing out GitHub Issues as the feedback mechanism for content and replacing it with a new feedback system. For more information see: https://aka.ms/ContentUserFeedback.
Submit and view feedback for