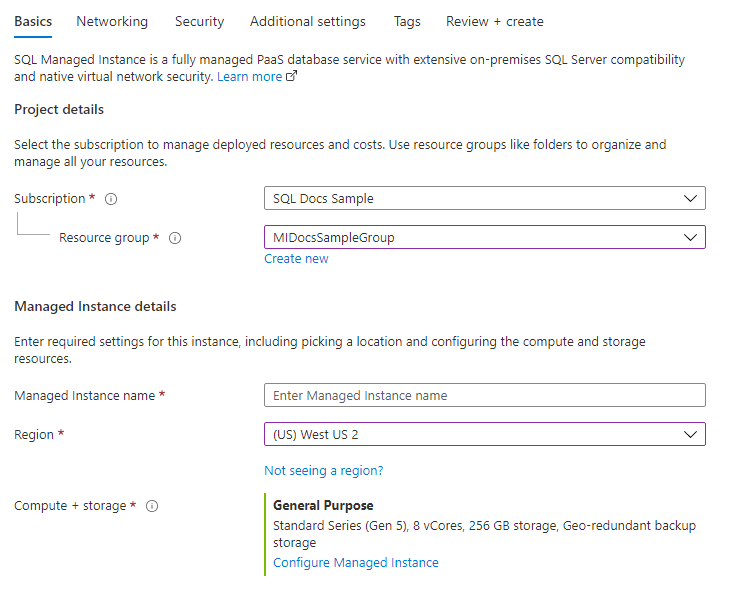
The SQL Managed Instances - Create Or Update REST API can be used to create a managed instance with a user-assigned managed identity.
Note
The script requires a virtual network and subnet be created as a prerequisite.
The following script will provision a managed instance with a user-assigned managed identity, set the Microsoft Entra admin as <AzureADAccount>, and enable Microsoft Entra-only authentication. The instance SQL Administrator login will also be created automatically and the password will be set to a random password. Since SQL Authentication connectivity is disabled with this provisioning, the SQL Administrator login won't be used.
The Microsoft Entra admin, <AzureADAccount> can be used to manage the instance when the provisioning is complete.
Replace the following values in the example:
<tenantId>: Can be found by going to the Azure portal, and going to your Microsoft Entra ID resource. In the Overview pane, you should see your Tenant ID<subscriptionId>: Your subscription ID can be found in the Azure portal<instanceName>: Use a unique managed instance name<ResourceGroupName>: Name of the resource group for your logical server<AzureADAccount>: Can be a Microsoft Entra user or group. For example, DummyLogin<Location>: Location of the server, such as westus2, or centralus<objectId>: Can be found by going to the Azure portal, and going to your Microsoft Entra ID resource. In the User pane, search for the Microsoft Entra user and find their Object ID- The
subnetId parameter needs to be updated with the <ResourceGroupName>, the Subscription ID, <VNetName>, and <SubnetName>
Import-Module Azure
Import-Module MSAL.PS

$tenantId = '<tenantId>'
$clientId = '1950a258-227b-4e31-a9cf-717495945fc2' # Static Microsoft client ID used for getting a token
$subscriptionId = '<subscriptionId>'
$uri = "urn:ietf:wg:oauth:2.0:oob"
$instanceName = "<instanceName>"
$resourceGroupName = "<ResourceGroupName>"
$scopes ="https://management.core.windows.net/.default"

Login-AzAccount -tenantId $tenantId

# Login as an Azure AD user with permission to provision a managed instance

$result = Get-MsalToken -RedirectUri $uri -ClientId $clientId -TenantId $tenantId -Scopes $scopes

$authHeader = @{
'Content-Type'='application\json; '
'Authorization'=$result.CreateAuthorizationHeader()
}

$body = '{
"name": "<instanceName>", "type": "Microsoft.Sql/managedInstances", "identity": {"type" : "UserAssigned", "UserAssignedIdentities" : {"/subscriptions/<subscriptionId>/resourceGroups/<ResourceGroupName>/providers/Microsoft.ManagedIdentity/userAssignedIdentities/<managedIdentity>" : {}}},"location": "<Location>", "sku": {"name": "GP_Gen5", "tier": "GeneralPurpose", "family":"Gen5","capacity": 8},
"properties": { "PrimaryUserAssignedIdentityId":"/subscriptions/<subscriptionId>/resourceGroups/<ResourceGroupName>/providers/Microsoft.ManagedIdentity/userAssignedIdentities/<primaryIdentity>","administrators":{ "login":"<AzureADAccount>", "sid":"<objectId>", "tenantId":"<tenantId>", "principalType":"User", "azureADOnlyAuthentication":true },
"subnetId": "/subscriptions/<subscriptionId>/resourceGroups/<ResourceGroupName>/providers/Microsoft.Network/virtualNetworks/<VNetName>/subnets/<SubnetName>",
"licenseType": "LicenseIncluded", "vCores": 8, "storageSizeInGB": 2048, "collation": "SQL_Latin1_General_CP1_CI_AS", "proxyOverride": "Proxy", "timezoneId": "UTC", "privateEndpointConnections": [], "storageAccountType": "GRS", "zoneRedundant": false
  }
}'

# To provision the instance, execute the `PUT` command

Invoke-RestMethod -Uri https://management.azure.com/subscriptions/$subscriptionId/resourceGroups/$resourceGroupName/providers/Microsoft.Sql/managedInstances/$instanceName/?api-version=2020-11-01-preview -Method PUT -Headers $authHeader -Body $body -ContentType "application/json"
To check the results, execute the GET command:
Invoke-RestMethod -Uri https://management.azure.com/subscriptions/$subscriptionId/resourceGroups/$resourceGroupName/providers/Microsoft.Sql/managedInstances/$instanceName/?api-version=2020-11-01-preview -Method GET -Headers $authHeader | Format-List
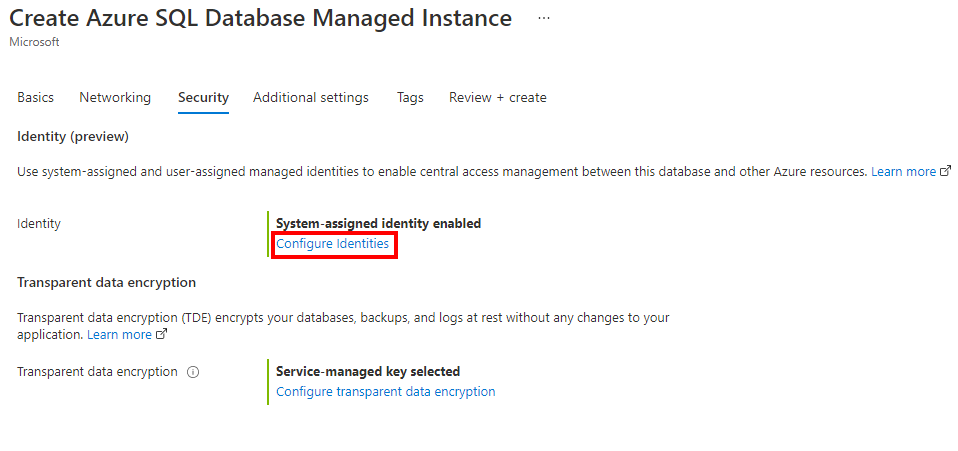
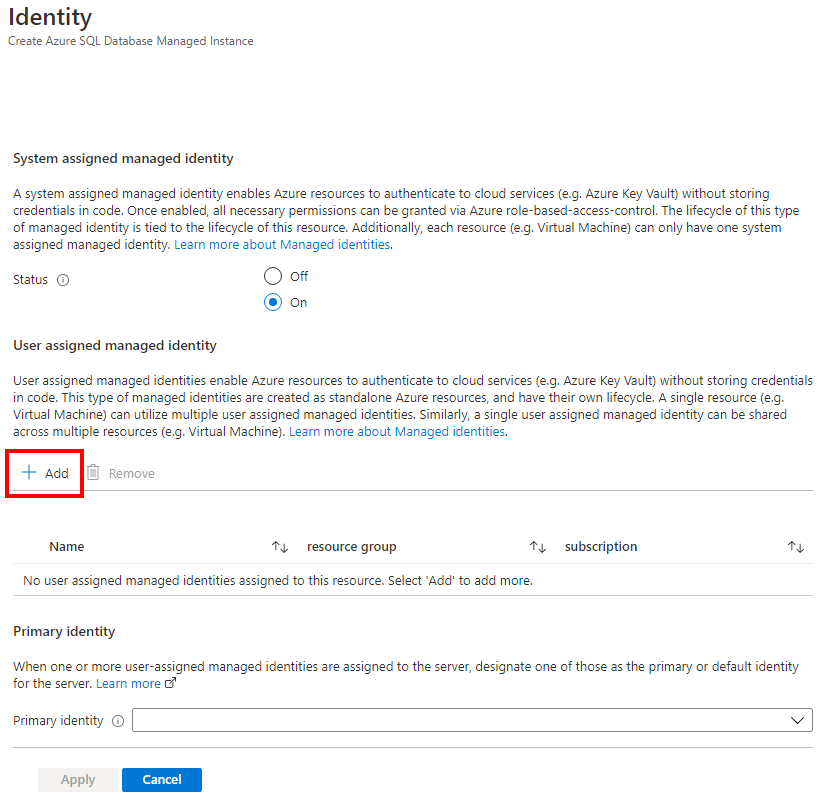
To provision a new virtual network, subnet, and new managed instance configured with a Microsoft Entra admin, a user-assigned managed identity, and Microsoft Entra-only authentication, use the following template.
Use a Custom deployment in the Azure portal, and Build your own template in the editor. Next, Save the configuration once you pasted in the example.
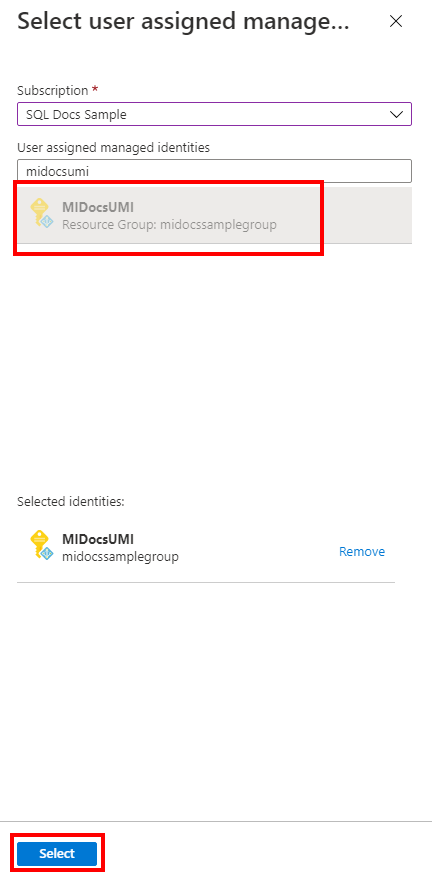
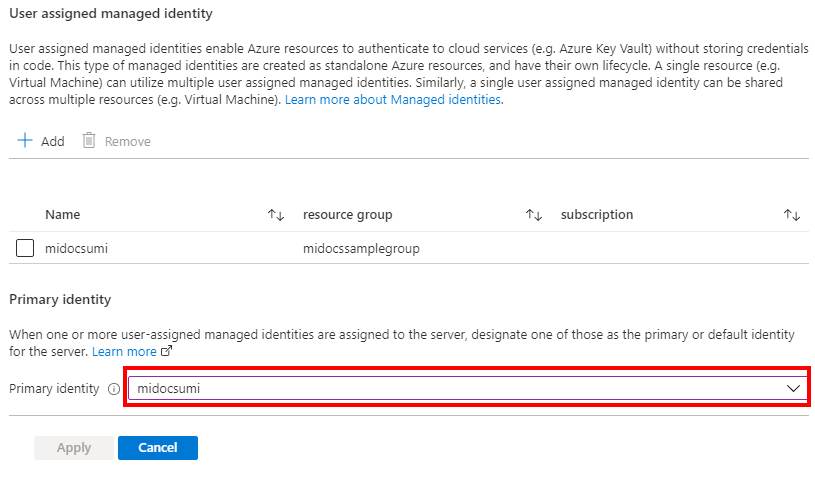
To get your user-assigned managed identity Resource ID, search for Managed Identities in the Azure portal. Find your managed identity, and go to Properties. An example of your UMI Resource ID will look like /subscriptions/<subscriptionId>/resourceGroups/<ResourceGroupName>/providers/Microsoft.ManagedIdentity/userAssignedIdentities/<managedIdentity>.
{
    "$schema": "https://schema.management.azure.com/schemas/2019-04-01/deploymentParameters.json#",
    "contentVersion": "1.0.0.1",
    "parameters": {
        "managedInstanceName": {
            "type": "String",
            "metadata": {
                "description": "Enter managed instance name."
            }
        },
        "aad_admin_name": {
            "type": "String",
            "metadata": {
                "description": "The name of the Azure AD admin for the SQL managed instance."
            }
        },
        "aad_admin_objectid": {
            "type": "String",
            "metadata": {
                "description": "The Object ID of the Azure AD admin."
            }
        },
        "aad_admin_tenantid": {
            "type": "String",
            "defaultValue": "[subscription().tenantId]",
            "metadata": {
                "description": "The Tenant ID of the Azure Active Directory"
            }
        },
        "aad_admin_type": {
            "defaultValue": "User",
            "allowedValues": [
                "User",
                "Group",
                "Application"
            ],
            "type": "String"
        },
        "aad_only_auth": {
            "defaultValue": true,
            "type": "Bool"
        },
        "user_identity_resource_id": {
            "defaultValue": "",
            "type": "String",
            "metadata": {
                "description": "The Resource ID of the user-assigned managed identity, in the form of /subscriptions/<subscriptionId>/resourceGroups/<ResourceGroupName>/providers/Microsoft.ManagedIdentity/userAssignedIdentities/<managedIdentity>."
            }
        },
        "location": {
            "defaultValue": "[resourceGroup().location]",
            "type": "String",
            "metadata": {
                "description": "Enter location. If you leave this field blank resource group location would be used."
            }
        },
        "virtualNetworkName": {
            "type": "String",
            "defaultValue": "SQLMI-VNET",
            "metadata": {
                "description": "Enter virtual network name. If you leave this field blank name will be created by the template."
            }
        },
        "addressPrefix": {
            "defaultValue": "10.0.0.0/16",
            "type": "String",
            "metadata": {
                "description": "Enter virtual network address prefix."
            }
        },
        "subnetName": {
            "type": "String",
            "defaultValue": "ManagedInstances",
            "metadata": {
                "description": "Enter subnet name. If you leave this field blank name will be created by the template."
            }
        },
        "subnetPrefix": {
            "defaultValue": "10.0.0.0/24",
            "type": "String",
            "metadata": {
                "description": "Enter subnet address prefix."
            }
        },
        "skuName": {
            "defaultValue": "GP_Gen5",
            "allowedValues": [
                "GP_Gen5",
                "BC_Gen5"
            ],
            "type": "String",
            "metadata": {
                "description": "Enter sku name."
            }
        },
        "vCores": {
            "defaultValue": 16,
            "allowedValues": [
                8,
                16,
                24,
                32,
                40,
                64,
                80
            ],
            "type": "Int",
            "metadata": {
                "description": "Enter number of vCores."
            }
        },
        "storageSizeInGB": {
            "defaultValue": 256,
            "minValue": 32,
            "maxValue": 8192,
            "type": "Int",
            "metadata": {
                "description": "Enter storage size."
            }
        },
        "licenseType": {
            "defaultValue": "LicenseIncluded",
            "allowedValues": [
                "BasePrice",
                "LicenseIncluded"
            ],
            "type": "String",
            "metadata": {
                "description": "Enter license type."
            }
        }
    },
    "variables": {
        "networkSecurityGroupName": "[concat('SQLMI-', parameters('managedInstanceName'), '-NSG')]",
        "routeTableName": "[concat('SQLMI-', parameters('managedInstanceName'), '-Route-Table')]"
    },
    "resources": [
        {
            "type": "Microsoft.Network/networkSecurityGroups",
            "apiVersion": "2020-06-01",
            "name": "[variables('networkSecurityGroupName')]",
            "location": "[parameters('location')]",
            "properties": {
                "securityRules": [
                    {
                        "name": "allow_tds_inbound",
                        "properties": {
                            "description": "Allow access to data",
                            "protocol": "Tcp",
                            "sourcePortRange": "*",
                            "destinationPortRange": "1433",
                            "sourceAddressPrefix": "VirtualNetwork",
                            "destinationAddressPrefix": "*",
                            "access": "Allow",
                            "priority": 1000,
                            "direction": "Inbound"
                        }
                    },
                    {
                        "name": "allow_redirect_inbound",
                        "properties": {
                            "description": "Allow inbound redirect traffic to Managed Instance inside the virtual network",
                            "protocol": "Tcp",
                            "sourcePortRange": "*",
                            "destinationPortRange": "11000-11999",
                            "sourceAddressPrefix": "VirtualNetwork",
                            "destinationAddressPrefix": "*",
                            "access": "Allow",
                            "priority": 1100,
                            "direction": "Inbound"
                        }
                    },
                    {
                        "name": "deny_all_inbound",
                        "properties": {
                            "description": "Deny all other inbound traffic",
                            "protocol": "*",
                            "sourcePortRange": "*",
                            "destinationPortRange": "*",
                            "sourceAddressPrefix": "*",
                            "destinationAddressPrefix": "*",
                            "access": "Deny",
                            "priority": 4096,
                            "direction": "Inbound"
                        }
                    },
                    {
                        "name": "deny_all_outbound",
                        "properties": {
                            "description": "Deny all other outbound traffic",
                            "protocol": "*",
                            "sourcePortRange": "*",
                            "destinationPortRange": "*",
                            "sourceAddressPrefix": "*",
                            "destinationAddressPrefix": "*",
                            "access": "Deny",
                            "priority": 4096,
                            "direction": "Outbound"
                        }
                    }
                ]
            }
        },
        {
            "type": "Microsoft.Network/routeTables",
            "apiVersion": "2020-06-01",
            "name": "[variables('routeTableName')]",
            "location": "[parameters('location')]",
            "properties": {
                "disableBgpRoutePropagation": false
            }
        },
        {
            "type": "Microsoft.Network/virtualNetworks",
            "apiVersion": "2020-06-01",
            "name": "[parameters('virtualNetworkName')]",
            "location": "[parameters('location')]",
            "dependsOn": [
                "[variables('routeTableName')]",
                "[variables('networkSecurityGroupName')]"
            ],
            "properties": {
                "addressSpace": {
                    "addressPrefixes": [
                        "[parameters('addressPrefix')]"
                    ]
                },
                "subnets": [
                    {
                        "name": "[parameters('subnetName')]",
                        "properties": {
                            "addressPrefix": "[parameters('subnetPrefix')]",
                            "routeTable": {
                                "id": "[resourceId('Microsoft.Network/routeTables', variables('routeTableName'))]"
                            },
                            "networkSecurityGroup": {
                                "id": "[resourceId('Microsoft.Network/networkSecurityGroups', variables('networkSecurityGroupName'))]"
                            },
                            "delegations": [
                                {
                                    "name": "miDelegation",
                                    "properties": {
                                        "serviceName": "Microsoft.Sql/managedInstances"
                                    }
                                }
                            ]
                        }
                    }
                ]
            }
        },
        {
            "type": "Microsoft.Sql/managedInstances",
            "apiVersion": "2020-11-01-preview",
            "name": "[parameters('managedInstanceName')]",
            "location": "[parameters('location')]",
            "dependsOn": [
                "[parameters('virtualNetworkName')]"
            ],
            "sku": {
                "name": "[parameters('skuName')]"
            },
            "identity": {
                "type": "UserAssigned",
                "UserAssignedIdentities": {
                    "[parameters('user_identity_resource_id')]": {}
                }
            },
            "properties": {
                "subnetId": "[resourceId('Microsoft.Network/virtualNetworks/subnets', parameters('virtualNetworkName'), parameters('subnetName'))]",
                "storageSizeInGB": "[parameters('storageSizeInGB')]",
                "vCores": "[parameters('vCores')]",
                "licenseType": "[parameters('licenseType')]",
                "PrimaryUserAssignedIdentityId": "[parameters('user_identity_resource_id')]",
                "administrators": {
                    "login": "[parameters('aad_admin_name')]",
                    "sid": "[parameters('aad_admin_objectid')]",
                    "tenantId": "[parameters('aad_admin_tenantid')]",
                    "principalType": "[parameters('aad_admin_type')]",
                    "azureADOnlyAuthentication": "[parameters('aad_only_auth')]"
                }
            }
        }
    ]
}