Tutorial: Configure an availability group listener on Linux virtual machines
Applies to: ![]() SQL Server on Azure VM
SQL Server on Azure VM
This tutorial will go over steps on how to create an availability group (AG) listener for your SQL Servers on Linux virtual machines (VMs) in Azure, for Red Hat Enterprise Linux (RHEL), SUSE Linux Enterprise Server (SLES), and Ubuntu.
You'll learn how to:
- Create a load balancer in the Azure portal
- Configure the back-end pool for the load balancer
- Create a probe for the load balancer
- Set the load balancing rules
- Create the load balancer resource in the cluster
- Create the AG listener
- Test connecting to the listener
- Testing a failover
Note
Bias-free communication
This article contains references to the term slave, a term Microsoft considers offensive when used in this context. The term appears in this article because it currently appears in the software. When the term is removed from the software, we will remove it from the article.
Prerequisite
Complete the Tutorial: Configure availability groups for SQL Server on RHEL virtual machines in Azure.
Create the load balancer in the Azure portal
The following instructions take you through steps 1 through 4 from the Create and configure the load balancer in the Azure portal section of the Configure a load balancer & availability group listener (SQL Server on Azure VMs) article.
Create the load balancer
In the Azure portal, open the resource group that contains the SQL Server virtual machines.
In the resource group, select Add.
Search for load balancer and then, in the search results, select Load Balancer, which is published by Microsoft.
On the Load Balancer pane, select Create.
In the Create load balancer dialog box, configure the load balancer as follows:
Setting Value Name A text name representing the load balancer. For example, sqlLB.Type Internal Virtual network The default virtual network that was created should be named VM1VNET.Subnet Select the subnet that the SQL Server instances are in. The default should be VM1Subnet.IP address assignment Static Private IP address Use the virtualipIP address that was created in the cluster.Subscription Use the subscription that was used for your resource group. Resource group Select the resource group that the SQL Server instances are in. Location Select the Azure location that the SQL Server instances are in.
Configure the back-end pool
Azure calls the back-end address pool backend pool. In this case, the back-end pool is the addresses of the three SQL Server instances in your AG.
In your resource group, select the load balancer that you created.
On Settings, select Backend pools.
On Backend pools, select Add to create a back-end address pool.
On Add backend pool, under Name, type a name for the back-end pool.
Under Associated to, select Virtual machine.
Select each virtual machine in the environment, and associate the appropriate IP address to each selection.

Select Add.
Create a probe
The probe defines how Azure verifies which of the SQL Server instances currently owns the AG listener. Azure probes the service based on the IP address on a port that you define when you create the probe.
On the load balancer Settings pane, select Health probes.
On the Health probes pane, select Add.
Configure the probe on the Add probe pane. Use the following values to configure the probe:
Setting Value Name A text name representing the probe. For example, SQLAlwaysOnEndPointProbe.Protocol TCPPort You can use any available port. For example, 59999.Interval 5Unhealthy threshold 2Select OK.
Sign in to all your virtual machines, and open the probe port using the following commands:
sudo firewall-cmd --zone=public --add-port=59999/tcp --permanent
sudo firewall-cmd --reload
Azure creates the probe and then uses it to test which SQL Server instance has the listener for the AG.
Set the load-balancing rules
The load-balancing rules configure how the load balancer routes traffic to the SQL Server instances. For this load balancer, you enable direct server return because only one of the three SQL Server instances owns the AG listener resource at a time.
On the load balancer Settings pane, select Load balancing rules.
On the Load balancing rules pane, select Add.
On the Add load balancing rules pane, configure the load-balancing rule. Use the following settings:
Setting Value Name A text name representing the load-balancing rules. For example, SQLAlwaysOnEndPointListener.Protocol TCP Port 1433Backend port 1433. This value is ignored because this rule uses Floating IP (direct server return).Probe Use the name of the probe that you created for this load balancer. Session persistence None Idle timeout (minutes) 4Floating IP (direct server return) Enabled 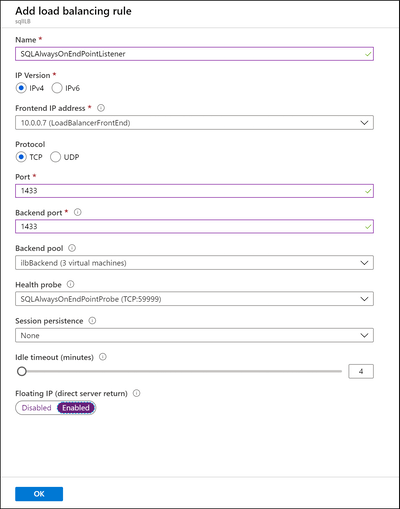
Select OK.
Azure configures the load-balancing rule. Now the load balancer is configured to route traffic to the SQL Server instance that hosts the listener for the AG.
At this point, the resource group has a load balancer that connects to all SQL Server machines. The load balancer also contains an IP address for the SQL Server Always On AG listener, so that any machine can respond to requests for the AGs.
Create the availability group listener resource
Before creating a load balancer resource in Pacemaker, First create the listener resource:
sudo crm configure primitive virtualip \
ocf:heartbeat:IPaddr2 \
params ip=x.y.z.a
In the previous example, x.y.z.a refers to the load balancer front-end IP address.
Create the load balancer resource in the cluster
Follow the instructions for the distribution you're configuring.
Sign in to the primary virtual machine. We need to create the resource to enable the Azure load balancer probe port (59999 is used in our example). Run the following command:
sudo pcs resource create azure_load_balancer azure-lb port=59999Create a group that contains the
virtualipandazure_load_balancerresource:sudo pcs resource group add virtualip_group azure_load_balancer virtualip
Add constraints
A colocation constraint must be configured to ensure the Azure load balancer IP address and the AG resource are running on the same node. Run the following command:
sudo pcs constraint colocation add azure_load_balancer ag_cluster-master INFINITY with-rsc-role=MasterCreate an ordering constraint to ensure that the AG resource is up and running before the Azure load balancer IP address. While the colocation constraint implies an ordering constraint, this enforces it.
sudo pcs constraint order promote ag_cluster-master then start azure_load_balancerTo verify the constraints, run the following command:
sudo pcs constraint list --fullYou should see the following output:
Location Constraints:
Ordering Constraints:
  promote ag_cluster-master then start virtualip (kind:Mandatory) (id:order-ag_cluster-master-virtualip-mandatory)
  promote ag_cluster-master then start azure_load_balancer (kind:Mandatory) (id:order-ag_cluster-master-azure_load_balancer-mandatory)
Colocation Constraints:
  virtualip with ag_cluster-master (score:INFINITY) (with-rsc-role:Master) (id:colocation-virtualip-ag_cluster-master-INFINITY)
  azure_load_balancer with ag_cluster-master (score:INFINITY) (with-rsc-role:Master) (id:colocation-azure_load_balancer-ag_cluster-master-INFINITY)
Ticket Constraints:
Create the availability group listener
On the primary node, run the following command in sqlcmd or SSMS. Replace the IP address used below with the
virtualipIP address.SQL Server 2022 and later versions:
ALTER AVAILABILITY GROUP [ag1]
ADD LISTENER 'ag1-listener' (
    WITH IP((
        '10.0.0.7',
        '0.0.0.0'
    )),
    PORT = 1433
);
GO
SQL Server 2017 and SQL Server 2019:
ALTER AVAILABILITY GROUP [ag1]
ADD LISTENER 'ag1-listener' (
    WITH IP((
        '10.0.0.7',
        '255.255.255.255'
    )),
    PORT = 1433
);
GO
Sign in to each VM node. Use the following command to open the hosts file and set up host name resolution for the
ag1-listeneron each machine.sudo vi /etc/hostsIn the vi editor, enter
ito insert text, and on a blank line, add the IP of theag1-listener. Then addag1-listenerafter a space next to the IP.<IP of ag1-listener> ag1-listenerTo exit the vi editor, first hit the Esc key, and then enter the command
:wqto write the file and quit. Do this on each node.
Test the listener and a failover
This section covers logging into a SQL Server AG listener, and testing a failover.
Test logging in to SQL Server using the availability group listener
Use sqlcmd to sign in to the primary node of SQL Server using the AG listener name:
- Use a login that was previously created and replace
<YourPassword>with the correct password. The following example uses thesalogin that was created with the SQL Server.
sqlcmd -S ag1-listener -U sa -P <YourPassword>- Use a login that was previously created and replace
Check the name of the server that you're connected to. Run the following command in sqlcmd:
SELECT @@SERVERNAME;Your output should show the current primary node. This should be
VM1if you have never tested a failover.Exit the SQL Server session by typing the
exitcommand.
Test a failover
Run the following command to manually fail over the primary replica to
<VM2>or another replica. Replace<VM2>with the value of your server name.sudo pcs resource move ag_cluster-master <VM2> --masterIf you check your constraints, you'll see that another constraint was added because of the manual failover:
sudo pcs constraint list --fullYou see that a constraint with ID
cli-prefer-ag_cluster-masterwas added.Remove the constraint with ID
cli-prefer-ag_cluster-masterusing the following command:sudo pcs constraint remove cli-prefer-ag_cluster-masterCheck your cluster resources using the command
sudo pcs resource, and you should see that the primary instance is now<VM2>.Note
This article contains references to the term slave, a term that Microsoft no longer uses. When the term is removed from the software, we'll remove it from this article.
[<username>@<VM1> ~]$ sudo pcs resource
Master/Slave Set: ag_cluster-master [ag_cluster]
    Masters: [ <VM2> ]
    Slaves: [ <VM1> <VM3> ]
Resource Group: virtualip_group
    azure_load_balancer        (ocf::heartbeat:azure-lb):      Started <VM2>
    virtualip  (ocf::heartbeat:IPaddr2):       Started <VM2>
Use sqlcmd to sign in to your primary replica using the listener name:
- Use a login that was previously created and replace
<YourPassword>with the correct password. The following example uses thesalogin that was created with the SQL Server.
sqlcmd -S ag1-listener -U sa -P <YourPassword>- Use a login that was previously created and replace
Check the server that you're connected to. Run the following command in sqlcmd:
SELECT @@SERVERNAME;You should see that you're now connected to the VM that you failed-over to.
Next step
In order to utilize an availability group listener for your SQL Server instances, you need to create and configure a load balancer.
Feedback
Coming soon: Throughout 2024 we will be phasing out GitHub Issues as the feedback mechanism for content and replacing it with a new feedback system. For more information see: https://aka.ms/ContentUserFeedback.
Submit and view feedback for