Add single sign-on to a bot
APPLIES TO: SDK v4
This article shows how to use the single sign-on (SSO) feature in a bot. To do so, this feature uses a consumer bot—also known as the root or parent bot—to interact with a skill or child bot. This article uses the terms root bot and skill bot.
If you include SSO support, a user can sign into the root bot using an identity provider and won't need to sign in again when control passes to a skill.
The root and skill bots are separate bots, running on potentially different servers, each with its own separate memory and state. For more information about skills, see Skills overview and Implement a skill. For more information about user authentication, see Bot Framework authentication basics, User authentication, and Add authentication to a bot.
Important
When you use Azure AI Bot Service authentication with Web Chat, there are some important security considerations you must keep in mind. For more information, see the security considerations section in the REST authentication article.
Prerequisites
- Knowledge of Bot basics, Managing state, and About single sign-on.
- Knowledge of The dialogs library and how to implement sequential conversation flow and reuse dialogs
- Knowledge of Azure and OAuth 2.0 development.
- Visual Studio 2019 or later for .NET.
- The SSO with simple skill consumer and skill in C#.
About the sample
This article references two bots: the RootBot and the SkillBot. The RootBot forwards activities to the SkillBot. They model this typical skill scenario:
- A root bot calls one or more skill bots.
- Both the root and skill bots implement the basic authentication described in the Add authentication to a bot article.
- The user logs into root bot.
- Because of the SSO and being already logged into the root bot, they're logged into the skill bot without requiring user interaction again.
For an overview of how the Bot Framework handles authentication, see User authentication. For SSO background information, see Single sign-on.
The RootBot supports SSO. It communicates with the SkillBot on behalf of the user, without the user being required to authenticate again into the _SkillBot.
For each project in the sample, you need the following:
- An Microsoft Entra ID application to register a bot resource in Azure.
- An Microsoft Entra ID identity provider application for authentication.
Note
Currently, only the Microsoft Entra ID identity provider is supported.
Create the Azure RootBot resource
- Create an Azure bot resource in the Azure portal for the
RootBot. Follow the steps described in Create an Azure bot resource. - Copy and save the bot registration app ID and the client secret.
Create the Microsoft Entra ID identity for RootBot
The Microsoft Entra ID is a cloud identity service that allows you to build applications that securely sign in users using industry standard protocols like OAuth2.0.
Create an identity application for the
RootBotthat uses Microsoft Entra ID to authenticate the user. Follow the steps described in Create the Microsoft Entra ID identity provider.In the left pane, select Manifest.
Set
accessTokenAcceptedVersionto 2.Select Save.
In the left pane, select Expose an API.
In the right pane, select Add a scope.
On the far right Add a scope section, select Save and continue.
In the displayed window, under Who can consent?, select Admins and users.
Enter the remaining required information.
Select Add scope.
Copy and save the scope value.
Create an OAuth connection setting for RootBot
Create an Microsoft Entra ID connection in the
RootBotbot registration and enter values as described in Microsoft Entra ID and the value described below.Leave the Token Exchange URL empty.
In the Scopes box, enter the
RootBotscope value you saved in the previous steps.Note
Scopes contains the URL that the user initially signs in into the root bot, while token exchange URL is left empty.
As an example, let's assume that the root bot appid is rootAppId and the skill bot appid is skillAppId. The root bot's scopes will look like api://rootAppId/customScope, which is used to login the user. This root bot's scopes is then exchanged with api://skillAppId/customscope during SSO.
Copy and save the name of the connection.
Create the Azure SkillBot resource
- Create an Azure bot resource in the Azure portal for the
SkillBot. Follow the steps described in Create an Azure bot resource. - Copy and save the bot registration app ID and the client secret.
Create the Microsoft Entra ID identity for SkillBot
The Microsoft Entra ID is a cloud identity service that allows you to build applications that securely sign in users using industry standard protocols like OAuth2.0.
Create an identity application for the
SkillBotthat uses Microsoft Entra ID to authenticate the bot. Follow the steps described in Create the Microsoft Entra ID identity provider.In the left pane, select Manifest.
Set
accessTokenAcceptedVersionto 2.Select Save.
In the left pane, select Expose an API.
In the right pane, select Add a scope.
In the far right Add a scope section, select Save and continue.
In the displayed window, under Who can consent? select Admins and users.
Enter the remaining required information.
Select Add scope.
Copy and save the scope value.
Select Add a client application. In the far right section, in the Client ID box, enter the RootBot identity app ID you saved before. Make sure you use the RootBot identity and not the registration app ID.
Note
For client applications, Azure AI Bot Service does not support single sing-on with the Microsoft Entra ID B2C identity provider.
Under Authorized scope, check the box by the scope value.
Select Add application.
In the navigation pane on the left, select API permissions. It's a best practice to explicitly set the API permissions for the app.
In the right pane, select Add a permission.
Select Microsoft APIs then Microsoft Graph.
Choose Delegated permissions and make sure the permissions you need are selected. This sample requires the permissions listed below.
Note
Any permission marked as ADMIN CONSENT REQUIRED will require both a user and a tenant admin to login.
- openid
- profile
- User.Read
- User.ReadBasic.All
Select Add permissions.
Create an OAuth connection setting for SkillBot
Create an Microsoft Entra ID connection in the
SkillBotbot registration and enter values as described in Microsoft Entra ID and the values described below.In the Token Exchange URL box, enter the
SkillBotscope value you saved in the previous steps.In the Scopes box, enter the following values separated by blank space:
profileUser.ReadUser.ReadBasic.Allopenid.Copy and save to a file the name of the connection.
Test the connection
- Select on the connection entry to open the connection you created.
- Select Test Connection at the top of the Service Provider Connection Setting pane.
- The first time, this should open a new browser tab listing the permissions your app is requesting and prompt you to accept.
- Select Accept.
- This should then redirect you to a Test Connection to <your-connection-name> Succeeded page.
For more information, see the Microsoft Entra ID for developers (v1.0) overview and Microsoft identity platform (v2.0) overview. For information about the differences between the v1 and v2 endpoints, see Why update to Microsoft identity platform (v2.0)?. For complete information, see Microsoft identity platform (formerly Microsoft Entra ID for developers).
Prepare the samples code
You must update the appsettings.json file in both samples as described below.
Clone the SSO with Simple Skill Consumer and Skill sample from the GitHub repository.
Open the
SkillBotprojectappsettings.jsonfile. Assign the following values from the saved file:{ "MicrosoftAppId": "<SkillBot registration app ID>", "MicrosoftAppPassword": "<SkillBot registration password>", "ConnectionName": "<SkillBot connection name>", "AllowedCallers": [ "<RootBot registration app ID>" ] }Open the
RootBotprojectappsettings.jsonfile. Assign the following values from the saved file:{ "MicrosoftAppId": "<RootBot registration app ID>", "MicrosoftAppPassword": "<RootBot registration password>", "ConnectionName": "<RootBot connection name>", "SkillHostEndpoint": "http://localhost:3978/api/skills/", "BotFrameworkSkills": [ { "Id": "SkillBot", "AppId": "<SkillBot registration app ID>", "SkillEndpoint": "http://localhost:39783/api/messages" } ] }
Test the samples
Use the following for testing:
RootBotcommandsloginallows the user to sign into the Microsoft Entra ID registration using theRootBot. Once signed in, SSO takes care of the sign-in into theSkillBotalso. The user doesn't have to sign in again.tokendisplays the user's token.logoutlogs the user out of theRootBot.
SkillBotcommandsskill loginallows theRootBotto sign into theSkillBot, on behalf of the user. The user isn't shown a sign-in card, if already signed in, unless SSO fails.skill tokendisplays the user's token from theSkillBot.skill logoutlogs the user out of theSkillBot
Note
The first time users try SSO on a skill, they may be presented with an OAuth card to log in. This is because they haven't yet given consent to the skill's Microsoft Entra ID app. To avoid this, they can grant admin consent for any graph permissions requested by the Microsoft Entra ID app.
If you haven't done so already, install the Bot Framework Emulator. See also Debug with the Emulator.
You'll need to configure the Emulator for the bot sample login to work. Use the steps below: as shown in Configure the Emulator for authentication.
After you've configured the authentication mechanism, you can perform the actual bot sample testing.
In Visual Studio, open the
SSOWithSkills.slnsolution and configure it to start debugging with multiple processes.Start debugging locally on your machine. Notice that in the
RootBotprojectappsettings.jsonfile you've the following settings:"SkillHostEndpoint": "http://localhost:3978/api/skills/" "SkillEndpoint": "http://localhost:39783/api/messages"Note
These settings imply that, with both
RootBotandSkillBotare running on the local machine. The Emulator communicates withRootBoton port 3978 andRootBotcommunicates withSkillBoton port 39783. As soon as you start debugging, two default browser windows open. One on port 3978 and the other on port 39783.Start the Emulator.
When you connect to the bot, enter your
RootBotregistration app ID and password.Type
hito start the conversation.Enter login. The
RootBotwill display a Sign In to AAD authentication card.
Select Sign In. The pop-up dialog Confirm Open URL is displayed.
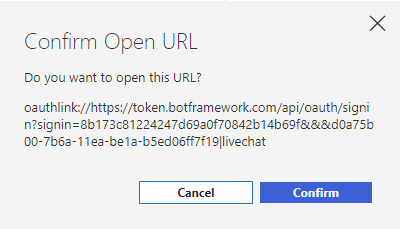
Select Confirm. You'll be logged in and the
RootBottoken is displayed.Enter token to display the token again.
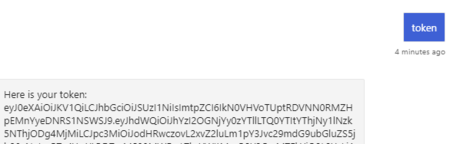
Now you're ready to communicate with the
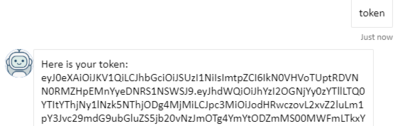
SkillBot. Once you've signed using theRootBot, you don't need to provide your credentials again until you sign out. This demonstrates that SSO is working.Enter skill login in the Emulator box. You'll not be asked to log in again. Instead the SkillBot token is displayed.
Enter skill token to display the token again.
Now you can enter skill logout to sign out of the
SkillBot. Then enter logout to sign out of theSimpleRootBoot.

Additional information
The following time-sequence diagram applies to the samples used in the article and shows the interaction between the various components involved. ABS stands for Azure AI Bot Service.
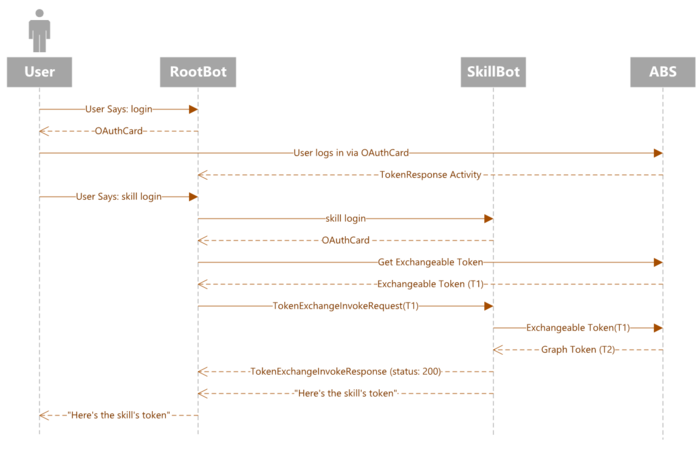
- The first time, the user enters the
logincommand for the RootBot. - The RootBot sends an OAuthCard asking the user to sign in.
- The user enters the authentication credentials that are sent to the ABS (Azure AI Bot Service).
- The ABS sends the authentication token, generated based on the user's credentials, to the RootBot.
- The RootBot displays the root token for the user to see.
- The user enters the
skill logincommand for the SkillBot. - The SkillBot sends an OAuthCard to the RootBot.
- The RootBot asks for an exchangeable token from ABS.
- SSO sends the SkillBot skill token to the RootBot.
- The RootBot displays the skill token for the user to see. Notice that the skill token was generated without the user having to sign in the SKillBot. This is because of the SSO.
The following example shows how the token exchange happens. The code is from the TokenExchangeSkillHandler.cs file.
private async Task<bool> InterceptOAuthCards(ClaimsIdentity claimsIdentity, Activity activity)
{
    var oauthCardAttachment = activity.Attachments?.FirstOrDefault(a => a?.ContentType == OAuthCard.ContentType);
    if (oauthCardAttachment != null)
    {
        var targetSkill = GetCallingSkill(claimsIdentity);
        if (targetSkill != null)
        {
            var oauthCard = ((JObject)oauthCardAttachment.Content).ToObject<OAuthCard>();

            if (!string.IsNullOrWhiteSpace(oauthCard?.TokenExchangeResource?.Uri))
            {
                using (var context = new TurnContext(_adapter, activity))
                {
                    context.TurnState.Add<IIdentity>("BotIdentity", claimsIdentity);

                    // AAD token exchange
                    try
                    {
                        var result = await _tokenExchangeProvider.ExchangeTokenAsync(
                            context,
                            _connectionName,
                            activity.Recipient.Id,
                            new TokenExchangeRequest() { Uri = oauthCard.TokenExchangeResource.Uri }).ConfigureAwait(false);

                        if (!string.IsNullOrEmpty(result?.Token))
                        {
                            // If token above is null, then SSO has failed and hence we return false.
                            // If not, send an invoke to the skill with the token.
                            return await SendTokenExchangeInvokeToSkill(activity, oauthCard.TokenExchangeResource.Id, result.Token, oauthCard.ConnectionName, targetSkill, default).ConfigureAwait(false);
                        }
                    }
                    catch
                    {
                        // Show oauth card if token exchange fails.
                        return false;
                    }

                    return false;
                }
            }
        }
    }
    return false;
}
Feedback
Coming soon: Throughout 2024 we will be phasing out GitHub Issues as the feedback mechanism for content and replacing it with a new feedback system. For more information see: https://aka.ms/ContentUserFeedback.
Submit and view feedback for