Tutorial: Add your knowledge base to Power Virtual Agents
Create and extend a Power Virtual Agents bot to provide answers from your knowledge base.
Note
The integration demonstrated in this tutorial is in preview and is not intended for deployment to production environments.
In this tutorial, you learn how to:
- Create a Power Virtual Agents bot
- Create a system fallback topic
- Add QnA Maker as an action to a topic as a Power Automate flow
- Create a Power Automate solution
- Add a Power Automate flow to your solution
- Publish Power Virtual Agents
- Test Power Virtual Agents, and recieve an answer from your QnA Maker knowledge base
Note
The QnA Maker service is being retired on the 31st of March, 2025. A newer version of the question and answering capability is now available as part of Azure AI Language. For question answering capabilities within the Language Service, see question answering. Starting 1st October, 2022 you won’t be able to create new QnA Maker resources. For information on migrating existing QnA Maker knowledge bases to question answering, consult the migration guide.
Create and publish a knowledge base
Follow the quickstart to create a knowledge base. Don't complete the last section, about creating a bot. Instead, use this tutorial to create a bot with Power Virtual Agents.
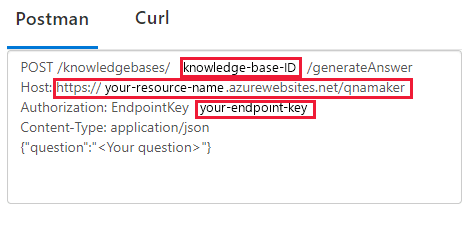
Enter your published knowledge base settings found on the Settings page in the QnA Maker portal. You will need this information for the Power Automate step to configure your QnA Maker
GenerateAnswerconnection.In the QnA Maker portal, on the Settings page, find the endpoint key, endpoint host, and knowledge base ID.
Create bot in Power Virtual Agents
Power Virtual Agents allows teams to create powerful bots by using a guided, no-code graphical interface. You don't need data scientists or developers.
Create a bot by following the steps in Create and delete Power Virtual Agents bots.
Create the system fallback topic
In Power Virtual Agents, you create a bot with a series of topics (subject areas), in order to answer user questions by performing actions.
Although the bot can connect to your knowledge base from any topic, this tutorial uses the system fallback topic. The fallback topic is used when the bot can't find an answer. The bot passes the user's text to QnA Maker's GenerateAnswer API, receives the answer from your knowledge base, and displays it to the user as a message.
Create a fallback topic by following the steps in Configure the system fallback topic in Power Virtual Agents.
Use the authoring canvas to add an action
Use the Power Virtual Agents authoring canvas to connect the fallback topic to your knowledge base. The topic starts with the unrecognized user text. Add an action that passes that text to QnA Maker, and then shows the answer as a message. The last step of displaying an answer is handled as a separate step, later in this tutorial.
This section creates the fallback topic conversation flow.
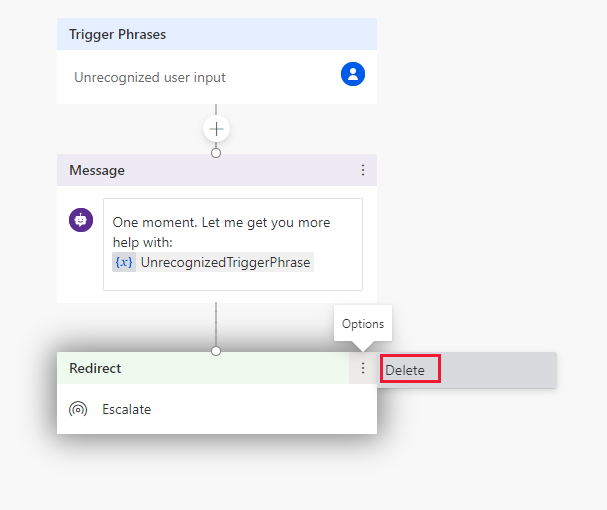
The new fallback action might already have conversation flow elements. Delete the Escalate item by selecting the Options menu.
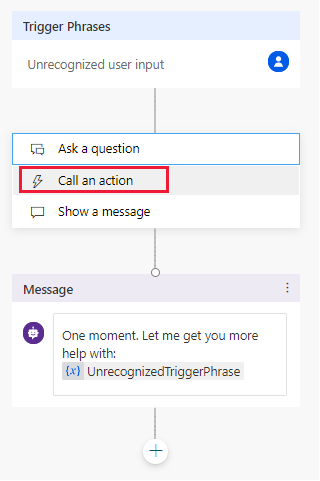
Above the Message node, select the plus (+) icon, and then select Call an action.
Select Create a flow. The process takes you to the Power Automate portal.
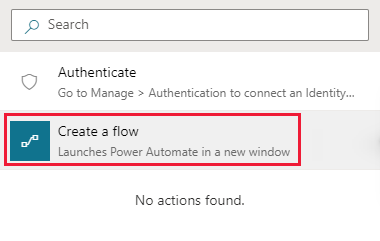
Power Automate opens to a new template. You won't use this new template.
Create a Power Automate flow to connect to your knowledge base
Note
Currently the Power Automate template does not support QnA Maker managed (Preview) endpoints. To add a QnA Maker managed (Preview) knowledge base to Power Automate skip this step and manually add the endpoints to it.
The following procedure creates a Power Automate flow that:
- Takes the incoming user text, and sends it to QnA Maker.
- Returns the top response back to your bot.
In Power Automate, select Templates from the left navigation. If you are asked if you want to leave the browser page, accept Leave.
On the templates page, search for the template Generate answer using QnA Maker then select the template. This template has all the steps to call QnA Maker with your knowledge base settings and return the top answer.
On the new screen for the QnA Maker flow, select Continue.

Select the Generate Answer action box, and fill in your QnA Maker settings from a previous section titled Create and publish a knowledge base. Your Service Host in the following image refers to your knowledge base host Host and is in the format of
https://YOUR-RESOURCE-NAME.azurewebsites.net/qnamaker.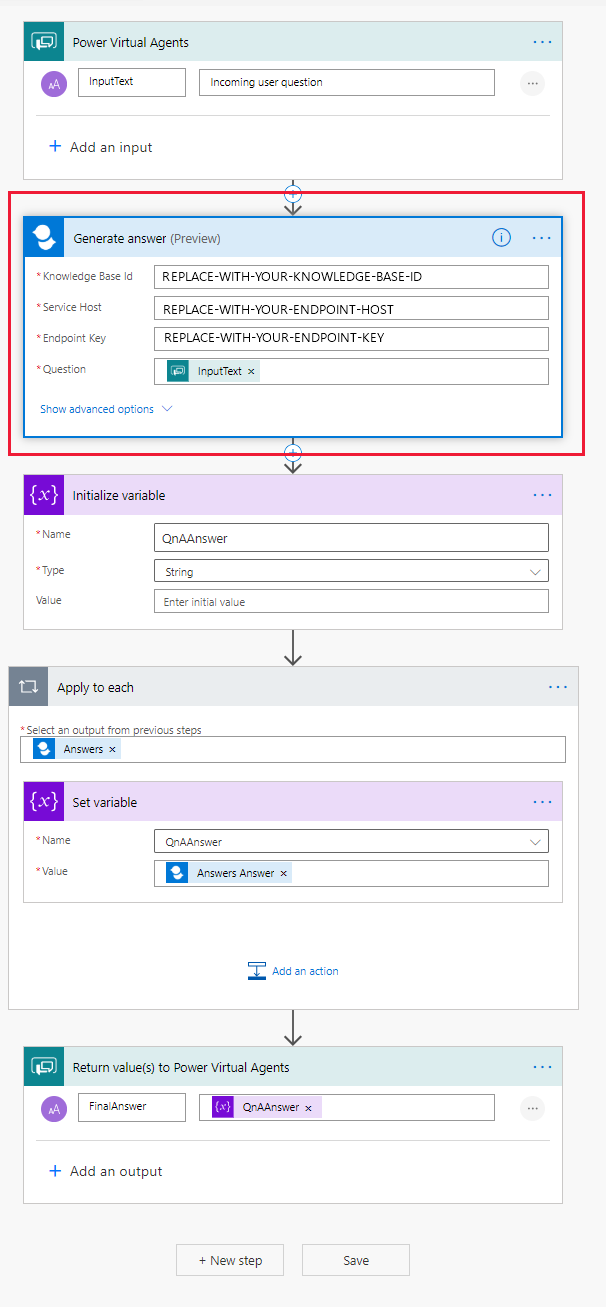
Select Save to save the flow.
Create a solution and add the flow
For the bot to find and connect to the flow, the flow must be included in a Power Automate solution.
While still in the Power Automate portal, select Solutions from the left-side navigation.
Select + New solution.
Enter a display name. The list of solutions includes every solution in your organization or school. Choose a naming convention that helps you filter to just your solutions. For example, you might prefix your email to your solution name:
jondoe-power-virtual-agent-qnamaker-fallback.Select your publisher from the list of choices.
Accept the default values for the name and version.
Select Create to finish the process.
Add your flow to the solution
In the list of solutions, select the solution you just created. It should be at the top of the list. If it isn't, search by your email name, which is part of the solution name.
In the solution, select + Add existing, and then select Flow from the list.
Find your flow from the Outside solutions list, and then select Add to finish the process. If there are many flows, look at the Modified column to find the most recent flow.
Add your solution's flow to Power Virtual Agents
Return to the browser tab with your bot in Power Virtual Agents. The authoring canvas should still be open.
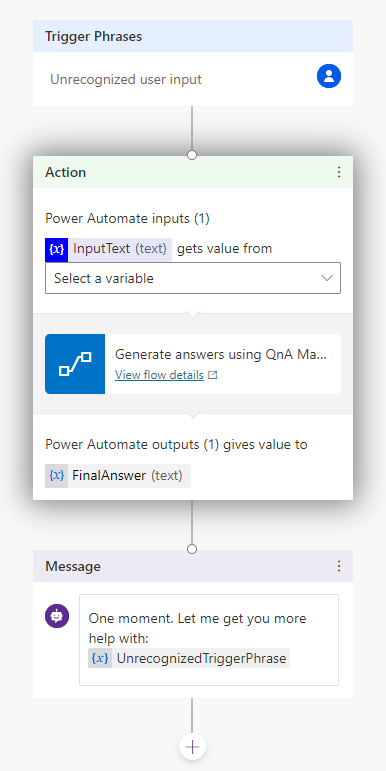
To insert a new step in the flow, above the Message action box, select the plus (+) icon. Then select Call an action.
From the Flow pop-up window, select the new flow named Generate answers using QnA Maker knowledge base.... The new action appears in the flow.
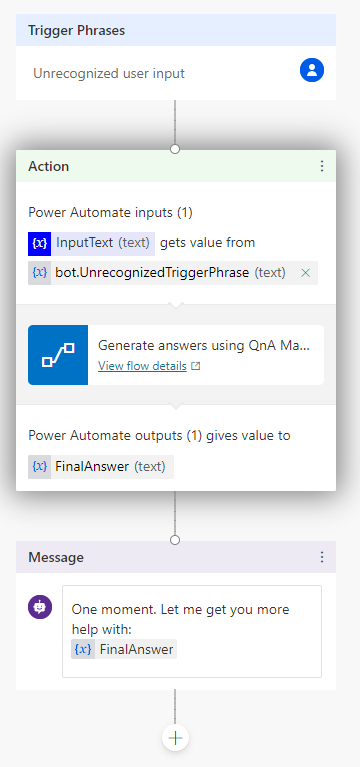
To correctly set the input variable to the QnA Maker action, select Select a variable, then select bot.UnrecognizedTriggerPhrase.
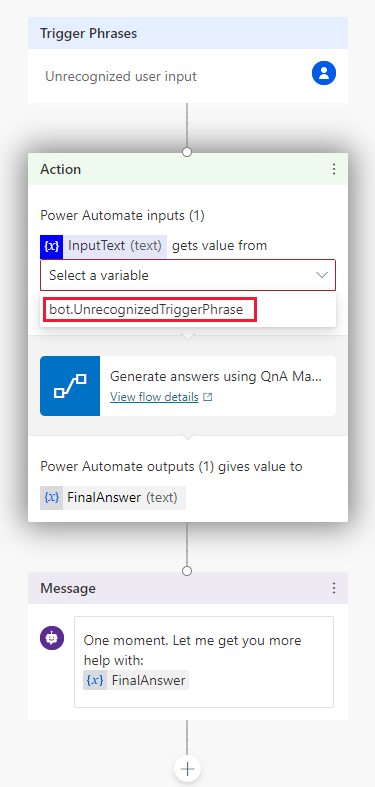
To correctly set the output variable to the QnA Maker action, in the Message action, select UnrecognizedTriggerPhrase, then select the icon to insert a variable,
{x}, then select FinalAnswer.From the context toolbar, select Save, to save the authoring canvas details for the topic.
Here's what the final bot canvas looks like.
Test the bot
As you design your bot in Power Virtual Agents, you can use the Test bot pane to see how the bot leads a customer through the bot conversation.
In the test pane, toggle Track between topics. This allows you to watch the progression between topics, as well as within a single topic.
Test the bot by entering the user text in the following order. The authoring canvas reports the successful steps with a green check mark.
Question order Test questions Purpose 1 Hello Begin conversation 2 Store hours Sample topic. This is configured for you without any additional work on your part. 3 Yes In reply to Did that answer your question?4 Excellent In reply to Please rate your experience.5 Yes In reply to Can I help with anything else?6 How can I improve the throughput performance for query predictions? This question triggers the fallback action, which sends the text to your knowledge base to answer. Then the answer is shown. the green check marks for the individual actions indicate success for each action. 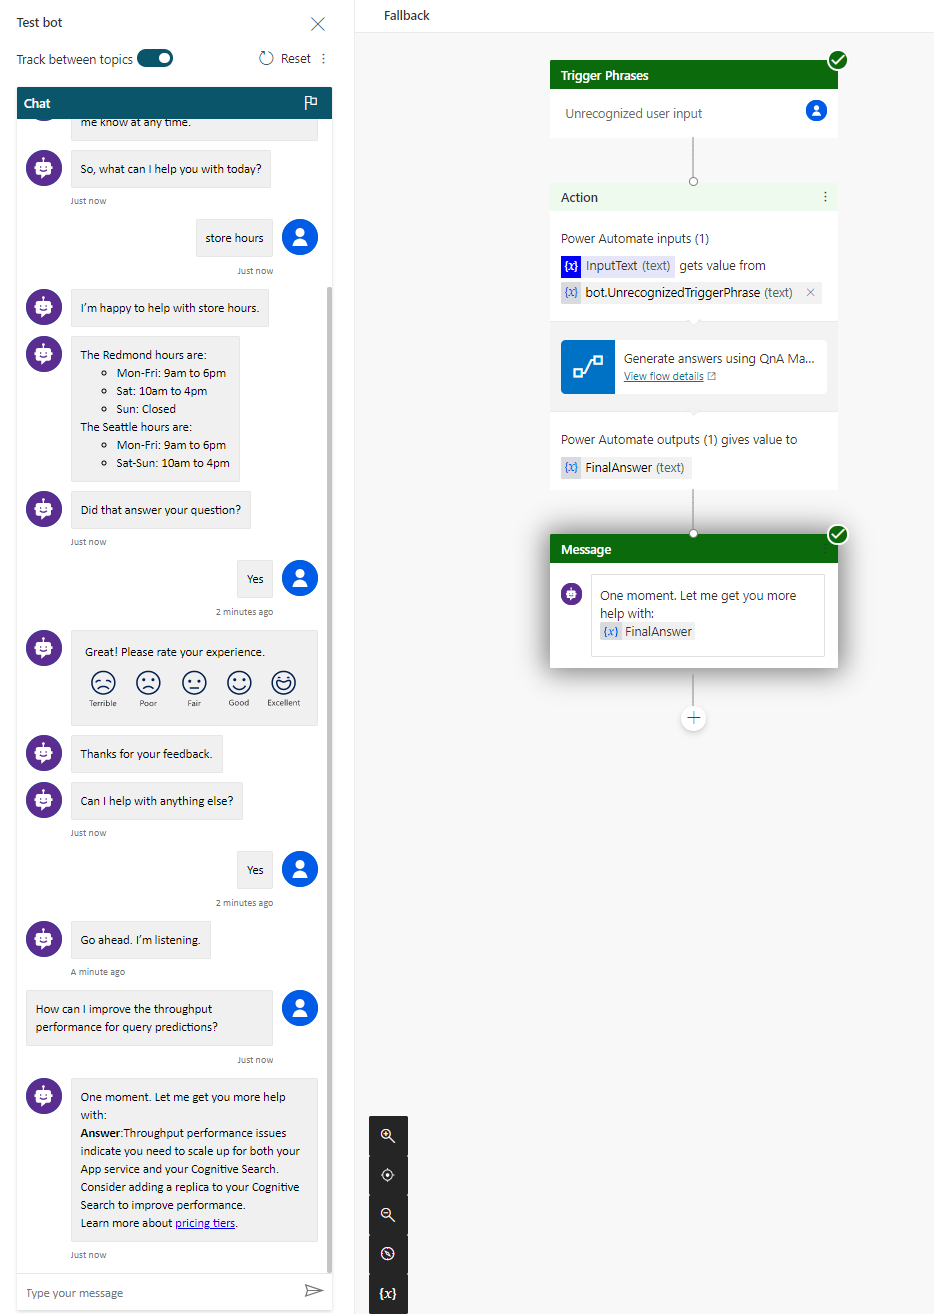
Publish your bot
To make the bot available to all members of your school or organization, you need to publish it.
Publish your bot by following the steps in Publish your bot.
Share your bot
To make your bot available to others, you first need to publish it to a channel. For this tutorial we'll use the demo website.
Configure the demo website by following the steps in Configure a chatbot for a live or demo website.
Then you can share your website URL with your school or organization members.
Clean up resources
When you are done with the knowledge base, remove the QnA Maker resources in the Azure portal.
Next step
Get analytics on your knowledge base
Learn more about: