Add a professional voice training dataset
When you're ready to create a custom text to speech voice for your application, the first step is to gather audio recordings and associated scripts to start training the voice model. For details on recording voice samples, see the tutorial. The Speech service uses this data to create a unique voice tuned to match the voice in the recordings. After you've trained the voice, you can start synthesizing speech in your applications.
All data you upload must meet the requirements for the data type that you choose. It's important to correctly format your data before it's uploaded, which ensures the data will be accurately processed by the Speech service. To confirm that your data is correctly formatted, see Training data types.
Note
- Standard subscription (S0) users can upload five data files simultaneously. If you reach the limit, wait until at least one of your data files finishes importing. Then try again.
- The maximum number of data files allowed to be imported per subscription is 500 .zip files for standard subscription (S0) users. Please see out Speech service quotas and limits for more details.
Upload your data
When you're ready to upload your data, go to the Prepare training data tab to add your first training set and upload data. A training set is a set of audio utterances and their mapping scripts used for training a voice model. You can use a training set to organize your training data. The service checks data readiness per each training set. You can import multiple data to a training set.
To upload training data, follow these steps:
- Sign in to the Speech Studio.
- Select Custom voice > Your project name > Prepare training data > Upload data.
- In the Upload data wizard, choose a data type and then select Next.
- Select local files from your computer or enter the Azure Blob storage URL to upload data.
- Under Specify the target training set, select an existing training set or create a new one. If you created a new training set, make sure it's selected in the drop-down list before you continue.
- Select Next.
- Enter a name and description for your data and then select Next.
- Review the upload details, and select Submit.
Note
Duplicate IDs are not accepted. Utterances with the same ID will be removed.
Duplicate audio names are removed from the training. Make sure the data you select don't contain the same audio names within the .zip file or across multiple .zip files. If utterance IDs (either in audio or script files) are duplicates, they're rejected.
Data files are automatically validated when you select Submit. Data validation includes series of checks on the audio files to verify their file format, size, and sampling rate. If there are any errors, fix them and submit again.
After you upload the data, you can check the details in the training set detail view. On the detail page, you can further check the pronunciation issue and the noise level for each of your data. The pronunciation score at the sentence level ranges from 0-100. A score below 70 normally indicates a speech error or script mismatch. Utterances with an overall score lower than 70 will be rejected. A heavy accent can reduce your pronunciation score and affect the generated digital voice.
Resolve data issues online
After upload, you can check the data details of the training set. Before continuing to train your voice model, you should try to resolve any data issues.
You can identify and resolve data issues per utterance in Speech Studio.
On the detail page, go to the Accepted data or Rejected data page. Select individual utterances you want to change, then select Edit.
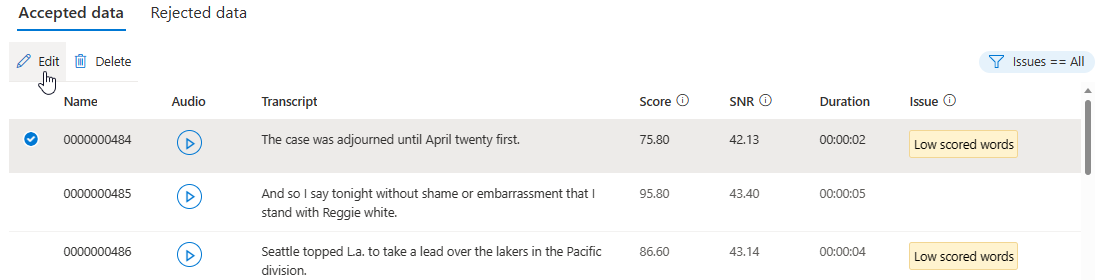
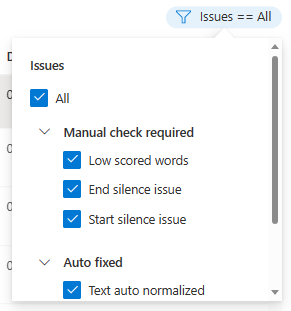
You can choose which data issues to be displayed based on your criteria.
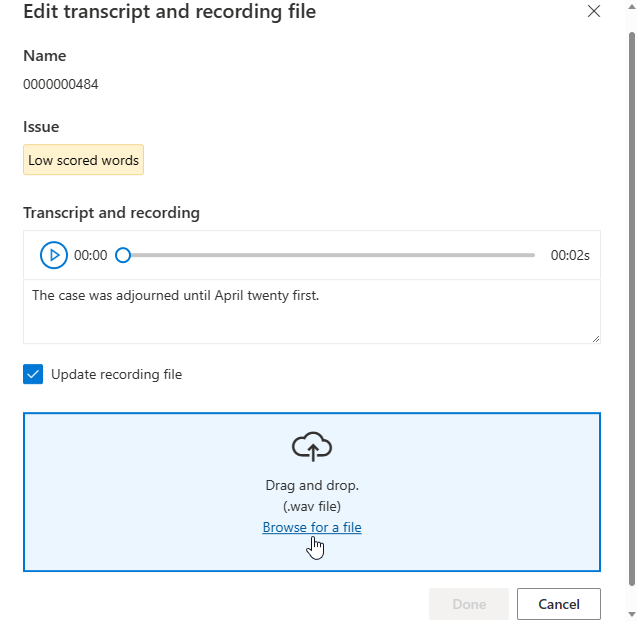
Edit window will be displayed.
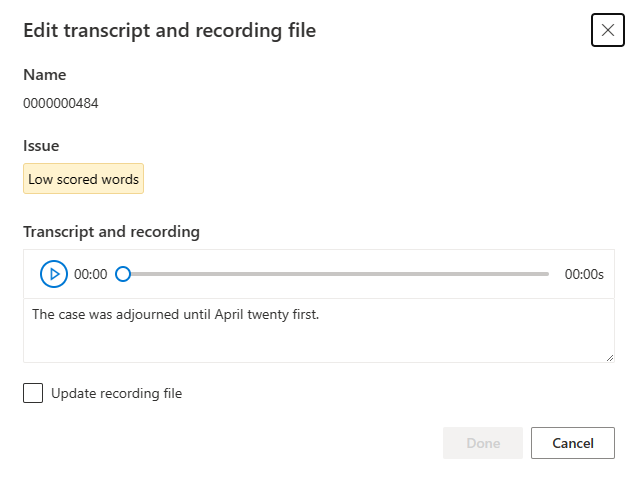
Update transcript or recording file according to issue description on the edit window.
You can edit transcript in the text box, then select Done
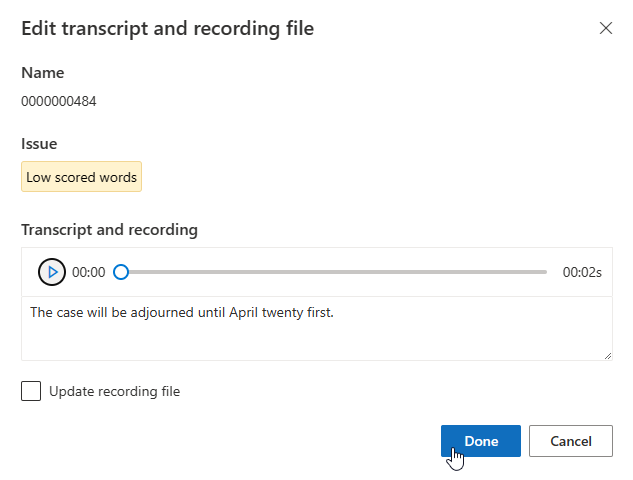
If you need to update recording file, select Update recording file, then upload the fixed recording file (.wav).
After you've made changes to your data, you need to check the data quality by clicking Analyze data before using this dataset for training.
You can't select this training set for training model before the analysis is complete.

You can also delete utterances with issues by selecting them and clicking Delete.
Typical data issues
The issues are divided into three types. Refer to the following tables to check the respective types of errors.
Auto-rejected
Data with these errors won't be used for training. Imported data with errors will be ignored, so you don't need to delete them. You can fix these data errors online or upload the corrected data again for training.
| Category | Name | Description |
|---|---|---|
| Script | Invalid separator | You must separate the utterance ID and the script content with a Tab character. |
| Script | Invalid script ID | The script line ID must be numeric. |
| Script | Duplicated script | Each line of the script content must be unique. The line is duplicated with {}. |
| Script | Script too long | The script must be less than 1,000 characters. |
| Script | No matching audio | The ID of each utterance (each line of the script file) must match the audio ID. |
| Script | No valid script | No valid script is found in this dataset. Fix the script lines that appear in the detailed issue list. |
| Audio | No matching script | No audio files match the script ID. The name of the .wav files must match with the IDs in the script file. |
| Audio | Invalid audio format | The audio format of the .wav files is invalid. Check the .wav file format by using an audio tool like SoX. |
| Audio | Low sampling rate | The sampling rate of the .wav files can't be lower than 16 KHz. |
| Audio | Too long audio | Audio duration is longer than 30 seconds. Split the long audio into multiple files. It's a good idea to make utterances shorter than 15 seconds. |
| Audio | No valid audio | No valid audio is found in this dataset. Check your audio data and upload again. |
| Mismatch | Low scored utterance | Sentence-level pronunciation score is lower than 70. Review the script and the audio content to make sure they match. |
Auto-fixed
The following errors are fixed automatically, but you should review and confirm the fixes are made correctly.
| Category | Name | Description |
|---|---|---|
| Mismatch | Silence auto fixed | The start silence is detected to be shorter than 100 ms, and has been extended to 100 ms automatically. Download the normalized dataset and review it. |
| Mismatch | Silence auto fixed | The end silence is detected to be shorter than 100 ms, and has been extended to 100 ms automatically. Download the normalized dataset and review it. |
| Script | Text auto normalized | Text is automatically normalized for digits, symbols, and abbreviations. Review the script and audio to make sure they match. |
Manual check required
Unresolved errors listed in the next table affect the quality of training, but data with these errors won't be excluded during training. For higher-quality training, it's a good idea to fix these errors manually.
| Category | Name | Description |
|---|---|---|
| Script | Non-normalized text | This script contains symbols. Normalize the symbols to match the audio. For example, normalize / to slash. |
| Script | Not enough question utterances | At least 10 percent of the total utterances should be question sentences. This helps the voice model properly express a questioning tone. |
| Script | Not enough exclamation utterances | At least 10 percent of the total utterances should be exclamation sentences. This helps the voice model properly express an excited tone. |
| Script | No valid end punctuation | Add one of the following at the end of the line: full stop (half-width '.' or full-width '。'), exclamation point (half-width '!' or full-width '!' ), or question mark ( half-width '?' or full-width '?'). |
| Audio | Low sampling rate for neural voice | It's recommended that the sampling rate of your .wav files should be 24 KHz or higher for creating neural voices. If it's lower, it will be automatically raised to 24 KHz. |
| Volume | Overall volume too low | Volume shouldn't be lower than -18 dB (10 percent of max volume). Control the volume average level within proper range during the sample recording or data preparation. |
| Volume | Volume overflow | Overflowing volume is detected at {}s. Adjust the recording equipment to avoid the volume overflow at its peak value. |
| Volume | Start silence issue | The first 100 ms of silence isn't clean. Reduce the recording noise floor level, and leave the first 100 ms at the start silent. |
| Volume | End silence issue | The last 100 ms of silence isn't clean. Reduce the recording noise floor level, and leave the last 100 ms at the end silent. |
| Mismatch | Low scored words | Review the script and the audio content to make sure they match, and control the noise floor level. Reduce the length of long silence, or split the audio into multiple utterances if it's too long. |
| Mismatch | Start silence issue | Extra audio was heard before the first word. Review the script and the audio content to make sure they match, control the noise floor level, and make the first 100 ms silent. |
| Mismatch | End silence issue | Extra audio was heard after the last word. Review the script and the audio content to make sure they match, control the noise floor level, and make the last 100 ms silent. |
| Mismatch | Low signal-noise ratio | Audio SNR level is lower than 20 dB. At least 35 dB is recommended. |
| Mismatch | No score available | Failed to recognize speech content in this audio. Check the audio and the script content to make sure the audio is valid, and matches the script. |
Next steps
You need a training dataset to create a professional voice. A training dataset includes audio and script files. The audio files are recordings of the voice talent reading the script files. The script files are the text of the audio files.
In this article, you create a training set and get its resource ID. Then, using the resource ID, you can upload a set of audio and script files.
Create a training set
To create a training set, use the TrainingSets_Create operation of the custom voice API. Construct the request body according to the following instructions:
- Set the required
projectIdproperty. See create a project. - Set the required
voiceKindproperty toMaleorFemale. The kind can't be changed later. - Set the required
localeproperty. This should be the locale of the training set data. The locale of the training set should be the same as the locale of the consent statement. The locale can't be changed later. You can find the text to speech locale list here. - Optionally, set the
descriptionproperty for the training set description. The training set description can be changed later.
Make an HTTP PUT request using the URI as shown in the following TrainingSets_Create example.
- Replace
YourResourceKeywith your Speech resource key. - Replace
YourResourceRegionwith your Speech resource region. - Replace
JessicaTrainingSetIdwith a training set ID of your choice. The case sensitive ID will be used in the training set's URI and can't be changed later.
curl -v -X PUT -H "Ocp-Apim-Subscription-Key: YourResourceKey" -H "Content-Type: application/json" -d '{
  "description": "300 sentences Jessica data in general style.",
  "projectId": "ProjectId",
  "locale": "en-US",
  "voiceKind": "Female"
} '  "https://YourResourceRegion.api.cognitive.microsoft.com/customvoice/trainingsets/JessicaTrainingSetId?api-version=2023-12-01-preview"
You should receive a response body in the following format:
{
  "id": "JessicaTrainingSetId",
  "description": "300 sentences Jessica data in general style.",
  "projectId": "ProjectId",
  "locale": "en-US",
  "voiceKind": "Female",
  "status": "Succeeded",
  "createdDateTime": "2023-04-01T05:30:00.000Z",
  "lastActionDateTime": "2023-04-02T10:15:30.000Z"
}
Upload training set data
To upload a training set of audio and scripts, use the TrainingSets_UploadData operation of the custom voice API.
Before calling this API, please store recording and script files in Azure Blob. In the example below, recording files are https://contoso.blob.core.windows.net/voicecontainer/jessica300/*.wav, script files are https://contoso.blob.core.windows.net/voicecontainer/jessica300/*.txt.
Construct the request body according to the following instructions:
- Set the required
kindproperty toAudioAndScript. The kind determines the type of training set. - Set the required
audiosproperty. Within theaudiosproperty, set the following properties:- Set the required
containerUrlproperty to the URL of the Azure Blob Storage container that contains the audio files. Use shared access signatures (SAS) for a container with both read and list permissions. - Set the required
extensionsproperty to the extensions of the audio files. - Optionally, set the
prefixproperty to set a prefix for the blob name.
- Set the required
- Set the required
scriptsproperty. Within thescriptsproperty, set the following properties:- Set the required
containerUrlproperty to the URL of the Azure Blob Storage container that contains the script files. Use shared access signatures (SAS) for a container with both read and list permissions. - Set the required
extensionsproperty to the extensions of the script files. - Optionally, set the
prefixproperty to set a prefix for the blob name.
- Set the required
Make an HTTP POST request using the URI as shown in the following TrainingSets_UploadData example.
- Replace
YourResourceKeywith your Speech resource key. - Replace
YourResourceRegionwith your Speech resource region. - Replace
JessicaTrainingSetIdif you specified a different training set ID in the previous step.
curl -v -X POST -H "Ocp-Apim-Subscription-Key: YourResourceKey" -H "Content-Type: application/json" -d '{
  "kind": "AudioAndScript",
  "audios": {
    "containerUrl": "https://contoso.blob.core.windows.net/voicecontainer?mySasToken",
    "prefix": "jessica300/",
    "extensions": [
      ".wav"
    ]
  },
  "scripts": {
    "containerUrl": "https://contoso.blob.core.windows.net/voicecontainer?mySasToken",
    "prefix": "jessica300/",
    "extensions": [
      ".txt"
    ]
  }
} '  "https://YourResourceRegion.api.cognitive.microsoft.com/customvoice/trainingsets/JessicaTrainingSetId:upload?api-version=2023-12-01-preview"
The response header contains the Operation-Location property. Use this URI to get details about the TrainingSets_UploadData operation. Here's an example of the response header:
Operation-Location: https://eastus.api.cognitive.microsoft.com/customvoice/operations/284b7e37-f42d-4054-8fa9-08523c3de345?api-version=2023-12-01-preview
Operation-Id: 284b7e37-f42d-4054-8fa9-08523c3de345
Next steps
Feedback
Coming soon: Throughout 2024 we will be phasing out GitHub Issues as the feedback mechanism for content and replacing it with a new feedback system. For more information see: https://aka.ms/ContentUserFeedback.
Submit and view feedback for