Quickstart: Orchestration workflow
Use this article to get started with Orchestration workflow projects using Language Studio and the REST API. Follow these steps to try out an example.
Prerequisites
- Azure subscription - Create one for free.
- A conversational language understanding project.
Sign in to Language Studio
Go to the Language Studio and sign in with your Azure account.
In the Choose a language resource window that appears, find your Azure subscription, and choose your Language resource. If you don't have a resource, you can create a new one.
Instance detail Required value Azure subscription Your Azure subscription. Azure resource group Your Azure resource group. Azure resource name Your Azure resource name. Location A valid location for your Azure resource. For example, "West US 2". Pricing tier A supported pricing tier for your Azure resource. You can use the Free (F0) tier to try the service. 

Create an orchestration workflow project
Once you have a Language resource created, create an orchestration workflow project. A project is a work area for building your custom ML models based on your data. Your project can only be accessed by you and others who have access to the Language resource being used.
For this quickstart, complete the conversational language understanding quickstart to create a conversational language understanding project that will be used later.
In Language Studio, find the section labeled Understand questions and conversational language and select Orchestration Workflow.
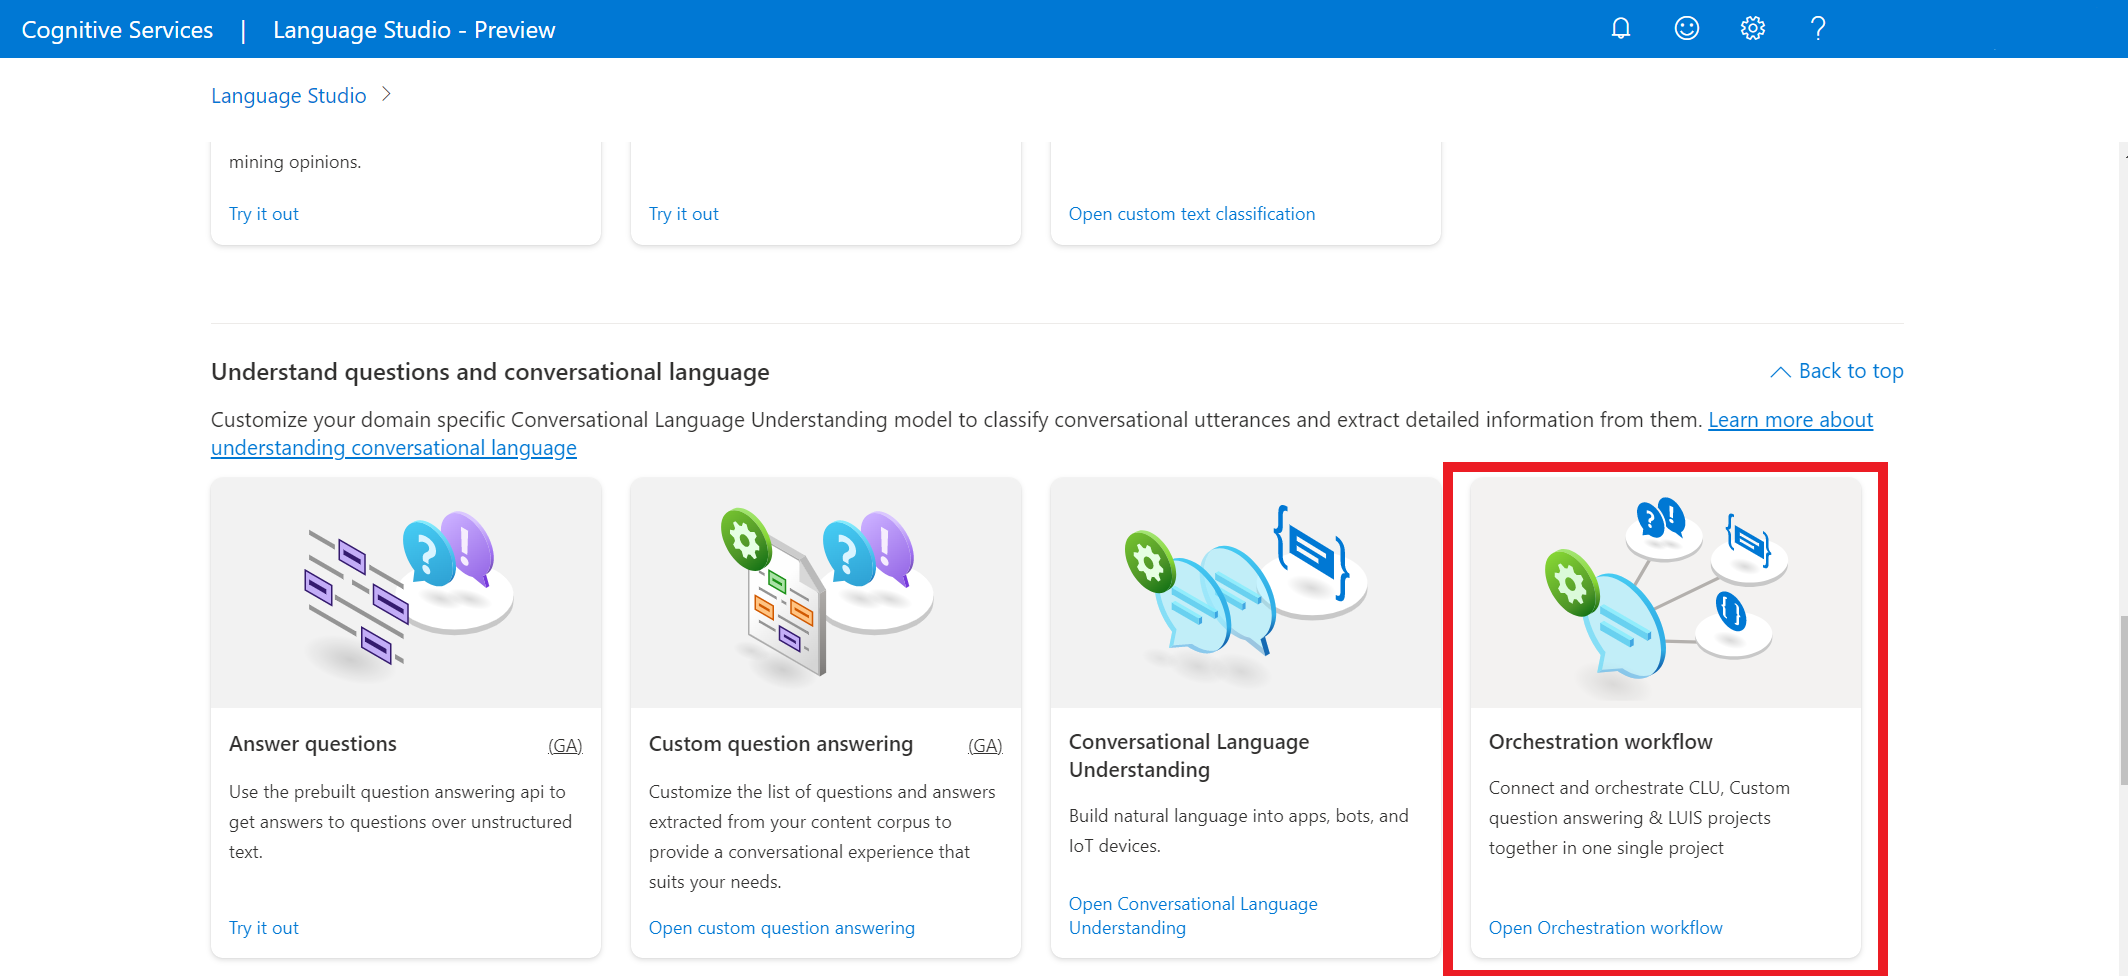
This will bring you to the Orchestration workflow project page. Select Create new project. To create a project, you will need to provide the following details:

| Value | Description |
|---|---|
| Name | A name for your project. |
| Description | Optional project description. |
| Utterances primary language | The primary language of your project. Your training data should primarily be in this language. |
Once you're done, select Next and review the details. Select create project to complete the process. You should now see the Build Schema screen in your project.
Build schema
After you complete the conversational language understanding quickstart and create an orchestration project, the next step is to add intents.
To connect to the previously created conversational language understanding project:
- In the build schema page in your orchestration project, select Add, to add an intent.
- In the window that appears, give your intent a name.
- Select Yes, I want to connect it to an existing project.
- From the connected services dropdown, select Conversational Language Understanding.
- From the project name dropdown, select your conversational language understanding project.
- Select Add intent to create your intent.
Train your model
To train a model, you need to start a training job. The output of a successful training job is your trained model.
To start training your model from within the Language Studio:
Select Training jobs from the left side menu.
Select Start a training job from the top menu.
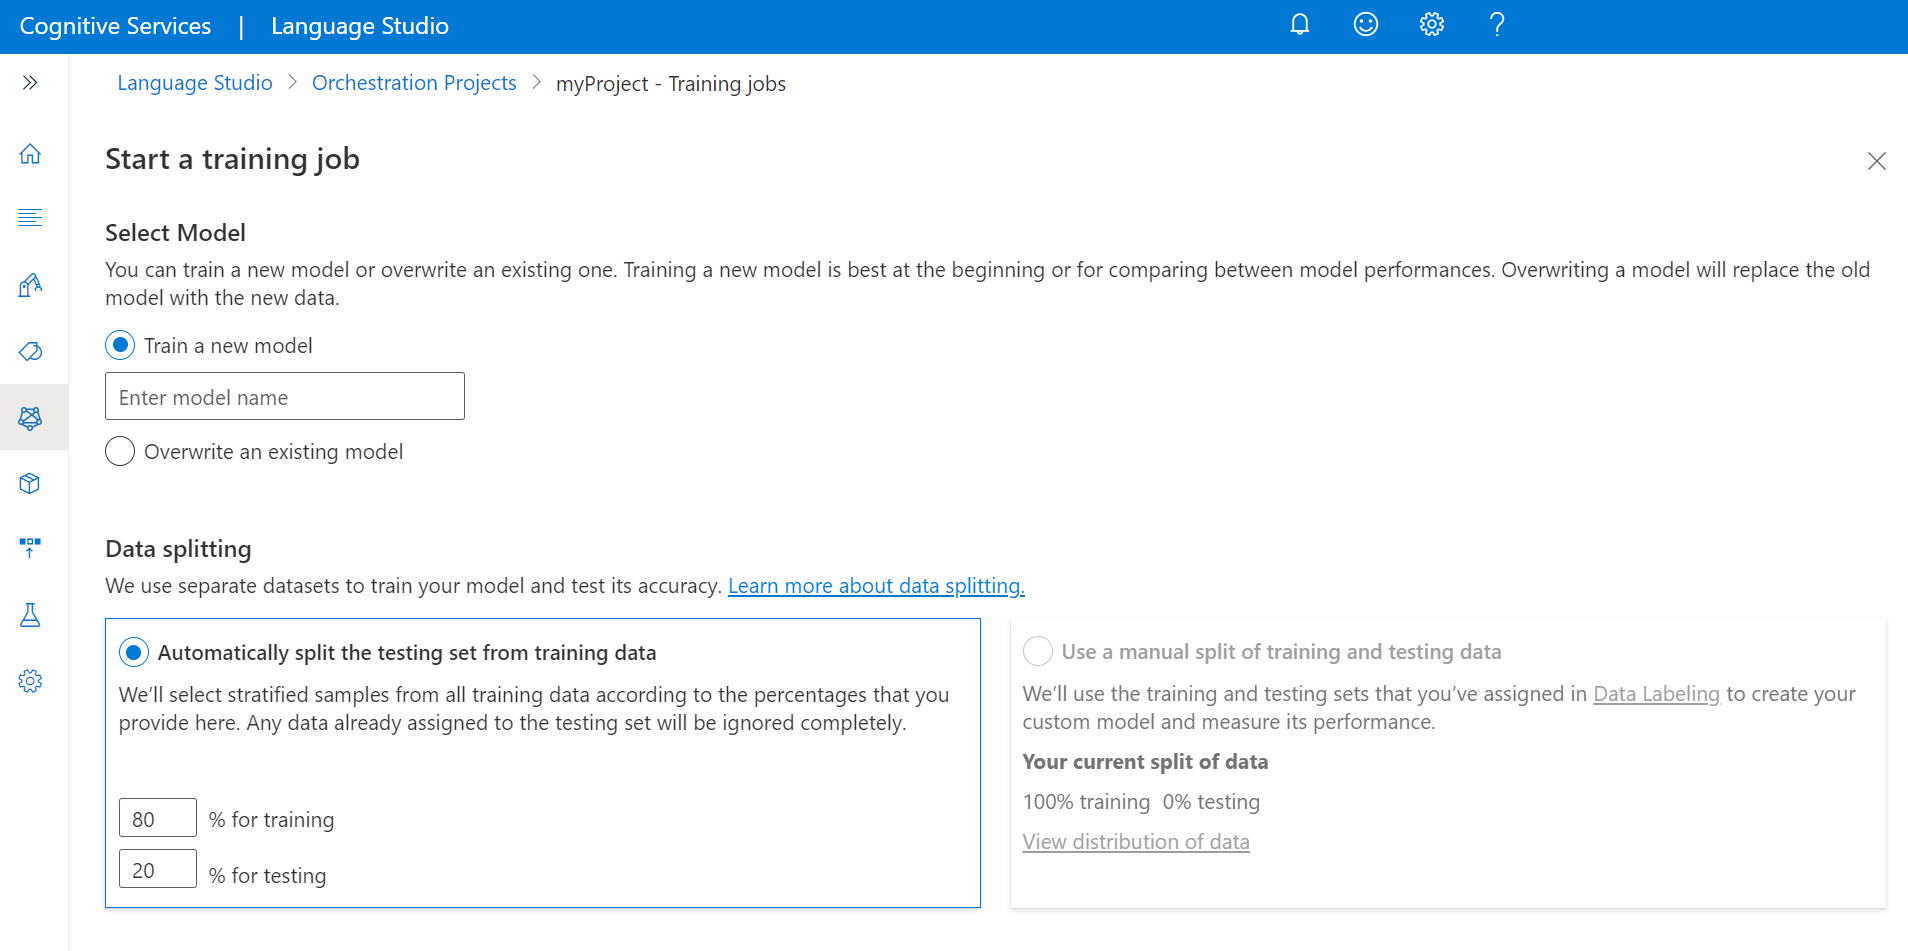
Select Train a new model and type in the model name in the text box. You can also overwrite an existing model by selecting this option and choosing the model you want to overwrite from the dropdown menu. Overwriting a trained model is irreversible, but it won't affect your deployed models until you deploy the new model.
If you have enabled your project to manually split your data when tagging your utterances, you will see two data splitting options:
- Automatically splitting the testing set from training data: Your tagged utterances will be randomly split between the training and testing sets, according to the percentages you choose. The default percentage split is 80% for training and 20% for testing. To change these values, choose which set you want to change and type in the new value.
Note
If you choose the Automatically splitting the testing set from training data option, only the utterances in your training set will be split according to the percentages provided.
- Use a manual split of training and testing data: Assign each utterance to either the training or testing set during the tagging step of the project.
Note
Use a manual split of training and testing data option will only be enabled if you add utterances to the testing set in the tag data page. Otherwise, it will be disabled.
Select the Train button.

Note
- Only successfully completed training jobs will generate models.
- Training can take some time between a couple of minutes and couple of hours based on the size of your tagged data.
- You can only have one training job running at a time. You cannot start other training job wihtin the same project until the running job is completed.
Deploy your model
Generally after training a model you would review its evaluation details. In this quickstart, you will just deploy your model, and make it available for you to try in Language Studio, or you can call the prediction API.
To deploy your model from within the Language Studio:
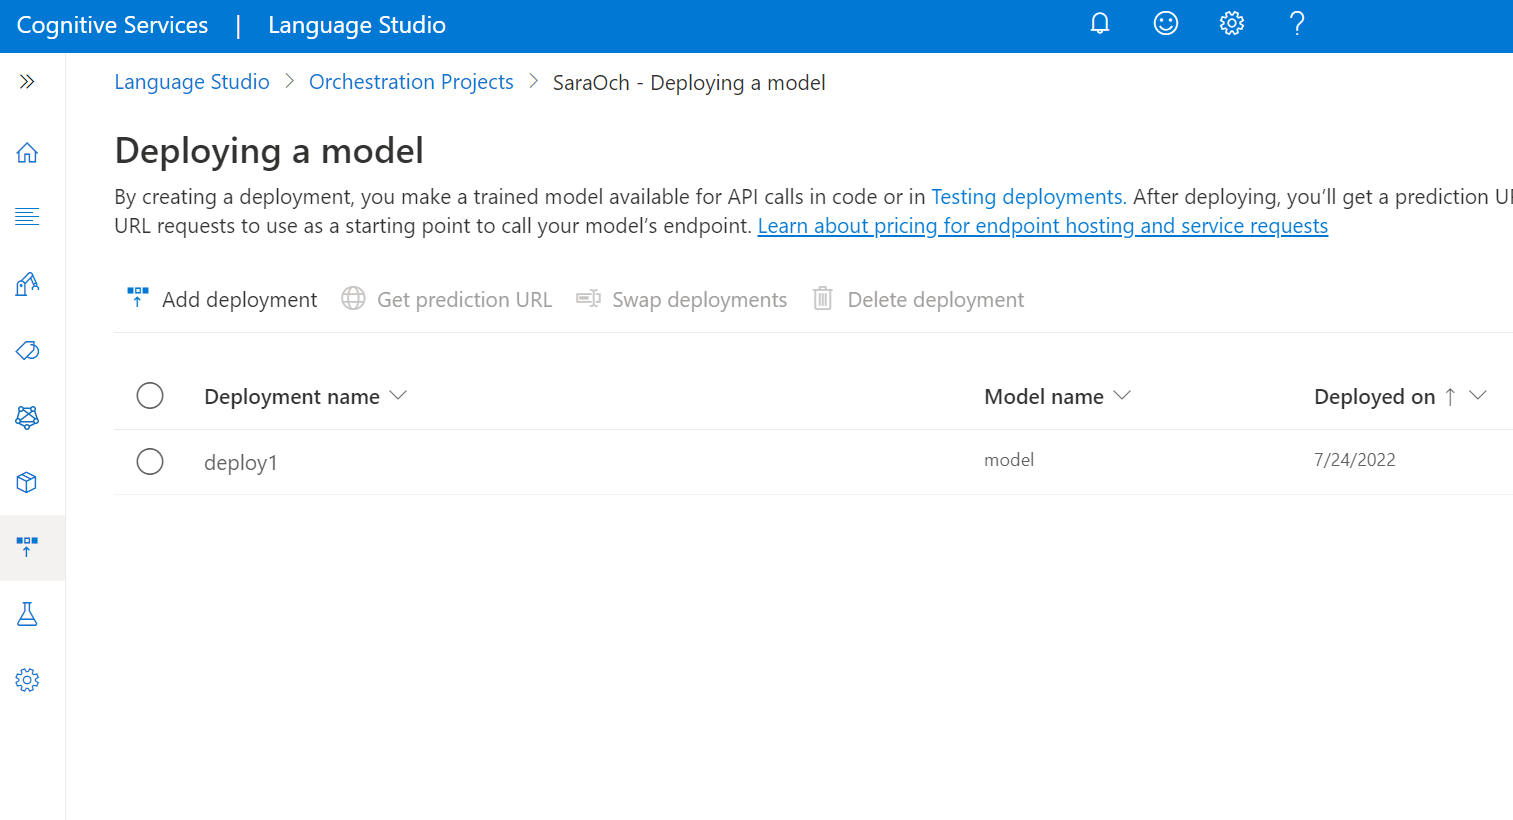
Select Deploying a model from the left side menu.
Select Add deployment to start a new deployment job.
Select Create new deployment to create a new deployment and assign a trained model from the dropdown below. You can also Overwrite an existing deployment by selecting this option and select the trained model you want to assign to it from the dropdown below.
Note
Overwriting an existing deployment doesn't require changes to your prediction API call, but the results you get will be based on the newly assigned model.
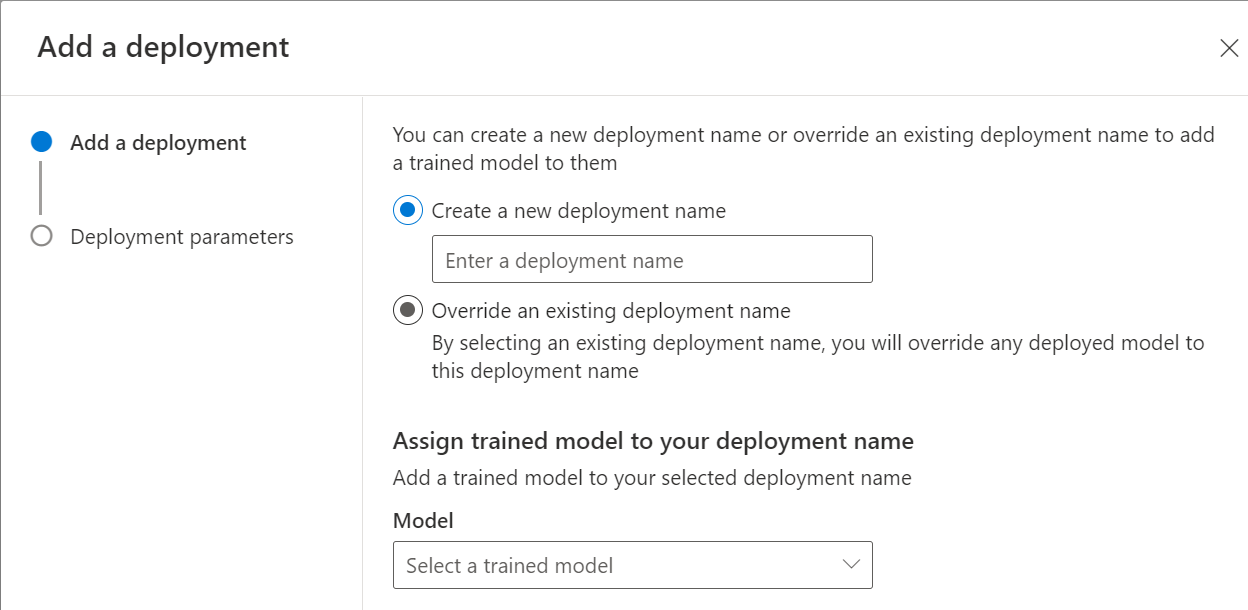
If you're connecting one or more LUIS applications or conversational language understanding projects, you have to specify the deployment name.
No configurations are required for custom question answering or unlinked intents.
LUIS projects must be published to the slot configured during the Orchestration deployment, and custom question answering KBs must also be published to their Production slots.
Select Deploy to submit your deployment job
After deployment is successful, an expiration date will appear next to it. Deployment expiration is when your deployed model will be unavailable to be used for prediction, which typically happens twelve months after a training configuration expires.


Test model
After your model is deployed, you can start using it to make predictions through Prediction API. For this quickstart, you will use the Language Studio to submit an utterance, get predictions and visualize the results.
To test your model from Language Studio
Select Testing deployments from the left side menu.
Select the model you want to test. You can only test models that are assigned to deployments.
From deployment name dropdown, select your deployment name.
In the text box, enter an utterance to test.
From the top menu, select Run the test.
After you run the test, you should see the response of the model in the result. You can view the results in entities cards view, or view it in JSON format.


Clean up resources
When you don't need your project anymore, you can delete your project using Language Studio. Select Projects from the left navigation menu, select the project you want to delete, and then select Delete from the top menu.
Prerequisites
- Azure subscription - Create one for free.
Create a Language resource from Azure portal
Create a new resource from the Azure portal
Go to the Azure portal to create a new Azure AI Language resource.
Select Continue to create your resource
Create a Language resource with following details.
Instance detail Required value Region One of the supported regions. Name A name for your Language resource. Pricing tier One of the supported pricing tiers.
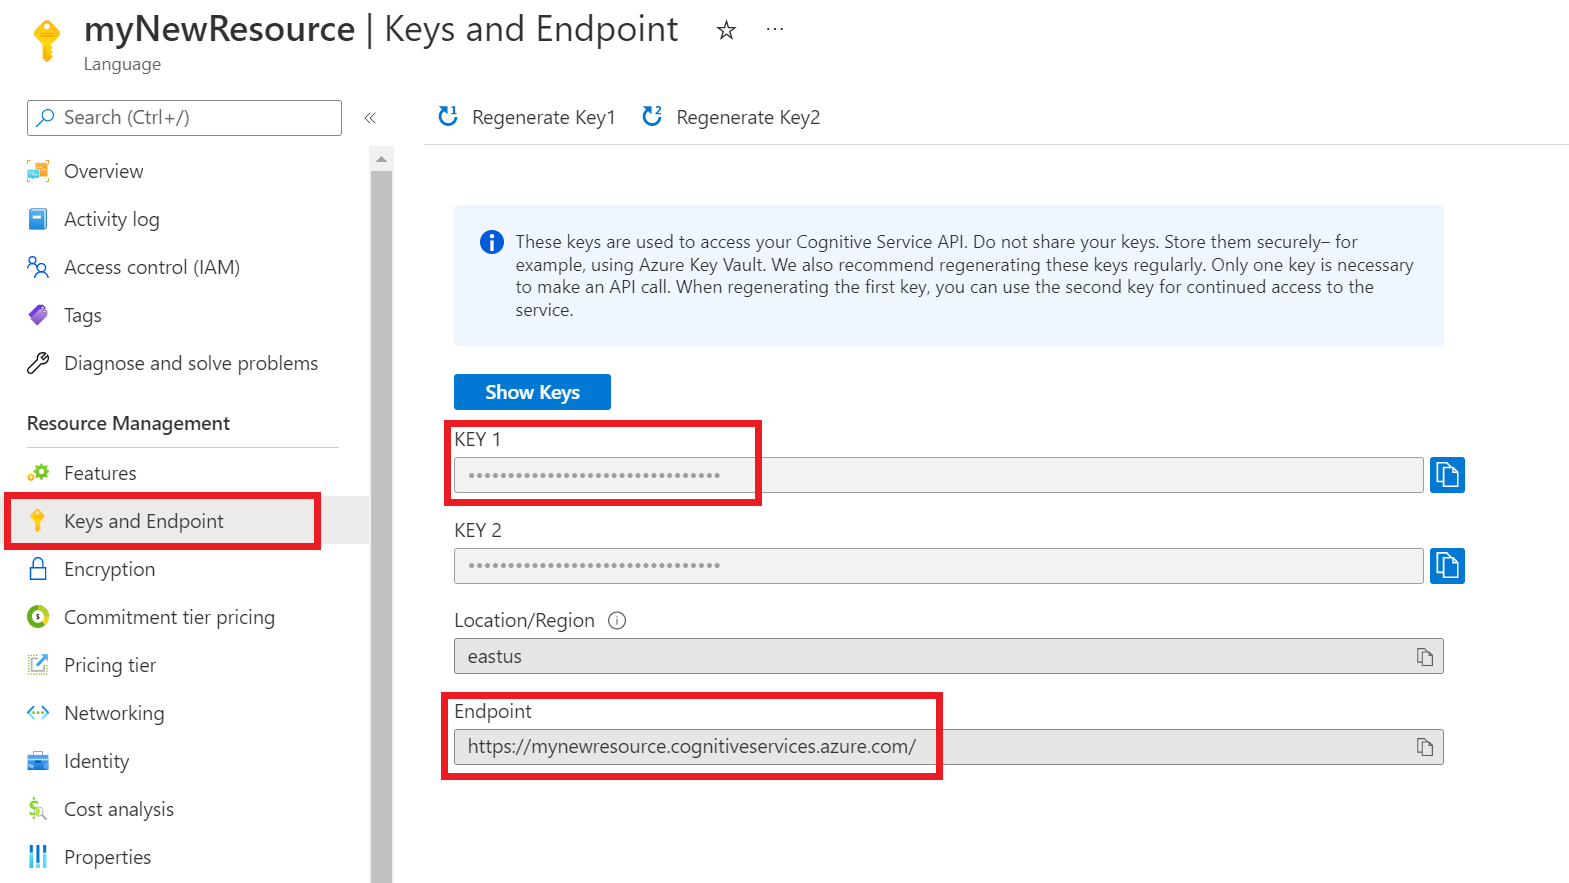
Get your resource keys and endpoint
Go to your resource overview page in the Azure portal.
From the menu on the left side, select Keys and Endpoint. You will use the endpoint and key for the API requests

Create an orchestration workflow project
Once you have a Language resource created, create an orchestration workflow project. A project is a work area for building your custom ML models based on your data. Your project can only be accessed by you and others who have access to the Language resource being used.
For this quickstart, complete the CLU quickstart to create a CLU project to be used in orchestration workflow.
Submit a PATCH request using the following URL, headers, and JSON body to create a new project.
Request URL
Use the following URL when creating your API request. Replace the placeholder values below with your own values.
{ENDPOINT}/language/authoring/analyze-conversations/projects/{PROJECT-NAME}?api-version={API-VERSION}
| Placeholder | Value | Example |
|---|---|---|
{ENDPOINT} |
The endpoint for authenticating your API request. | https://<your-custom-subdomain>.cognitiveservices.azure.com |
{PROJECT-NAME} |
The name for your project. This value is case-sensitive. | myProject |
{API-VERSION} |
The version of the API you are calling. | 2023-04-01 |
Headers
Use the following header to authenticate your request.
| Key | Value |
|---|---|
Ocp-Apim-Subscription-Key |
The key to your resource. Used for authenticating your API requests. |
Body
Use the following sample JSON as your body.
{
  "projectName": "{PROJECT-NAME}",
  "language": "{LANGUAGE-CODE}",
  "projectKind": "Orchestration",
  "description": "Project description"
 }
| Key | Placeholder | Value | Example |
|---|---|---|---|
projectName |
{PROJECT-NAME} |
The name of your project. This value is case-sensitive. | EmailApp |
language |
{LANGUAGE-CODE} |
A string specifying the language code for the utterances used in your project. If your project is a multilingual project, choose the language code of the majority of the utterances. | en-us |
Build schema
After completing the CLU quickstart, and creating an orchestration project, the next step is to add intents.
Submit a POST request using the following URL, headers, and JSON body to import your project.
Request URL
Use the following URL when creating your API request. Replace the placeholder values below with your own values.
{ENDPOINT}/language/authoring/analyze-conversations/projects/{PROJECT-NAME}/:import?api-version={API-VERSION}
| Placeholder | Value | Example |
|---|---|---|
{ENDPOINT} |
The endpoint for authenticating your API request. | https://<your-custom-subdomain>.cognitiveservices.azure.com |
{PROJECT-NAME} |
The name for your project. This value is case-sensitive. | myProject |
{API-VERSION} |
The version of the API you are calling. | 2023-04-01 |
Headers
Use the following header to authenticate your request.
| Key | Value |
|---|---|
Ocp-Apim-Subscription-Key |
The key to your resource. Used for authenticating your API requests. |
Body
Note
Each intent should only be of one type only from (CLU,LUIS and qna)
Use the following sample JSON as your body.
{
  "projectFileVersion": "{API-VERSION}",
  "stringIndexType": "Utf16CodeUnit",
  "metadata": {
    "projectKind": "Orchestration",
    "settings": {
      "confidenceThreshold": 0
    },
    "projectName": "{PROJECT-NAME}",
    "description": "Project description",
    "language": "{LANGUAGE-CODE}"
  },
  "assets": {
    "projectKind": "Orchestration",
    "intents": [
      {
        "category": "string",
        "orchestration": {
          "kind": "luis",
          "luisOrchestration": {
            "appId": "00000000-0000-0000-0000-000000000000",
            "appVersion": "string",
            "slotName": "string"
          },
          "cluOrchestration": {
            "projectName": "string",
            "deploymentName": "string"
          },
          "qnaOrchestration": {
            "projectName": "string"
          }
        }
      }
    ],
    "utterances": [
      {
        "text": "Trying orchestration",
        "language": "{LANGUAGE-CODE}",
        "intent": "string"
      }
    ]
  }
}
| Key | Placeholder | Value | Example |
|---|---|---|---|
api-version |
{API-VERSION} |
The version of the API you are calling. The version used here must be the same API version in the URL. | 2022-03-01-preview |
projectName |
{PROJECT-NAME} |
The name of your project. This value is case-sensitive. | EmailApp |
language |
{LANGUAGE-CODE} |
A string specifying the language code for the utterances used in your project. If your project is a multilingual project, choose the language code of the majority of the utterances. | en-us |
Train your model
To train a model, you need to start a training job. The output of a successful training job is your trained model.
Create a POST request using the following URL, headers, and JSON body to submit a training job.
Request URL
Use the following URL when creating your API request. Replace the placeholder values below with your own values.
{ENDPOINT}/language/authoring/analyze-conversations/projects/{PROJECT-NAME}/:train?api-version={API-VERSION}
| Placeholder | Value | Example |
|---|---|---|
{ENDPOINT} |
The endpoint for authenticating your API request. | https://<your-custom-subdomain>.cognitiveservices.azure.com |
{PROJECT-NAME} |
The name for your project. This value is case-sensitive. | EmailApp |
{API-VERSION} |
The version of the API you are calling. | 2023-04-01 |
Headers
Use the following header to authenticate your request.
| Key | Value |
|---|---|
Ocp-Apim-Subscription-Key |
The key to your resource. Used for authenticating your API requests. |
Request body
Use the following object in your request. The model will be named MyModel once training is complete.
{
  "modelLabel": "{MODEL-NAME}",
  "trainingMode": "standard",
  "trainingConfigVersion": "{CONFIG-VERSION}",
  "evaluationOptions": {
    "kind": "percentage",
    "testingSplitPercentage": 20,
    "trainingSplitPercentage": 80
  }
}
| Key | Placeholder | Value | Example |
|---|---|---|---|
modelLabel |
{MODEL-NAME} |
Your Model name. | Model1 |
trainingMode |
standard |
Training mode. Only one mode for training is available in orchestration, which is standard. |
standard |
trainingConfigVersion |
{CONFIG-VERSION} |
The training configuration model version. By default, the latest model version is used. | 2022-05-01 |
kind |
percentage |
Split methods. Possible values are percentage or manual. See how to train a model for more information. |
percentage |
trainingSplitPercentage |
80 |
Percentage of your tagged data to be included in the training set. Recommended value is 80. |
80 |
testingSplitPercentage |
20 |
Percentage of your tagged data to be included in the testing set. Recommended value is 20. |
20 |
Note
The trainingSplitPercentage and testingSplitPercentage are only required if Kind is set to percentage and the sum of both percentages should be equal to 100.
Once you send your API request, you will receive a 202 response indicating success. In the response headers, extract the operation-location value. It will be formatted like this:
{ENDPOINT}/language/authoring/analyze-conversations/projects/{PROJECT-NAME}/train/jobs/{JOB-ID}?api-version={API-VERSION}
You can use this URL to get the training job status.
Get Training Status
Training could take sometime between 10 and 30 minutes. You can use the following request to keep polling the status of the training job until it is successfully completed.
Use the following GET request to get the status of your model's training progress. Replace the placeholder values below with your own values.
Request URL
{ENDPOINT}/language/authoring/analyze-conversations/projects/{PROJECT-NAME}/train/jobs/{JOB-ID}?api-version={API-VERSION}
| Placeholder | Value | Example |
|---|---|---|
{YOUR-ENDPOINT} |
The endpoint for authenticating your API request. | https://<your-custom-subdomain>.cognitiveservices.azure.com |
{PROJECT-NAME} |
The name for your project. This value is case-sensitive. | EmailApp |
{JOB-ID} |
The ID for locating your model's training status. This is in the location header value you received when submitted your training job. |
xxxxxxxx-xxxx-xxxx-xxxx-xxxxxxxxxxxxx |
{API-VERSION} |
The version of the API you are calling. | 2023-04-01 |
Headers
Use the following header to authenticate your request.
| Key | Value |
|---|---|
Ocp-Apim-Subscription-Key |
The key to your resource. Used for authenticating your API requests. |
Response Body
Once you send the request, you will get the following response. Keep polling this endpoint until the status parameter changes to "succeeded".
{
  "result": {
    "modelLabel": "{MODEL-LABEL}",
    "trainingConfigVersion": "{TRAINING-CONFIG-VERSION}",
    "estimatedEndDateTime": "2022-04-18T15:47:58.8190649Z",
    "trainingStatus": {
      "percentComplete": 3,
      "startDateTime": "2022-04-18T15:45:06.8190649Z",
      "status": "running"
    },
    "evaluationStatus": {
      "percentComplete": 0,
      "status": "notStarted"
    }
  },
  "jobId": "xxxxxx-xxxxx-xxxxxx-xxxxxx",
  "createdDateTime": "2022-04-18T15:44:44Z",
  "lastUpdatedDateTime": "2022-04-18T15:45:48Z",
  "expirationDateTime": "2022-04-25T15:44:44Z",
  "status": "running"
}
| Key | Value | Example |
|---|---|---|
modelLabel |
The model name | Model1 |
trainingConfigVersion |
The training configuration version. By default, the latest version is used. | 2022-05-01 |
startDateTime |
The time training started | 2022-04-14T10:23:04.2598544Z |
status |
The status of the training job | running |
estimatedEndDateTime |
Estimated time for the training job to finish | 2022-04-14T10:29:38.2598544Z |
jobId |
Your training job ID | xxxxx-xxxx-xxxx-xxxx-xxxxxxxxx |
createdDateTime |
Training job creation date and time | 2022-04-14T10:22:42Z |
lastUpdatedDateTime |
Training job last updated date and time | 2022-04-14T10:23:45Z |
expirationDateTime |
Training job expiration date and time | 2022-04-14T10:22:42Z |
Deploy your model
Generally after training a model you would review its evaluation details. In this quickstart, you will just deploy your model, and call the prediction API to query the results.
Submit deployment job
Create a PUT request using the following URL, headers, and JSON body to start deploying an orchestration workflow model.
Request URL
{ENDPOINT}/language/authoring/analyze-conversations/projects/{PROJECT-NAME}/deployments/{DEPLOYMENT-NAME}?api-version={API-VERSION}
| Placeholder | Value | Example |
|---|---|---|
{ENDPOINT} |
The endpoint for authenticating your API request. | https://<your-custom-subdomain>.cognitiveservices.azure.com |
{PROJECT-NAME} |
The name for your project. This value is case-sensitive. | myProject |
{DEPLOYMENT-NAME} |
The name for your deployment. This value is case-sensitive. | staging |
{API-VERSION} |
The version of the API you are calling. | 2023-04-01 |
Headers
Use the following header to authenticate your request.
| Key | Value |
|---|---|
Ocp-Apim-Subscription-Key |
The key to your resource. Used for authenticating your API requests. |
Request Body
{
  "trainedModelLabel": "{MODEL-NAME}",
}
| Key | Placeholder | Value | Example |
|---|---|---|---|
| trainedModelLabel | {MODEL-NAME} |
The model name that will be assigned to your deployment. You can only assign successfully trained models. This value is case-sensitive. | myModel |
Once you send your API request, you will receive a 202 response indicating success. In the response headers, extract the operation-location value. It will be formatted like this:
{ENDPOINT}/language/authoring/analyze-conversations/projects/{PROJECT-NAME}/deployments/{DEPLOYMENT-NAME}/jobs/{JOB-ID}?api-version={API-VERSION}
You can use this URL to get the deployment job status.
Get deployment job status
Use the following GET request to get the status of your deployment job. Replace the placeholder values below with your own values.
Request URL
{ENDPOINT}/language/authoring/analyze-conversations/projects/{PROJECT-NAME}/deployments/{DEPLOYMENT-NAME}/jobs/{JOB-ID}?api-version={API-VERSION}
| Placeholder | Value | Example |
|---|---|---|
{ENDPOINT} |
The endpoint for authenticating your API request. | https://<your-custom-subdomain>.cognitiveservices.azure.com |
{PROJECT-NAME} |
The name for your project. This value is case-sensitive. | myProject |
{DEPLOYMENT-NAME} |
The name for your deployment. This value is case-sensitive. | staging |
{JOB-ID} |
The ID for locating your model's training status. This is in the location header value you received from the API in response to your model deployment request. |
xxxxxxxx-xxxx-xxxx-xxxx-xxxxxxxxxxxxx |
{API-VERSION} |
The version of the API you are calling. | 2023-04-01 |
Headers
Use the following header to authenticate your request.
| Key | Value |
|---|---|
Ocp-Apim-Subscription-Key |
The key to your resource. Used for authenticating your API requests. |
Response Body
Once you send the request, you will get the following response. Keep polling this endpoint until the status parameter changes to "succeeded".
{
    "jobId":"{JOB-ID}",
    "createdDateTime":"{CREATED-TIME}",
    "lastUpdatedDateTime":"{UPDATED-TIME}",
    "expirationDateTime":"{EXPIRATION-TIME}",
    "status":"running"
}
Query model
After your model is deployed, you can start using it to make predictions through the prediction API.
Once deployment succeeds, you can begin querying your deployed model for predictions.
Create a POST request using the following URL, headers, and JSON body to start testing an orchestration workflow model.
Request URL
{ENDPOINT}/language/:analyze-conversations?api-version={API-VERSION}
| Placeholder | Value | Example |
|---|---|---|
{ENDPOINT} |
The endpoint for authenticating your API request. | https://<your-custom-subdomain>.cognitiveservices.azure.com |
{API-VERSION} |
The version of the API you are calling. | 2023-04-01 |
Headers
Use the following header to authenticate your request.
| Key | Value |
|---|---|
Ocp-Apim-Subscription-Key |
The key to your resource. Used for authenticating your API requests. |
Request Body
{
  "kind": "Conversation",
  "analysisInput": {
    "conversationItem": {
      "text": "Text1",
      "participantId": "1",
      "id": "1"
    }
  },
  "parameters": {
    "projectName": "{PROJECT-NAME}",
    "deploymentName": "{DEPLOYMENT-NAME}",
    "directTarget": "qnaProject",
    "targetProjectParameters": {
      "qnaProject": {
        "targetProjectKind": "QuestionAnswering",
        "callingOptions": {
          "context": {
            "previousUserQuery": "Meet Surface Pro 4",
            "previousQnaId": 4
          },
          "top": 1,
          "question": "App Service overview"
        }
      }
    }
  }
}
Response Body
Once you send the request, you will get the following response for the prediction!
{
  "kind": "ConversationResult",
  "result": {
    "query": "App Service overview",
    "prediction": {
      "projectKind": "Orchestration",
      "topIntent": "qnaTargetApp",
      "intents": {
        "qnaTargetApp": {
          "targetProjectKind": "QuestionAnswering",
          "confidenceScore": 1,
          "result": {
            "answers": [
              {
                "questions": [
                  "App Service overview"
                ],
                "answer": "The compute resources you use are determined by the *App Service plan* that you run your apps on.",
                "confidenceScore": 0.7384000000000001,
                "id": 1,
                "source": "https://learn.microsoft.com/azure/app-service/overview",
                "metadata": {},
                "dialog": {
                  "isContextOnly": false,
                  "prompts": []
                }
              }
            ]
          }
        }
      }
    }
  }
}
Clean up resources
When you don't need your project anymore, you can delete your project using the APIs.
Create a DELETE request using the following URL, headers, and JSON body to delete a conversational language understanding project.
Request URL
{ENDPOINT}/language/authoring/analyze-conversations/projects/{PROJECT-NAME}?api-version={API-VERSION}
| Placeholder | Value | Example |
|---|---|---|
{ENDPOINT} |
The endpoint for authenticating your API request. | https://<your-custom-subdomain>.cognitiveservices.azure.com |
{PROJECT-NAME} |
The name for your project. This value is case-sensitive. | myProject |
{API-VERSION} |
The version of the API you are calling. | 2023-04-01 |
Headers
Use the following header to authenticate your request.
| Key | Value |
|---|---|
Ocp-Apim-Subscription-Key |
The key to your resource. Used for authenticating your API requests. |
Once you send your API request, you will receive a 202 response indicating success, which means your project has been deleted.
Next steps
Feedback
Coming soon: Throughout 2024 we will be phasing out GitHub Issues as the feedback mechanism for content and replacing it with a new feedback system. For more information see: https://aka.ms/ContentUserFeedback.
Submit and view feedback for