Connect different services with Orchestration workflow
Orchestration workflow is a feature that allows you to connect different projects from LUIS, conversational language understanding, and custom question answering in one project. You can then use this project for predictions under one endpoint. The orchestration project makes a prediction on which project should be called and automatically routes the request to that project, and returns with its response.
In this tutorial, you will learn how to connect a custom question answering knowledge base with a conversational language understanding project. You will then call the project using the .NET SDK sample for orchestration.
This tutorial will include creating a chit chat knowledge base and email commands project. Chit chat will deal with common niceties and greetings with static responses. Email commands will predict among a few simple actions for an email assistant. The tutorial will then teach you to call the Orchestrator using the SDK in a .NET environment using a sample solution.
Prerequisites
- Create a Language resource and select the custom question answering feature in the Azure portal to get your key and endpoint. After it deploys, select Go to resource.
- You will need the key and endpoint from the resource you create to connect your bot to the API. You'll paste your key and endpoint into the code below later in the tutorial. Copy them from the Keys and Endpoint tab in your resource.
- When you enable custom question answering, you must select an Azure search resource to connect to.
- Make sure the region of your resource is supported by conversational language understanding.
- Download the OrchestrationWorkflowSample sample.
Create a custom question answering knowledge base
Sign into the Language Studio and select your Language resource.
Find and select the Custom question answering card in the homepage.
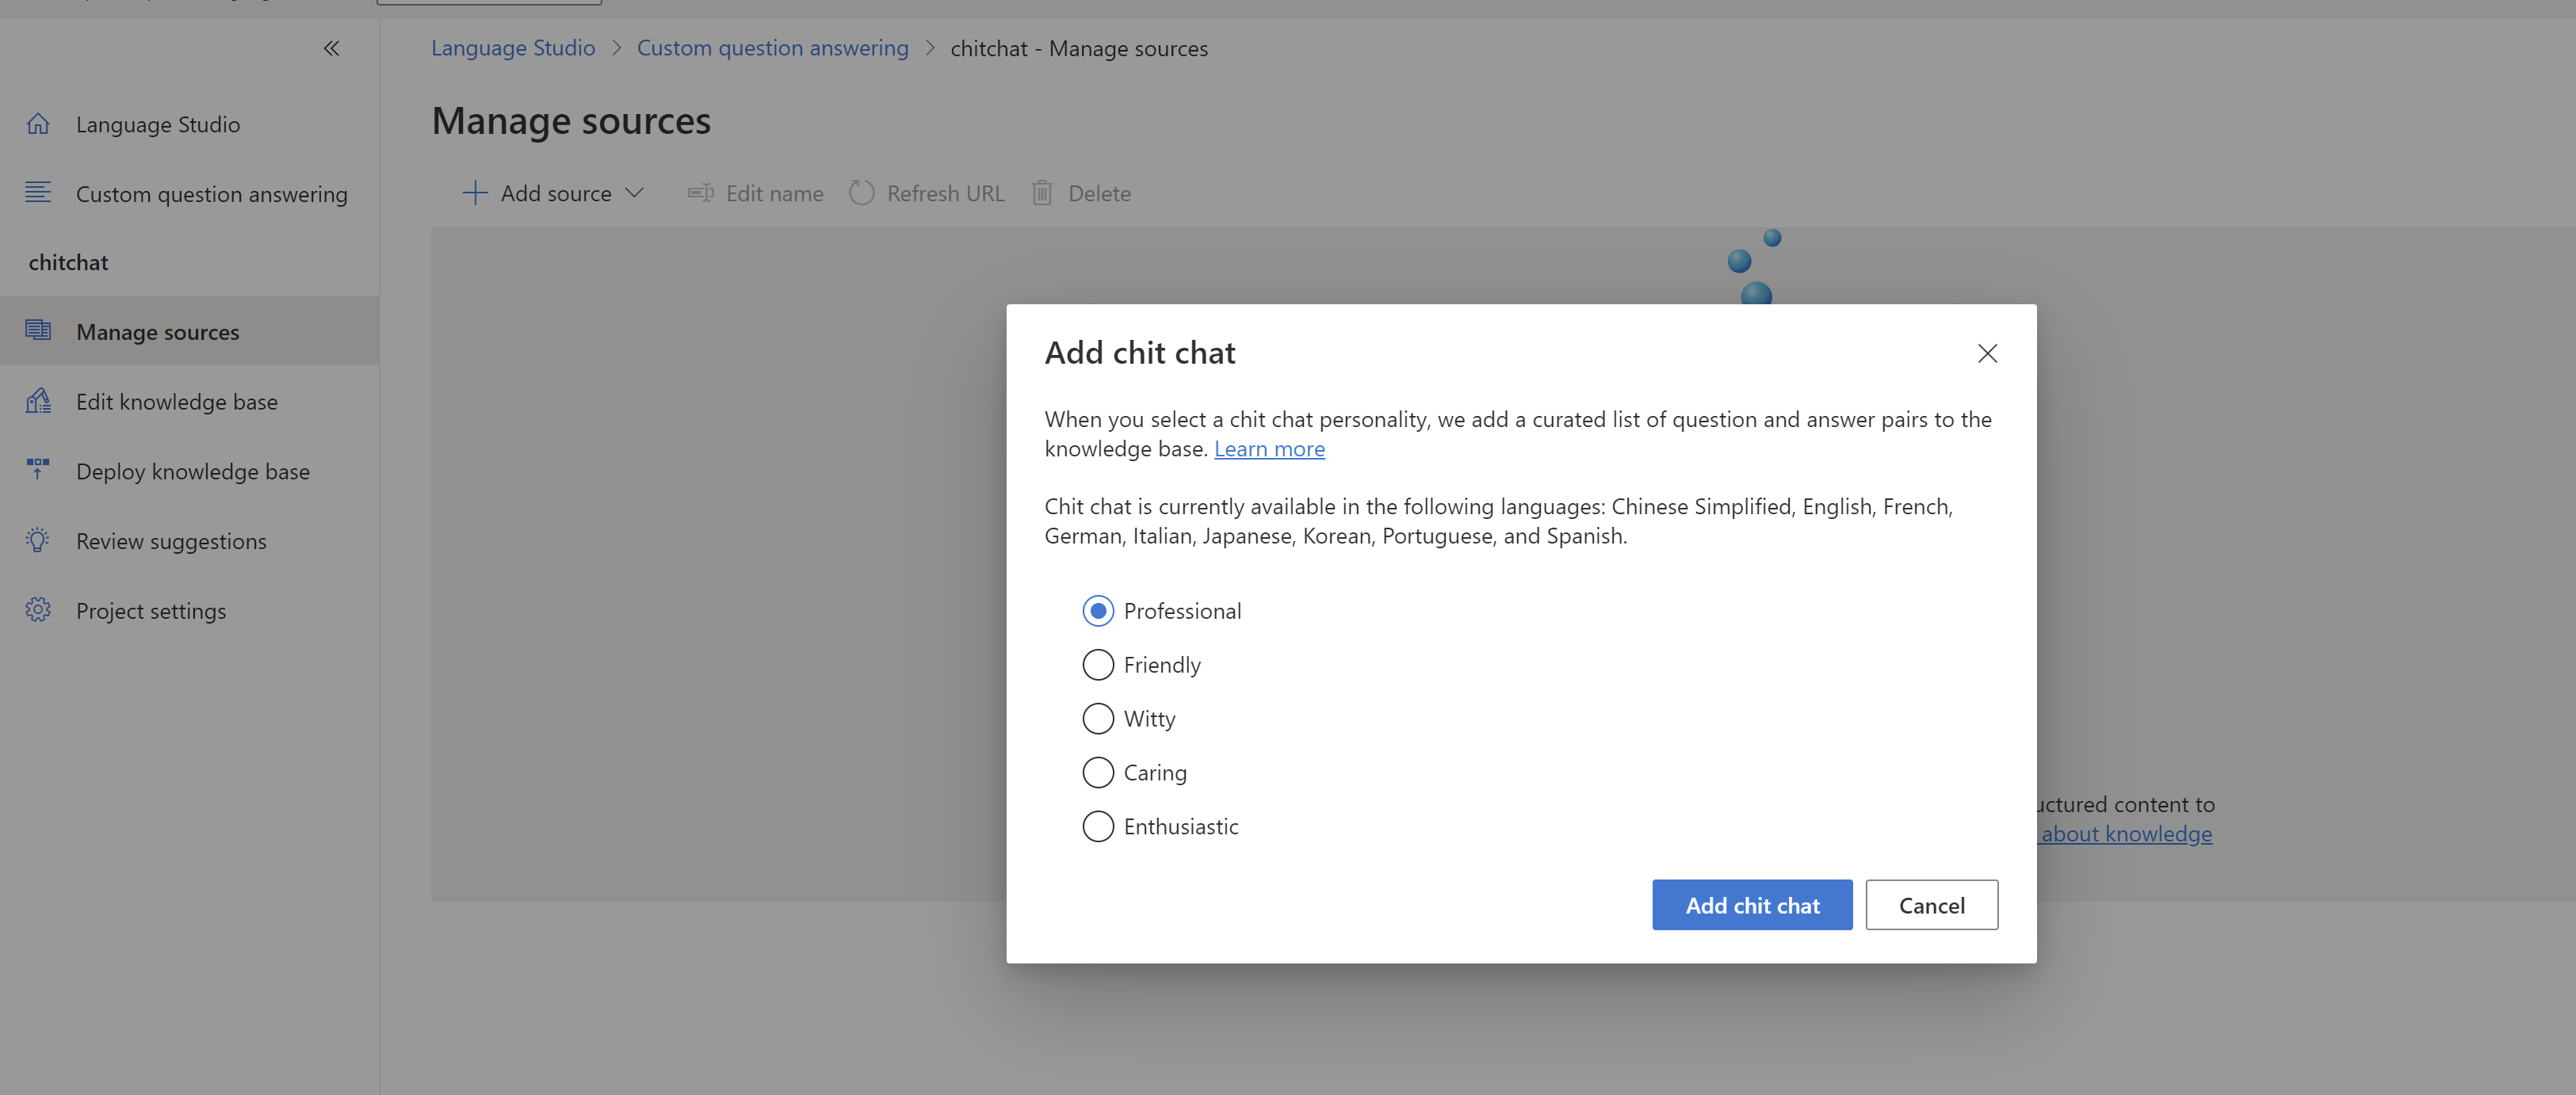
Select Create new project and add the name chitchat with the language English before clicking on Create project.
When the project loads, select Add source and select Chit chat. Select the professional personality for chit chat before
Go to Deploy knowledge base from the left navigation menu and select Deploy and confirm the popup that shows up.

You are now done with deploying your knowledge base for chit chat. You can explore the type of questions and answers to expect in the Edit knowledge base page.
Create a conversational language understanding project
In Language Studio, go to the Conversational language understanding service.
Download the
EmailProject.jsonsample file here.Select the Import button. Browse to the `EmailProject.json`` file you downloaded and press Done.
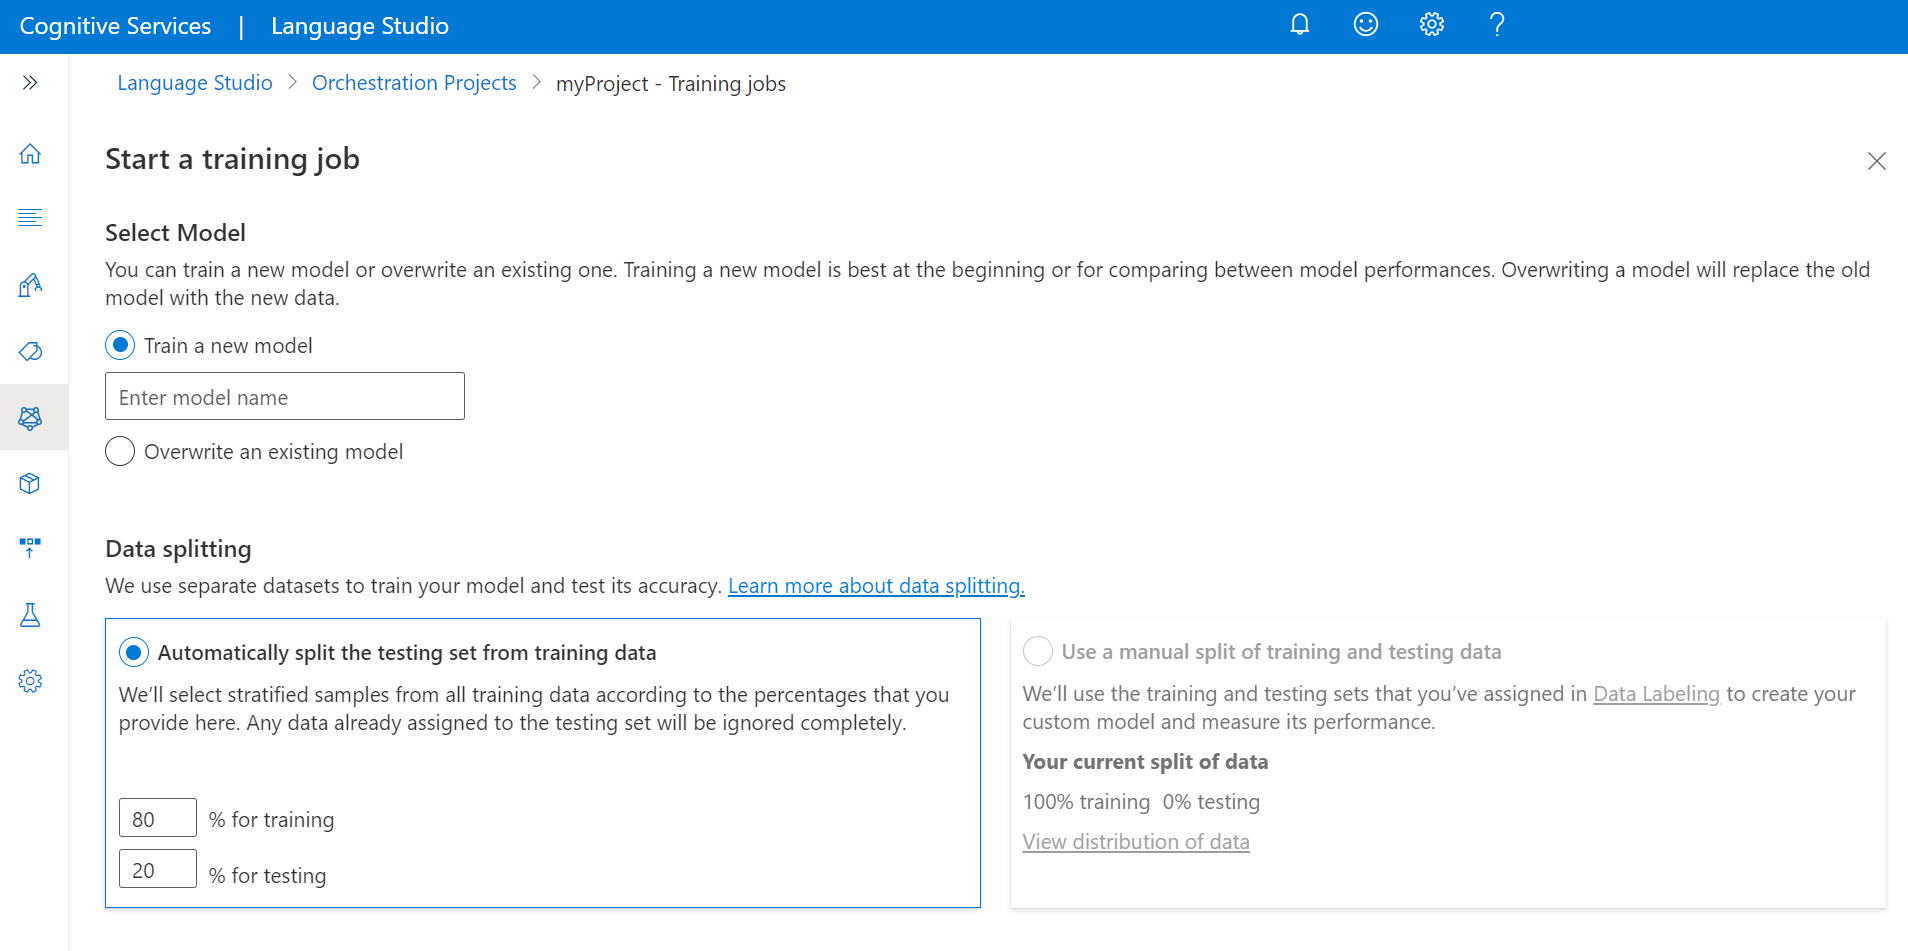
Once the project is loaded, select Training jobs on the left. Press on Start a training job, provide the model name v1 and press Train.
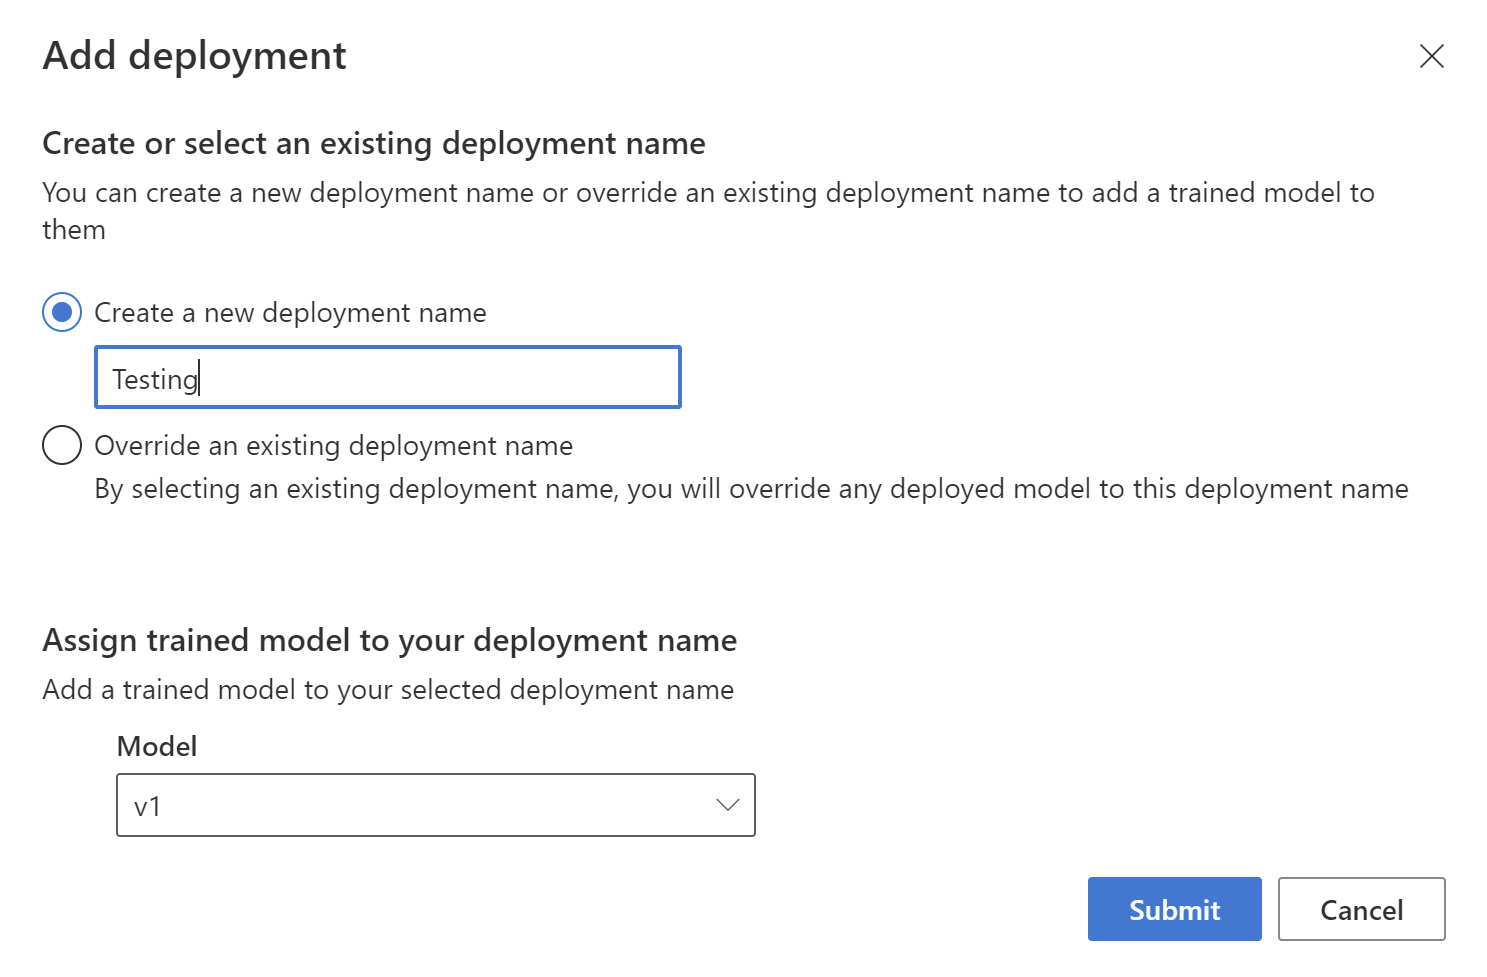
Once training is complete, click to Deploying a model on the left. Select Add Deployment and create a new deployment with the name Testing, and assign model v1 to the deployment.


You are now done with deploying a conversational language understanding project for email commands. You can explore the different commands in the Data labeling page.
Create an Orchestration workflow project
- In Language Studio, go to the Orchestration workflow service.
- Select Create new project. Use the name Orchestrator and the language English before clicking next then done.
- Once the project is created, select Add in the Schema definition page.
- Select Yes, I want to connect it to an existing project. Add the intent name EmailIntent and select Conversational Language Understanding as the connected service. Select the recently created EmailProject project for the project name before clicking on Add Intent.

- Add another intent but now select Question Answering as the service and select chitchat as the project name.
- Similar to conversational language understanding, go to Training jobs and start a new training job with the name v1 and press Train.
- Once training is complete, click to Deploying a model on the left. Select Add deployment and create a new deployment with the name Testing, and assign model v1 to the deployment and press Next.
- On the next page, select the deployment name Testing for the EmailIntent. This tells the orchestrator to call the Testing deployment in EmailProject when it routes to it. Custom question answering projects only have one deployment by default.

Now your orchestration project is ready to be used. Any incoming request will be routed to either EmailIntent and the EmailProject in conversational language understanding or ChitChatIntent and the chitchat knowledge base.
Call the orchestration project with the Conversations SDK
In the downloaded sample, open OrchestrationWorkflowSample.sln in Visual Studio.
In the OrchestrationWorkflowSample solution, make sure to install all the required packages. In Visual Studio, go to Tools, NuGet Package Manager and select Package Manager Console and run the following command.
dotnet add package Azure.AI.Language.Conversations
Alternatively, you can search for "Azure.AI.Language.Conversations" in the NuGet package manager and install the latest release.
- In
Program.cs, replace{api-key}and the{endpoint}variables. Use the key and endpoint for the Language resource you created earlier. You can find them in the Keys and Endpoint tab in your Language resource in Azure.
Uri endpoint = new Uri("{endpoint}");
AzureKeyCredential credential = new AzureKeyCredential("{api-key}");
- Replace the project and deployment parameters to Orchestrator and Testing as below if they are not set already.
string projectName = "Orchestrator";
string deploymentName = "Testing";
- Run the project or press F5 in Visual Studio.
- Input a query such as "read the email from matt" or "hello how are you". You'll now observe different responses for each, a conversational language understanding EmailProject response from the first query, and the answer from the chitchat knowledge base for the second query.
Conversational Language Understanding:

Custom Question Answering:

You can now connect other projects to your orchestrator and begin building complex architectures with various different projects.
Next steps
- Learn more about conversational language understanding.
- Learn more about custom question answering.
Feedback
Coming soon: Throughout 2024 we will be phasing out GitHub Issues as the feedback mechanism for content and replacing it with a new feedback system. For more information see: https://aka.ms/ContentUserFeedback.
Submit and view feedback for