Quickstart: Create an Azure AI services resource by using an ARM template
This quickstart shows you how to use an Azure Resource Manager template (ARM template) to create a resource in Azure AI services.
Azure AI services is a cloud-based portfolio of AI services. It helps developers build cognitive intelligence into applications without needing direct skills or knowledge of AI or data science.
Azure AI services is available through REST APIs and client library SDKs in popular development languages. It enables developers to easily add cognitive features into their applications with cognitive solutions that can see, hear, speak, and analyze.
By creating an Azure AI services resource, you can:
- Access multiple AI services in Azure with a single key and endpoint.
- Consolidate billing from the services that you use.
An Azure Resource Manager template is a JavaScript Object Notation (JSON) file that defines the infrastructure and configuration for your project. The template uses declarative syntax. You describe your intended deployment without writing the sequence of programming commands to create the deployment.
Prerequisites
- If you don't have an Azure subscription, create one for free.
- If you're planning to use Spatial Analysis in Azure AI Vision or Text Analytics for Health in Azure AI Language, then you must create your first Vision or Language resources from the Azure portal so you can review and acknowledge the terms and conditions. You can do so here: Azure AI Language, Azure AI Vision. After that, you can create subsequent resources using any deployment tool (for example, SDK, CLI, or ARM template) under the same Azure subscription.
Review the template
The template that you use in this quickstart is from Azure Quickstart Templates.
{
  "$schema": "https://schema.management.azure.com/schemas/2019-04-01/deploymentTemplate.json#",
  "contentVersion": "1.0.0.0",
  "metadata": {
    "_generator": {
      "name": "bicep",
      "version": "0.15.31.15270",
      "templateHash": "17000396405303018145"
    }
  },
  "parameters": {
    "cognitiveServiceName": {
      "type": "string",
      "defaultValue": "[format('CognitiveService-{0}', uniqueString(resourceGroup().id))]",
      "metadata": {
        "description": "That name is the name of our application. It has to be unique.Type a name followed by your resource group name. (<name>-<resourceGroupName>)"
      }
    },
    "location": {
      "type": "string",
      "defaultValue": "[resourceGroup().location]",
      "metadata": {
        "description": "Location for all resources."
      }
    },
    "sku": {
      "type": "string",
      "defaultValue": "S0",
      "allowedValues": [
        "S0"
      ]
    }
  },
  "resources": [
    {
      "type": "Microsoft.CognitiveServices/accounts",
      "apiVersion": "2021-10-01",
      "name": "[parameters('cognitiveServiceName')]",
      "location": "[parameters('location')]",
      "sku": {
        "name": "[parameters('sku')]"
      },
      "kind": "CognitiveServices",
      "properties": {
        "apiProperties": {
          "statisticsEnabled": false
        }
      }
    }
  ]
}
One Azure resource is defined in the Bicep file: Microsoft.CognitiveServices/accounts specifies that it's an Azure AI services resource. The kind field in the Bicep file defines the type of resource.
The following tables provide information about products and pricing for Azure AI services.
Multi-service
| Service | Kind |
|---|---|
| Multiple services. For more information, see the pricing page. | CognitiveServices |
Vision
| Service | Kind |
|---|---|
| Vision | ComputerVision |
| Custom Vision - Prediction | CustomVision.Prediction |
| Custom Vision - Training | CustomVision.Training |
| Face | Face |
| Document Intelligence | FormRecognizer |
Speech
| Service | Kind |
|---|---|
| Speech | SpeechServices |
Language
| Service | Kind |
|---|---|
| Language Understanding (LUIS) | LUIS |
| QnA Maker | QnAMaker |
| Language | TextAnalytics |
| Text Translation | TextTranslation |
Decision
| Service | Kind |
|---|---|
| Anomaly Detector | AnomalyDetector |
| Content Moderator | ContentModerator |
| Personalizer | Personalizer |
Azure OpenAI
| Service | Kind |
|---|---|
| Azure OpenAI | OpenAI |
Pricing tiers and billing
Pricing tiers (and the amount you're billed) are based on the number of transactions that you send by using your authentication information. Each pricing tier specifies the:
- Maximum number of allowed transactions per second (TPS).
- Service features enabled within the pricing tier.
- Cost for a predefined number of transactions. Going above this number will cause an extra charge, as specified in the pricing details for your service.
Note
Many of the Azure AI services have a free tier that you can use to try the service. To use the free tier, use F0 as the pricing tier for your resource.
Deploy the template
Select the Deploy to Azure button.

Enter the following values.
Value Description Subscription Select an Azure subscription. Resource group Select Create new, enter a unique name for the resource group, and then select OK. Region Select a region (for example, East US). Cognitive Service Name Replace the value with a unique name for your Azure AI services resource. You'll need the name in the next section when you validate the deployment. Location Replace with the region that you selected. Sku Select the pricing tier for your resource. 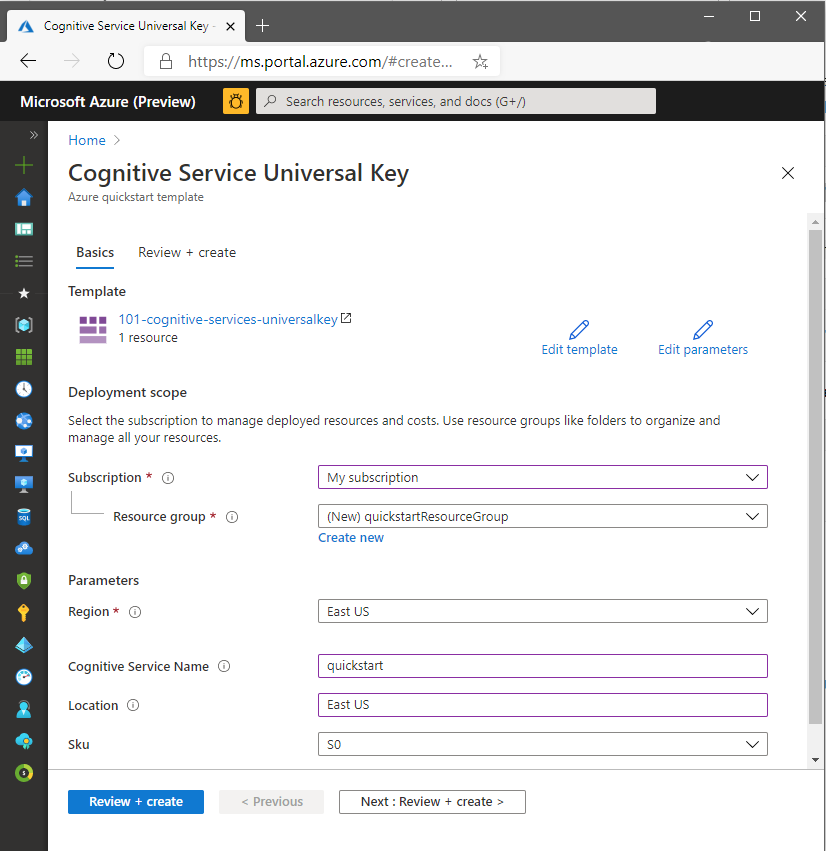
Select Review + Create, and then select Create. When deployment is successful, the Go to resource button is available.
Tip
If your subscription doesn't allow you to create an Azure AI services resource, you might need to enable the privilege of that Azure resource provider by using the Azure portal, a PowerShell command or an Azure CLI command. If you're not the subscription owner, ask the subscription owner or someone with an admin role to complete the registration for you. Or ask for the /register/action privileges to be granted to your account.
Review deployed resources
When your deployment finishes, you can select the Go to resource button to see your new resource. You can also find the resource group by:
- Selecting Resource groups from the left pane.
- Selecting the resource group name.
Clean up resources
If you want to clean up and remove an Azure AI services subscription, you can delete the resource or the resource group. Deleting the resource group also deletes any other resources that the group contains.
- On the left pane, select Resource groups to display the list of your resource groups.
- Locate the resource group that contains the resource to be deleted.
- Right-click the resource group, select Delete resource group, and then confirm.
Related content
- For more information on how to securely work with Azure AI services, see Authenticate requests to Azure AI services.
- For a list of Azure AI services, see What are Azure AI services?.
- For a list of natural languages that Azure AI services supports, see Natural language support in Azure AI services.
- To understand how to use Azure AI services on-premises, see What are Azure AI containers?.
- To estimate the cost of using Azure AI services, see Plan and manage costs for Azure AI Studio.
Feedback
Coming soon: Throughout 2024 we will be phasing out GitHub Issues as the feedback mechanism for content and replacing it with a new feedback system. For more information see: https://aka.ms/ContentUserFeedback.
Submit and view feedback for