(DEPRECATED) Use Helm to deploy containers on a Kubernetes cluster
Tip
For the updated version this article that uses Azure Kubernetes Service, see Install applications with Helm in Azure Kubernetes Service (AKS).
Warning
The Azure Container Service (ACS) is being deprecated. No new features or functionality are being added to ACS. All of the APIs, portal experience, CLI commands and documentation are marked as deprecated.
In 2017, we introduced Azure Kubernetes Service (AKS) for simplifying Kubernetes management, deployment, and operations. If you use the Kubernetes orchestrator, please migrate to AKS by January 31, 2020. To get started, see migrate to Azure Kubernetes Service.
For more information, see the Azure Container Service deprecation announcement on Azure.com.
Helm is an open-source packaging tool that helps you install and manage the lifecycle of Kubernetes applications. Similar to Linux package managers such as Apt-get and Yum, Helm is used to manage Kubernetes charts, which are packages of preconfigured Kubernetes resources. This article shows you how to work with Helm on a Kubernetes cluster deployed in Azure Container Service.
Helm has two components:
The Helm CLI is a client that runs on your machine locally or in the cloud
Tiller is a server that runs on the Kubernetes cluster and manages the lifecycle of your Kubernetes applications
Prerequisites
Create a Kubernetes cluster in Azure Container Service
Install and configure
kubectlon a local computerInstall Helm on a local computer
Helm basics
To view information about the Kubernetes cluster that you are installing Tiller and deploying your applications to, type the following command:
kubectl cluster-info

After you have installed Helm, install Tiller on your Kubernetes cluster by typing the following command:
helm init --upgrade
When it completes successfully, you see output like the following:

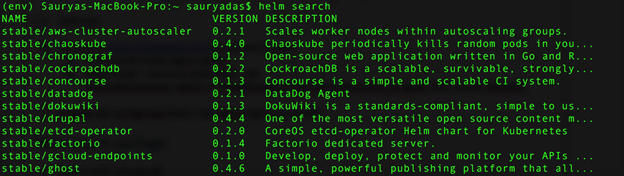
To view all the Helm charts available in the repository, type the following command:
helm search
You see output like the following:
To update the charts to get the latest versions, type:
helm repo update
Deploy an Nginx ingress controller chart
To deploy an Nginx ingress controller chart, type a single command:
helm install stable/nginx-ingress
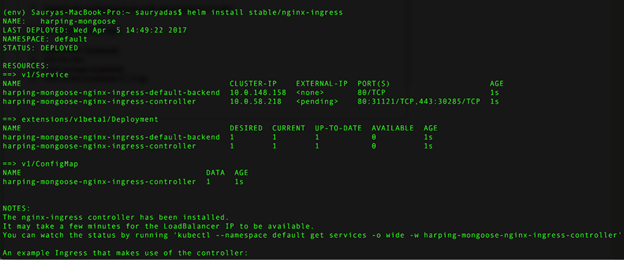
If you type kubectl get svc to view all services that are running on the cluster, you see that an IP address is assigned to the ingress controller. (While the assignment is in progress, you see <pending>. It takes a couple of minutes to complete.)
After the IP address is assigned, navigate to the value of the external IP address to see the Nginx backend running.

To see a list of charts installed on your cluster, type:
helm list
You can abbreviate the command to helm ls.
Deploy a MariaDB chart and client
Now deploy a MariaDB chart and a MariaDB client to connect to the database.
To deploy the MariaDB chart, type the following command:
helm install --name v1 stable/mariadb
where --name is a tag used for releases.
Tip
If the deployment fails, run helm repo update and try again.
To view all the charts deployed on your cluster, type:
helm list
To view all deployments running on your cluster, type:
kubectl get deployments
Finally, to run a pod to access the client, type:
kubectl run v1-mariadb-client --rm --tty -i --image bitnami/mariadb --command -- bash
To connect to the client, type the following command, replacing v1-mariadb with the name of your deployment:
sudo mysql –h v1-mariadb
You can now use standard SQL commands to create databases, tables, etc. For example, Create DATABASE testdb1; creates an empty database.
Next steps
- For more information about managing Kubernetes charts, see the Helm documentation.