Configure managed identities with Microsoft Entra ID for your Azure Cosmos DB account
APPLIES TO:
![]() NoSQL
NoSQL
![]() MongoDB
MongoDB
![]() Cassandra
Cassandra
![]() Gremlin
Gremlin
![]() Table
Table
Managed identities for Azure resources provide Azure services with an automatically managed identity in Microsoft Entra ID. This article shows how to create a managed identity for Azure Cosmos DB accounts.
Prerequisites
- If you're unfamiliar with managed identities for Azure resources, see What are managed identities for Azure resources?. To learn about managed identity types, see Managed identity types.
- To set up managed identities, your account needs to have the DocumentDB Account Contributor role.
Add a system-assigned identity
Using the Azure portal
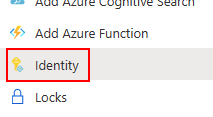
To enable a system-assigned managed identity on an existing Azure Cosmos DB account, navigate to your account in the Azure portal and select Identity from the left menu.
Under the System assigned section, flip the Status to On and select Save. You will be asked to confirm the creation of the system-assigned managed identity.
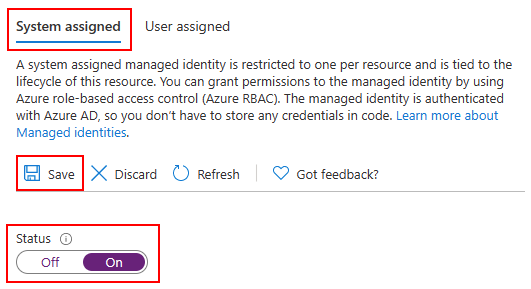
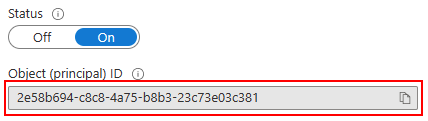
Once the identity has been created and assigned, you can retrieve its Object (principal) ID.
Using an Azure Resource Manager (ARM) template
Important
Make sure to use an apiVersion of 2021-03-15 or higher when working with managed identities.
To enable a system-assigned identity on a new or existing Azure Cosmos DB account, include the following property in the resource definition:
"identity": {
    "type": "SystemAssigned"
}
The resources section of your ARM template should then look like the following:
"resources": [
    {
        "type": " Microsoft.DocumentDB/databaseAccounts",
        "identity": {
            "type": "SystemAssigned"
        },
        // ...
    },
    // ...
]
Once your Azure Cosmos DB account has been created or updated, it will show the following property:
"identity": {
    "type": "SystemAssigned",
    "tenantId": "<azure-ad-tenant-id>",
    "principalId": "<azure-ad-principal-id>"
}
Using the Azure CLI
To enable a system-assigned identity while creating a new Azure Cosmos DB account, add the --assign-identity option:
resourceGroupName='myResourceGroup'
accountName='mycosmosaccount'

az cosmosdb create \
    -n $accountName \
    -g $resourceGroupName \
    --locations regionName='West US 2' failoverPriority=0 isZoneRedundant=False \
    --assign-identity
You can also add a system-assigned identity on an existing account using the az cosmosdb identity assign command:
resourceGroupName='myResourceGroup'
accountName='mycosmosaccount'

az cosmosdb identity assign \
    -n $accountName \
    -g $resourceGroupName
Once your Azure Cosmos DB account has been created or updated, you can fetch the identity assigned with the az cosmosdb identity show command:
resourceGroupName='myResourceGroup'
accountName='mycosmosaccount'

az cosmosdb identity show \
    -n $accountName \
    -g $resourceGroupName
{
    "type": "SystemAssigned",
    "tenantId": "<azure-ad-tenant-id>",
    "principalId": "<azure-ad-principal-id>"
}
Add a user-assigned identity
Using the Azure portal
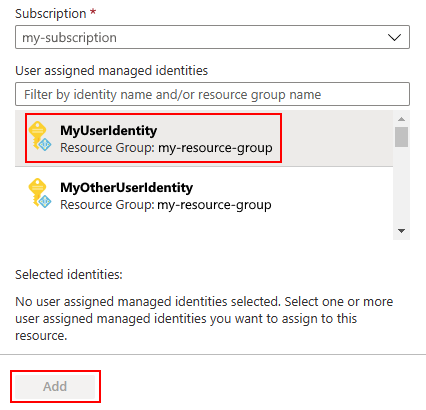
To enable a user-assigned managed identity on an existing Azure Cosmos DB account, navigate to your account in the Azure portal and select Identity from the left menu.
Under the user assigned section, select + Add.
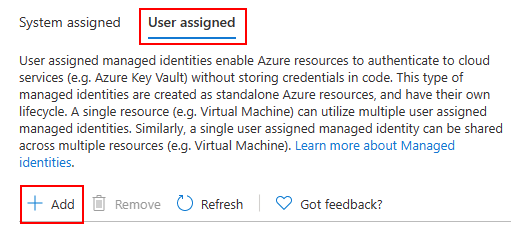
Find and select all the identities you wish to assign to your Azure Cosmos DB account, then select Add.
Using an Azure Resource Manager (ARM) template
Important
Make sure to use an apiVersion of 2021-03-15 or higher when working with managed identities.
To enable a user-assigned identity on a new or existing Azure Cosmos DB account, include the following property in the resource definition:
"identity": {
    "type": "UserAssigned",
    "userAssignedIdentities": {
        "<identity-resource-id>": {}
    }
}
The resources section of your ARM template should then look like the following:
"resources": [
    {
        "type": " Microsoft.DocumentDB/databaseAccounts",
        "identity": {
            "type": "UserAssigned",
            "userAssignedIdentities": {
                "<identity-resource-id>": {}
            }
        },
        // ...
    },
    // ...
]
After your Azure Cosmos DB account has been created or updated, it will show the following property:
"identity": {
    "type": "UserAssigned",
    "tenantId": "<azure-ad-tenant-id>",
    "principalId": "<azure-ad-principal-id>"
}
Using the Azure CLI
To enable a user-assigned identity while creating a new Azure Cosmos DB account, add the --assign-identity option and pass the resource ID of the identity you wish to assign:
resourceGroupName='myResourceGroup'
accountName='mycosmosaccount'

az cosmosdb create \
    -n $accountName \
    -g $resourceGroupName \
    --locations regionName='West US 2' failoverPriority=0 isZoneRedundant=False \
    --assign-identity <identity-resource-id>
You can also add a user-assigned identity on an existing account using the az cosmosdb identity assign command:
resourceGroupName='myResourceGroup'
accountName='mycosmosaccount'

az cosmosdb identity assign \
    -n $accountName \
    -g $resourceGroupName
    --identities <identity-resource-id>
After your Azure Cosmos DB account has been created or updated, you can fetch the identity assigned with the az cosmosdb identity show command:
resourceGroupName='myResourceGroup'
accountName='mycosmosaccount'

az cosmosdb identity show \
    -n $accountName \
    -g $resourceGroupName
{
    "type": "UserAssigned",
    "tenantId": "<azure-ad-tenant-id>",
    "principalId": "<azure-ad-principal-id>"
}
Remove a system-assigned or user-assigned identity
Using an Azure Resource Manager (ARM) template
Important
Make sure to use an apiVersion of 2021-03-15 or higher when working with managed identities.
To remove a system-assigned identity from your Azure Cosmos DB account, set the type of the identity property to None:
"identity": {
    "type": "None"
}
Using the Azure CLI
To remove all managed identities from your Azure Cosmos DB account, use the az cosmosdb identity remove command:
resourceGroupName='myResourceGroup'
accountName='mycosmosaccount'

az cosmosdb identity remove \
    -n $accountName \
    -g $resourceGroupName
Next steps
- Learn more about managed identities for Azure resources
- Learn more about customer-managed keys on Azure Cosmos DB
Feedback
Coming soon: Throughout 2024 we will be phasing out GitHub Issues as the feedback mechanism for content and replacing it with a new feedback system. For more information see: https://aka.ms/ContentUserFeedback.
Submit and view feedback for