Request data restoration from an Azure Cosmos DB backup
APPLIES TO:
![]() NoSQL
NoSQL
![]() MongoDB
MongoDB
![]() Cassandra
Cassandra
![]() Gremlin
Gremlin
![]() Table
Table
If you accidentally delete your database or a container, you can file a support ticket or call the Azure support to restore the data from automatic online backups. Azure support is available for selected plans only such as Standard, Developer, and plans higher than those tiers. Azure support isn't available with Basic plan. To learn about different support plans, see the Azure support plans page.
To restore a specific snapshot of the backup, Azure Cosmos DB requires that the data is available during the backup cycle for that snapshot. You should have the following details before requesting a restore:
- Have your subscription ID ready.
- Based on how your data was accidentally deleted or modified, you should prepare to have additional information. It's advised that you have the information available ahead to minimize the back-and-forth that can be detrimental in some time sensitive cases.
- If the entire Azure Cosmos DB account is deleted, you need to provide the name of the deleted account. If you create another account with the same name as the deleted account, share that with the support team because it helps to determine the right account to choose. It's recommended to file different support tickets for each deleted account because it minimizes the confusion for the state of restore.
- If one or more databases are deleted, you should provide the Azure Cosmos DB account, and the Azure Cosmos DB database names and specify if a new database with the same name exists.
- If one or more containers are deleted, you should provide the Azure Cosmos DB account name, database names, and the container names. And specify if a container with the same name exists.
- If you've accidentally deleted or corrupted your data, you should contact Azure support within 8 hours so that the Azure Cosmos DB team can help you restore the data from the backups. Before you create a support request to restore the data, make sure to increase the backup retention for your account to at least seven days. It’s best to increase your retention within 8 hours of this event. This way the Azure Cosmos DB support team has enough time to restore your account.
In addition to Azure Cosmos DB account name, database names, container names, you should specify the point in time to use for data restoration. It's important to be as precise as possible to help us determine the best available backups at that time. It is also important to specify the time in UTC. If you want to restore the account without network access, please do mention in the ticket.
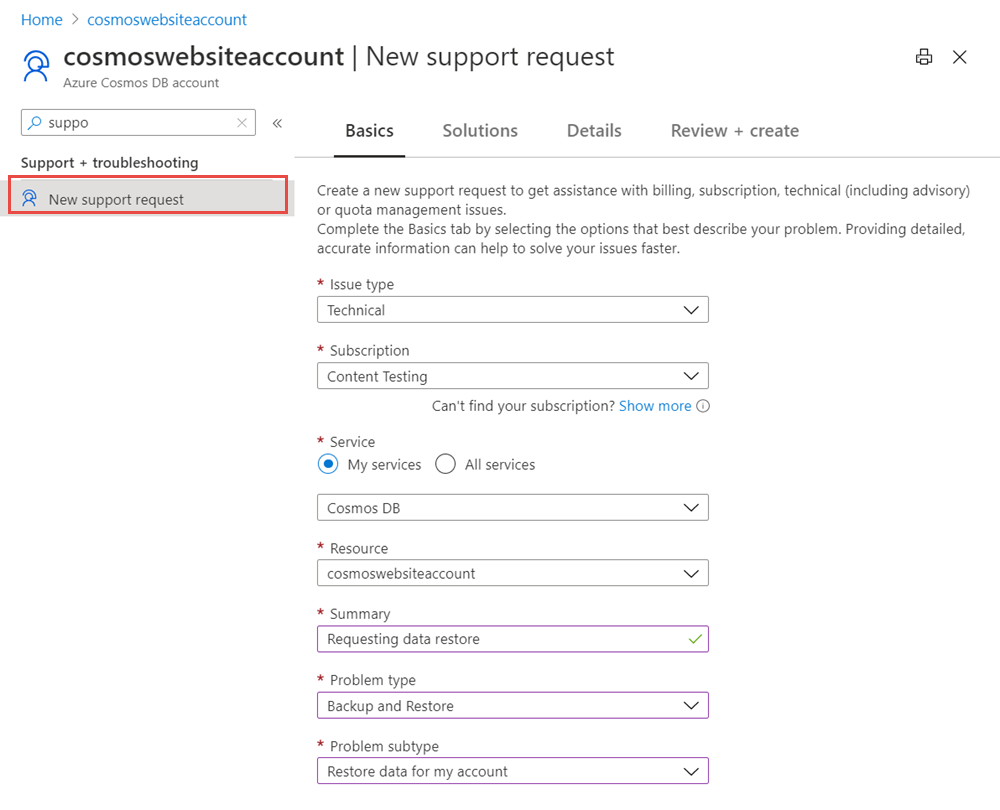
The following screenshot illustrates how to create a support request for a container(collection/graph/table) to restore data by using Azure portal. Provide other details such as type of data, purpose of the restore, time when the data was deleted to help us prioritize the request.
Considerations for restoring the data from a backup
You may accidentally delete or modify your data in one of the following scenarios:
Delete the entire Azure Cosmos DB account.
Delete one or more Azure Cosmos DB databases.
Delete one or more Azure Cosmos DB containers.
Delete or modify the Azure Cosmos DB items (for example, documents) within a container. This specific case is typically referred to as data corruption.
A shared offer database or containers within a shared offer database are deleted or corrupted.
Azure Cosmos DB can restore data in all the above scenarios. A new Azure Cosmos DB account is created to hold the restored data when restoring from a backup. The name of the new account, if it's not specified, has the format <Azure_Cosmos_account_original_name>-restored1. The last digit is incremented when multiple restores are attempted. You can't restore data to a precreated Azure Cosmos DB account.
When you accidentally delete an Azure Cosmos DB account, we can restore the data into a new account with the same name, if the account name isn't in use. So, we recommend that you don't re-create the account after deleting it. Because it not only prevents the restored data to use the same name, but also makes discovering the right account to restore from difficult.
When you accidentally delete an Azure Cosmos DB database, we can restore the whole database or a subset of the containers within that database. It's also possible to select specific containers across databases and restore them to a new Azure Cosmos DB account.
When you accidentally delete or modify one or more items within a container (the data corruption case), you need to specify the time to restore to. Time is important if there's data corruption. Because the container is live, the backup is still running, so if you wait beyond the retention period (the default is eight hours) the backups would be overwritten. In order to prevent the backup from being overwritten, increase the backup retention for your account to at least seven days. It’s best to increase your retention within 8 hours from the data corruption.
If you've accidentally deleted or corrupted your data, you should contact Azure support within 8 hours so that the Azure Cosmos DB team can help you restore the data from the backups. This way the Azure Cosmos DB support team has enough time to restore your account.
Note
After you restore the data, not all the source capabilities or settings are carried over to the restored account. The following settings are not carried over to the new account:
- VNET access control lists
- Stored procedures, triggers and user-defined functions
- Multi-region settings
- Managed identity settings
If you assign throughput at the database level, the backup and restore process in this case happen at the entire database level, and not at the individual containers level. In such cases, you can't select a subset of containers to restore.
Get the restore details from the restored account
After the restore operation completes, you may want to know the source account details from which you restored or the restore time. You can get these details from the Azure portal, PowerShell, or CLI.
Use the following steps to get the restore details from Azure portal:
Sign in to the Azure portal and navigate to the restored account.
Open the Tags page.
The Tags page should have the tags restoredAtTimestamp and restoredSourceDatabaseAccountName. These tags describe the timestamp and the source account name that were used for the periodic restore.
Post-restore actions
The primary goal of the data restore is to recover the data that you've accidentally deleted or modified. So, we recommend that you first inspect the content of the recovered data to ensure it contains what you are expecting. If everything looks good, you can migrate the data back to the primary account. Although it's possible to use the restored account as your new active account, it's not a recommended option if you have production workloads.
After you restore the data, you get a notification about the name of the new account (it’s typically in the format <original-name>-restored1) and the time when the account was restored to. The restored account has the same provisioned throughput, indexing policies and it is in same region as the original account. A user who is the subscription admin or a coadmin can see the restored account.
Migrate data to the original account
The following are different ways to migrate data back to the original account:
- Use the Azure Data Factory.
- Use the change feed in Azure Cosmos DB.
- You can write your own custom code.
It's advised that you delete the container or database immediately after migrating the data. If you don't delete the restored databases or containers, they incur cost for request units, storage, and egress.
Next steps
- Learn more about periodic backup and restore
- Learn more about continuous backup
Feedback
Coming soon: Throughout 2024 we will be phasing out GitHub Issues as the feedback mechanism for content and replacing it with a new feedback system. For more information see: https://aka.ms/ContentUserFeedback.
Submit and view feedback for