Transform data in Azure Virtual Network using Hive activity in Azure Data Factory
APPLIES TO:  Azure Data Factory
  Azure Synapse Analytics
Tip
Try out Data Factory in Microsoft Fabric, an all-in-one analytics solution for enterprises. Microsoft Fabric covers everything from data movement to data science, real-time analytics, business intelligence, and reporting. Learn how to start a new trial for free!
In this tutorial, you use Azure PowerShell to create a Data Factory pipeline that transforms data using Hive Activity on a HDInsight cluster that is in an Azure Virtual Network (VNet). You perform the following steps in this tutorial:
- Create a data factory.
- Author and setup self-hosted integration runtime
- Author and deploy linked services.
- Author and deploy a pipeline that contains a Hive activity.
- Start a pipeline run.
- Monitor the pipeline run
- verify the output.
If you don't have an Azure subscription, create a free account before you begin.
Prerequisites
Note
We recommend that you use the Azure Az PowerShell module to interact with Azure. See Install Azure PowerShell to get started. To learn how to migrate to the Az PowerShell module, see Migrate Azure PowerShell from AzureRM to Az.
Azure Storage account. You create a hive script, and upload it to the Azure storage. The output from the Hive script is stored in this storage account. In this sample, HDInsight cluster uses this Azure Storage account as the primary storage.
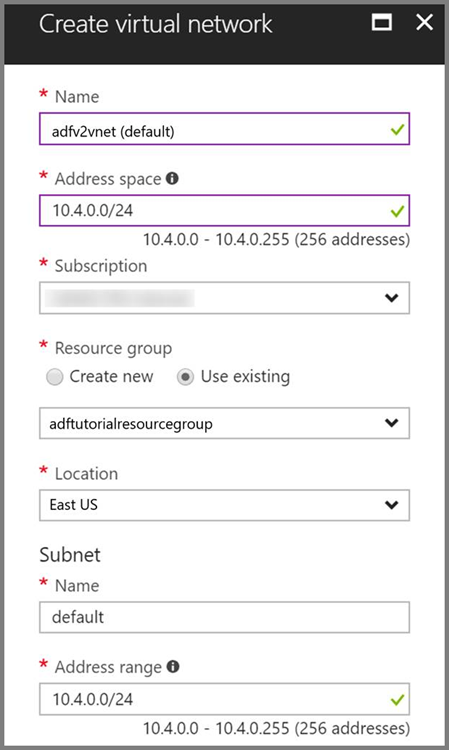
Azure Virtual Network. If you don't have an Azure virtual network, create it by following these instructions. In this sample, the HDInsight is in an Azure Virtual Network. Here is a sample configuration of Azure Virtual Network.
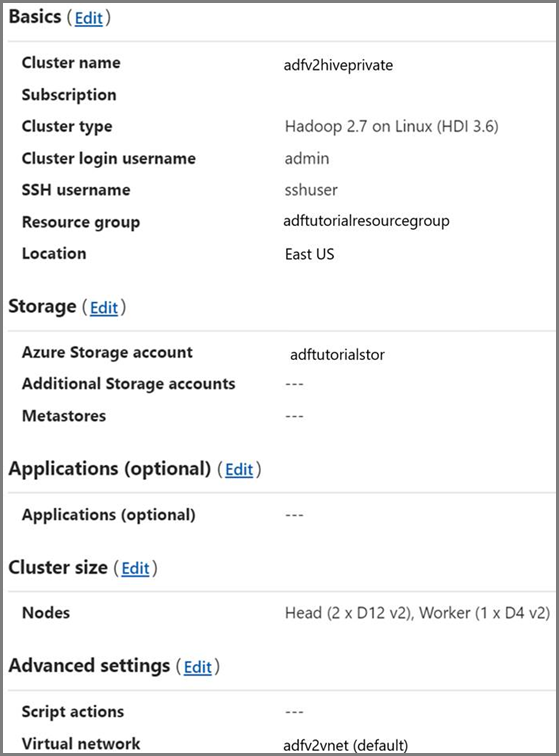
HDInsight cluster. Create a HDInsight cluster and join it to the virtual network you created in the previous step by following this article: Extend Azure HDInsight using an Azure Virtual Network. Here is a sample configuration of HDInsight in a virtual network.
Azure PowerShell. Follow the instructions in How to install and configure Azure PowerShell.
Upload Hive script to your Blob Storage account
Create a Hive SQL file named hivescript.hql with the following content:
DROP TABLE IF EXISTS HiveSampleOut;
CREATE EXTERNAL TABLE HiveSampleOut (clientid string, market string, devicemodel string, state string)
ROW FORMAT DELIMITED FIELDS TERMINATED BY ' '
STORED AS TEXTFILE LOCATION '${hiveconf:Output}';

INSERT OVERWRITE TABLE HiveSampleOut
Select
    clientid,
    market,
    devicemodel,
    state
FROM hivesampletable
In your Azure Blob Storage, create a container named adftutorial if it does not exist.
Create a folder named hivescripts.
Upload the hivescript.hql file to the hivescripts subfolder.
Create a data factory
Set the resource group name. You create a resource group as part of this tutorial. However, you can use an existing resource group if you like.
$resourceGroupName = "ADFTutorialResourceGroup"Specify the data factory name. Must be globally unique.
$dataFactoryName = "MyDataFactory09142017"Specify a name for the pipeline.
$pipelineName = "MyHivePipeline" #Specify a name for the self-hosted integration runtime. You need a self-hosted integration runtime when the Data Factory needs to access resources (such as Azure SQL Database) inside a VNet.
$selfHostedIntegrationRuntimeName = "MySelfHostedIR09142017"Launch PowerShell. Keep Azure PowerShell open until the end of this quickstart. If you close and reopen, you need to run the commands again. For a list of Azure regions in which Data Factory is currently available, select the regions that interest you on the following page, and then expand Analytics to locate Data Factory: Products available by region. The data stores (Azure Storage, Azure SQL Database, etc.) and computes (HDInsight, etc.) used by data factory can be in other regions.
Run the following command, and enter the user name and password that you use to sign in to the Azure portal:
Connect-AzAccountRun the following command to view all the subscriptions for this account:
Get-AzSubscriptionRun the following command to select the subscription that you want to work with. Replace SubscriptionId with the ID of your Azure subscription:
Select-AzSubscription -SubscriptionId "<SubscriptionId>"Create the resource group: ADFTutorialResourceGroup if it does not exist already in your subscription.
New-AzResourceGroup -Name $resourceGroupName -Location "East Us"Create the data factory.
$df = Set-AzDataFactoryV2 -Location EastUS -Name $dataFactoryName -ResourceGroupName $resourceGroupNameExecute the following command to see the output:
$df
Create self-hosted IR
In this section, you create a self-hosted integration runtime and associate it with an Azure VM in the same Azure Virtual Network where your HDInsight cluster is in.
Create Self-hosted integration runtime. Use a unique name in case if another integration runtime with the same name exists.
Set-AzDataFactoryV2IntegrationRuntime -ResourceGroupName $resourceGroupName -DataFactoryName $dataFactoryName -Name $selfHostedIntegrationRuntimeName -Type SelfHostedThis command creates a logical registration of the self-hosted integration runtime.
Use PowerShell to retrieve authentication keys to register the self-hosted integration runtime. Copy one of the keys for registering the self-hosted integration runtime.
Get-AzDataFactoryV2IntegrationRuntimeKey -ResourceGroupName $resourceGroupName -DataFactoryName $dataFactoryName -Name $selfHostedIntegrationRuntimeName | ConvertTo-JsonHere is the sample output:
{
    "AuthKey1":  "IR@0000000000000000000000000000000000000=",
    "AuthKey2":  "IR@0000000000000000000000000000000000000="
}
Note down the value of AuthKey1 without quotation mark.
Create an Azure VM and join it into the same virtual network that contains your HDInsight cluster. For details, see How to create virtual machines. Join them into an Azure Virtual Network.
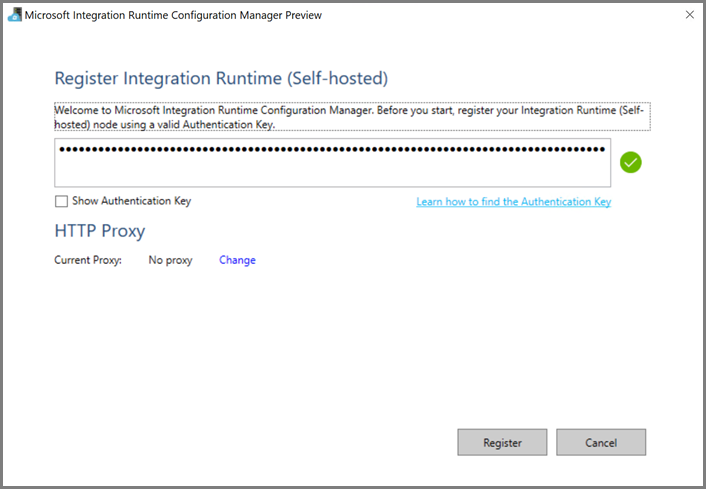
On the Azure VM, download self-hosted integration runtime. Use the Authentication Key obtained in the previous step to manually register the self-hosted integration runtime.
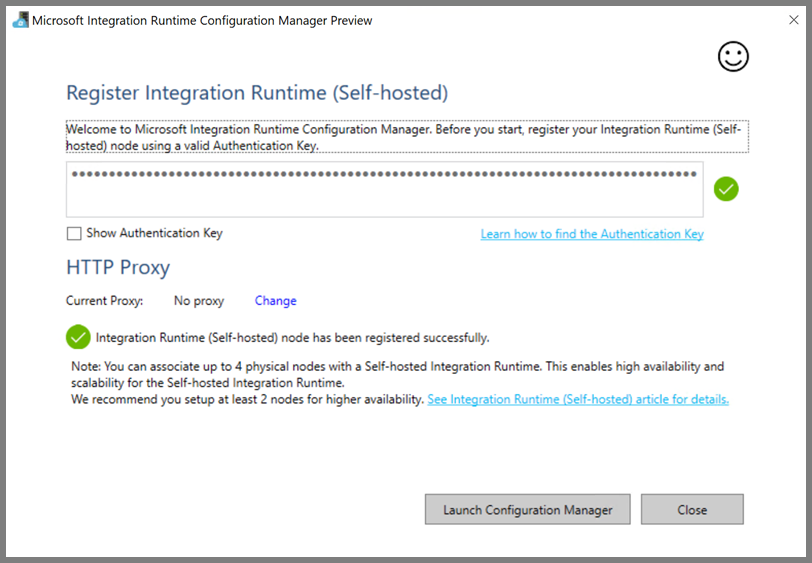
You see the following message when the self-hosted integration runtime is registered successfully:
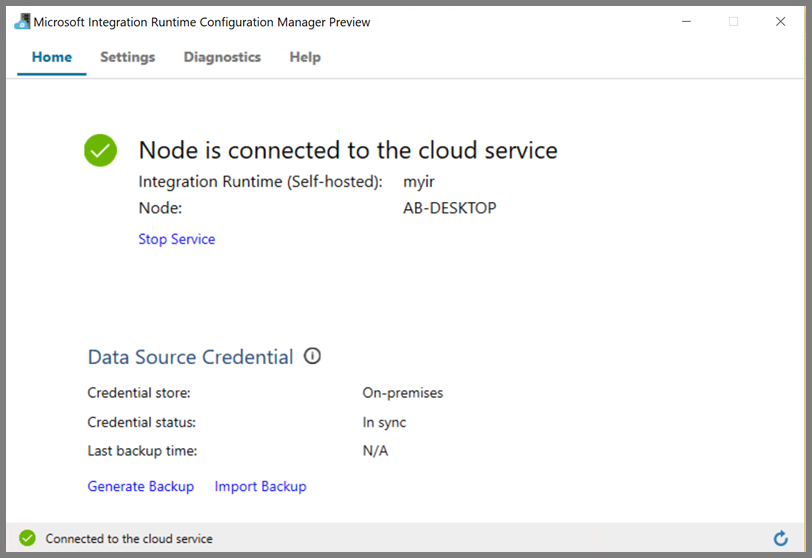
You see the following page when the node is connected to the cloud service:
Author linked services
You author and deploy two Linked Services in this section:
- An Azure Storage Linked Service that links an Azure Storage account to the data factory. This storage is the primary storage used by your HDInsight cluster. In this case, we also use this Azure Storage account to keep the Hive script and output of the script.
- An HDInsight Linked Service. Azure Data Factory submits the Hive script to this HDInsight cluster for execution.
Azure Storage linked service
Create a JSON file using your preferred editor, copy the following JSON definition of an Azure Storage linked service, and then save the file as MyStorageLinkedService.json.
{
    "name": "MyStorageLinkedService",
    "properties": {
      "type": "AzureStorage",
      "typeProperties": {
        "connectionString": "DefaultEndpointsProtocol=https;AccountName=<storageAccountName>;AccountKey=<storageAccountKey>"
      },
      "connectVia": {
        "referenceName": "MySelfhostedIR",
        "type": "IntegrationRuntimeReference"
      }
    }
}
Replace <accountname> and <accountkey> with the name and key of your Azure Storage account.
HDInsight linked service
Create a JSON file using your preferred editor, copy the following JSON definition of an Azure HDInsight linked service, and save the file as MyHDInsightLinkedService.json.
{
  "name": "MyHDInsightLinkedService",
  "properties": {
      "type": "HDInsight",
      "typeProperties": {
          "clusterUri": "https://<clustername>.azurehdinsight.net",
          "userName": "<username>",
          "password": {
            "value": "<password>",
            "type": "SecureString"
          },
          "linkedServiceName": {
            "referenceName": "MyStorageLinkedService",
            "type": "LinkedServiceReference"
          }
      },
      "connectVia": {
        "referenceName": "MySelfhostedIR",
        "type": "IntegrationRuntimeReference"
      }
  }
}
Update values for the following properties in the linked service definition:
userName. Name of the cluster login user that you specified when creating the cluster.
password. The password for the user.
clusterUri. Specify the URL of your HDInsight cluster in the following format:
https://<clustername>.azurehdinsight.net. This article assumes that you have access to the cluster over the internet. For example, you can connect to the cluster athttps://clustername.azurehdinsight.net. This address uses the public gateway, which is not available if you have used network security groups (NSGs) or user-defined routes (UDRs) to restrict access from the internet. For Data Factory to submit jobs to HDInsight clusters in Azure Virtual Network, your Azure Virtual Network needs to be configured in such a way that the URL can be resolved to the private IP address of the gateway used by HDInsight.From Azure portal, open the Virtual Network the HDInsight is in. Open the network interface with name starting with
nic-gateway-0. Note down its private IP address. For example, 10.6.0.15.If your Azure Virtual Network has DNS server, update the DNS record so the HDInsight cluster URL
https://<clustername>.azurehdinsight.netcan be resolved to10.6.0.15. This is the recommended approach. If you don’t have a DNS server in your Azure Virtual Network, you can temporarily work around this by editing the hosts file (C:\Windows\System32\drivers\etc) of all VMs that registered as self-hosted integration runtime nodes by adding an entry like this:10.6.0.15 myHDIClusterName.azurehdinsight.net
Create linked services
In the PowerShell, switch to the folder where you created JSON files, and run the following command to deploy the linked services:
In the PowerShell, switch to the folder where you created JSON files.
Run the following command to create an Azure Storage linked service.
Set-AzDataFactoryV2LinkedService -DataFactoryName $dataFactoryName -ResourceGroupName $resourceGroupName -Name "MyStorageLinkedService" -File "MyStorageLinkedService.json"Run the following command to create an Azure HDInsight linked service.
Set-AzDataFactoryV2LinkedService -DataFactoryName $dataFactoryName -ResourceGroupName $resourceGroupName -Name "MyHDInsightLinkedService" -File "MyHDInsightLinkedService.json"
Author a pipeline
In this step, you create a new pipeline with a Hive activity. The activity executes Hive script to return data from a sample table and save it to a path you defined. Create a JSON file in your preferred editor, copy the following JSON definition of a pipeline definition, and save it as MyHivePipeline.json.
{
  "name": "MyHivePipeline",
  "properties": {
    "activities": [
      {
        "name": "MyHiveActivity",
        "type": "HDInsightHive",
        "linkedServiceName": {
            "referenceName": "MyHDILinkedService",
            "type": "LinkedServiceReference"
        },
        "typeProperties": {
          "scriptPath": "adftutorial\\hivescripts\\hivescript.hql",
          "getDebugInfo": "Failure",
          "defines": {
            "Output": "wasb://<Container>@<StorageAccount>.blob.core.windows.net/outputfolder/"
          },
          "scriptLinkedService": {
            "referenceName": "MyStorageLinkedService",
            "type": "LinkedServiceReference"
          }
        }
      }
    ]
  }
}
Note the following points:
- scriptPath points to path to Hive script on the Azure Storage Account you used for MyStorageLinkedService. The path is case-sensitive.
- Output is an argument used in the Hive script. Use the format of
wasb://<Container>@<StorageAccount>.blob.core.windows.net/outputfolder/to point it to an existing folder on your Azure Storage. The path is case-sensitive.
Switch to the folder where you created JSON files, and run the following command to deploy the pipeline:
Set-AzDataFactoryV2Pipeline -DataFactoryName $dataFactoryName -ResourceGroupName $resourceGroupName -Name $pipelineName -File "MyHivePipeline.json"
Start the pipeline
Start a pipeline run. It also captures the pipeline run ID for future monitoring.
$runId = Invoke-AzDataFactoryV2Pipeline -DataFactoryName $dataFactoryName -ResourceGroupName $resourceGroupName -PipelineName $pipelineNameRun the following script to continuously check the pipeline run status until it finishes.
while ($True) {
    $result = Get-AzDataFactoryV2ActivityRun -DataFactoryName $dataFactoryName -ResourceGroupName $resourceGroupName -PipelineRunId $runId -RunStartedAfter (Get-Date).AddMinutes(-30) -RunStartedBefore (Get-Date).AddMinutes(30)

    if(!$result) {
        Write-Host "Waiting for pipeline to start..." -foregroundcolor "Yellow"
    }
    elseif (($result | Where-Object { $_.Status -eq "InProgress" } | Measure-Object).count -ne 0) {
        Write-Host "Pipeline run status: In Progress" -foregroundcolor "Yellow"
    }
    else {
        Write-Host "Pipeline '"$pipelineName"' run finished. Result:" -foregroundcolor "Yellow"
        $result
        break
    }
    ($result | Format-List | Out-String)
    Start-Sleep -Seconds 15
}

Write-Host "Activity `Output` section:" -foregroundcolor "Yellow"
$result.Output -join "`r`n"

Write-Host "Activity `Error` section:" -foregroundcolor "Yellow"
$result.Error -join "`r`n"
Here is the output of the sample run:
Pipeline run status: In Progress

ResourceGroupName : ADFV2SampleRG2
DataFactoryName   : SampleV2DataFactory2
ActivityName      : MyHiveActivity
PipelineRunId     : 000000000-0000-0000-000000000000000000
PipelineName      : MyHivePipeline
Input             : {getDebugInfo, scriptPath, scriptLinkedService, defines}
Output            :
LinkedServiceName :
ActivityRunStart  : 9/18/2017 6:58:13 AM
ActivityRunEnd    :
DurationInMs      :
Status            : InProgress
Error             :

Pipeline ' MyHivePipeline' run finished. Result:

ResourceGroupName : ADFV2SampleRG2
DataFactoryName   : SampleV2DataFactory2
ActivityName      : MyHiveActivity
PipelineRunId     : 0000000-0000-0000-0000-000000000000
PipelineName      : MyHivePipeline
Input             : {getDebugInfo, scriptPath, scriptLinkedService, defines}
Output            : {logLocation, clusterInUse, jobId, ExecutionProgress...}
LinkedServiceName :
ActivityRunStart  : 9/18/2017 6:58:13 AM
ActivityRunEnd    : 9/18/2017 6:59:16 AM
DurationInMs      : 63636
Status            : Succeeded
Error             : {errorCode, message, failureType, target}

Activity Output section:
"logLocation": "wasbs://adfjobs@adfv2samplestor.blob.core.windows.net/HiveQueryJobs/000000000-0000-47c3-9b28-1cdc7f3f2ba2/18_09_2017_06_58_18_023/Status"
"clusterInUse": "https://adfv2HivePrivate.azurehdinsight.net"
"jobId": "job_1505387997356_0024"
"ExecutionProgress": "Succeeded"
"effectiveIntegrationRuntime": "MySelfhostedIR"
Activity Error section:
"errorCode": ""
"message": ""
"failureType": ""
"target": "MyHiveActivity"
Check the
outputfolderfolder for new file created as the Hive query result, it should look like the following sample output:8 en-US SCH-i500 California 23 en-US Incredible Pennsylvania 212 en-US SCH-i500 New York 212 en-US SCH-i500 New York 212 en-US SCH-i500 New York 212 en-US SCH-i500 New York 212 en-US SCH-i500 New York 212 en-US SCH-i500 New York 212 en-US SCH-i500 New York 212 en-US SCH-i500 New York 212 en-US SCH-i500 New York 212 en-US SCH-i500 New York 212 en-US SCH-i500 New York 212 en-US SCH-i500 New York 246 en-US SCH-i500 District Of Columbia 246 en-US SCH-i500 District Of Columbia
Related content
You performed the following steps in this tutorial:
- Create a data factory.
- Author and setup self-hosted integration runtime
- Author and deploy linked services.
- Author and deploy a pipeline that contains a Hive activity.
- Start a pipeline run.
- Monitor the pipeline run
- verify the output.
Advance to the following tutorial to learn about transforming data by using a Spark cluster on Azure:
Feedback
Coming soon: Throughout 2024 we will be phasing out GitHub Issues as the feedback mechanism for content and replacing it with a new feedback system. For more information see: https://aka.ms/ContentUserFeedback.
Submit and view feedback for