Deploy high performance network VMs on your Azure Stack Edge Pro GPU device
APPLIES TO:  Azure Stack Edge Pro - GPUAzure Stack Edge Pro 2Azure Stack Edge Pro RAzure Stack Edge Mini R
You can create and manage virtual machines (VMs) on an Azure Stack Edge Pro GPU device by using the Azure portal, templates, and Azure PowerShell cmdlets, and via the Azure CLI or Python scripts. This article describes how to create and manage a high performance network (HPN) VM on your Azure Stack Edge Pro GPU device.
About HPN VMs
HPN VMs are specifically designed for 5G and Multi-access Edge Computing (MEC) network functions that require high packet processing rates, low latency, and low jitter.
HPN VMs rely on a non-uniform memory access (NUMA) architecture to increase processing speeds. In a NUMA system, CPUs are arranged in smaller systems called nodes. Each node has a dedicated set of logical processors and memory. An HPN VM can use CPU from only one NUMA node.
On your Azure Stack Edge device, logical processors are distributed on NUMA nodes and high speed network interfaces can be attached to these nodes.
To maximize performance, processing, and transmitting on the same NUMA node, processors are allocated memory that they're closest to in order to reduce physical distance. For more information, see NUMA Support.
vCPU reservations for Azure Stack Edge
To deploy HPN VMs on Azure Stack Edge, you must reserve vCPUs on NUMA nodes. The number of vCPUs reserved determines the available vCPUs that can be assigned to the HPN VMs.
For the number of cores that each HPN VM size uses, see Supported HPN VM sizes.
In version 2210, vCPUs are automatically reserved with the maximum number of vCPUs supported on each NUMA node. If vCPUs were already reserved for HPN VMs in an earlier version, the existing reservation is carried forth to the 2210 version. If vCPUs weren't reserved for HPN VMs in an earlier version, upgrading to 2210 will still carry forth the existing configuration.
For versions 2209 and earlier, you must reserve vCPUs on NUMA nodes before you deploy HPN VMs on your device. We recommend NUMA node 0 for vCPU reservations because NUMA node 0 has Mellanox high speed network interfaces.
HPN VM deployment workflow
The high-level summary of the HPN deployment workflow is as follows:
While configuring the network settings on your device, make sure that there's a virtual switch associated with a network interface on your device that can be used for VM resources and VMs. We'll use the default virtual network created with the vswitch for this article. You have the option of creating and using a different virtual network, if desired.
Enable cloud management of VMs from the Azure portal. Download a VHD onto your device, and create a VM image from the VHD.
Reserve vCPUs on the device for HPN VMs with versions 2209 and earlier. For version 2210, the vCPUs are automatically reserved.
Use the resources created in the previous steps:
- The VM image that you created.
- The default virtual network associated with the virtual switch. The default virtual network name is the same as the name of the virtual switch.
- The default subnet for the default virtual network.
And create or specify the following resources:
- Specify a VM name and a supported HPN VM size, and specify sign-in credentials for the VM.
- Create new data disks or attach existing data disks.
- Configure a static or dynamic IP for the VM. If you're providing a static IP, specify a free IP in the subnet range of the default virtual network.
Use the preceding resources to create an HPN VM.
Prerequisites
Before you create and manage VMs on your device via the Azure portal, make sure that:
You've configured and activated your Azure Stack Edge Pro GPU device as described in Tutorial: Activate Azure Stack Edge Pro with GPU.
Make sure that you've created a virtual switch. The VMs and the resources for VMs will be using this virtual switch and the associated virtual network. For more information, see Configure a virtual switch on Azure Stack Edge Pro GPU.
You have access to a VM image for the VM you intend to create. To create a VM image, you can Get an image from Azure Marketplace.
In addition to the above prerequisites for VM creation, you'll also need to check the vCPU reservation of HPN VMs.
The default vCPU reservation uses the SkuPolicy, which reserves all vCPUs that are available for HPN VMs.
If the vCPUs were already reserved for HPN VMs in an earlier version - for example, in version 2209 or earlier, then the existing reservation is carried forth to the 2210 version.
For most use cases, we recommend that you use the default configuration. If needed, you can also customize the NUMA configuration for HPN VMs. To customize the configuration, use the steps provided for 2209.
Use the following steps to get information about the SkuPolicy settings on your device:
Run the following command to see the available NUMA policies on your device:
Get-HcsNumaPolicyHere's an example output:
[DBE-BNVGF33.microsoftdatabox.com]: PS>Get-HcsNumaPolicy

Get-HcsNumaPolicy
PolicyType: AllRoot
HpnLpMapping:
   CPUs: []

PolicyType: SkuPolicy
HpnLpMapping:
   CPUs: [4, 5, 6, 7, 8, 9, 10, 11, 12, 13, 14, 15, 16, 17, 18, 19, 20, 21, 22, 23, 28, 29, 30, 31, 32, 33, 34, 35, 36, 37, 38, 39, 40, 41, 42, 43, 44, 45, 46, 47]

[DBE-BNVGF33.microsoftdatabox.com]: PS>
Run the following command to get the vCPU reservation information on your device:
This cmdlet will output:
- HpnLpMapping: The NUMA logical processor indexes that are reserved on the machine.
- HpnCapableLpMapping: The NUMA logical processor indexes that are capable for reservation.
- HpnLpAvailable: The NUMA logical processor indexes that are available for new HPN VM deployments.
Get-HcsNumaLpMappingHere's an example output when SkuPolicy is in effect:
[DBE-BNVGF33.microsoftdatabox.com]: PS>Get-HcsNumaLpMapping
Hardware:
 { Numa Node #0 : CPUs [0, 1, 2, 3, 4, 5, 6, 7, 8, 9, 10, 11, 12, 13, 14, 15, 16, 17, 18, 19, 20, 21, 22, 23] }
 { Numa Node #1 : CPUs [24, 25, 26, 27, 28, 29, 30, 31, 32, 33, 34, 35, 36, 37, 38, 39, 40, 41, 42, 43, 44, 45, 46, 47] }

HpnCapableLpMapping:
 { Numa Node #0 : CPUs [4, 5, 6, 7, 8, 9, 10, 11, 12, 13, 14, 15, 16, 17, 18, 19, 20, 21, 22, 23] }
 { Numa Node #1 : CPUs [28, 29, 30, 31, 32, 33, 34, 35, 36, 37, 38, 39, 40, 41, 42, 43, 44, 45, 46, 47] }

BNVGF33:
HpnLpMapping:
 { Numa Node #0 : CPUs [4, 5, 6, 7, 8, 9, 10, 11, 12, 13, 14, 15, 16, 17, 18, 19, 20, 21, 22, 23] }
 { Numa Node #1 : CPUs [28, 29, 30, 31, 32, 33, 34, 35, 36, 37, 38, 39, 40, 41, 42, 43, 44, 45, 46, 47] }

HpnLpAvailable:
 { Numa Node #0 : CPUs [4, 5, 6, 7, 8, 9, 10, 11, 12, 13, 14, 15, 16, 17, 18, 19, 20, 21, 22, 23] }
 { Numa Node #1 : CPUs [28, 29, 30, 31, 32, 33, 34, 35, 36, 37, 38, 39, 40, 41, 42, 43, 44, 45, 46, 47] }
Proceed to the following steps only if you want to change the current reservation, or to create a new reservation.
Run the following command to set a NUMA logical processor mapping on your device. You can use the
-Customparameter if you want to specify a custom logical processor set. See the 2209 and earlier tab in this article for rules when specifying a custom set.Running this command stops running VMs, triggers a reboot, and then restarts the VMs.
Set-HcsNumaLpMapping -UseSkuPolicyHere's an example output:
[DBE-BNVGF33.microsoftdatabox.com]: Set-HcsNumaLpMapping -UseSkuPolicy
Requested Config already exists. No action needed.

[DBE-BNVGF33.microsoftdatabox.com]: PS> Set-HcsNumaLpMapping -UseAllRoot
Requested Configuration requires a reboot...
Machine will reboot in some time. Please be patient.
[DBE-BNVGF33.microsoftdatabox.com]: PS>
Run the following command to validate the vCPU reservation and verify that the VMs have restarted.
Get-HcsNumaLpMapping
Deploy a VM
Follow these steps to create an HPN VM on your device.
Note
Azure Stack Edge Pro 1 devices have two NUMA nodes, so you must provision HPN VMs before you provision non-HPN VMs.
In the Azure portal of your Azure Stack Edge resource, Add a VM image. You'll use this VM image to create a VM in the next step. You can choose either Gen1 or Gen2 for the VM.
Follow all the steps in Add a VM with this configuration requirement.
On the Basics tab, select a VM size from DSv2 or F-series supported for HPN.

Finish the remaining steps in the VM creation. The VM will take approximately 30 minutes to be created.

After the VM is successfully created, you'll see your new VM on the Overview pane. Select the newly created VM to go to Virtual machines.
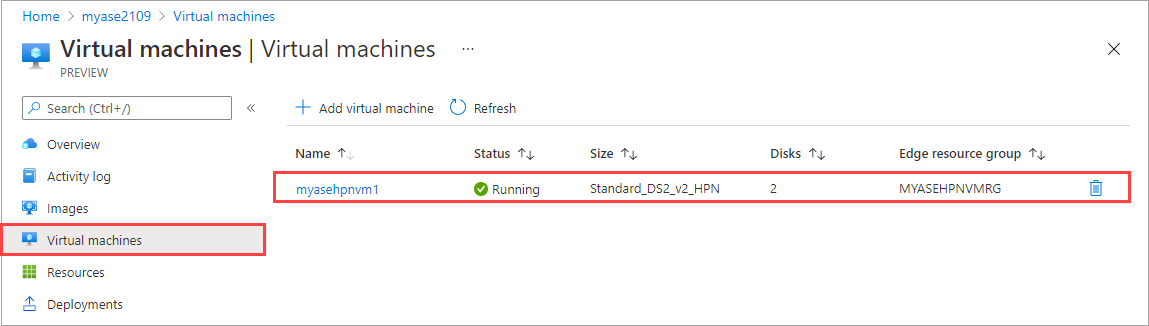
Select the VM to see the details.
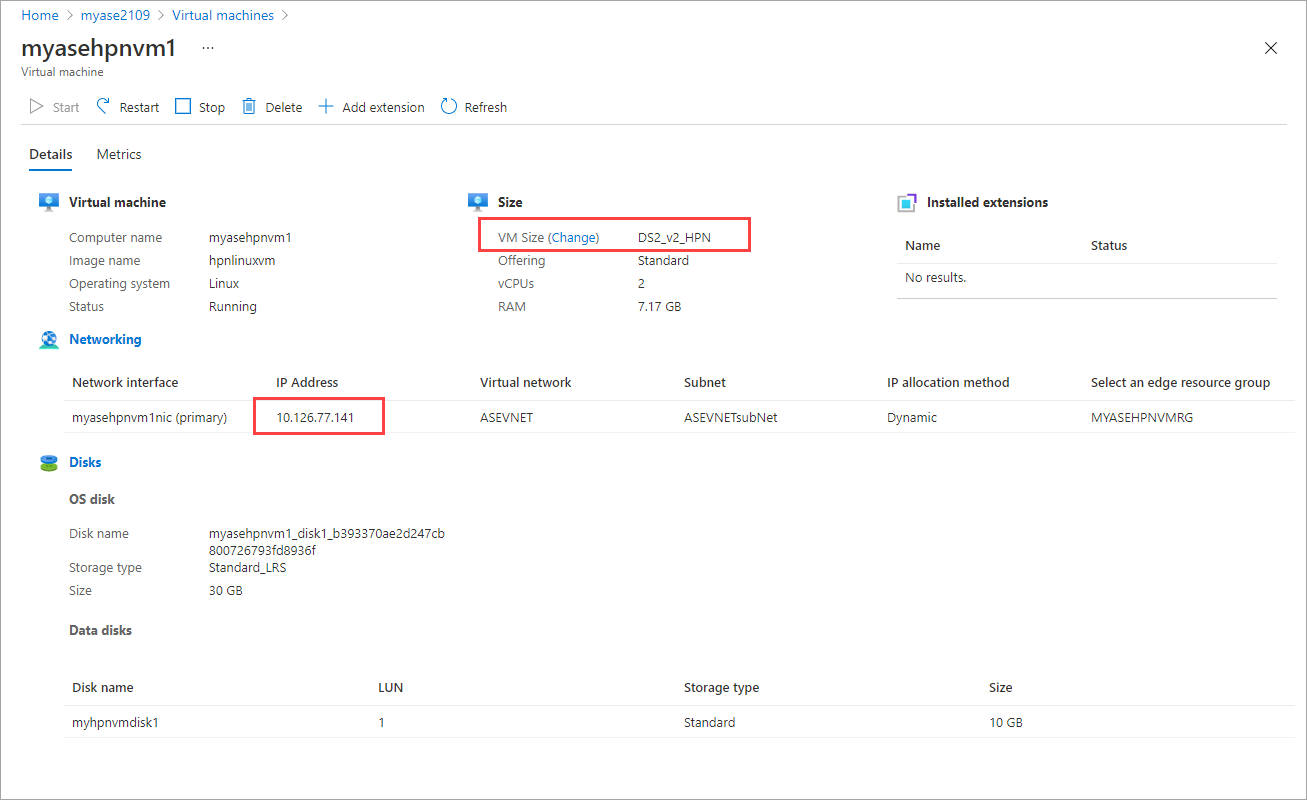
You'll use the IP address for the network interface to connect to the VM.
Note
If the vCPUs are not reserved for HPN VMs prior to the deployment, the deployment will fail with a FabricVmPlacementErrorInsufficientNumaNodeCapacity error.
Next steps
Feedback
Coming soon: Throughout 2024 we will be phasing out GitHub Issues as the feedback mechanism for content and replacing it with a new feedback system. For more information see: https://aka.ms/ContentUserFeedback.
Submit and view feedback for