Configure Microsoft Defender for Containers components
Microsoft Defender for Containers is the cloud-native solution for securing your containers.
Defender for Containers protects your clusters whether they're running in:
Azure Kubernetes Service (AKS) - Microsoft's managed service for developing, deploying, and managing containerized applications.
Amazon Elastic Kubernetes Service (EKS) in a connected Amazon Web Services (AWS) account - Amazon's managed service for running Kubernetes on AWS without needing to install, operate, and maintain your own Kubernetes control plane or nodes.
Google Kubernetes Engine (GKE) in a connected Google Cloud Platform (GCP) project - Google’s managed environment for deploying, managing, and scaling applications using GCP infrastructure.
Other Kubernetes distributions (using Azure Arc-enabled Kubernetes) - Cloud Native Computing Foundation (CNCF) certified Kubernetes clusters hosted on-premises or on IaaS. For more information, see the On-prem/IaaS (Arc) section of Supported features by environment.
Learn about this plan in Overview of Microsoft Defender for Containers.
You can first learn how to connect and protect your containers in these articles:
- Protect your Azure containers with Defender for Containers
- Protect your on-premises Kubernetes clusters with Defender for Containers
- Protect your Amazon Web Service (AWS) accounts containers with Defender for Containers
- Protect your Google Cloud Platform (GCP) project containers with Defender for Containers
You can also learn more by watching these videos from the Defender for Cloud in the Field video series:
- Microsoft Defender for Containers in a multicloud environment
- Protect Containers in GCP with Defender for Containers
Note
Defender for Containers' support for Arc-enabled Kubernetes clusters is a preview feature. The preview feature is available on a self-service, opt-in basis.
Previews are provided "as is" and "as available" and are excluded from the service level agreements and limited warranty.
To learn more about the supported operating systems, feature availability, outbound proxy and more, see the Defender for Containers feature availability.
Network requirements
Validate the following endpoints are configured for outbound access so that the Defender sensor can connect to Microsoft Defender for Cloud to send security data and events:
See the required FQDN/application rules for Microsoft Defender for Containers.
By default, AKS clusters have unrestricted outbound (egress) internet access.
Network requirements
Caution
This article references CentOS, a Linux distribution that is nearing End Of Life (EOL) status. Please consider your use and planning accordingly. For more information, see the CentOS End Of Life guidance.
Validate the following endpoints are configured for outbound access so that the Defender sensor can connect to Microsoft Defender for Cloud to send security data and events:
For public cloud deployments:
| Azure Domain | Azure Government Domain | Microsoft Azure operated by 21Vianet Domain | Port |
|---|---|---|---|
| *.ods.opinsights.azure.com | *.ods.opinsights.azure.us | *.ods.opinsights.azure.cn | 443 |
| *.oms.opinsights.azure.com | *.oms.opinsights.azure.us | *.oms.opinsights.azure.cn | 443 |
| login.microsoftonline.com | login.microsoftonline.us | login.chinacloudapi.cn | 443 |
The following domains are only necessary if you're using a relevant OS. For example, if you have EKS clusters running in AWS, then you would only need to apply the Amazon Linux 2 (Eks): Domain: "amazonlinux.*.amazonaws.com/2/extras/*" domain.
| Domain | Port | Host operating systems |
|---|---|---|
| amazonlinux.*.amazonaws.com/2/extras/* | 443 | Amazon Linux 2 |
| yum default repositories | - | RHEL / Centos |
| apt default repositories | - | Debian |
You'll also need to validate the Azure Arc-enabled Kubernetes network requirements.
Enable the plan
To enable the plan:
From Defender for Cloud's menu, open the Settings page and select the relevant subscription.
In the Defender plans page, select Defender for Containers and select Settings.

Tip
If the subscription already has Defender for Kubernetes and/or Defender for container registries enabled, an update notice is shown. Otherwise, the only option will be Defender for Containers.
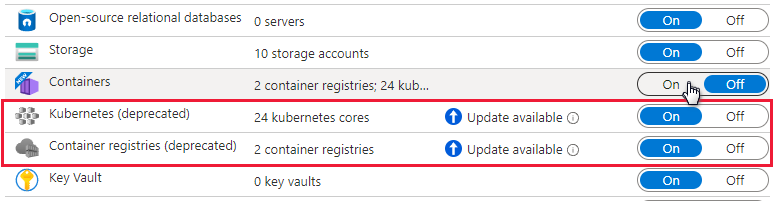
Turn the relevant component on to enable it.
Note
- Defenders for Containers customers who joined before August 2023 and don't have Agentless discovery for Kubernetes enabled as part of Defender CSPM when they enabled the plan, must manually enable the Agentless discovery for Kubernetes extension within the Defender for Containers plan.
- When you turn off Defender for Containers, the components are set to off and are not deployed to any more containers but they are not removed from containers that they are already installed on.


Enablement method per capability
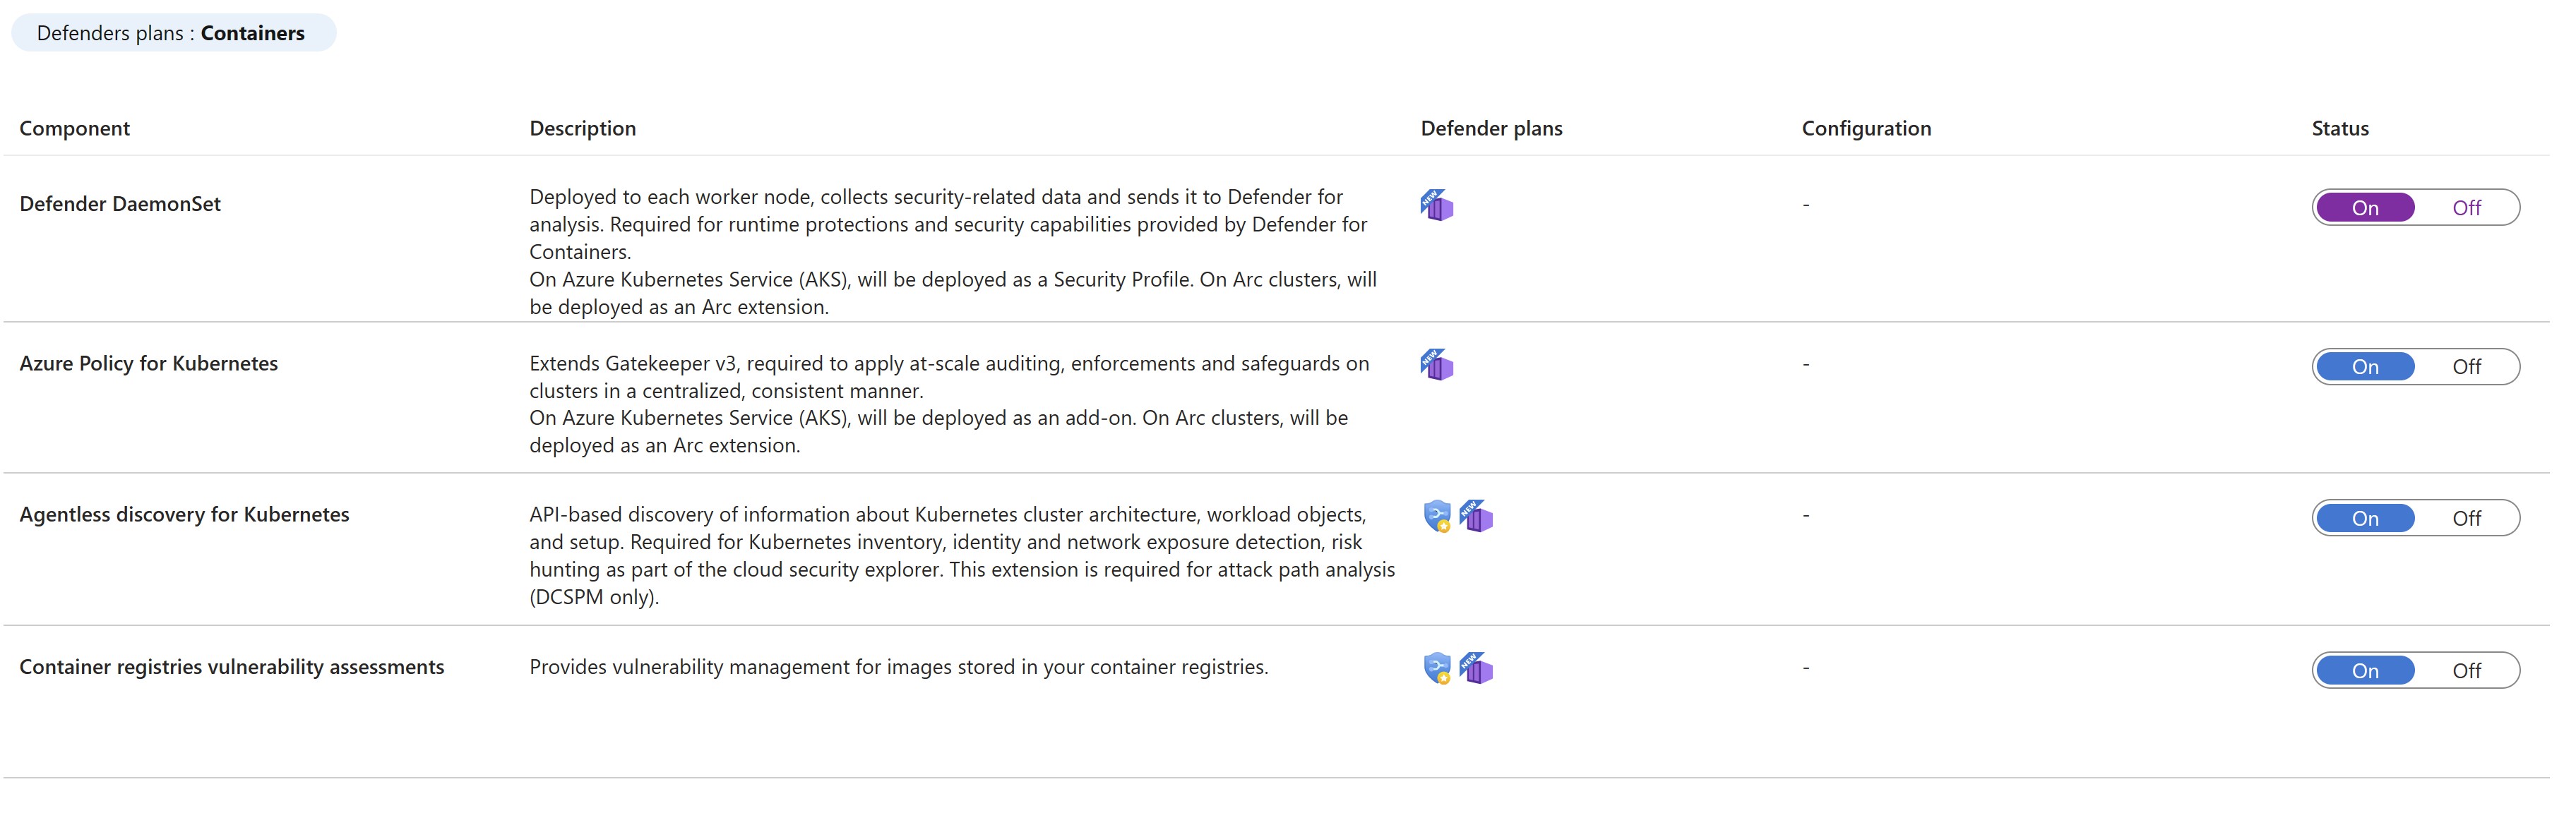
By default, when enabling the plan through the Azure portal, Microsoft Defender for Containers is configured to automatically enable all capabilities and install all required components to provide the protections offered by the plan, including the assignment of a default workspace.
If you don't want to enable all capabilities of the plans, you can manually select which specific capabilities to enable by selecting Edit configuration for the Containers plan. Then, in the Settings & monitoring page, select the capabilities you want to enable. In addition, you can modify this configuration from the Defender plans page after initial configuration of the plan.
For detailed information on the enablement method for each one the capabilities, see the support matrix.
Roles and permissions
Learn more about the roles used to provision Defender for Containers extensions.
Assigning custom workspace for Defender sensor
You can assign a custom workspace through Azure Policy.
Manual deployment of Defender sensor or Azure policy agent without auto-provisioning using recommendations
Capabilities that require sensor installation can also be deployed on one or more Kubernetes clusters, using the appropriate recommendation:
| Sensor | Recommendation |
|---|---|
| Defender Sensor for Kubernetes | Azure Kubernetes Service clusters should have Defender profile enabled |
| Defender Sensor for Arc-enabled Kubernetes | Azure Arc-enabled Kubernetes clusters should have the Defender extension installed |
| Azure policy agent for Kubernetes | Azure Kubernetes Service clusters should have the Azure Policy Add-on for Kubernetes installed |
| Azure policy agent for Arc-enabled Kubernetes | Azure Arc-enabled Kubernetes clusters should have the Azure Policy extension installed |
Perform the following steps to perform deployment of the Defender sensor on specific clusters:
From Microsoft Defender for Cloud's recommendations page, open the Enable enhanced security security control or search directly for one of the above recommendations (or use the above links to open the recommendation directly)
View all clusters without a sensor via the unhealthy tab.
Select the clusters to deploy the desired sensor on and select Fix.
Select Fix X resources.
Deploying Defender sensor - all options
You can enable the Defender for Containers plan and deploy all of the relevant components from the Azure portal, the REST API, or with a Resource Manager template. For detailed steps, select the relevant tab.
Once the Defender sensor has been deployed, a default workspace is automatically assigned. You can assign a custom workspace in place of the default workspace through Azure Policy.
Note
The Defender sensor is deployed to each node to provide the runtime protections and collect signals from those nodes using eBPF technology.
Use the fix button from the Defender for Cloud recommendation
A streamlined, frictionless, process lets you use the Azure portal pages to enable the Defender for Cloud plan and setup auto provisioning of all the necessary components for defending your Kubernetes clusters at scale.
A dedicated Defender for Cloud recommendation provides:
- Visibility about which of your clusters has the Defender sensor deployed
- Fix button to deploy it to those clusters without the sensor
From Microsoft Defender for Cloud's recommendations page, open the Enable enhanced security security control.
Use the filter to find the recommendation named Azure Kubernetes Service clusters should have Defender profile enabled.
Tip
Notice the Fix icon in the actions column
Select the clusters to see the details of the healthy and unhealthy resources - clusters with and without the sensor.
From the unhealthy resources list, select a cluster and select Remediate to open the pane with the remediation confirmation.
Select Fix X resources.
Enable the plan
To enable the plan:
From Defender for Cloud's menu, open the Settings page and select the relevant subscription.
In the Defender plans page, select Defender for Containers and select Settings.
Tip
If the subscription already has Defender for Kubernetes or Defender for container registries enabled, an update notice is shown. Otherwise, the only option will be Defender for Containers.
Turn the relevant component on to enable it.
Note
When you turn off Defender for Containers, the components are set to off and are not deployed to any more containers but they are not removed from containers that they are already installed on.
By default, when enabling the plan through the Azure portal, Microsoft Defender for Containers is configured to automatically install required components to provide the protections offered by plan, including the assignment of a default workspace.
If you want to disable automatic installation of components during the onboarding process, select Edit configuration for the Containers plan. The Advanced options will appear, and you can disable automatic installation for each component.
In addition, you can modify this configuration from the Defender plans page.
Note
If you choose to disable the plan at any time after enabling it through the portal as shown above, you'll need to manually remove Defender for Containers components deployed on your clusters.
You can assign a custom workspace through Azure Policy.
If you disable the automatic installation of any component, you can easily deploy the component to one or more clusters using the appropriate recommendation:
- Policy Add-on for Kubernetes - Azure Kubernetes Service clusters should have the Azure Policy Add-on for Kubernetes installed
- Azure Kubernetes Service profile - Azure Kubernetes Service clusters should have Defender profile enabled
- Azure Arc-enabled Kubernetes extension - Azure Arc-enabled Kubernetes clusters should have the Defender extension installed
- Azure Arc-enabled Kubernetes Policy extension - Azure Arc-enabled Kubernetes clusters should have the Azure Policy extension installed
Learn more about the roles used to provision Defender for Containers extensions.
Prerequisites
Before deploying the sensor, ensure you:
- Connect the Kubernetes cluster to Azure Arc
- Complete the pre-requisites listed under the generic cluster extensions documentation.
Deploy the Defender sensor
You can deploy the Defender sensor using a range of methods. For detailed steps, select the relevant tab.
Use the fix button from the Defender for Cloud recommendation
A dedicated Defender for Cloud recommendation provides:
- Visibility about which of your clusters has the Defender sensor deployed
- Fix button to deploy it to those clusters without the sensor
From Microsoft Defender for Cloud's recommendations page, open the Enable enhanced security security control.
Use the filter to find the recommendation named Azure Arc-enabled Kubernetes clusters should have Defender for Cloud's extension installed.
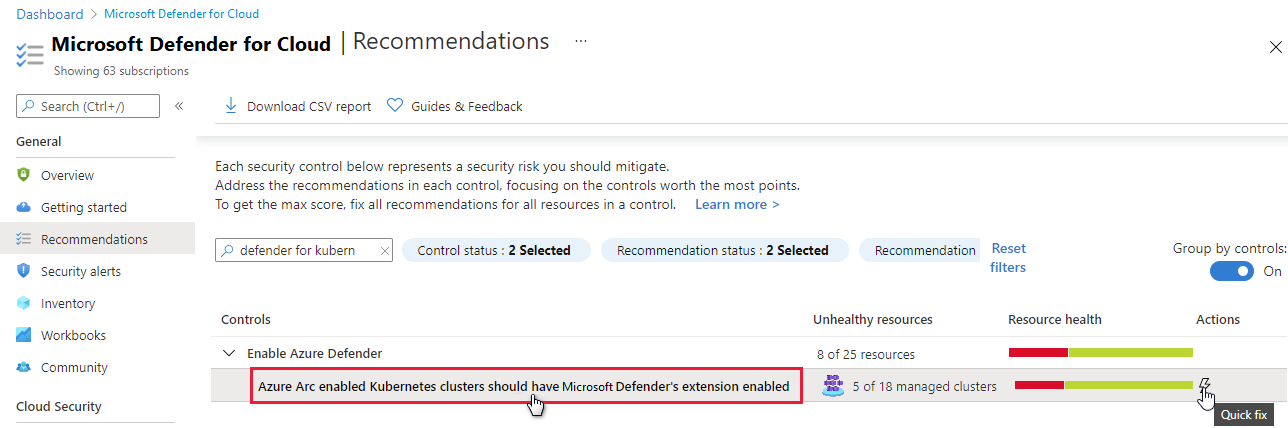
Tip
Notice the Fix icon in the actions column
Select the sensor to see the details of the healthy and unhealthy resources - clusters with and without the sensor.
From the unhealthy resources list, select a cluster and select Remediate to open the pane with the remediation options.
Select the relevant Log Analytics workspace and select Remediate x resource.

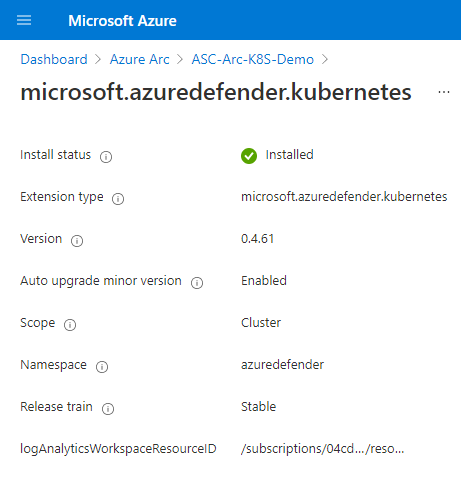
Verify the deployment
To verify that your cluster has the Defender sensor installed on it, follow the steps in one of the tabs below:
Use Defender for Cloud recommendation to verify the status of your sensor
From Microsoft Defender for Cloud's recommendations page, open the Enable Microsoft Defender for Cloud security control.
Select the recommendation named Azure Arc-enabled Kubernetes clusters should have Microsoft Defender for Cloud's extension installed.
Check that the cluster on which you deployed the sensor is listed as Healthy.

Enable the plan
Important
- If you haven't already connected an AWS account, connect your AWS accounts to Microsoft Defender for Cloud.
- If you have already enabled the plan on your connector, and you would like to change optional configurations or enable new capabilities, go directly to step 4.
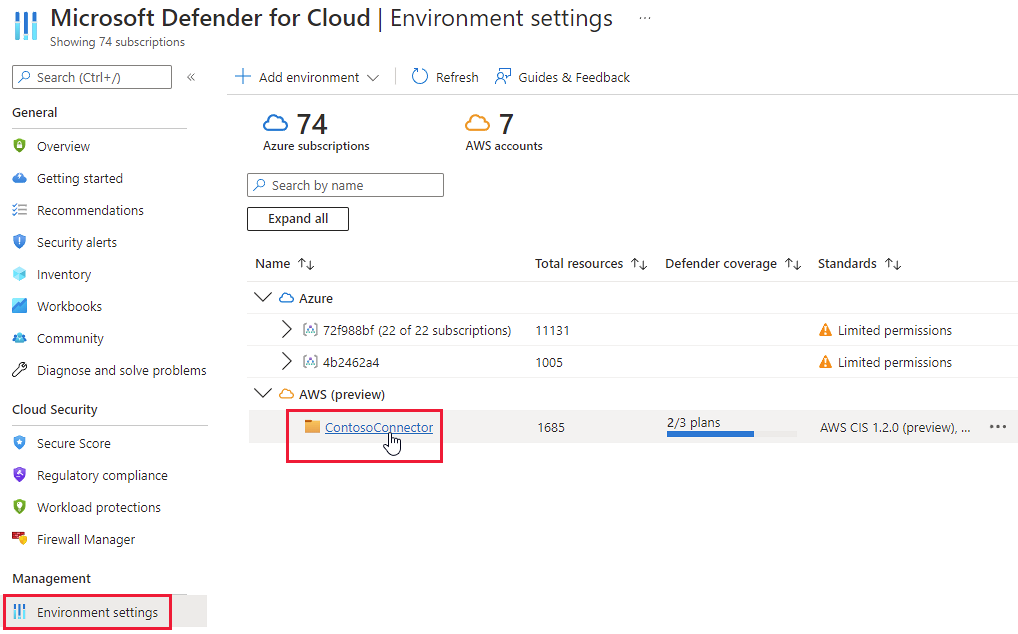
To protect your EKS clusters, enable the Containers plan on the relevant account connector:
From Defender for Cloud's menu, open Environment settings.
Select the AWS connector.
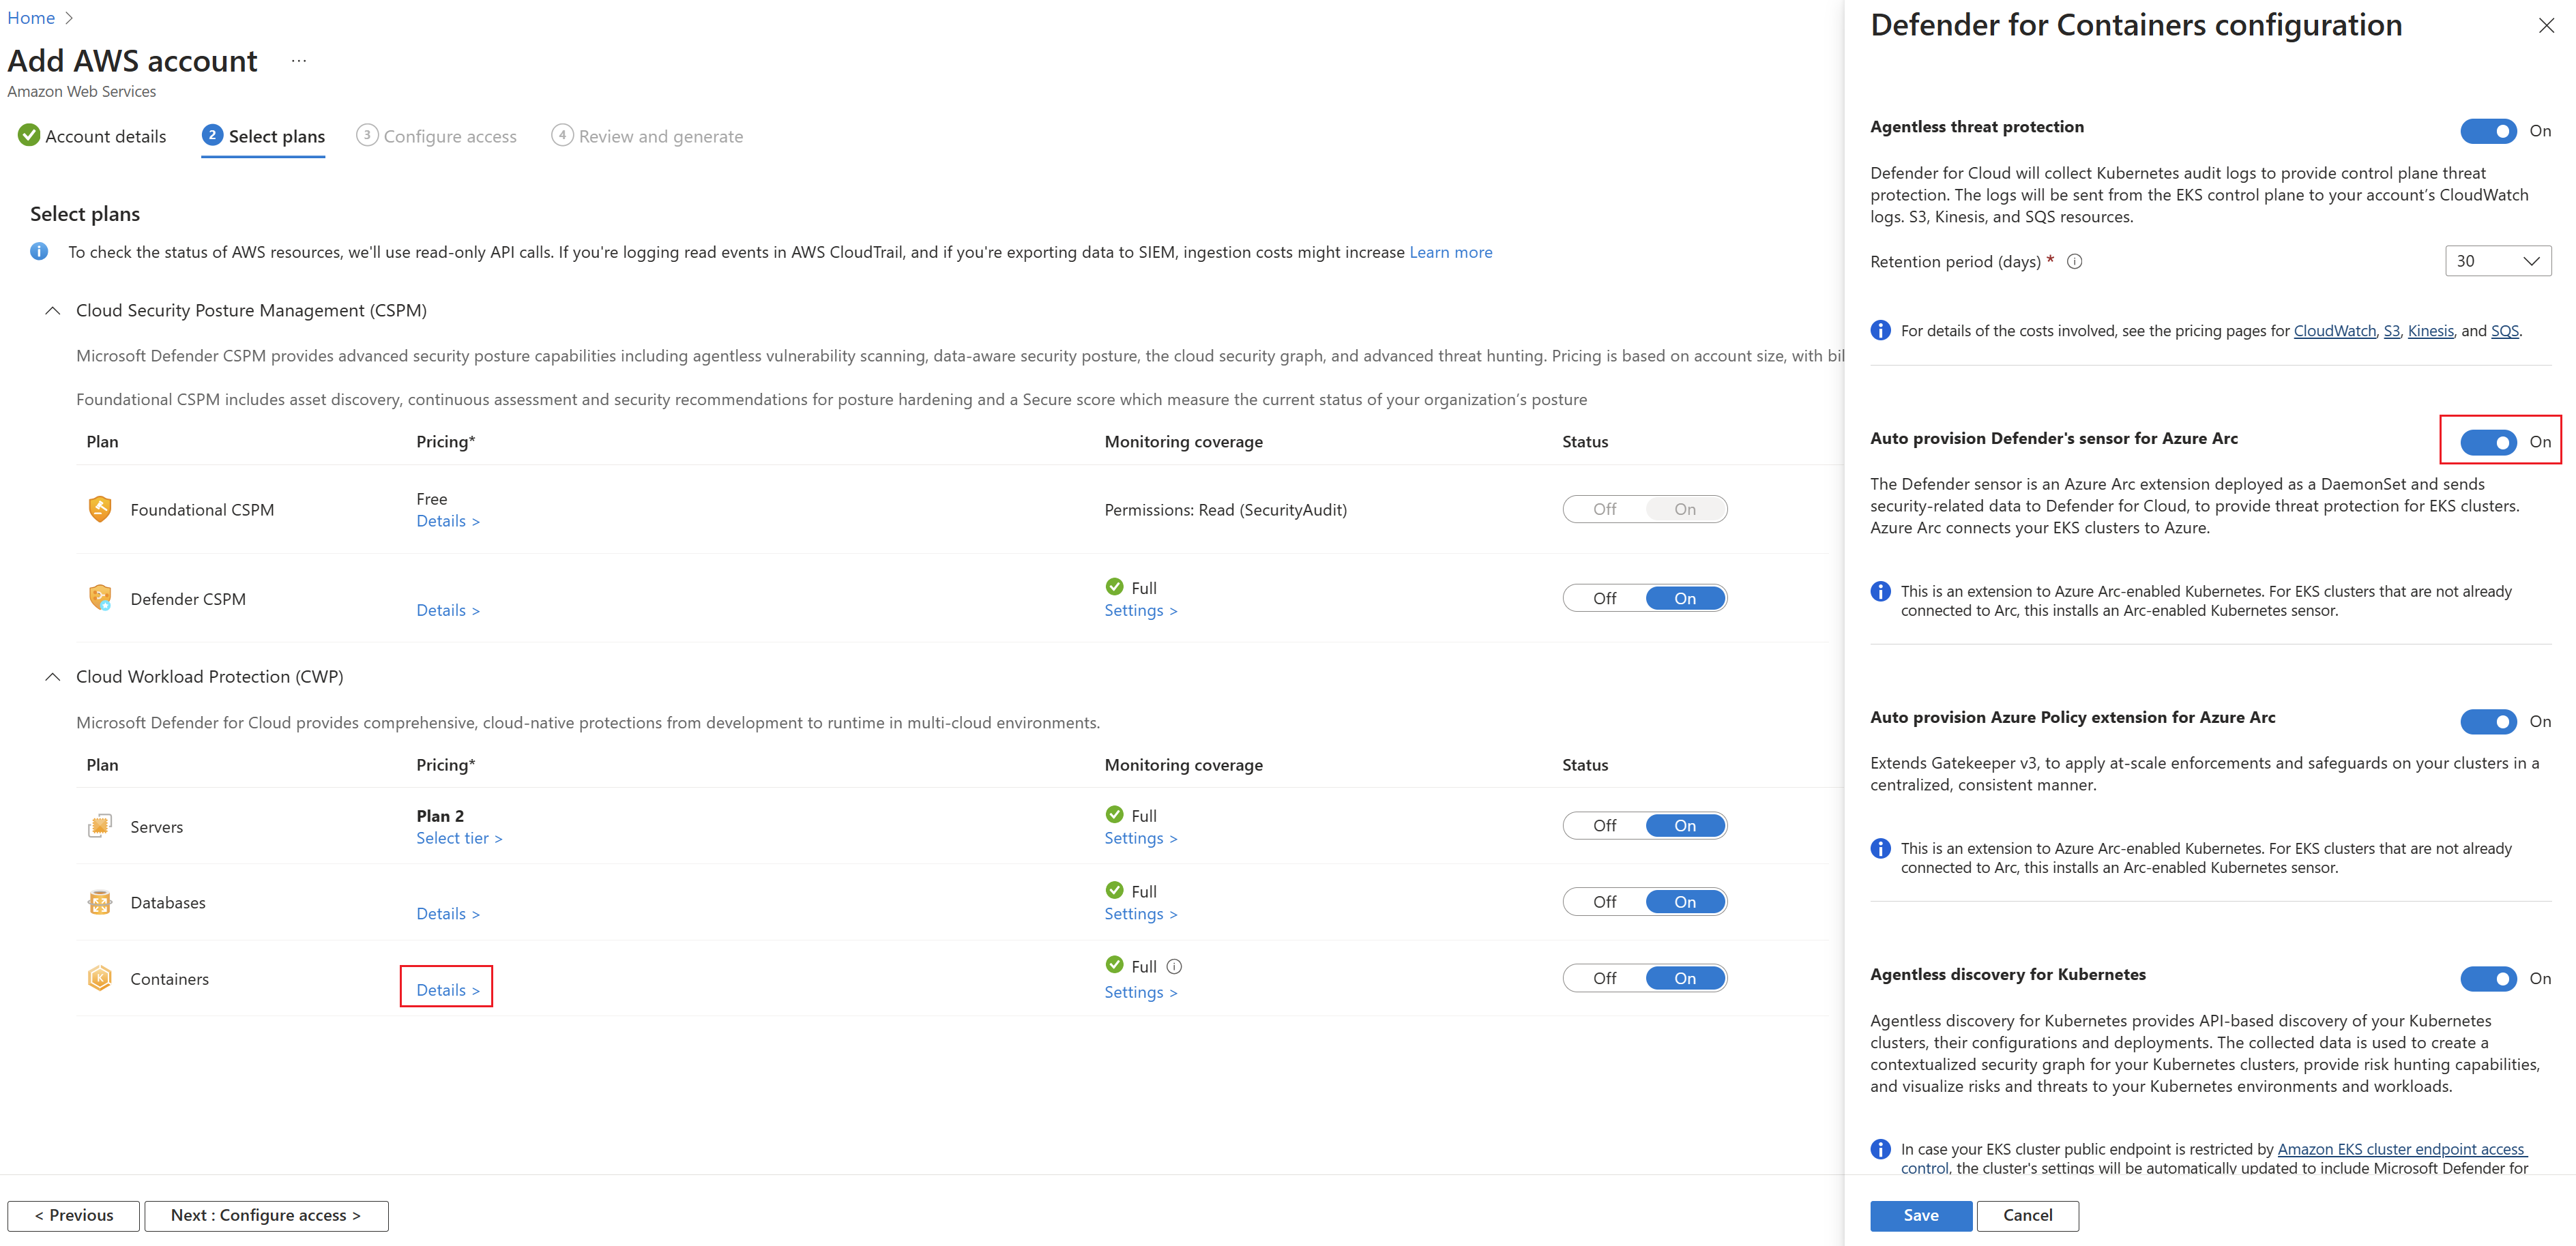
Verify that the toggle for the Containers plan is set to On.

To change optional configurations for the plan, select Settings.

Defender for Containers requires control plane audit logs to provide runtime threat protection. To send Kubernetes audit logs to Microsoft Defender, toggle the setting to On. To change the retention period for your audit logs, enter the required time frame.
Note
If you disable this configuration, then the
Threat detection (control plane)feature will be disabled. Learn more about features availability.Agentless discovery for Kubernetes provides API-based discovery of your Kubernetes clusters. To enable the Agentless discovery for Kubernetes feature, toggle the setting to On.
The Agentless Container Vulnerability Assessment provides vulnerability management for images stored in ECR and running images on your EKS clusters. To enable the Agentless Container Vulnerability Assessment feature, toggle the setting to On.
Continue through the remaining pages of the connector wizard.
If you're enabling the Agentless Discovery for Kubernetes feature, you need to grant control plane permissions on the cluster. You can do this in one of the following ways:
Run this Python script to grant the permissions. The script adds the Defender for Cloud role MDCContainersAgentlessDiscoveryK8sRole to the aws-auth ConfigMap of the EKS clusters that you wish to onboard.
Grant each Amazon EKS cluster the MDCContainersAgentlessDiscoveryK8sRole role with the ability to interact with the cluster. Sign into all existing and newly created clusters using eksctl and execute the following script:
    eksctl create iamidentitymapping \
    --cluster my-cluster \
    --region region-code \
    --arn arn:aws:iam::account:role/MDCContainersAgentlessDiscoveryK8sRole \
    --group system:masters\
    --no-duplicate-arns
For more information, see Enabling IAM principal access to your cluster.
Azure Arc-enabled Kubernetes, the Defender sensor, and Azure Policy for Kubernetes should be installed and running on your EKS clusters. There is a dedicated Defender for Cloud recommendations to install these extensions (and Azure Arc if necessary):
EKS clusters should have Microsoft Defender's extension for Azure Arc installed
For each of the recommendations, follow the steps below to install the required extensions.
To install the required extensions:
From Defender for Cloud's Recommendations page, search for one of the recommendations by name.
Select an unhealthy cluster.
Important
You must select the clusters one at a time.
Don't select the clusters by their hyperlinked names: select anywhere else in the relevant row.
Select Fix.
Defender for Cloud generates a script in the language of your choice: select Bash (for Linux) or PowerShell (for Windows).
Select Download remediation logic.
Run the generated script on your cluster.
Repeat steps "a" through "f" for the second recommendation.

View recommendations and alerts for your EKS clusters
Tip
You can simulate container alerts by following the instructions in this blog post.
To view the alerts and recommendations for your EKS clusters, use the filters on the alerts, recommendations, and inventory pages to filter by resource type AWS EKS cluster.

Deploying the Defender sensor
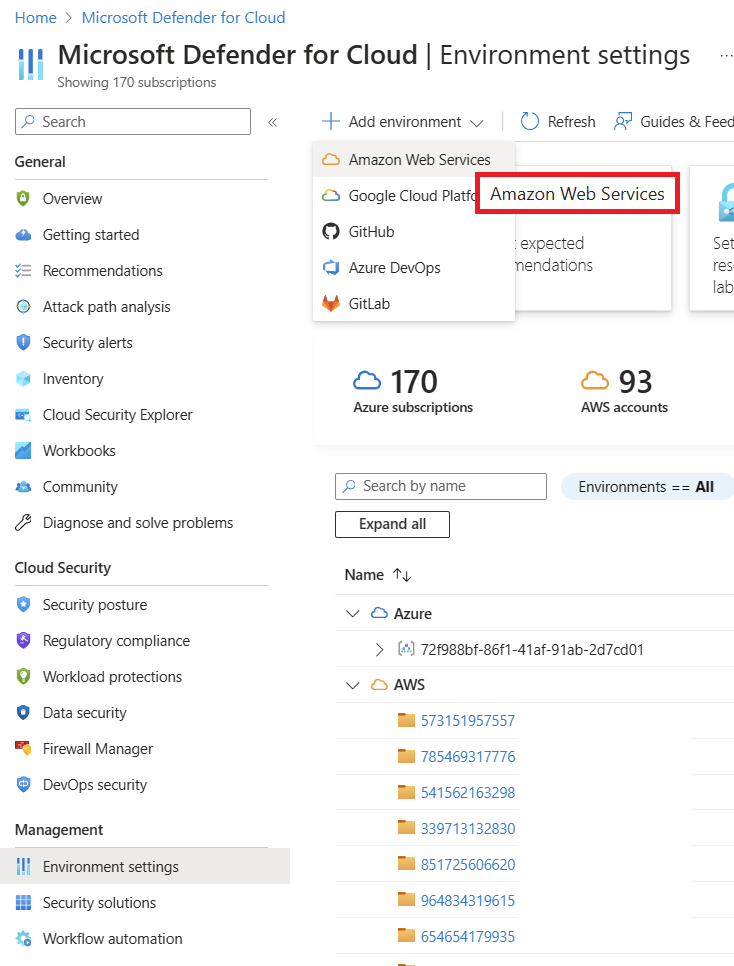
To deploy the Defender sensor on your AWS clusters, follow these steps:
Go to Microsoft Defender for Cloud -> Environment settings -> Add environment -> Amazon Web Services.
Fill in the account details.

Go to Select plans, open the Containers plan and make sure Auto provision Defender's sensor for Azure Arc is set to on.
Go to Configure access and follow the steps there.
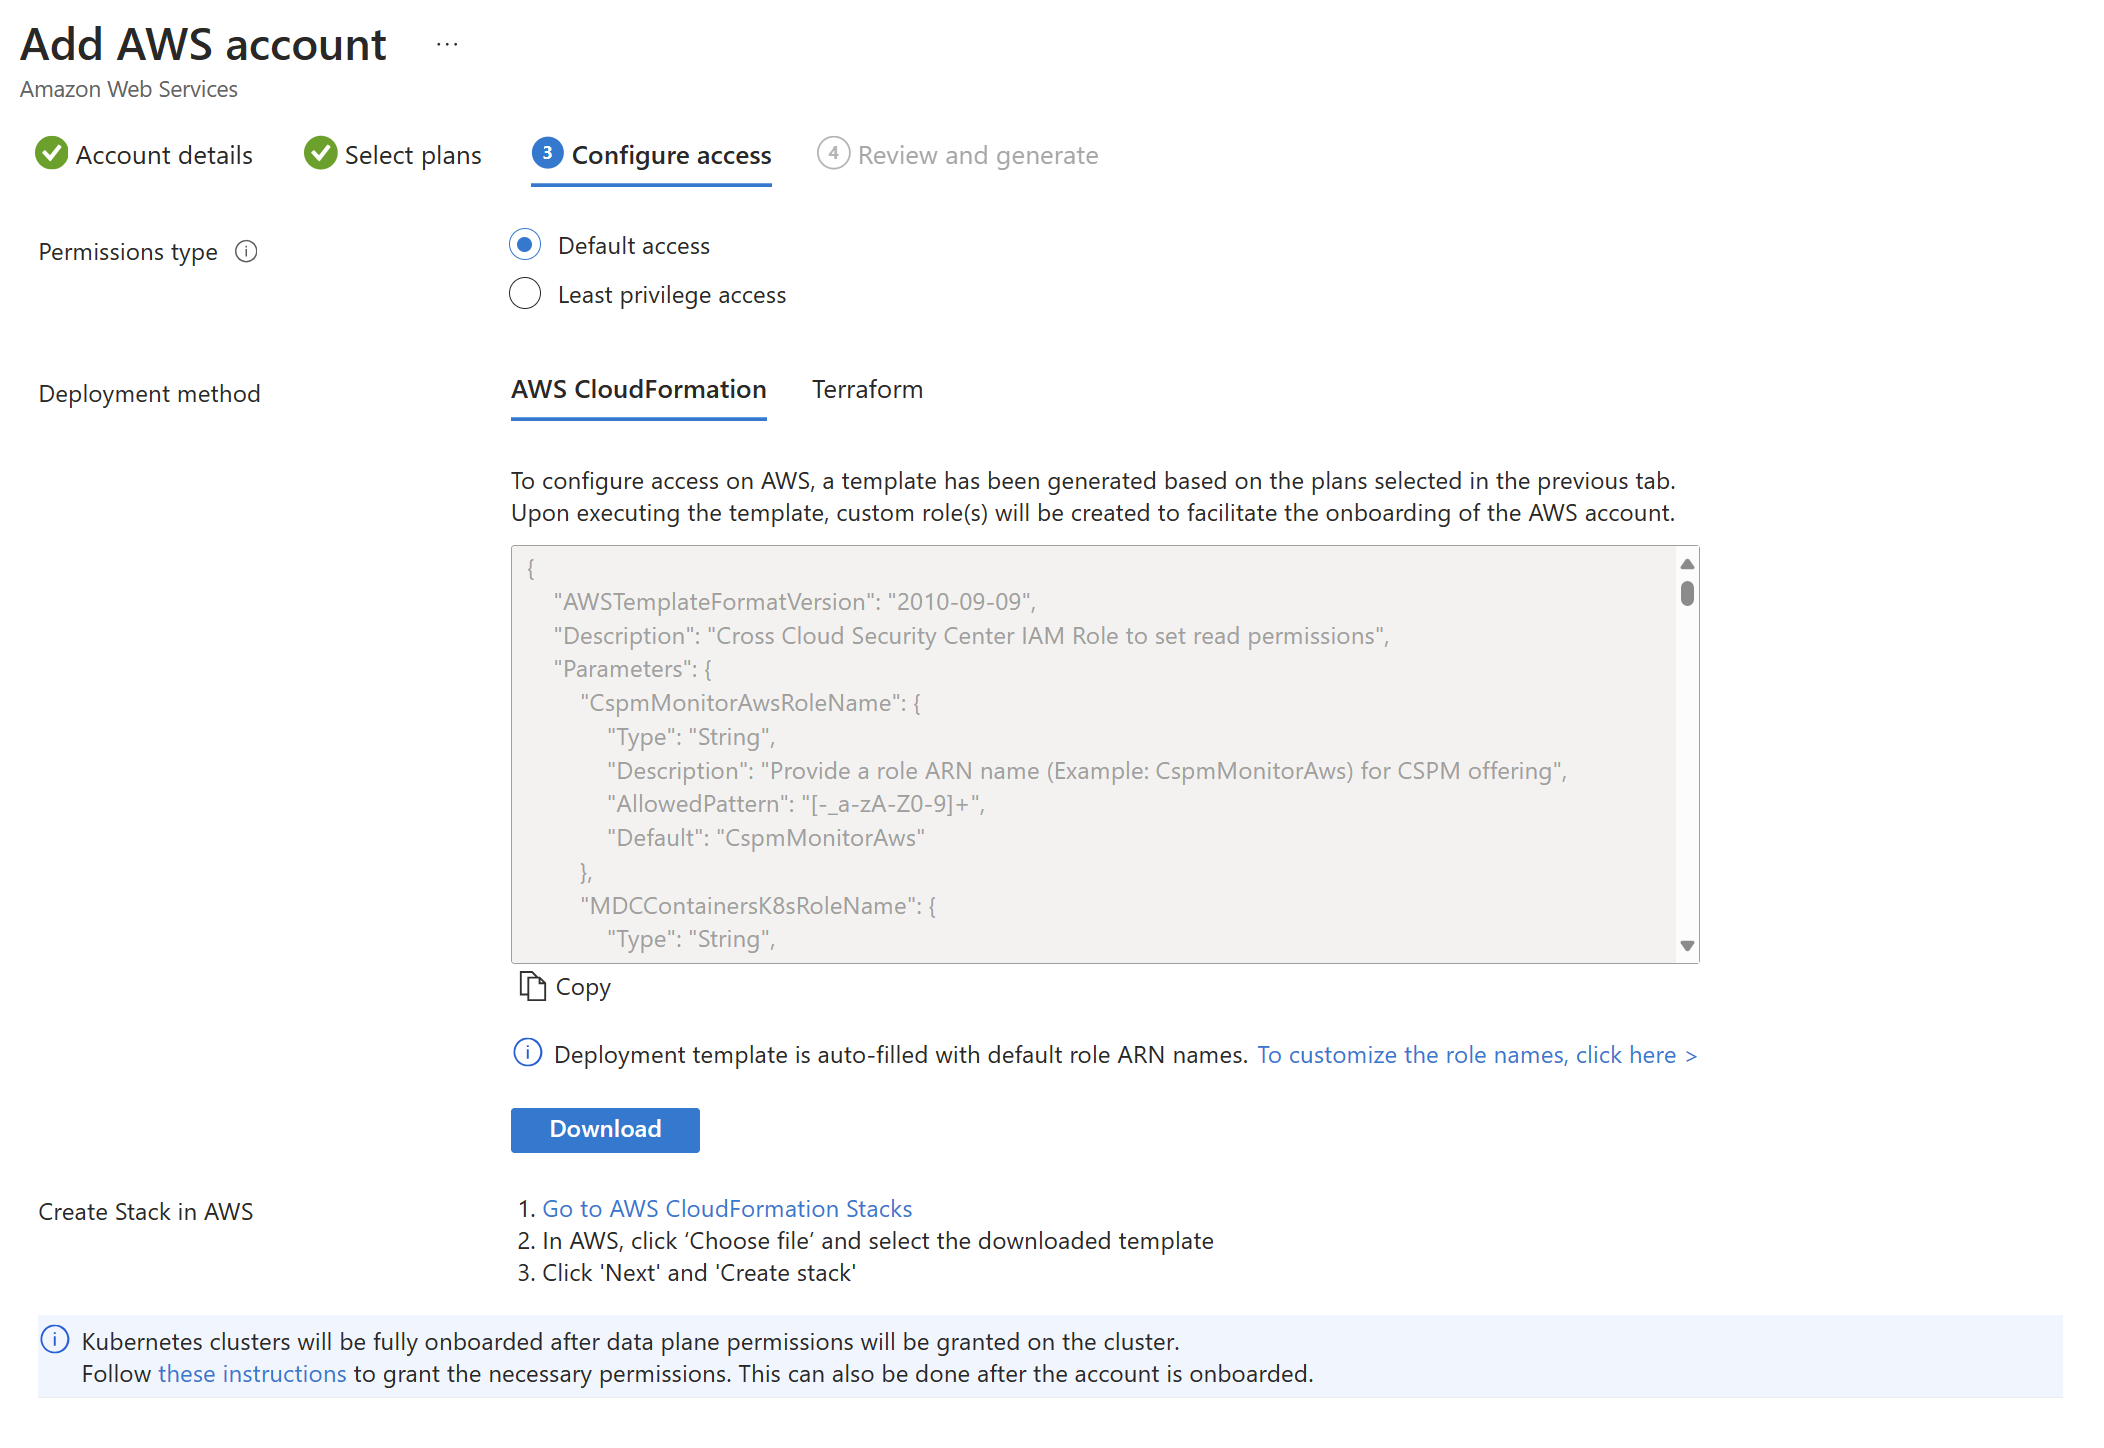
Once the Cloud Formation template was deployed successfully, select Create.


Note
You can exclude a specific AWS cluster from autoprovisioning. For sensor deployment, apply the ms_defender_container_exclude_agents tag on the resource with the value true. For agentless deployment, apply the ms_defender_container_exclude_agentless tag on the resource with the value true.
Enable the plan
Important
If you haven't already connected a GCP project, connect your GCP projects to Microsoft Defender for Cloud.
To protect your GKE clusters, you'll need to enable the Containers plan on the relevant GCP project.
Note
Verify that you don't have any Azure policies that prevent the Arc installation.
To protect Google Kubernetes Engine (GKE) clusters:
Sign in to the Azure portal.
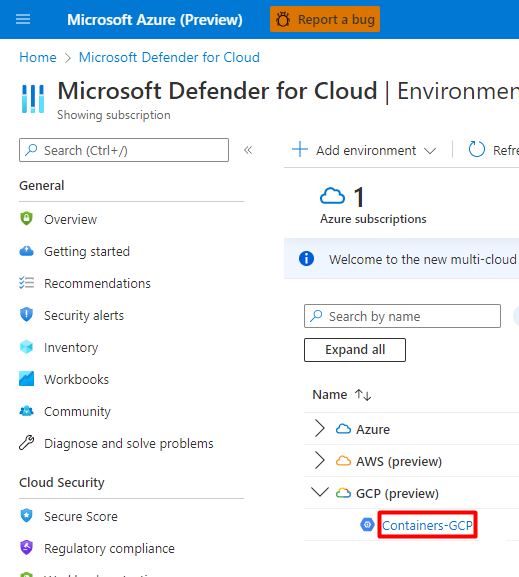
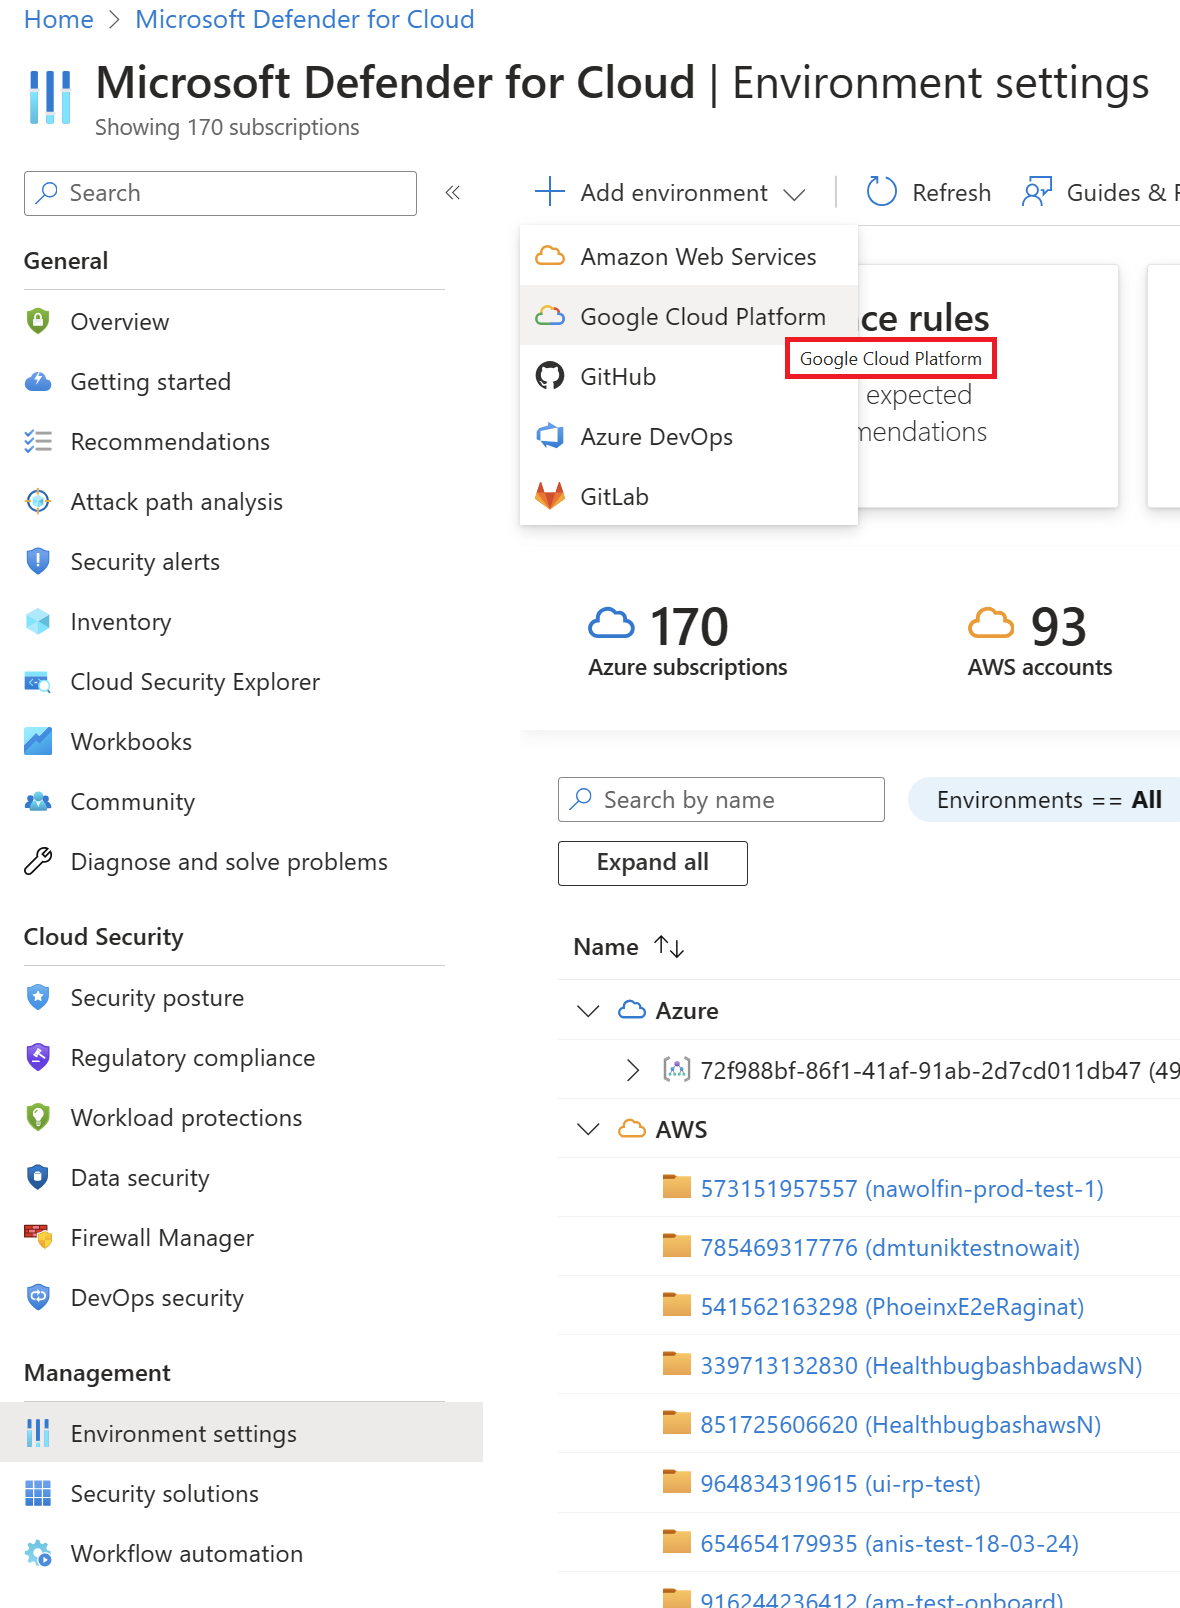
Navigate to Microsoft Defender for Cloud > Environment settings.
Select the relevant GCP connector
Select the Next: Select plans > button.
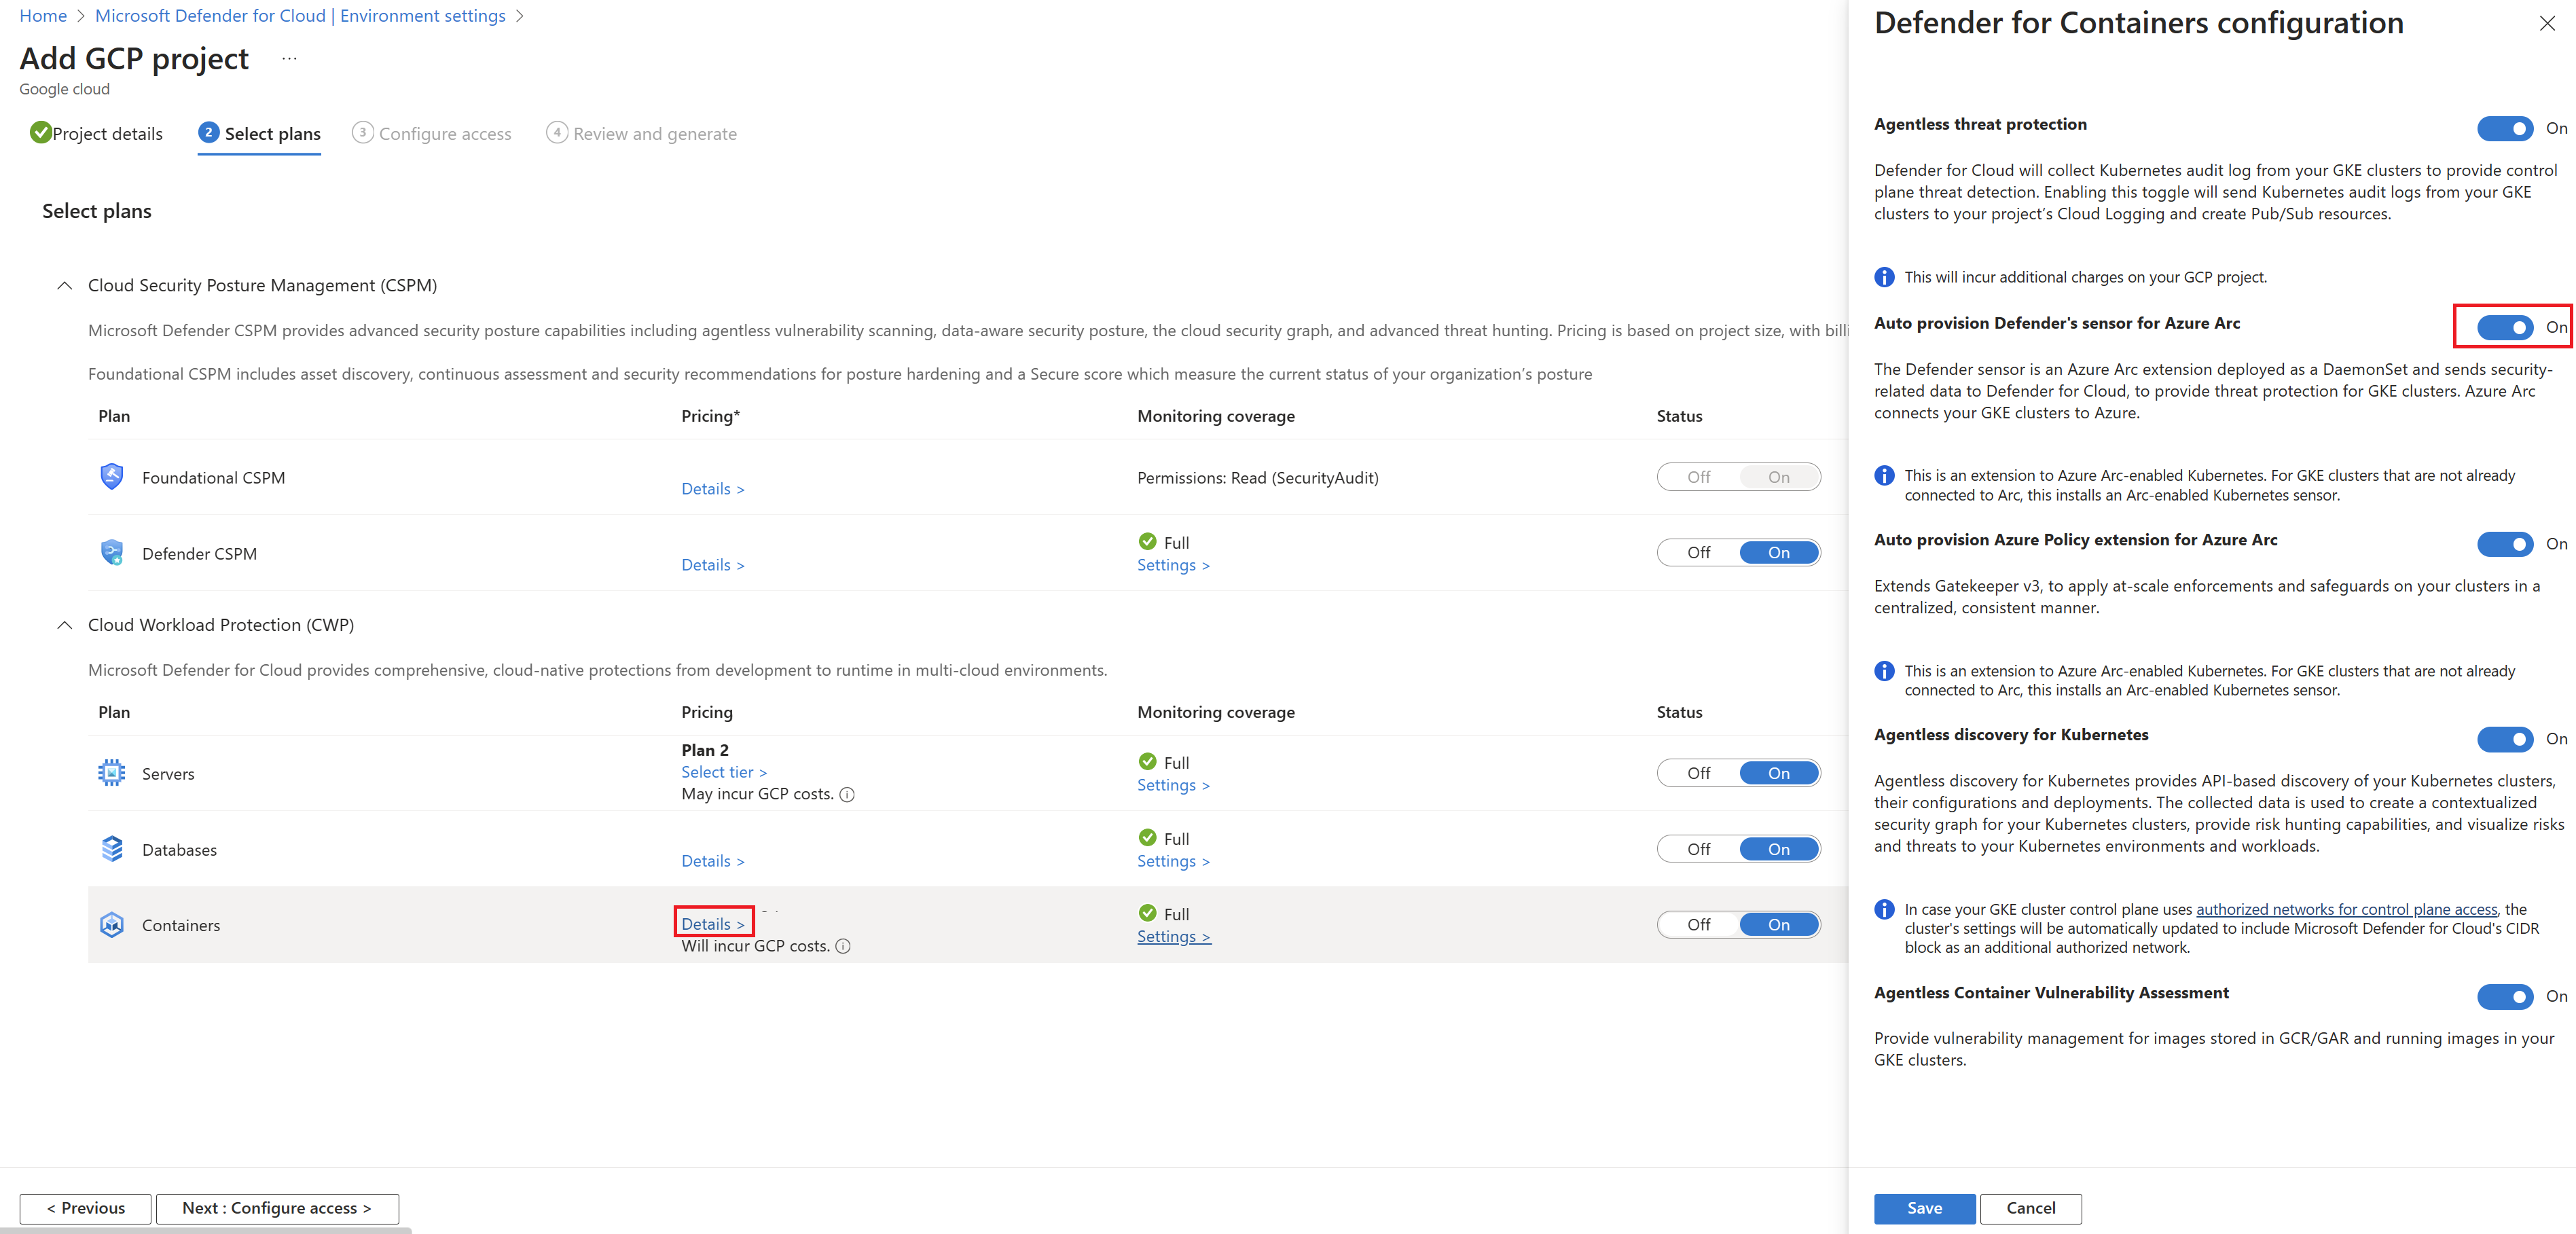
Ensure that the Containers plan is toggled to On.

To change optional configurations for the plan, select Settings.
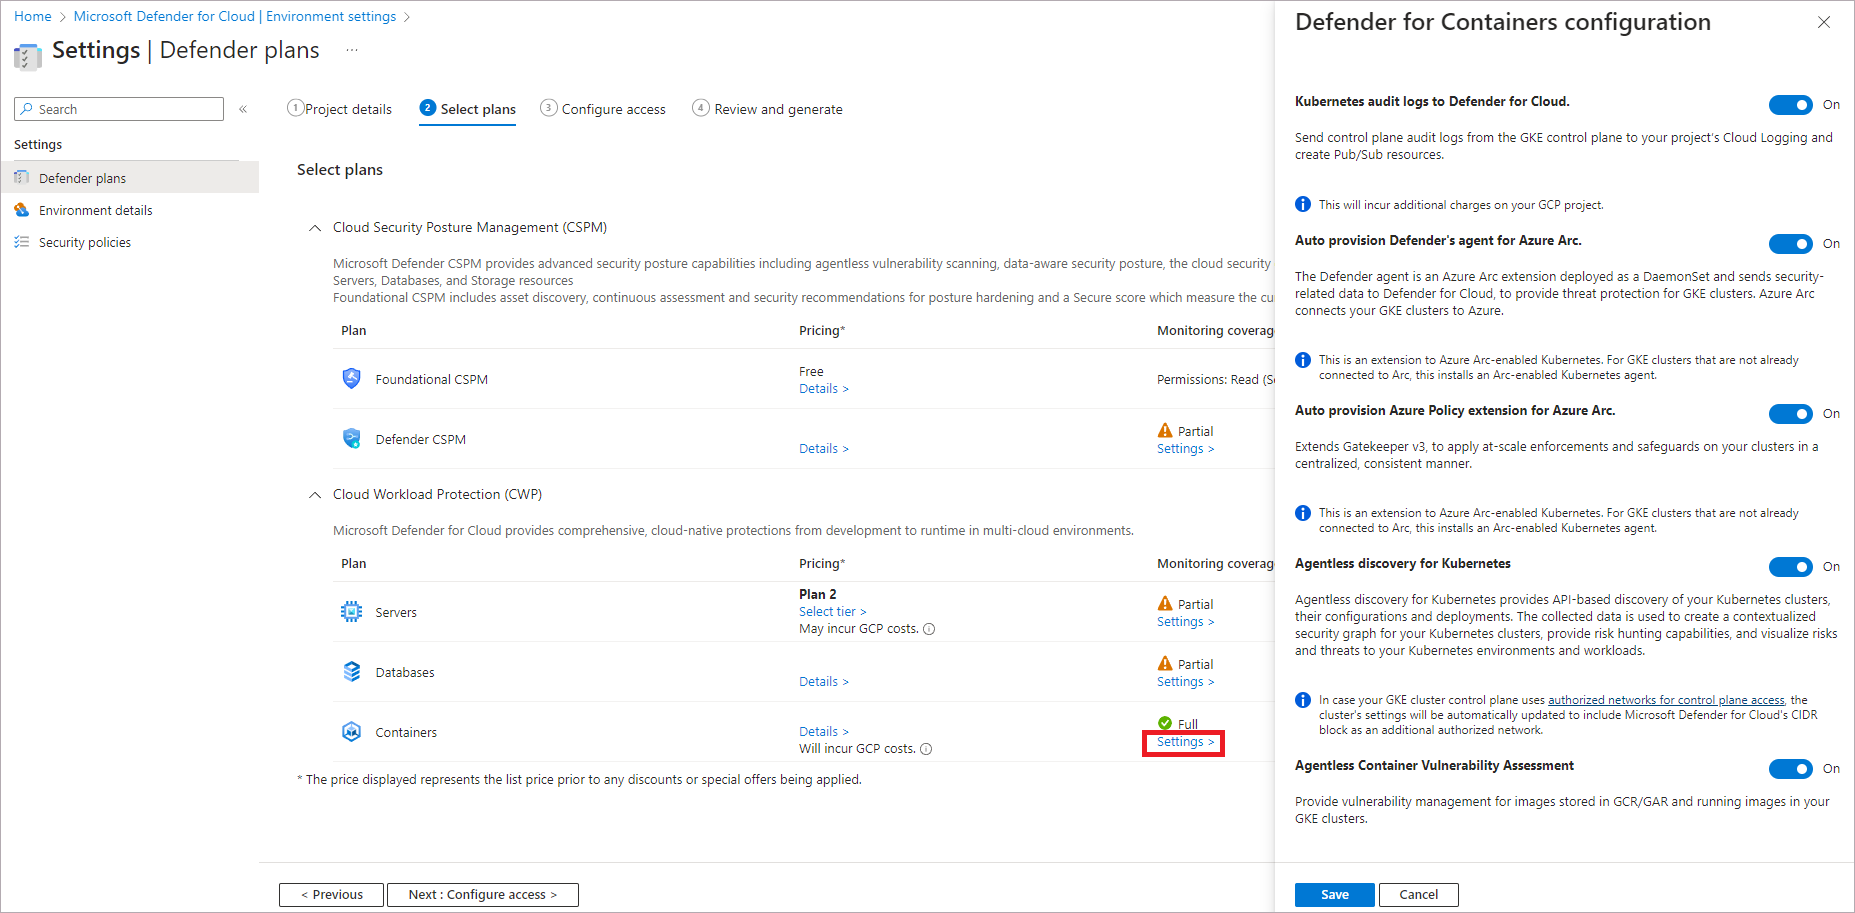
Kubernetes audit logs to Defender for Cloud: Enabled by default. This configuration is available at the GCP project level only. It provides agentless collection of the audit log data through GCP Cloud Logging to the Microsoft Defender for Cloud back end for further analysis. Defender for Containers requires control plane audit logs to provide runtime threat protection. To send Kubernetes audit logs to Microsoft Defender, toggle the setting to On.
Note
If you disable this configuration, then the
Threat detection (control plane)feature will be disabled. Learn more about features availability.Auto provision Defender's sensor for Azure Arc and Auto provision Azure Policy extension for Azure Arc: Enabled by default. You can install Azure Arc-enabled Kubernetes and its extensions on your GKE clusters in three ways:
- Enable Defender for Containers autoprovisioning at the project level, as explained in the instructions in this section. We recommend this method.
- Use Defender for Cloud recommendations for per-cluster installation. They appear on the Microsoft Defender for Cloud recommendations page. Learn how to deploy the solution to specific clusters.
- Manually install Arc-enabled Kubernetes and extensions.
Agentless discovery for Kubernetes provides API-based discovery of your Kubernetes clusters. To enable the Agentless discovery for Kubernetes feature, toggle the setting to On.
The Agentless Container Vulnerability Assessment provides vulnerability management for images stored in Google Registries (GAR and GCR) and running images on your GKE clusters. To enable the Agentless Container Vulnerability Assessment feature, toggle the setting to On.
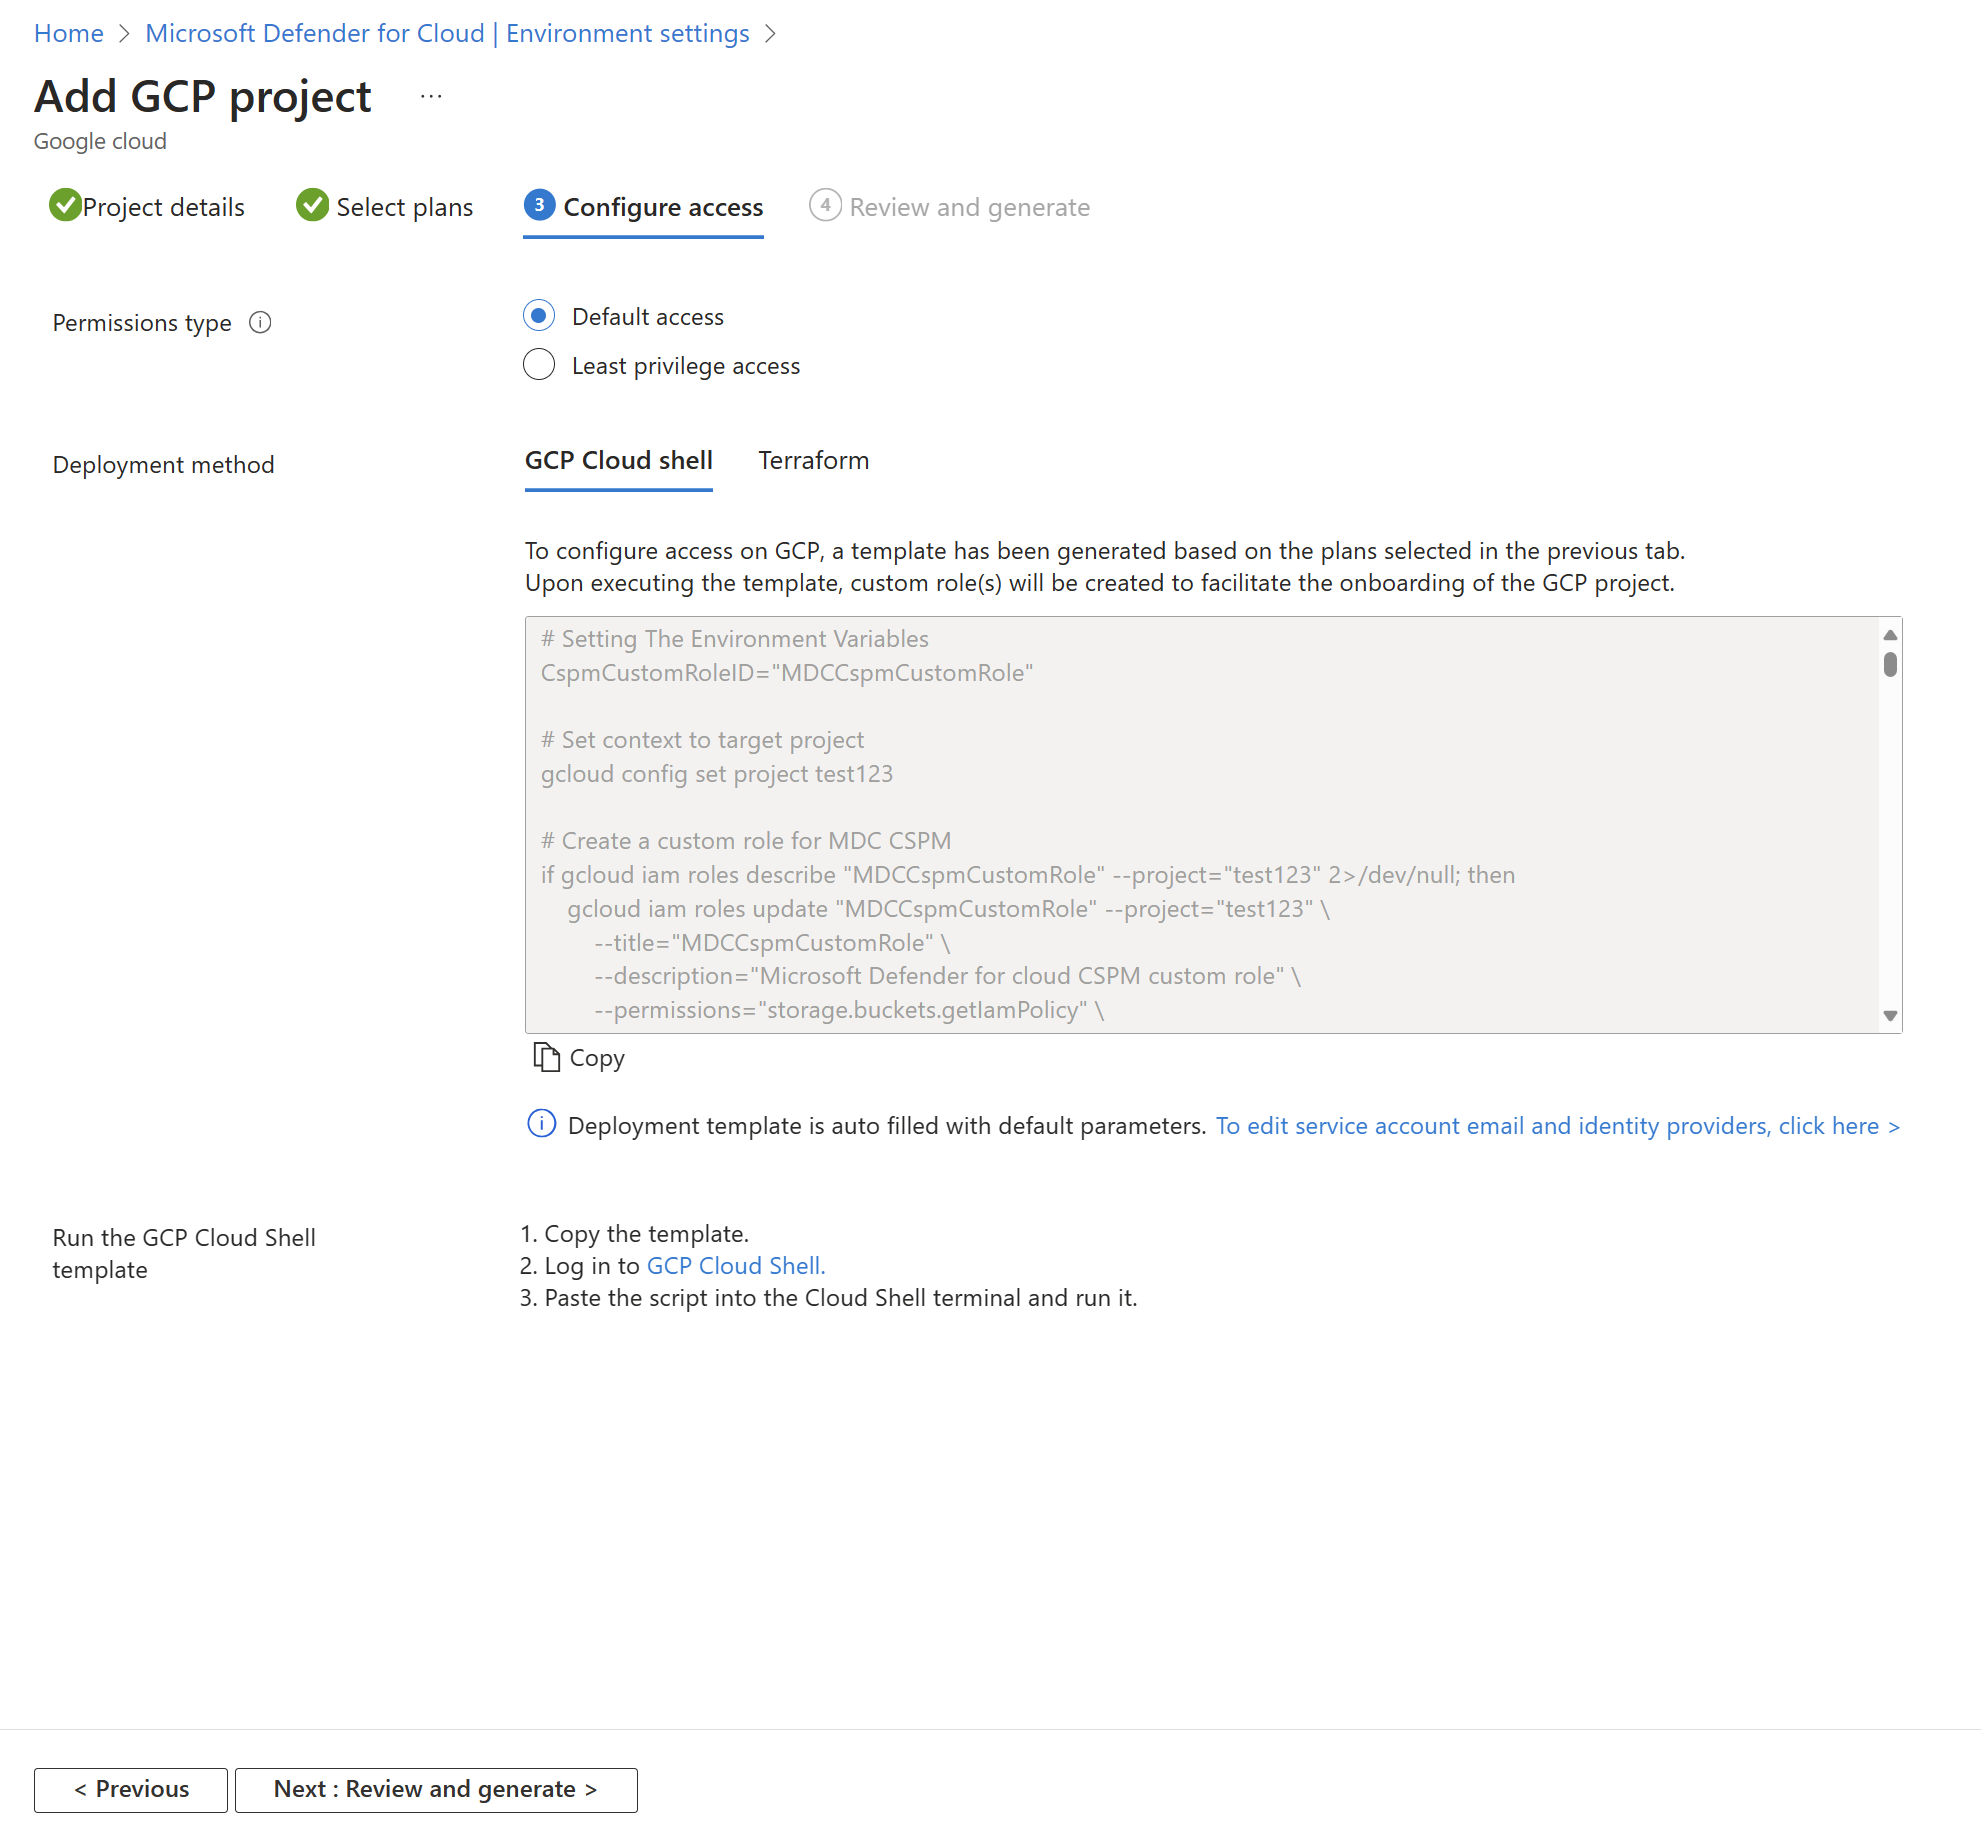
Select the Copy button.
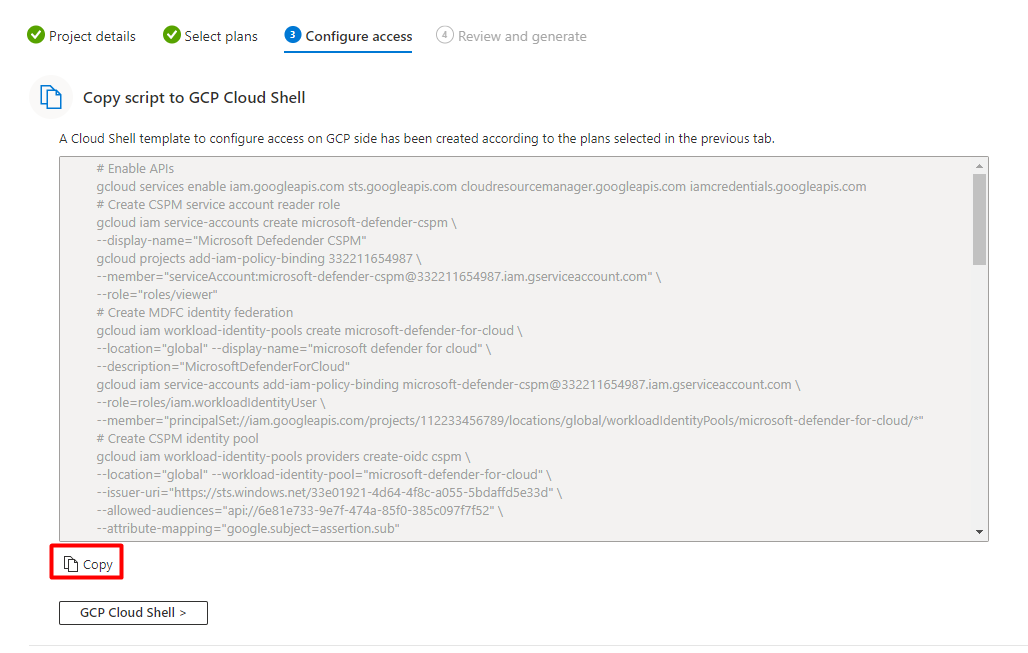
Select the GCP Cloud Shell > button.
Paste the script into the Cloud Shell terminal, and run it.


The connector will update after the script executes. This process can take up to 6-8 hours up to complete.
Deploy the solution to specific clusters
If you disabled any of the default auto provisioning configurations to Off, during the GCP connector onboarding process, or afterwards. You'll need to manually install Azure Arc-enabled Kubernetes, the Defender sensor, and the Azure Policy for Kubernetes to each of your GKE clusters to get the full security value out of Defender for Containers.
There are 2 dedicated Defender for Cloud recommendations you can use to install the extensions (and Arc if necessary):
GKE clusters should have Microsoft Defender's extension for Azure Arc installedGKE clusters should have the Azure Policy extension installed
Note
When installing Arc extensions, you must verify that the GCP project provided is identical to the one in the relevant connector.
To deploy the solution to specific clusters:
Sign in to the Azure portal.
Navigate to Microsoft Defender for Cloud > Recommendations.
From Defender for Cloud's Recommendations page, search for one of the recommendations by name.
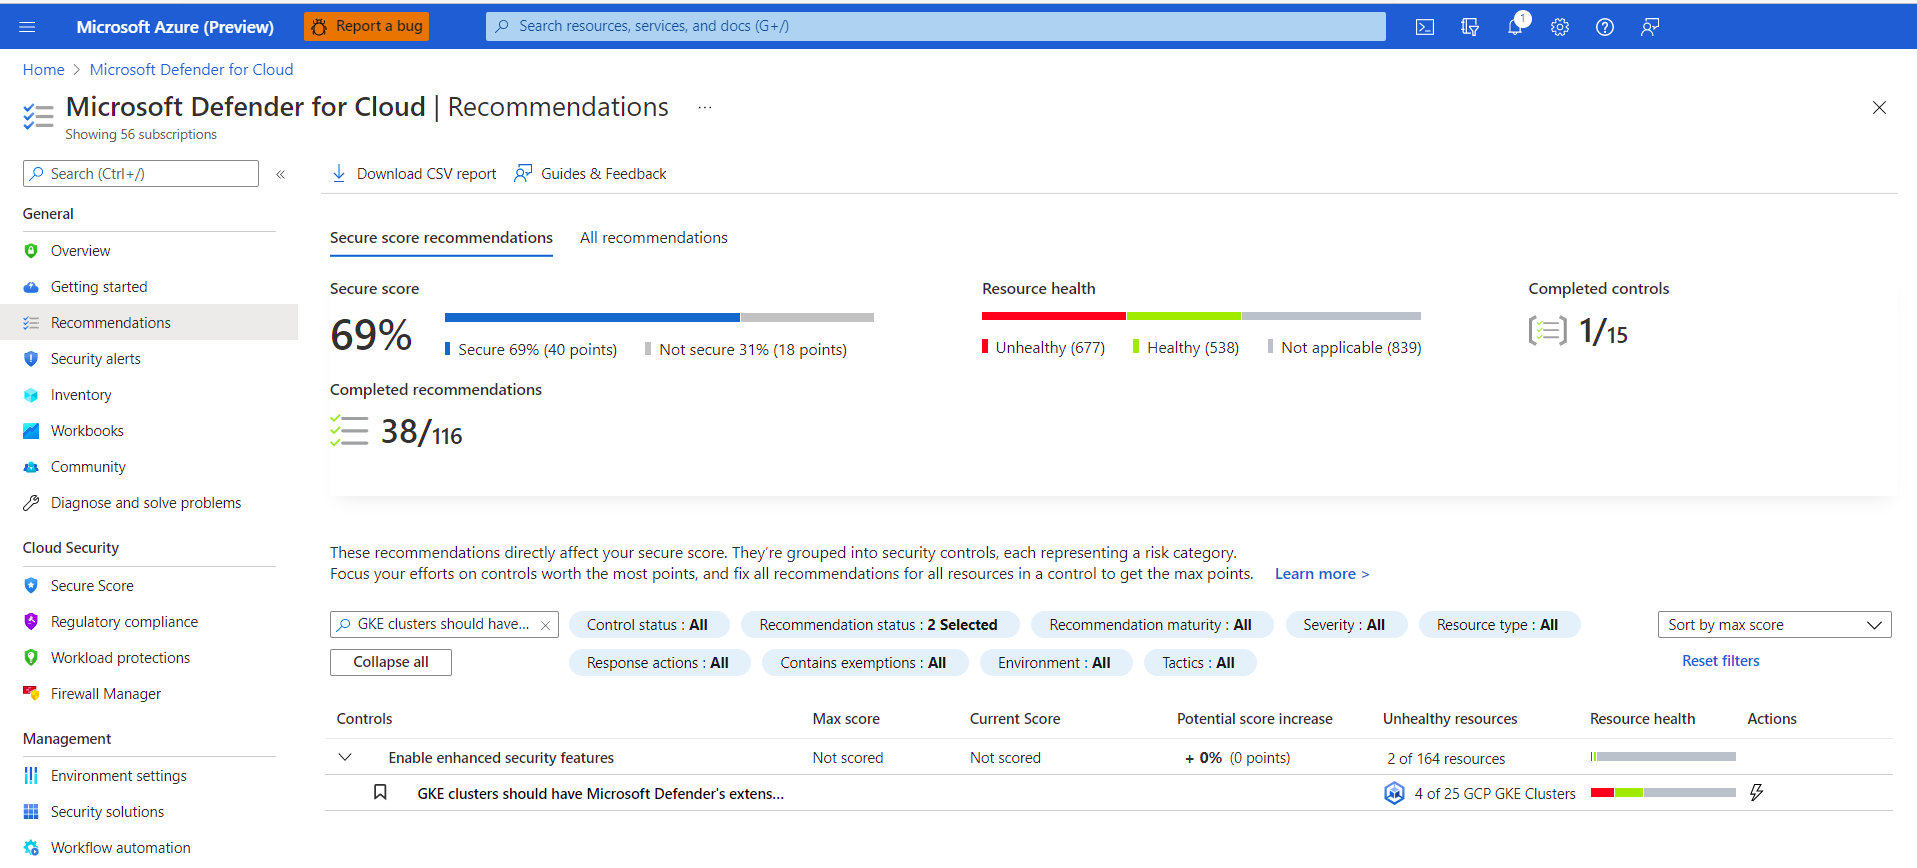
Select an unhealthy GKE cluster.
Important
You must select the clusters one at a time.
Don't select the clusters by their hyperlinked names: select anywhere else in the relevant row.
Select the name of the unhealthy resource.
Select Fix.

Defender for Cloud will generate a script in the language of your choice:
- For Linux, select Bash.
- For Windows, select PowerShell.
Select Download remediation logic.
Run the generated script on your cluster.
Repeat steps 3 through 8 for the second recommendation.

View your GKE cluster alerts
Sign in to the Azure portal.
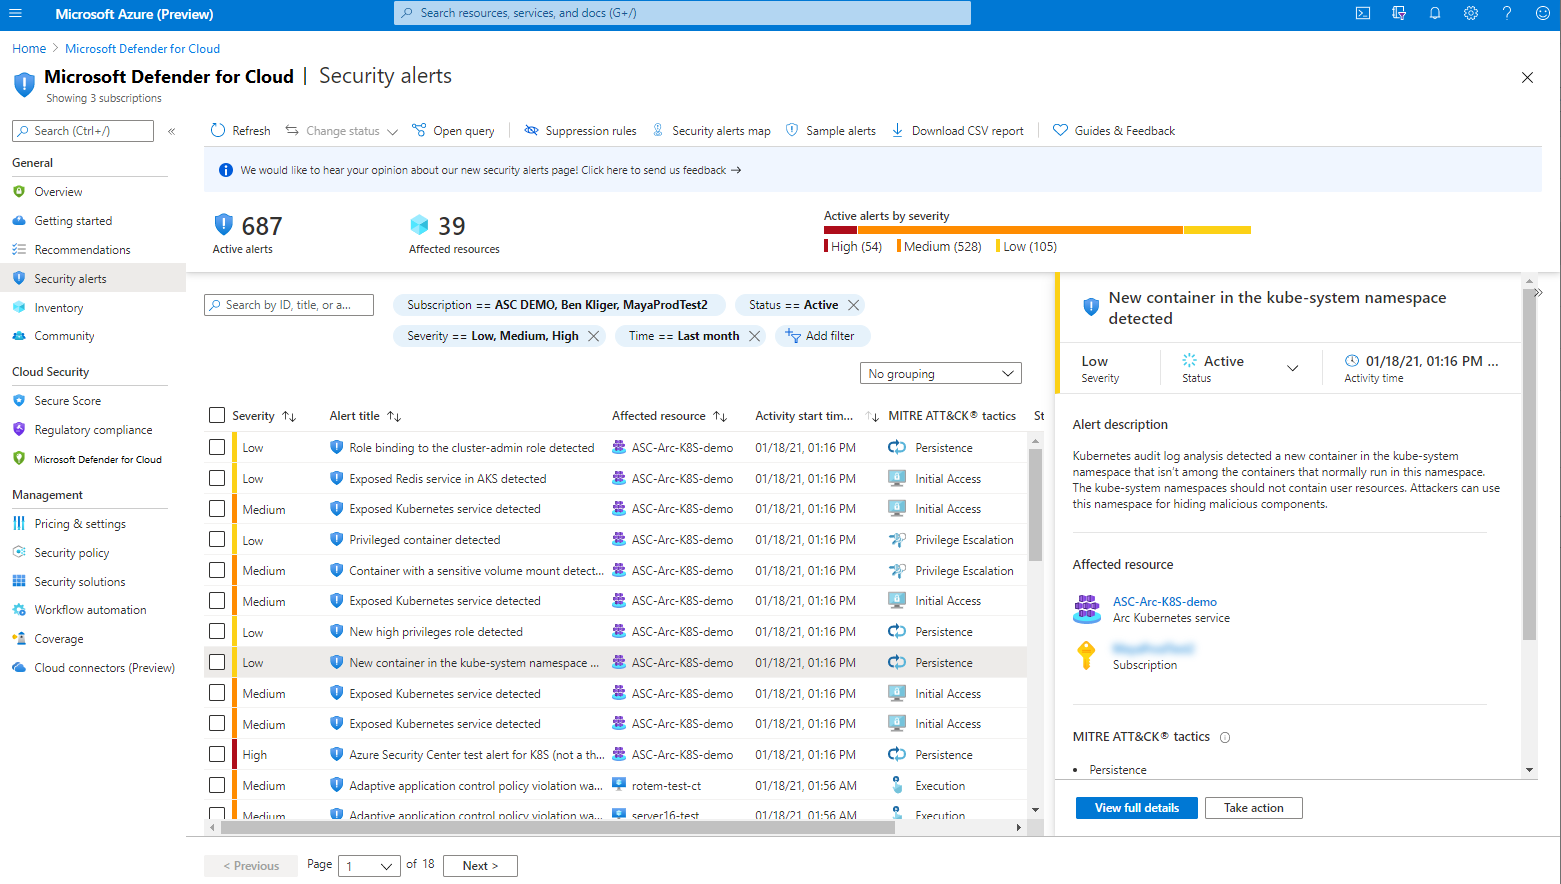
Navigate to Microsoft Defender for Cloud > Security alerts.
Select the
 button.
In the Filter dropdown menu, select Resource type.
In the Value dropdown menu, select GCP GKE Cluster.
Select Ok.
Deploying the Defender sensor
To deploy the Defender sensor on your GCP clusters, follow these steps:
Go to Microsoft Defender for Cloud -> Environment settings -> Add environment -> Google Cloud Platform.
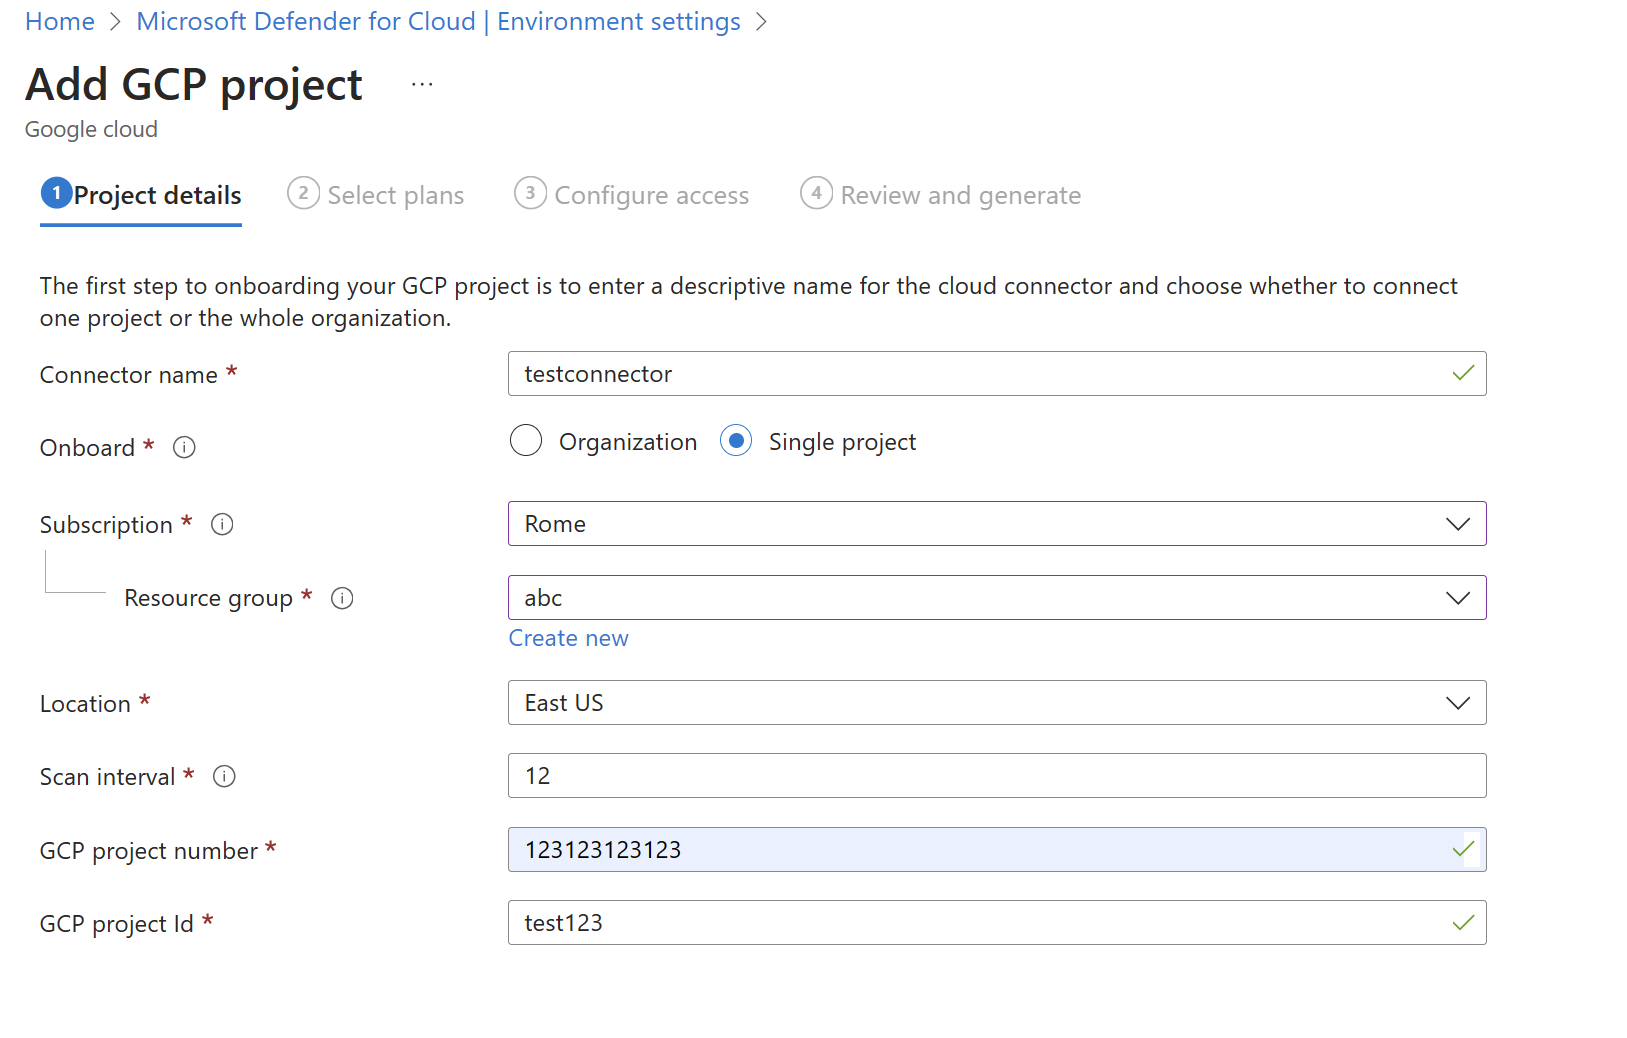
Fill in the account details.
Go to Select plans, open the Containers plan, and make sure Auto provision Defender's sensor for Azure Arc is set to on.
Go to Configure access and follow the steps there.
After the gcloud script ran successfully, select Create.


Note
You can exclude a specific GCP cluster from autoprovisioning. For sensor deployment, apply the ms_defender_container_exclude_agents label on the resource with the value true. For agentless deployment, apply the ms_defender_container_exclude_agentless label on the resource with the value true.
Simulate security alerts from Microsoft Defender for Containers
A full list of supported alerts is available in the reference table of all Defender for Cloud security alerts.
To simulate a security alert, run the following command from the cluster:
kubectl get pods --namespace=asc-alerttest-662jfi039nThe expected response is
No resource found.Within 30 minutes, Defender for Cloud detects this activity and trigger a security alert.
Note
To simulate agentless alerts for Defender for Containers, Azure Arc isn't a prerequisite.
In the Azure portal, open Microsoft Defender for Cloud's security alerts page and look for the alert on the relevant resource:

Remove the Defender sensor
To remove this - or any - Defender for Cloud extension, it's not enough to turn off auto provisioning:
- Enabling auto provisioning, potentially impacts existing and future machines.
- Disabling auto provisioning for an extension, only affects the future machines - nothing is uninstalled by disabling auto provisioning.
Note
To turn off the Defender for Containers plan entirely, go to Environment settings and disable the Microsoft Defender for Containers plan.
Nevertheless, to ensure the Defender for Containers components aren't automatically provisioned to your resources from now on, disable auto provisioning of the extensions as explained in Configure auto provisioning for agents and extensions from Microsoft Defender for Cloud.
You can remove the extension using Azure portal, Azure CLI, or REST API as explained in the tabs below.
Use Azure portal to remove the extension
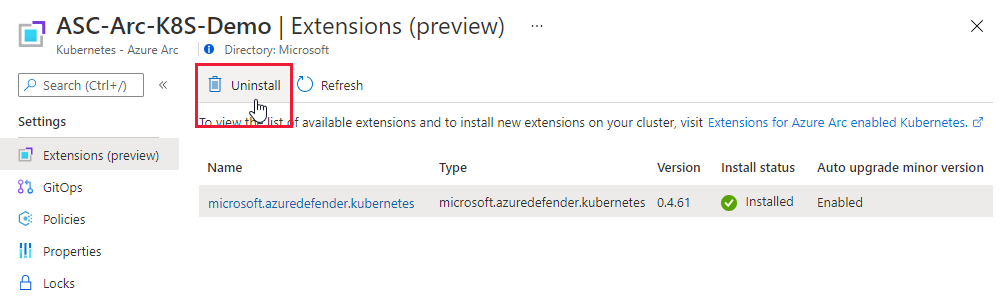
From the Azure portal, open Azure Arc.
From the infrastructure list, select Kubernetes clusters and then select the specific cluster.
Open the extensions page. The extensions on the cluster are listed.
Select the cluster and select Uninstall.

Default Log Analytics workspace for AKS
The Log Analytics workspace is used by the Defender sensor as a data pipeline to send data from the cluster to Defender for Cloud without retaining any data in the Log Analytics workspace itself. As a result, users won't be billed in this use case.
The Defender sensor uses a default Log Analytics workspace. If you don't already have a default Log Analytics workspace, Defender for Cloud will create a new resource group and default workspace when the Defender sensor is installed. The default workspace is created based on your region.
The naming convention for the default Log Analytics workspace and resource group is:
- Workspace: DefaultWorkspace-[subscription-ID]-[geo]
- Resource Group: DefaultResourceGroup-[geo]
Assign a custom workspace
When you enable the auto-provision option, a default workspace will be automatically assigned. You can assign a custom workspace through Azure Policy.
To check if you have a workspace assigned:
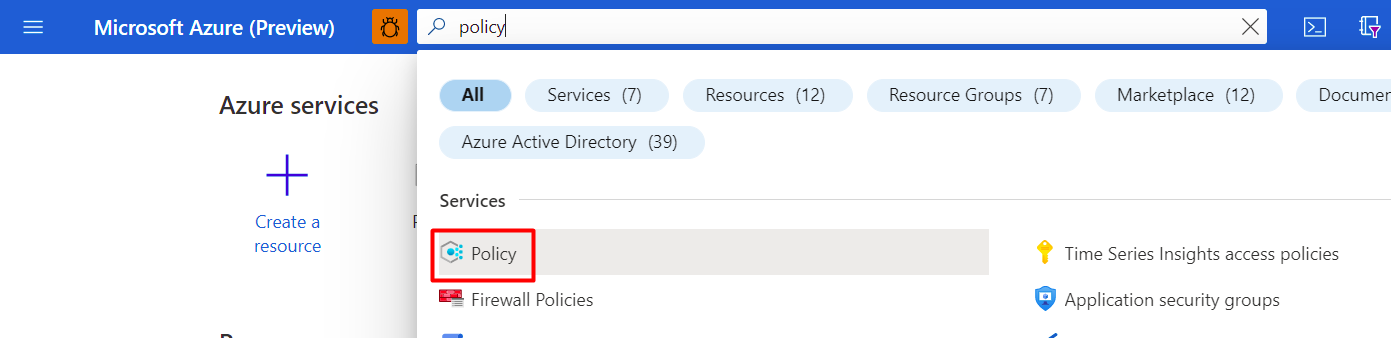
Sign in to the Azure portal.
Search for and select Policy.
Select Definitions.
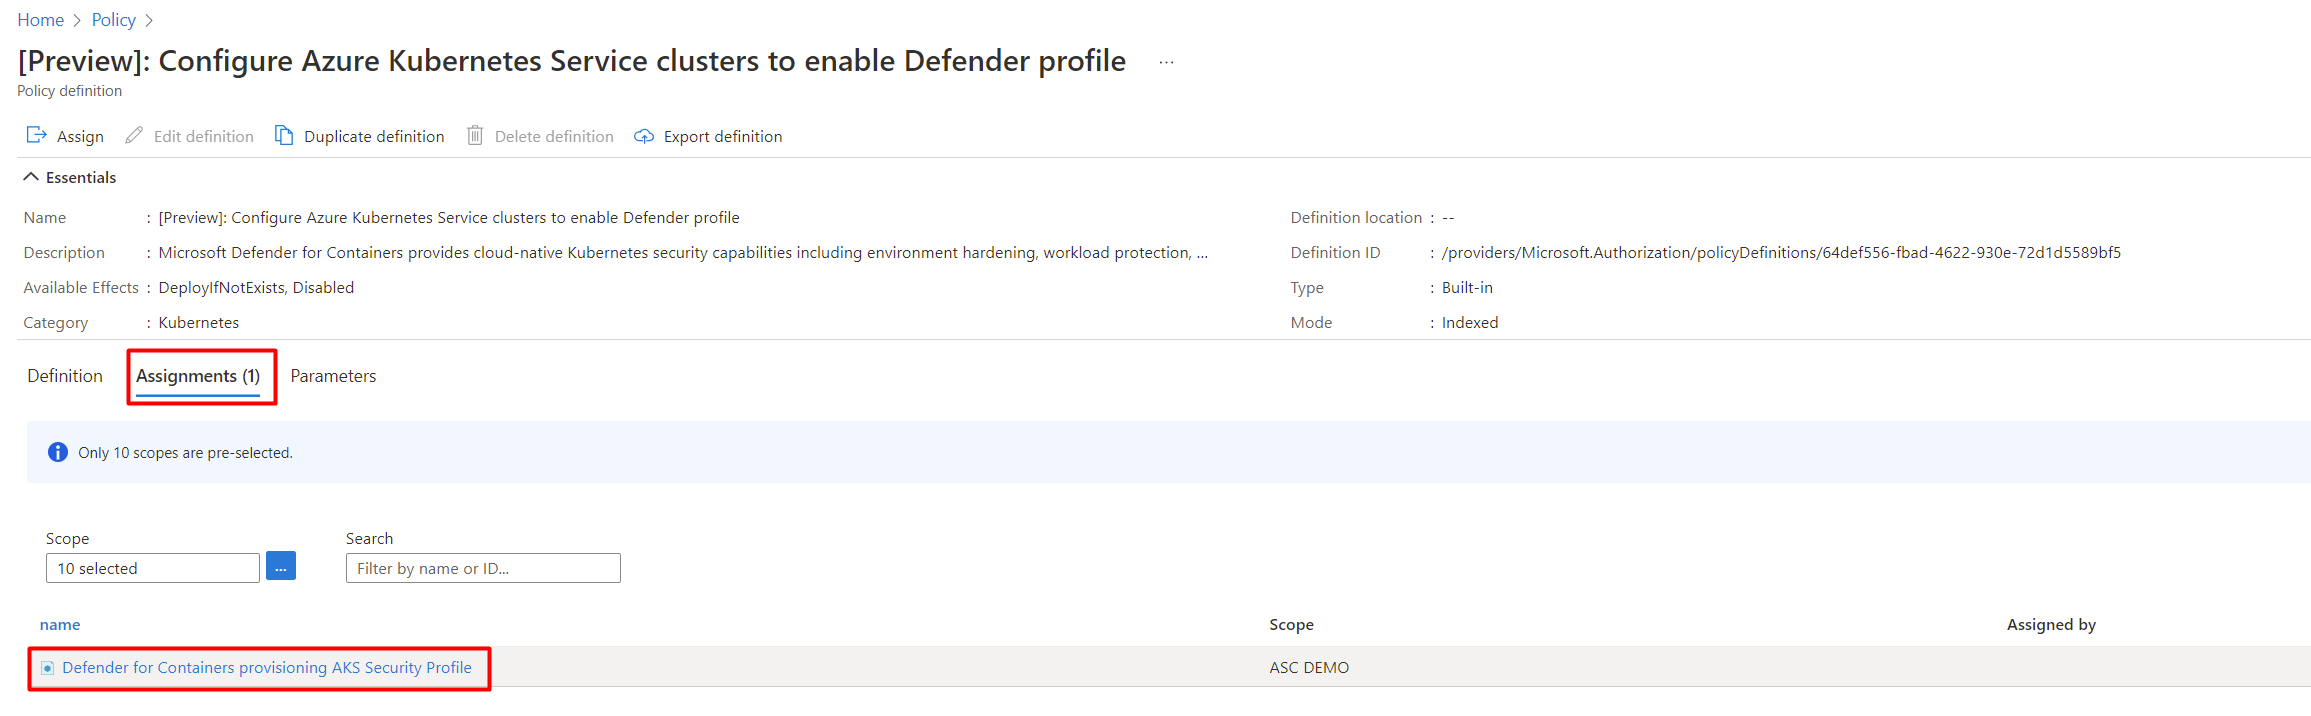
Search for policy ID
64def556-fbad-4622-930e-72d1d5589bf5.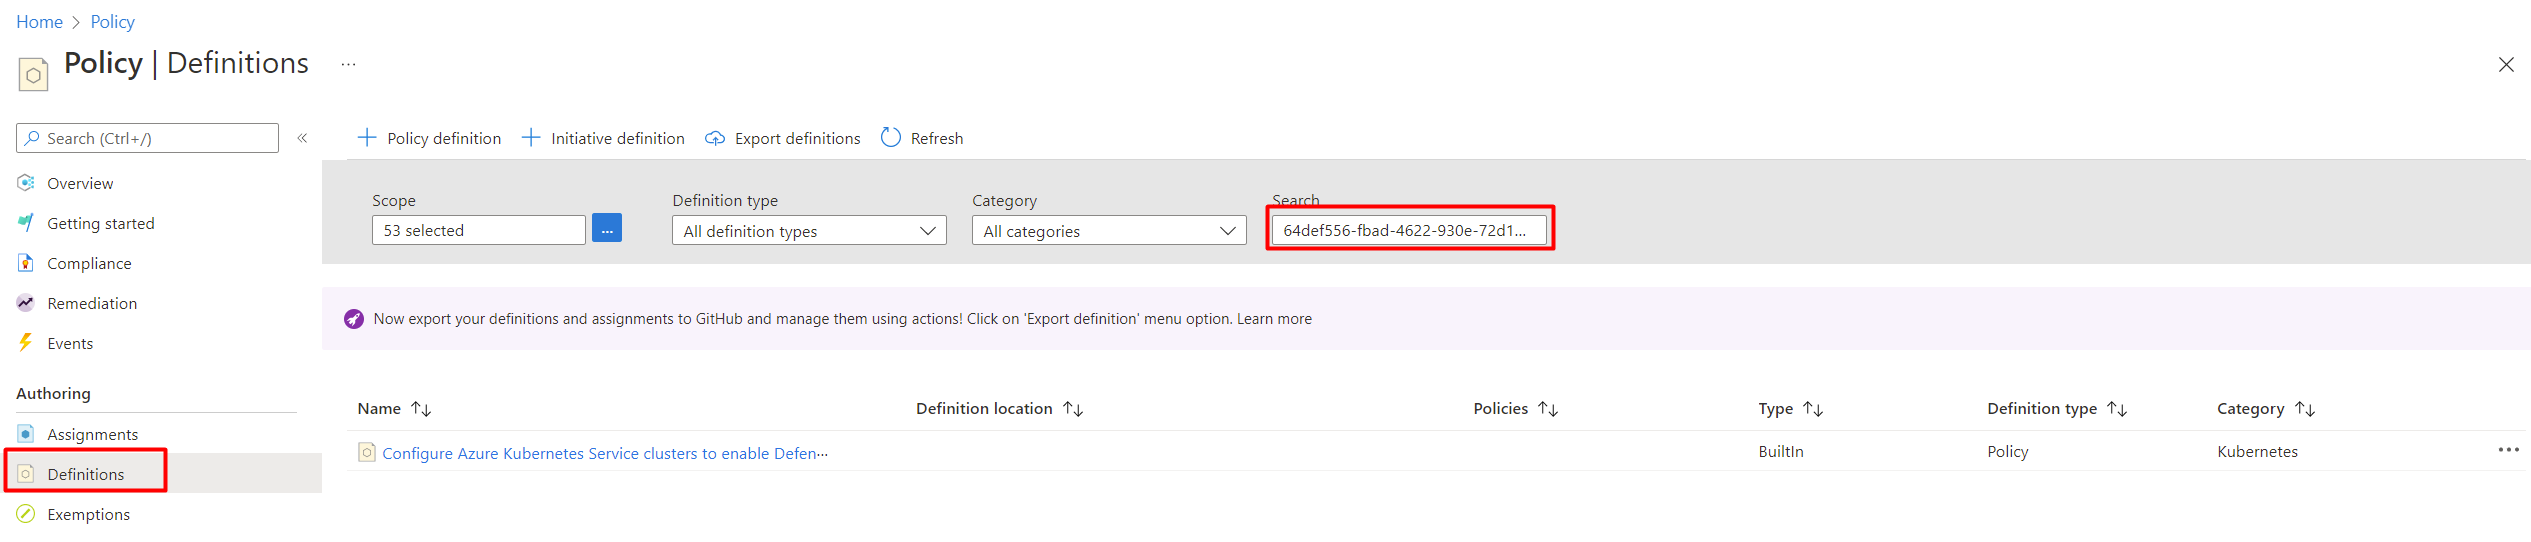
Select Configure Azure Kubernetes Service clusters to enable Defender profile.
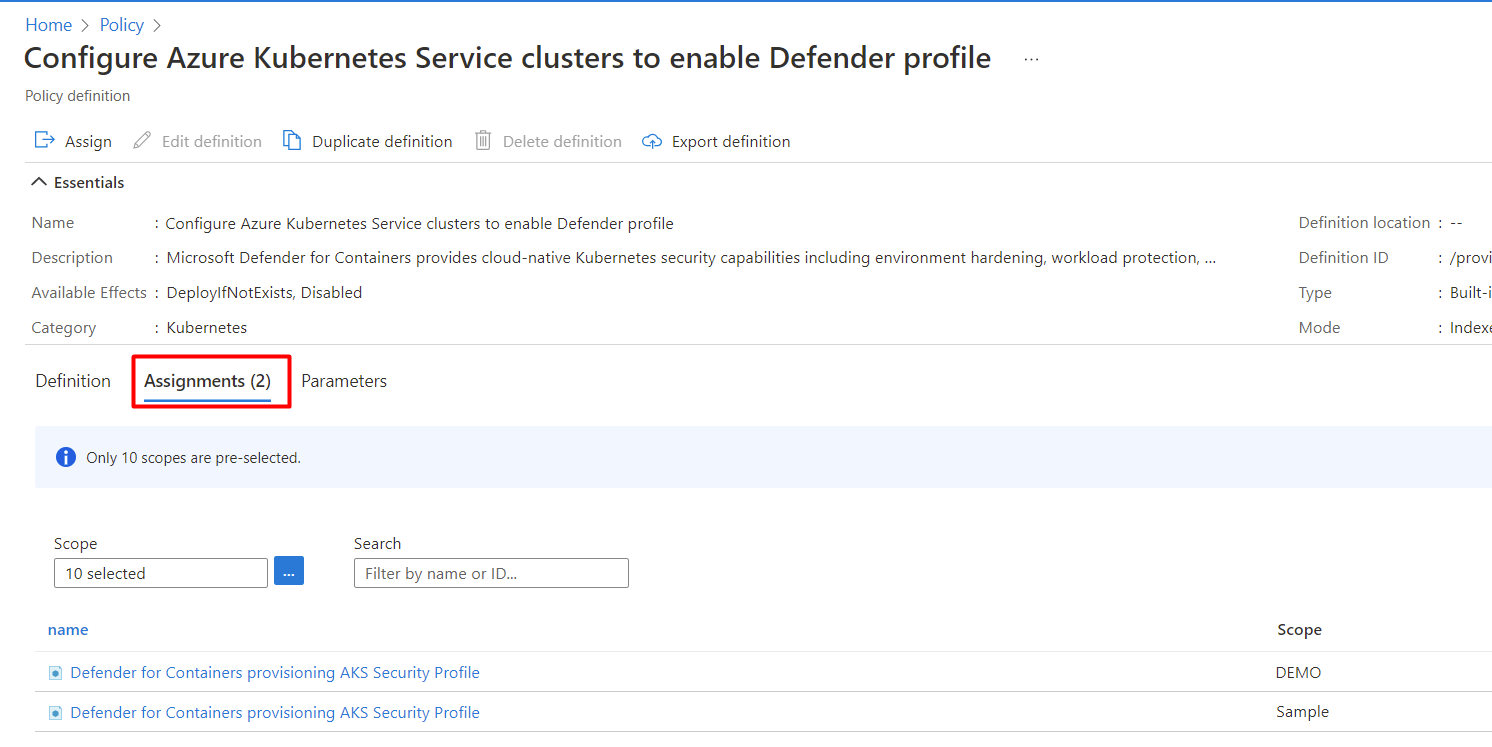
Select Assignment.
Follow the Create a new assignment with custom workspace steps if the policy hasn't yet been assigned to the relevant scope. Or, follow the Update assignment with custom workspace steps if the policy is already assigned and you want to change it to use a custom workspace.


Create a new assignment with custom workspace
If the policy hasn't been assigned, you'll see Assignments (0).

To assign custom workspace:
Select Assign.
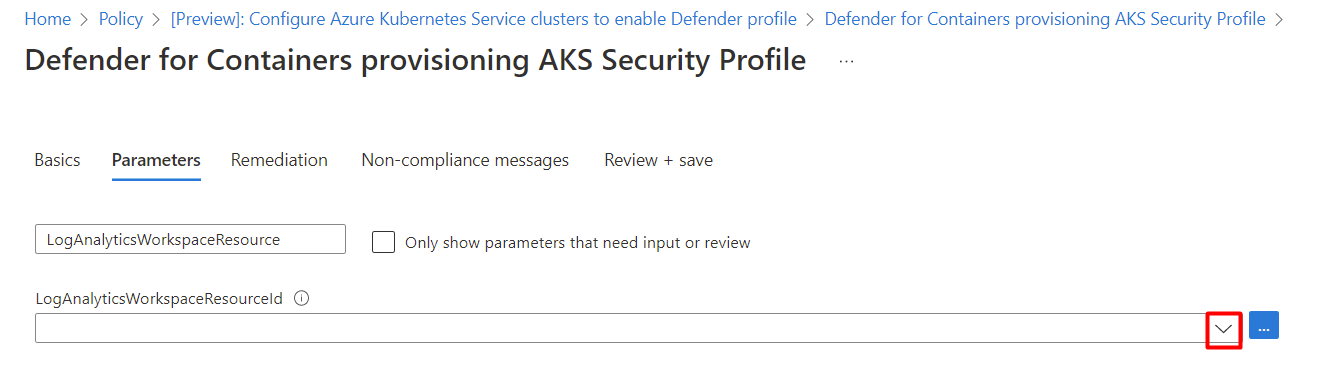
In the Parameters tab, deselect the Only show parameters that need input or review option.
Select a LogAnalyticsWorkspaceResource ID from the dropdown menu.
Select Review + create.
Select Create.

Update assignment with custom workspace
If the policy has already been assigned to a workspace, you'll see Assignments (1).

Note
If you have more than one subscription the number might be higher.
To assign custom workspace:
Select the relevant assignment.
Select Edit assignment.
In the Parameters tab, deselect the Only show parameters that need input or review option.
Select a LogAnalyticsWorkspaceResource ID from the dropdown menu.
Select Review + save.
Select Save.

Default Log Analytics workspace for Arc
The Log Analytics workspace is used by the Defender sensor as a data pipeline to send data from the cluster to Defender for Cloud without retaining any data in the Log Analytics workspace itself. As a result, users won't be billed in this use case.
The Defender sensor uses a default Log Analytics workspace. If you don't already have a default Log Analytics workspace, Defender for Cloud will create a new resource group and default workspace when the Defender sensor is installed. The default workspace is created based on your region.
The naming convention for the default Log Analytics workspace and resource group is:
- Workspace: DefaultWorkspace-[subscription-ID]-[geo]
- Resource Group: DefaultResourceGroup-[geo]
Assign a custom workspace
When you enable the auto-provision option, a default workspace will be automatically assigned. You can assign a custom workspace through Azure Policy.
To check if you have a workspace assigned:
Sign in to the Azure portal.
Search for, and select Policy.
Select Definitions.
Search for policy ID
708b60a6-d253-4fe0-9114-4be4c00f012c.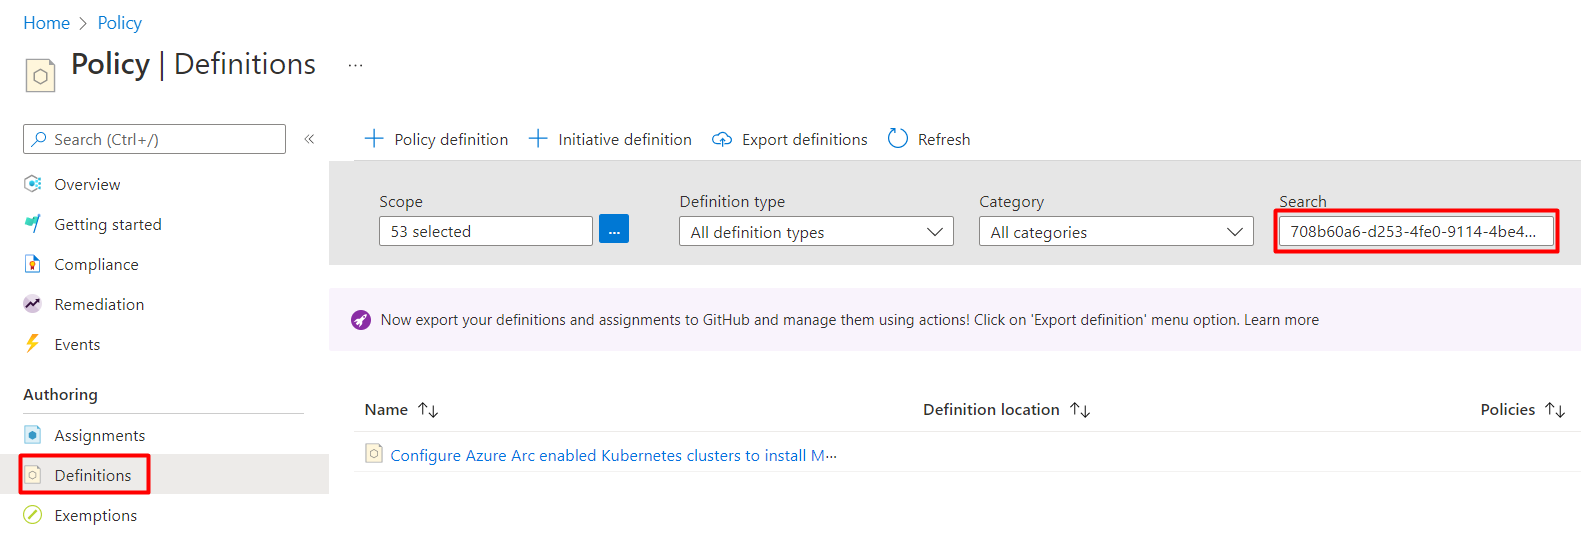
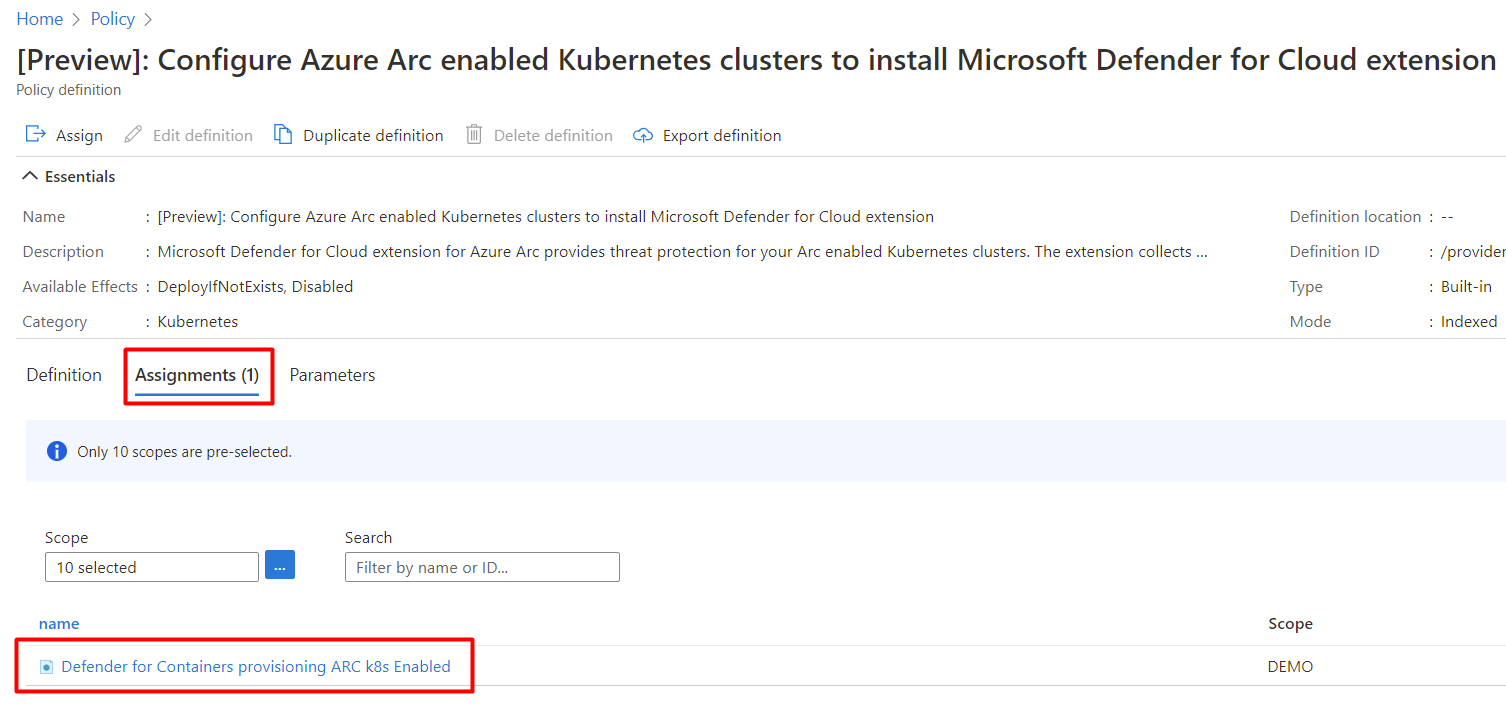
Select Configure Azure Arc enabled Kubernetes clusters to install Microsoft Defender for Cloud extension..
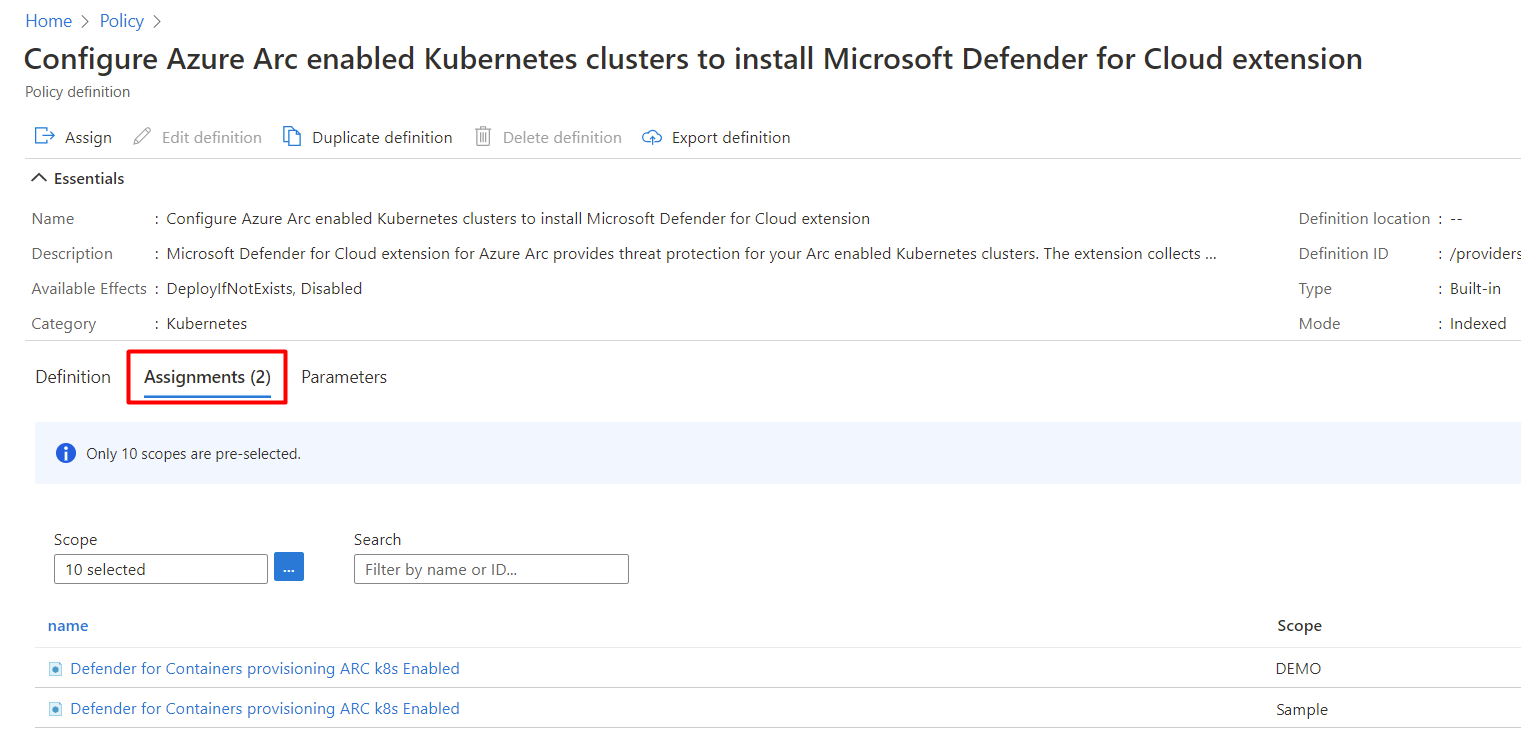
Select Assignments.
Follow the Create a new assignment with custom workspace steps if the policy hasn't yet been assigned to the relevant scope. Or, follow the Update assignment with custom workspace steps if the policy is already assigned and you want to change it to use a custom workspace.


Create a new assignment with custom workspace
If the policy hasn't been assigned, you'll see Assignments (0).

To assign custom workspace:
Select Assign.
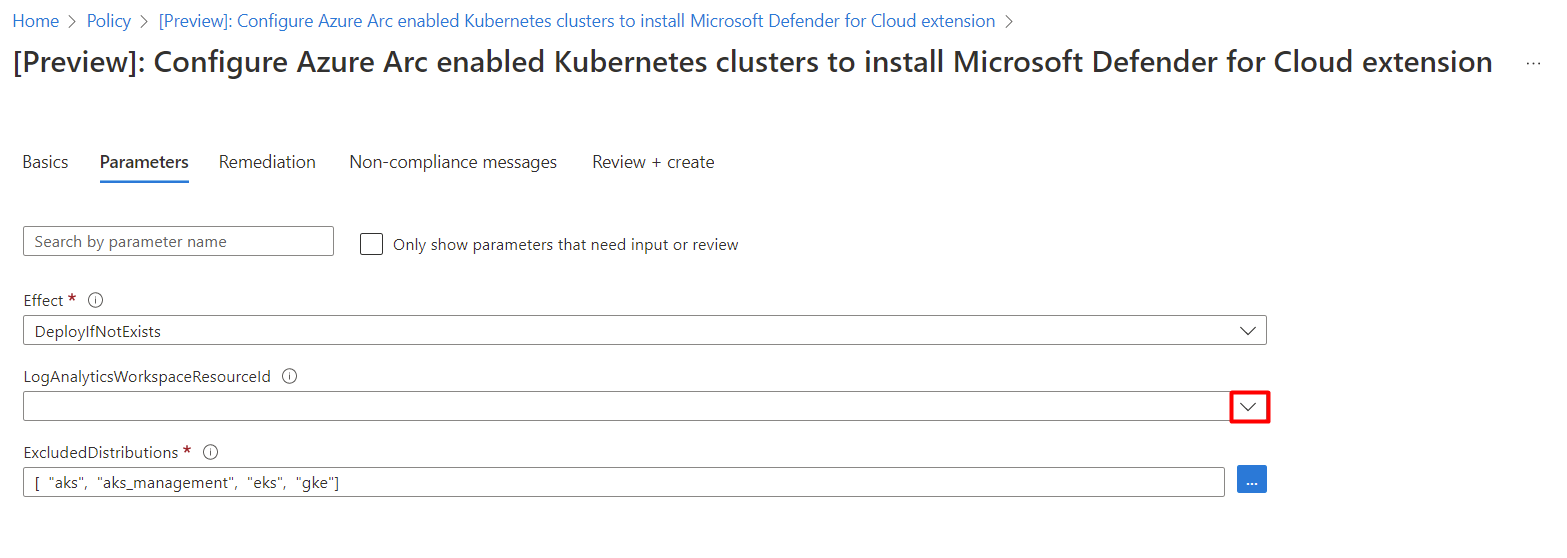
In the Parameters tab, deselect the Only show parameters that need input or review option.
Select a LogAnalyticsWorkspaceResource ID from the dropdown menu.
Select Review + create.
Select Create.

Update assignment with custom workspace
If the policy has already been assigned to a workspace, you'll see Assignments (1).
Note
If you have more than one subscription the number might be higher. If you have a number 1 or higher, the assignment might still not be on the relevant scope. If this is the case, you will want to follow the Create a new assignment with custom workspace steps.

To assign custom workspace:
Select the relevant assignment.
Select Edit assignment.
In the Parameters tab, deselect the Only show parameters that need input or review option.
Select a LogAnalyticsWorkspaceResource ID from the dropdown menu.
Select Review + save.
Select Save.

Remove the Defender sensor
To remove this - or any - Defender for Cloud extension, it's not enough to turn off auto provisioning:
- Enabling auto provisioning, potentially impacts existing and future machines.
- Disabling auto provisioning for an extension, only affects the future machines - nothing is uninstalled by disabling auto provisioning.
Note
To turn off the Defender for Containers plan entirely, go to Environment settings and disable the Microsoft Defender for Containers plan.
Nevertheless, to ensure the Defender for Containers components aren't automatically provisioned to your resources from now on, disable auto provisioning of the extensions as explained in Configure auto provisioning for agents and extensions from Microsoft Defender for Cloud.
You can remove the extension using the REST API or a Resource Manager template as explained in the tabs below.
Use REST API to remove the Defender sensor from AKS
To remove the extension using the REST API, run the following PUT command:
https://management.azure.com/subscriptions/{{SubscriptionId}}/resourcegroups/{{ResourceGroup}}/providers/Microsoft.ContainerService/managedClusters/{{ClusterName}}?api-version={{ApiVersion}}
| Name | Description | Mandatory |
|---|---|---|
| SubscriptionId | Cluster's subscription ID | Yes |
| ResourceGroup | Cluster's resource group | Yes |
| ClusterName | Cluster's name | Yes |
| ApiVersion | API version, must be >= 2022-06-01 | Yes |
Request body:
{
  "location": "{{Location}}",
  "properties": {
    "securityProfile": {
            "defender": {
                "securityMonitoring": {
                    "enabled": false
                }
            }
        }
    }
}
Request body parameters:
| Name | Description | Mandatory |
|---|---|---|
| location | Cluster's location | Yes |
| properties.securityProfile.defender.securityMonitoring.enabled | Determines whether to enable or disable Microsoft Defender for Containers on the cluster | Yes |
Learn more
You can check out the following blogs:
- Protect your Google Cloud workloads with Microsoft Defender for Cloud
- Introducing Microsoft Defender for Containers
- A new name for multicloud security: Microsoft Defender for Cloud
Next steps
Now that you enabled Defender for Containers, you can:
Feedback
Coming soon: Throughout 2024 we will be phasing out GitHub Issues as the feedback mechanism for content and replacing it with a new feedback system. For more information see: https://aka.ms/ContentUserFeedback.
Submit and view feedback for