Enable agentless scanning for VMs
Agentless scanning provides visibility into installed software and software vulnerabilities on your workloads to extend vulnerability assessment coverage to server workloads without a vulnerability assessment agent installed.
Agentless vulnerability assessment uses the Microsoft Defender Vulnerability Management engine to assess vulnerabilities in the software installed on your VMs, without requiring Defender for Endpoint to be installed. Vulnerability assessment shows software inventory and vulnerability results in the same format as the agent-based assessments.
Compatibility with agent-based vulnerability assessment solutions
Defender for Cloud already supports different agent-based vulnerability scans, including Microsoft Defender Vulnerability Management (MDVM), BYOL and Qualys. Agentless scanning extends the visibility of Defender for Cloud to reach more devices.
When you enable agentless vulnerability assessment:
If you have no existing integrated vulnerability assessment solutions enabled on any of your VMs on your subscription, Defender for Cloud automatically enables MDVM by default.
If you select Microsoft Defender Vulnerability Management as part of an integration with Microsoft Defender for Endpoint, Defender for Cloud shows a unified and consolidated view that optimizes coverage and freshness.
- Machines covered by just one of the sources (Defender Vulnerability Management or agentless) show the results from that source.
- Machines covered by both sources show the agent-based results only for increased freshness.
If you select Vulnerability assessment with Qualys or BYOL integrations - Defender for Cloud shows the agent-based results by default. Results from the agentless scan are shown for machines that don't have an agent installed or from machines that aren't reporting findings correctly.
To change the default behavior to always display results from MDVM (regardless if a third-party agent solution), select the Microsoft Defender Vulnerability Management setting in the vulnerability assessment solution.
Enabling agentless scanning for machines
When you enable Defender Cloud Security Posture Management (CSPM) or Defender for Servers P2, agentless scanning is enabled on by default.
If you have Defender for Servers P2 already enabled and agentless scanning is turned off, you need to turn on agentless scanning manually.
You can enable agentless scanning on
Note
Agentless malware scanning is only available if you have enabled Defender for Servers plan 2
Agentless vulnerability assessment on Azure
To enable agentless vulnerability assessment on Azure:
From Defender for Cloud's menu, open Environment settings.
Select the relevant subscription.
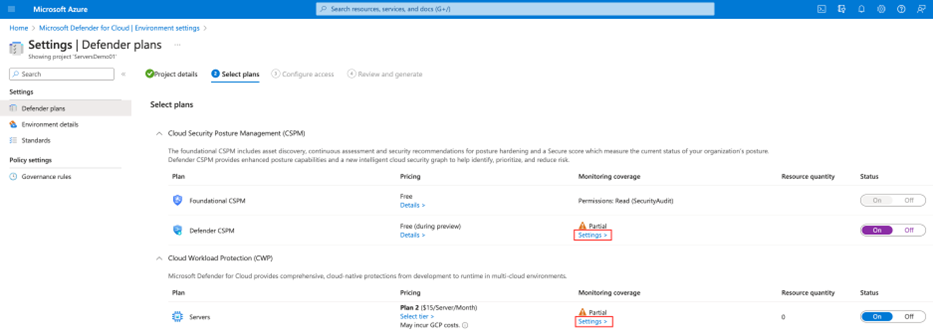
For either the Defender Cloud Security Posture Management (CSPM) or Defender for Servers P2 plan, select Settings.
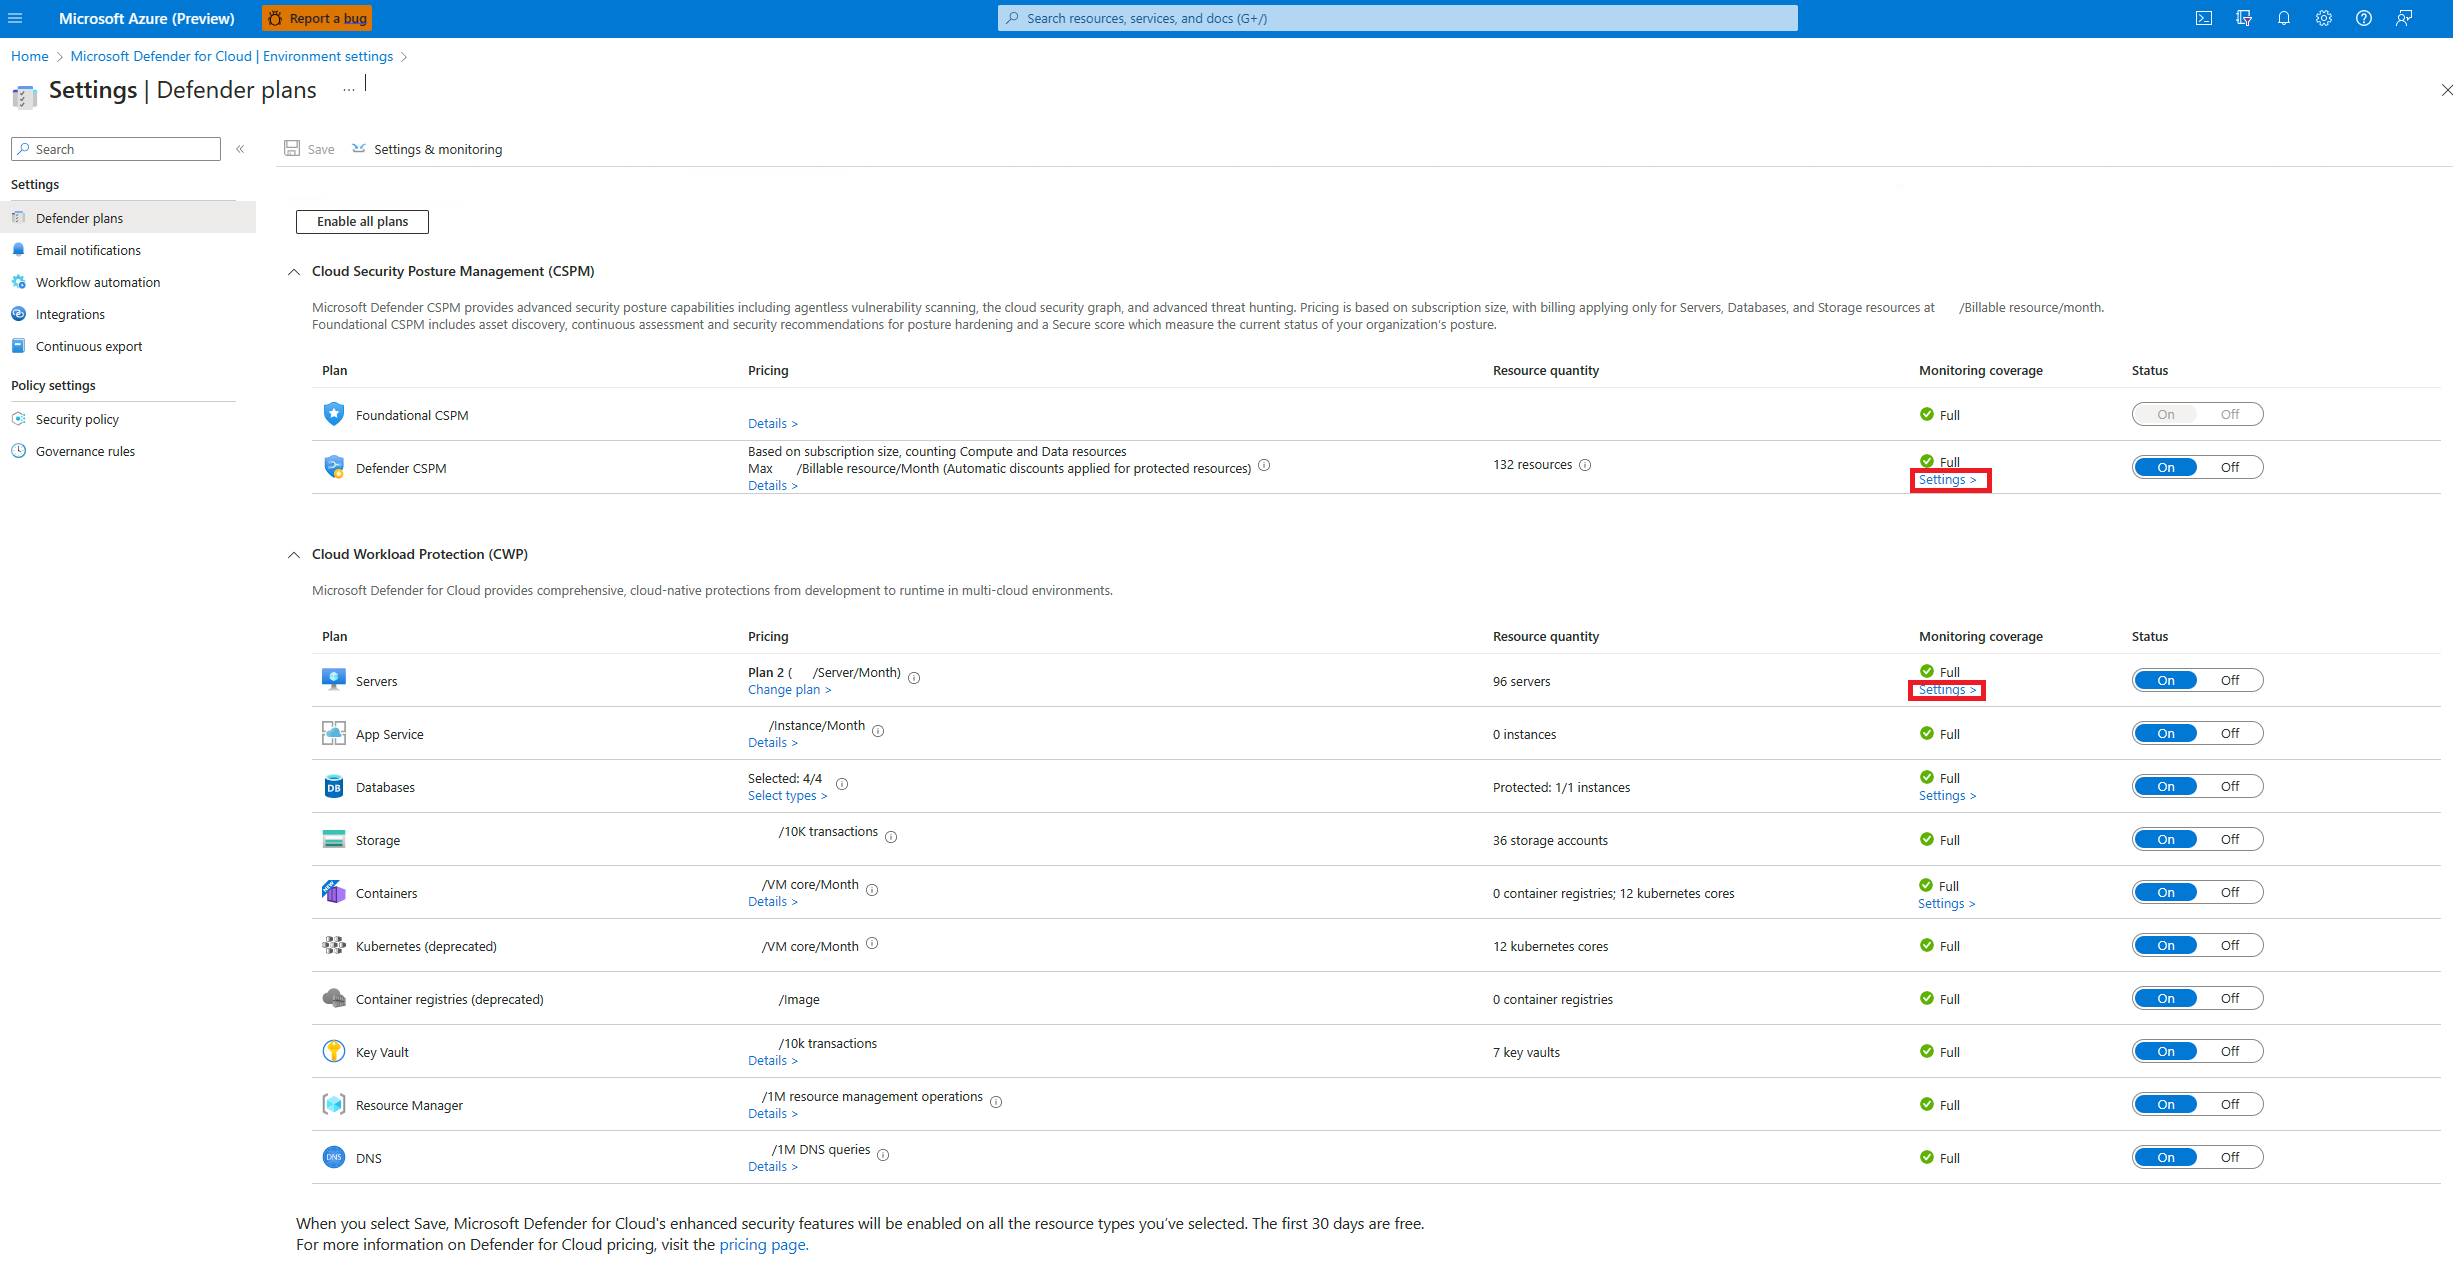
The agentless scanning settings are shared by both Defender Cloud Security Posture Management (CSPM) or Defender for Servers P2. When you enable agentless scanning on either plan, the setting is enabled for both plans.
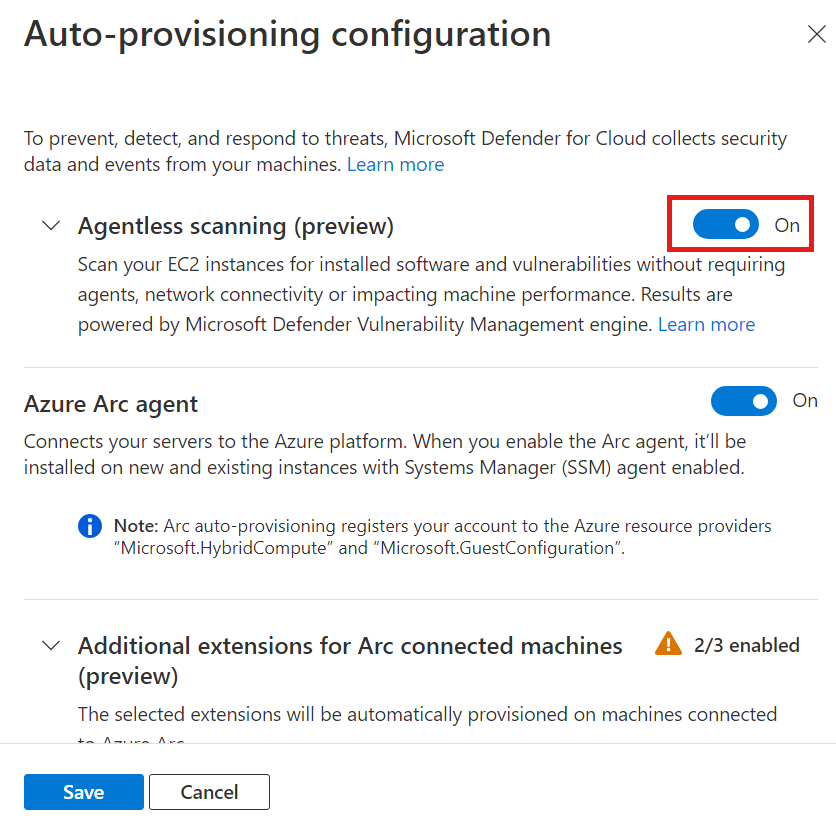
In the settings pane, turn on Agentless scanning for machines.
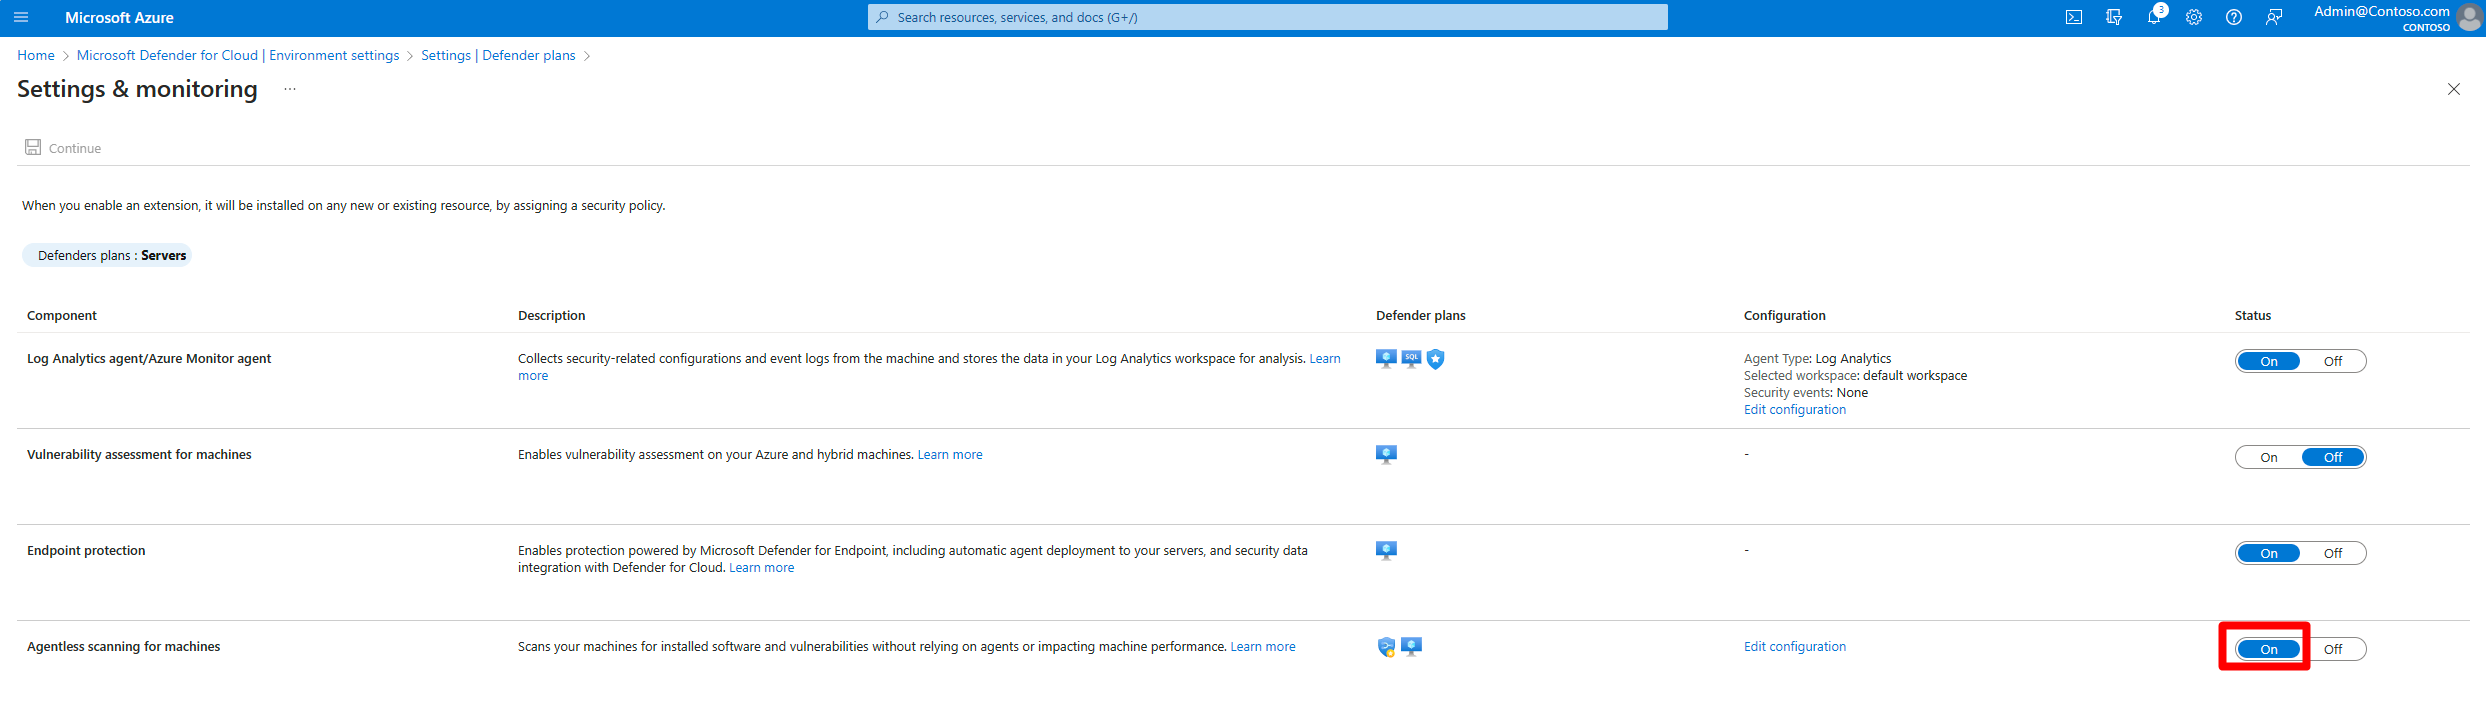
Select Save.


To enable scanning of CMK encrypted disks in Azure (preview):
For agentless scanning to cover Azure VMs with CMK encrypted disks, you need to grant Defender for Cloud additional permissions to create a secure copy of these disks. To do so, additional permissions are needed on Key Vaults used for CMK encryption for your VMs.
To manually assign the permissions, follow the below instructions according to your Key Vault type:
- For Key Vaults using non-RBAC permissions, assign "Microsoft Defender for Cloud Servers Scanner Resource Provider" (
0c7668b5-3260-4ad0-9f53-34ed54fa19b2) these permissions: Key Get, Key Wrap, Key Unwrap. - For Key Vaults using RBAC permissions, assign "Microsoft Defender for Cloud Servers Scanner Resource Provider” (
0c7668b5-3260-4ad0-9f53-34ed54fa19b2) the Key Vault Crypto Service Encryption User built-in role.
To assign these permissions at scale, you can also use this script.
For more information, see agentless scanning permissions.
Agentless vulnerability assessment on AWS
From Defender for Cloud's menu, open Environment settings.
Select the relevant account.
For either the Defender Cloud Security Posture Management (CSPM) or Defender for Servers P2 plan, select Settings.
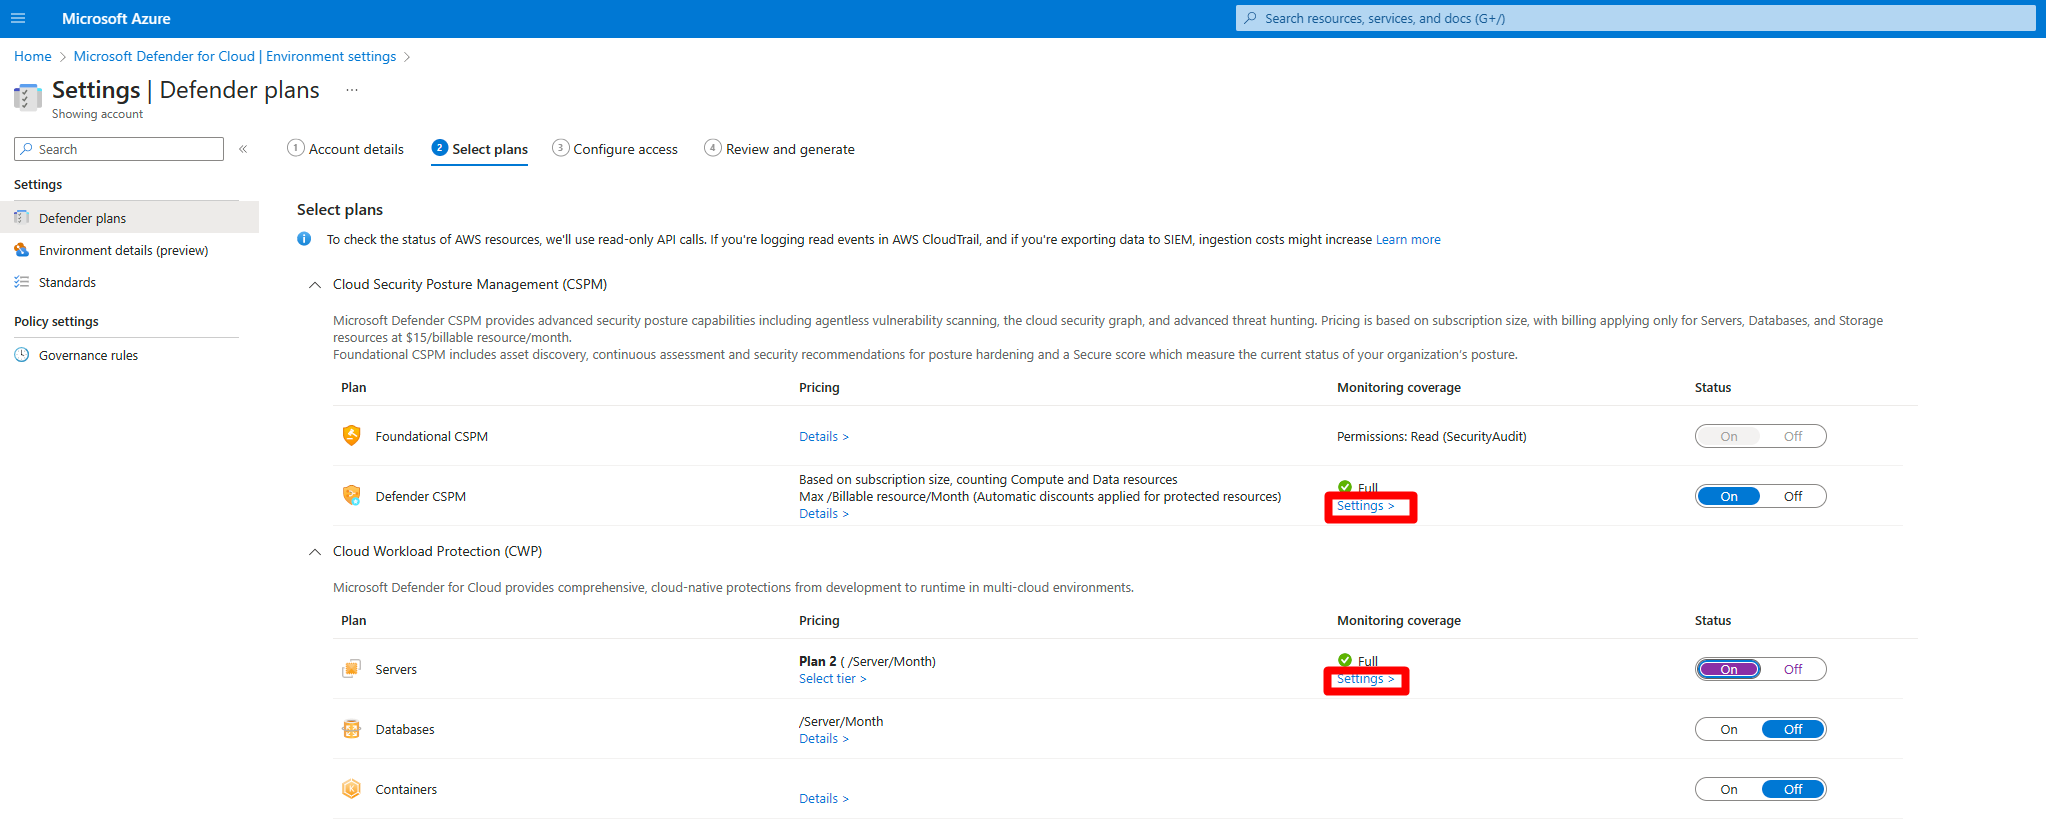
When you enable agentless scanning on either plan, the setting applies to both plans.
In the settings pane, turn on Agentless scanning for machines.
Select Save and Next: Configure Access.
Download the CloudFormation template.
Using the downloaded CloudFormation template, create the stack in AWS as instructed on screen. If you're onboarding a management account, you need to run the CloudFormation template both as Stack and as StackSet. Connectors will be created for the member accounts up to 24 hours after the onboarding.
Select Next: Review and generate.
Select Update.


After you enable agentless scanning, software inventory and vulnerability information are updated automatically in Defender for Cloud.
Enable agentless scanning in GCP
In Defender for Cloud, select Environment settings.
Select the relevant project or organization.
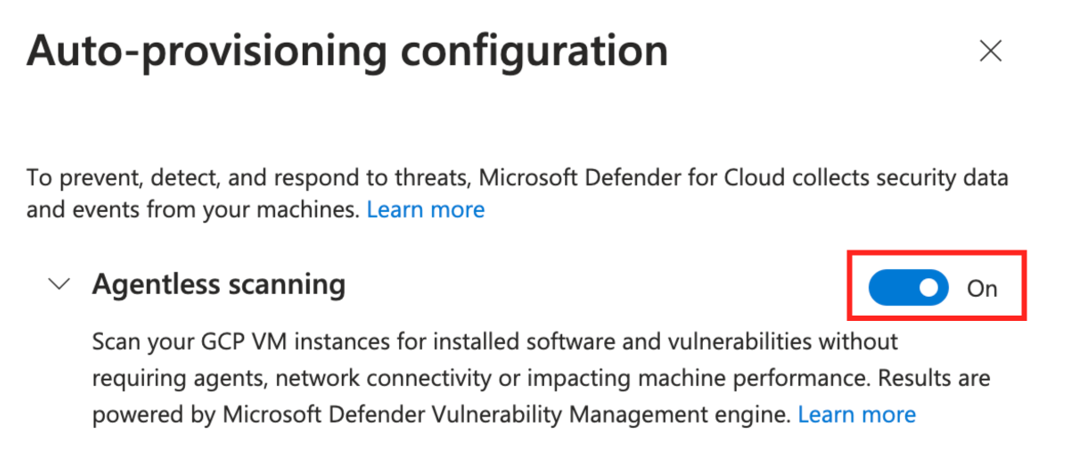
For either the Defender Cloud Security Posture Management (CSPM) or Defender for Servers P2 plan, select Settings.
Toggle Agentless scanning to On.
Select Save and Next: Configure Access.
Copy the onboarding script.
Run the onboarding script in the GCP organization/project scope (GCP portal or gcloud CLI).
Select Next: Review and generate.
Select Update.


Test the agentless malware scanner's deployment
Security alerts appear on the portal only in cases where threats are detected on your environment. If you do not have any alerts it may be because there are no threats on your environment. You can test to see that the device is properly onboarded and reporting to Defender for Cloud by creating a test file.
Create a test file for Linux
Open a terminal window on the VM.
Execute the following command:
# test string
TEST_STRING='$$89-barbados-dublin-damascus-notice-pulled-natural-31$$'

# File to be created
FILE_PATH="/tmp/virus_test_file.txt"

# Write the test string to the file
echo -n $TEST_STRING > $FILE_PATH

# Check if the file was created and contains the correct string
if [ -f "$FILE_PATH" ]; then
    if grep -Fq "$TEST_STRING" "$FILE_PATH"; then
        echo "Virus test file created and validated successfully."
    else
        echo "Virus test file does not contain the correct string."
    fi
else
    echo "Failed to create virus test file."
fi
The alert MDC_Test_File malware was detected (Agentless) will appear within 24 hours in the Defender for Cloud Alerts page and in the Defender XDR portal.

Create a test file for Windows
Create a test file with a text document
Create a text file on your VM.
Paste the text
$$89-barbados-dublin-damascus-notice-pulled-natural-31$$into the text file.Important
Ensure that there are no extra spaces or lines in the text file.
Save the file.
Open the file to validate that it contains the content from stage 2.
The alert MDC_Test_File malware was detected (Agentless) will appear within 24 hours in the Defender for Cloud Alerts page and in the Defender XDR portal.
Create a test file with PowerShell
Open PowerShell on your VM.
Execute the following script.
# Virus test string
$TEST_STRING = '$$89-barbados-dublin-damascus-notice-pulled-natural-31$$'

# File to be created
$FILE_PATH = "C:\temp\virus_test_file.txt"

# Create "temp" directory if it does not exist
$DIR_PATH = "C:\temp"
if (!(Test-Path -Path $DIR_PATH)) {
   New-Item -ItemType Directory -Path $DIR_PATH
}

# Write the test string to the file without a trailing newline
[IO.File]::WriteAllText($FILE_PATH, $TEST_STRING)

# Check if the file was created and contains the correct string
if (Test-Path -Path $FILE_PATH) {
    $content = [IO.File]::ReadAllText($FILE_PATH)
    if ($content -eq $TEST_STRING) {
      Write-Host "Test file created and validated successfully."
    } else {
       Write-Host "Test file does not contain the correct string."
    }
} else {
    Write-Host "Failed to create test file."
}
The alert MDC_Test_File malware was detected (Agentless) will appear within 24 hours in the Defender for Cloud Alerts page and in the Defender XDR portal.
Exclude machines from scanning
Agentless scanning applies to all of the eligible machines in the subscription. To prevent specific machines from being scanned, you can exclude machines from agentless scanning based on your pre-existing environment tags. When Defender for Cloud performs the continuous discovery for machines, excluded machines are skipped.
To configure machines for exclusion:
In Defender for Cloud, select Environment settings.
Select the relevant subscription or multicloud connector.
For either the Defender Cloud Security Posture Management (CSPM) or Defender for Servers P2 plan, select Settings.
For agentless scanning, select Edit configuration.

Enter the tag name and value that applies to the machines that you want to exempt. You can enter
multiple tag:valuepairs.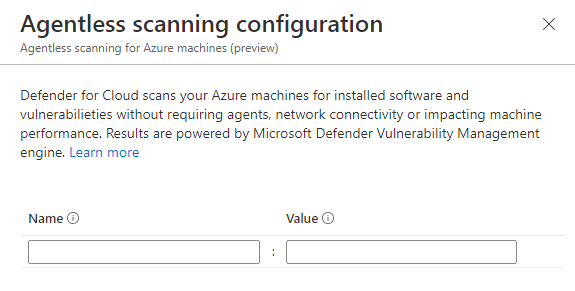
Select Save.

Related content
Learn more about:
Feedback
Coming soon: Throughout 2024 we will be phasing out GitHub Issues as the feedback mechanism for content and replacing it with a new feedback system. For more information see: https://aka.ms/ContentUserFeedback.
Submit and view feedback for