Connect your AWS account to Microsoft Defender for Cloud
Workloads commonly span multiple cloud platforms. Cloud security services must do the same. Microsoft Defender for Cloud helps protect workloads in Amazon Web Services (AWS), but you need to set up the connection between them and Defender for Cloud.
The following screenshot shows AWS accounts displayed in the Defender for Cloud overview dashboard.

You can learn more by watching the New AWS connector in Defender for Cloud video from the Defender for Cloud in the Field video series.
For a reference list of all the recommendations that Defender for Cloud can provide for AWS resources, see Security recommendations for AWS resources - a reference guide.
AWS authentication process
Federated authentication is used between Microsoft Defender for Cloud and AWS. All of the resources related to the authentication are created as a part of the CloudFormation template deployment, including:
An identity provider (OpenID connect)
Identity and Access Management (IAM) roles with a federated principal (connected to the identity providers).
The architecture of the authentication process across clouds is as follows:
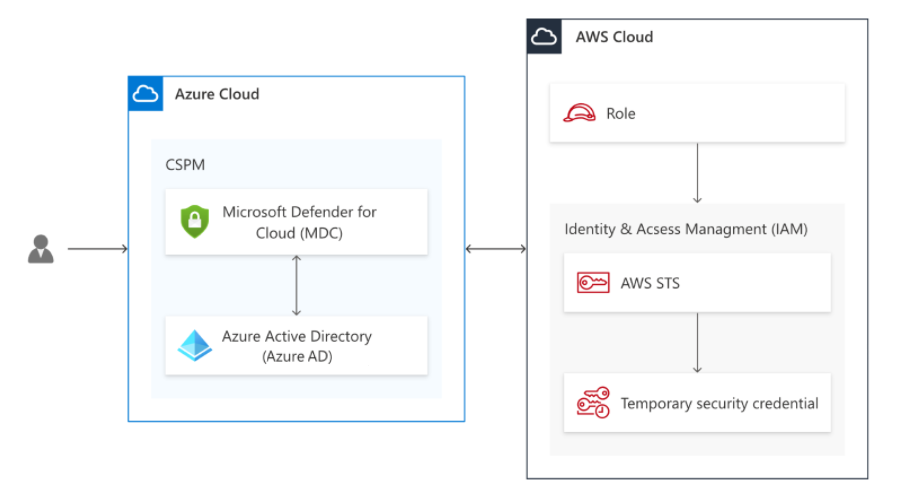
Microsoft Defender for Cloud CSPM service acquires a Microsoft Entra token with a validity life time of 1 hour that is signed by the Microsoft Entra ID using the RS256 algorithm.
The Microsoft Entra token is exchanged with AWS short living credentials and Defender for Cloud's CSPM service assumes the CSPM IAM role (assumed with web identity).
Since the principal of the role is a federated identity as defined in a trust relationship policy, the AWS identity provider validates the Microsoft Entra token against the Microsoft Entra ID through a process that includes:
audience validation
token digital signature validation
certificate thumbprint
The Microsoft Defender for Cloud CSPM role is assumed only after the validation conditions defined at the trust relationship have been met. The conditions defined for the role level are used for validation within AWS and allows only the Microsoft Defender for Cloud CSPM application (validated audience) access to the specific role (and not any other Microsoft token).
After the Microsoft Entra token is validated by the AWS identity provider, the AWS STS exchanges the token with AWS short-living credentials which the CSPM service uses to scan the AWS account.
Prerequisites
To complete the procedures in this article, you need:
A Microsoft Azure subscription. If you don't have an Azure subscription, you can sign up for a free one.
Microsoft Defender for Cloud set up on your Azure subscription.
Access to an AWS account.
Contributor permission for the relevant Azure subscription, and Administrator permission on the AWS account.
Note
The AWS connector is not available on the national government clouds (Azure Government, Microsoft Azure operated by 21Vianet).
Native connector plan requirements
Each plan has its own requirements for the native connector.
Defender for Containers
If you choose the Microsoft Defender for Containers plan, you need:
- At least one Amazon EKS cluster with permission to access to the EKS Kubernetes API server. If you need to create a new EKS cluster, follow the instructions in Getting started with Amazon EKS – eksctl.
- The resource capacity to create a new Amazon SQS queue, Kinesis Data Firehose delivery stream, and Amazon S3 bucket in the cluster's region.
Defender for SQL
If you choose the Microsoft Defender for SQL plan, you need:
- Microsoft Defender for SQL enabled on your subscription. Learn how to protect your databases.
- An active AWS account, with EC2 instances running SQL Server or RDS Custom for SQL Server.
- Azure Arc for servers installed on your EC2 instances or RDS Custom for SQL Server.
We recommend that you use the autoprovisioning process to install Azure Arc on all of your existing and future EC2 instances. To enable the Azure Arc autoprovisioning, you need Owner permission on the relevant Azure subscription.
AWS Systems Manager (SSM) manages autoprovisioning by using the SSM Agent. Some Amazon Machine Images already have the SSM Agent preinstalled. If your EC2 instances don't have the SSM Agent, install it by using these instructions from Amazon: Install SSM Agent for a hybrid and multicloud environment (Windows).
Ensure that your SSM Agent has the managed policy AmazonSSMManagedInstanceCore. It enables core functionality for the AWS Systems Manager service.
Enable these other extensions on the Azure Arc-connected machines:
- Microsoft Defender for Endpoint
- A vulnerability assessment solution (TVM or Qualys)
- The Log Analytics agent on Azure Arc-connected machines or the Azure Monitor agent
Make sure the selected Log Analytics workspace has a security solution installed. The Log Analytics agent and the Azure Monitor agent are currently configured at the subscription level. All of your AWS accounts and Google Cloud Platform (GCP) projects under the same subscription inherit the subscription settings for the Log Analytics agent and the Azure Monitor agent.
Learn more about monitoring components for Defender for Cloud.
Defender for Servers
If you choose the Microsoft Defender for Servers plan, you need:
- Microsoft Defender for Servers enabled on your subscription. Learn how to enable plans in Enable enhanced security features.
- An active AWS account, with EC2 instances.
- Azure Arc for servers installed on your EC2 instances.
We recommend that you use the autoprovisioning process to install Azure Arc on all of your existing and future EC2 instances. To enable the Azure Arc autoprovisioning, you need Owner permission on the relevant Azure subscription.
AWS Systems Manager manages autoprovisioning by using the SSM Agent. Some Amazon Machine Images already have the SSM Agent preinstalled. If your EC2 instances don't have the SSM Agent, install it by using either of the following instructions from Amazon:
- Install SSM Agent for a hybrid and multicloud environment (Windows)
- Install SSM Agent for a hybrid and multicloud environment (Linux)
Ensure that your SSM Agent has the managed policy AmazonSSMManagedInstanceCore, which enables core functionality for the AWS Systems Manager service.
You must have the SSM Agent for auto provisioning Arc agent on EC2 machines. If the SSM doesn't exist, or is removed from the EC2, the Arc provisioning won't be able to proceed.
Note
As part of the CloudFormation template that is run during the onboarding process, an automation process is created and triggered every 30 days, over all the EC2s that existed during the initial run of the CloudFormation. The goal of this scheduled scan is to ensure that all the relevant EC2s have an IAM profile with the required IAM policy that allows Defender for Cloud to access, manage, and provide the relevant security features (including the Arc agent provisioning). The scan does not apply to EC2s that were created after the run of the CloudFormation.
If you want to manually install Azure Arc on your existing and future EC2 instances, use the EC2 instances should be connected to Azure Arc recommendation to identify instances that don't have Azure Arc installed.
Enable these other extensions on the Azure Arc-connected machines:
- Microsoft Defender for Endpoint
- A vulnerability assessment solution (TVM or Qualys)
- The Log Analytics agent on Azure Arc-connected machines or the Azure Monitor agent
Make sure the selected Log Analytics workspace has a security solution installed. The Log Analytics agent and the Azure Monitor agent are currently configured at the subscription level. All of your AWS accounts and GCP projects under the same subscription inherit the subscription settings for the Log Analytics agent and the Azure Monitor agent.
Learn more about monitoring components for Defender for Cloud.
Note
As the Log Analytics agent (also known as MMA) is set to retire in August 2024, all Defender for Servers features and security capabilities that currently depend on it, including those described on this page, will be available through either Microsoft Defender for Endpoint integration or agentless scanning, before the retirement date. For more information about the roadmap for each of the features that are currently rely on Log Analytics Agent, see this announcement.
Defender for Servers assigns tags to your Azure ARC resources on top of your EC2 instances to manage the autoprovisioning process. You must have these tags properly assigned to your resources so that Defender for Cloud can manage them: AccountId, Cloud, InstanceId, and MDFCSecurityConnector.
Defender CSPM
If you choose the Microsoft Defender CSPM plan, you need:
- a Microsoft Azure subscription. If you don't have an Azure subscription, you can sign up for a free subscription.
- You must enable Microsoft Defender for Cloud on your Azure subscription.
- Connect your non-Azure machines, AWS accounts.
- In order to gain access to all of the features available from the CSPM plan, the plan must be enabled by the Subscription Owner.
Learn more about how to enable Defender CSPM.
Connect your AWS account
To connect your AWS to Defender for Cloud by using a native connector:
Sign in to the Azure portal.
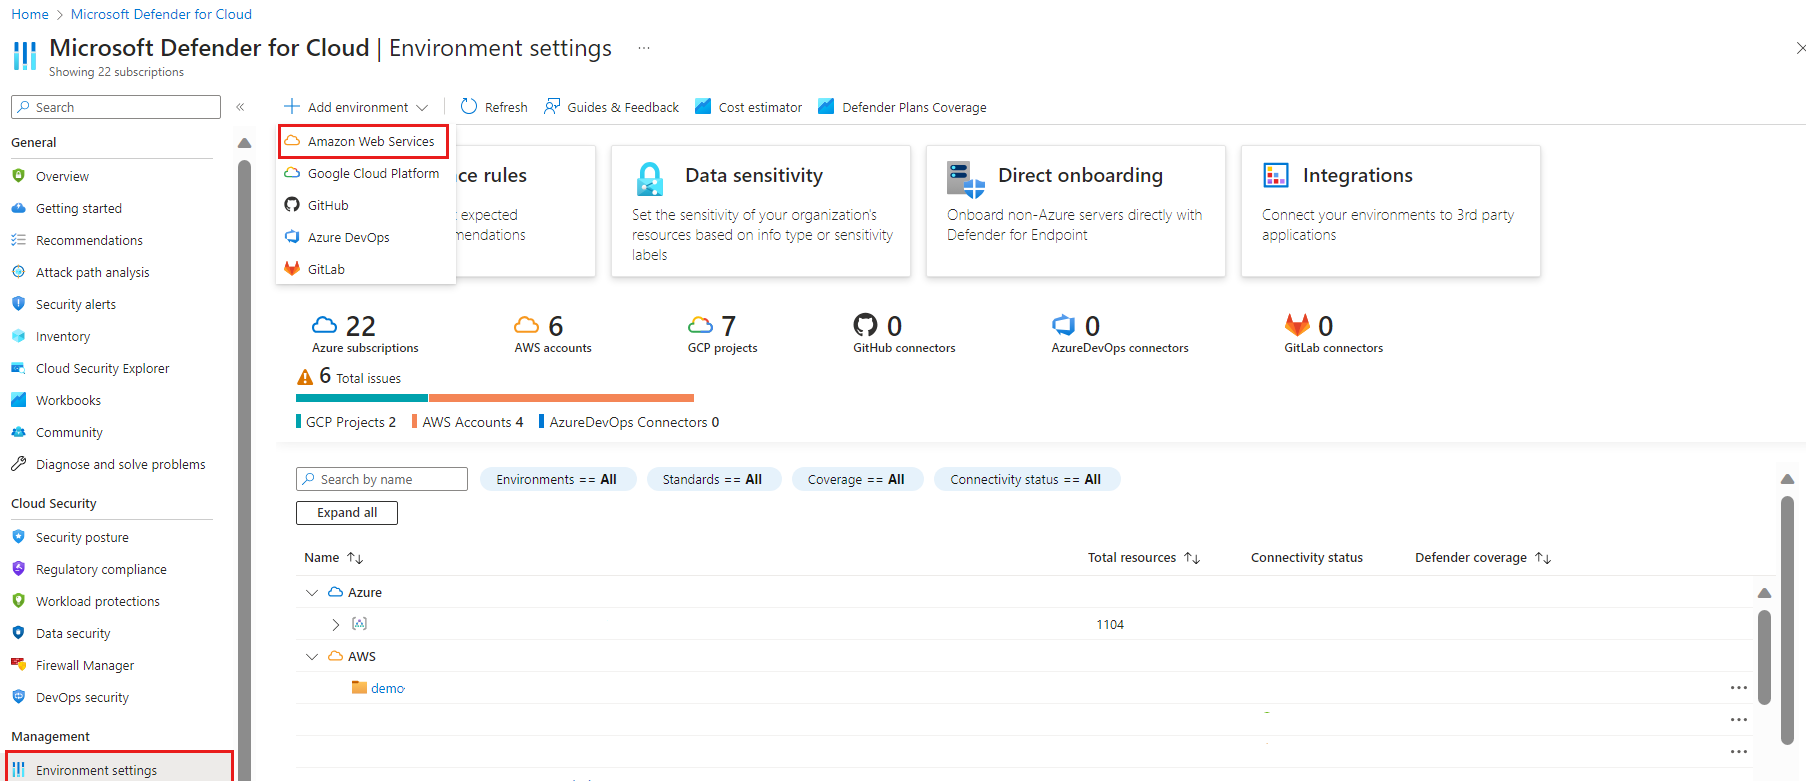
Go to Defender for Cloud > Environment settings.
Select Add environment > Amazon Web Services.
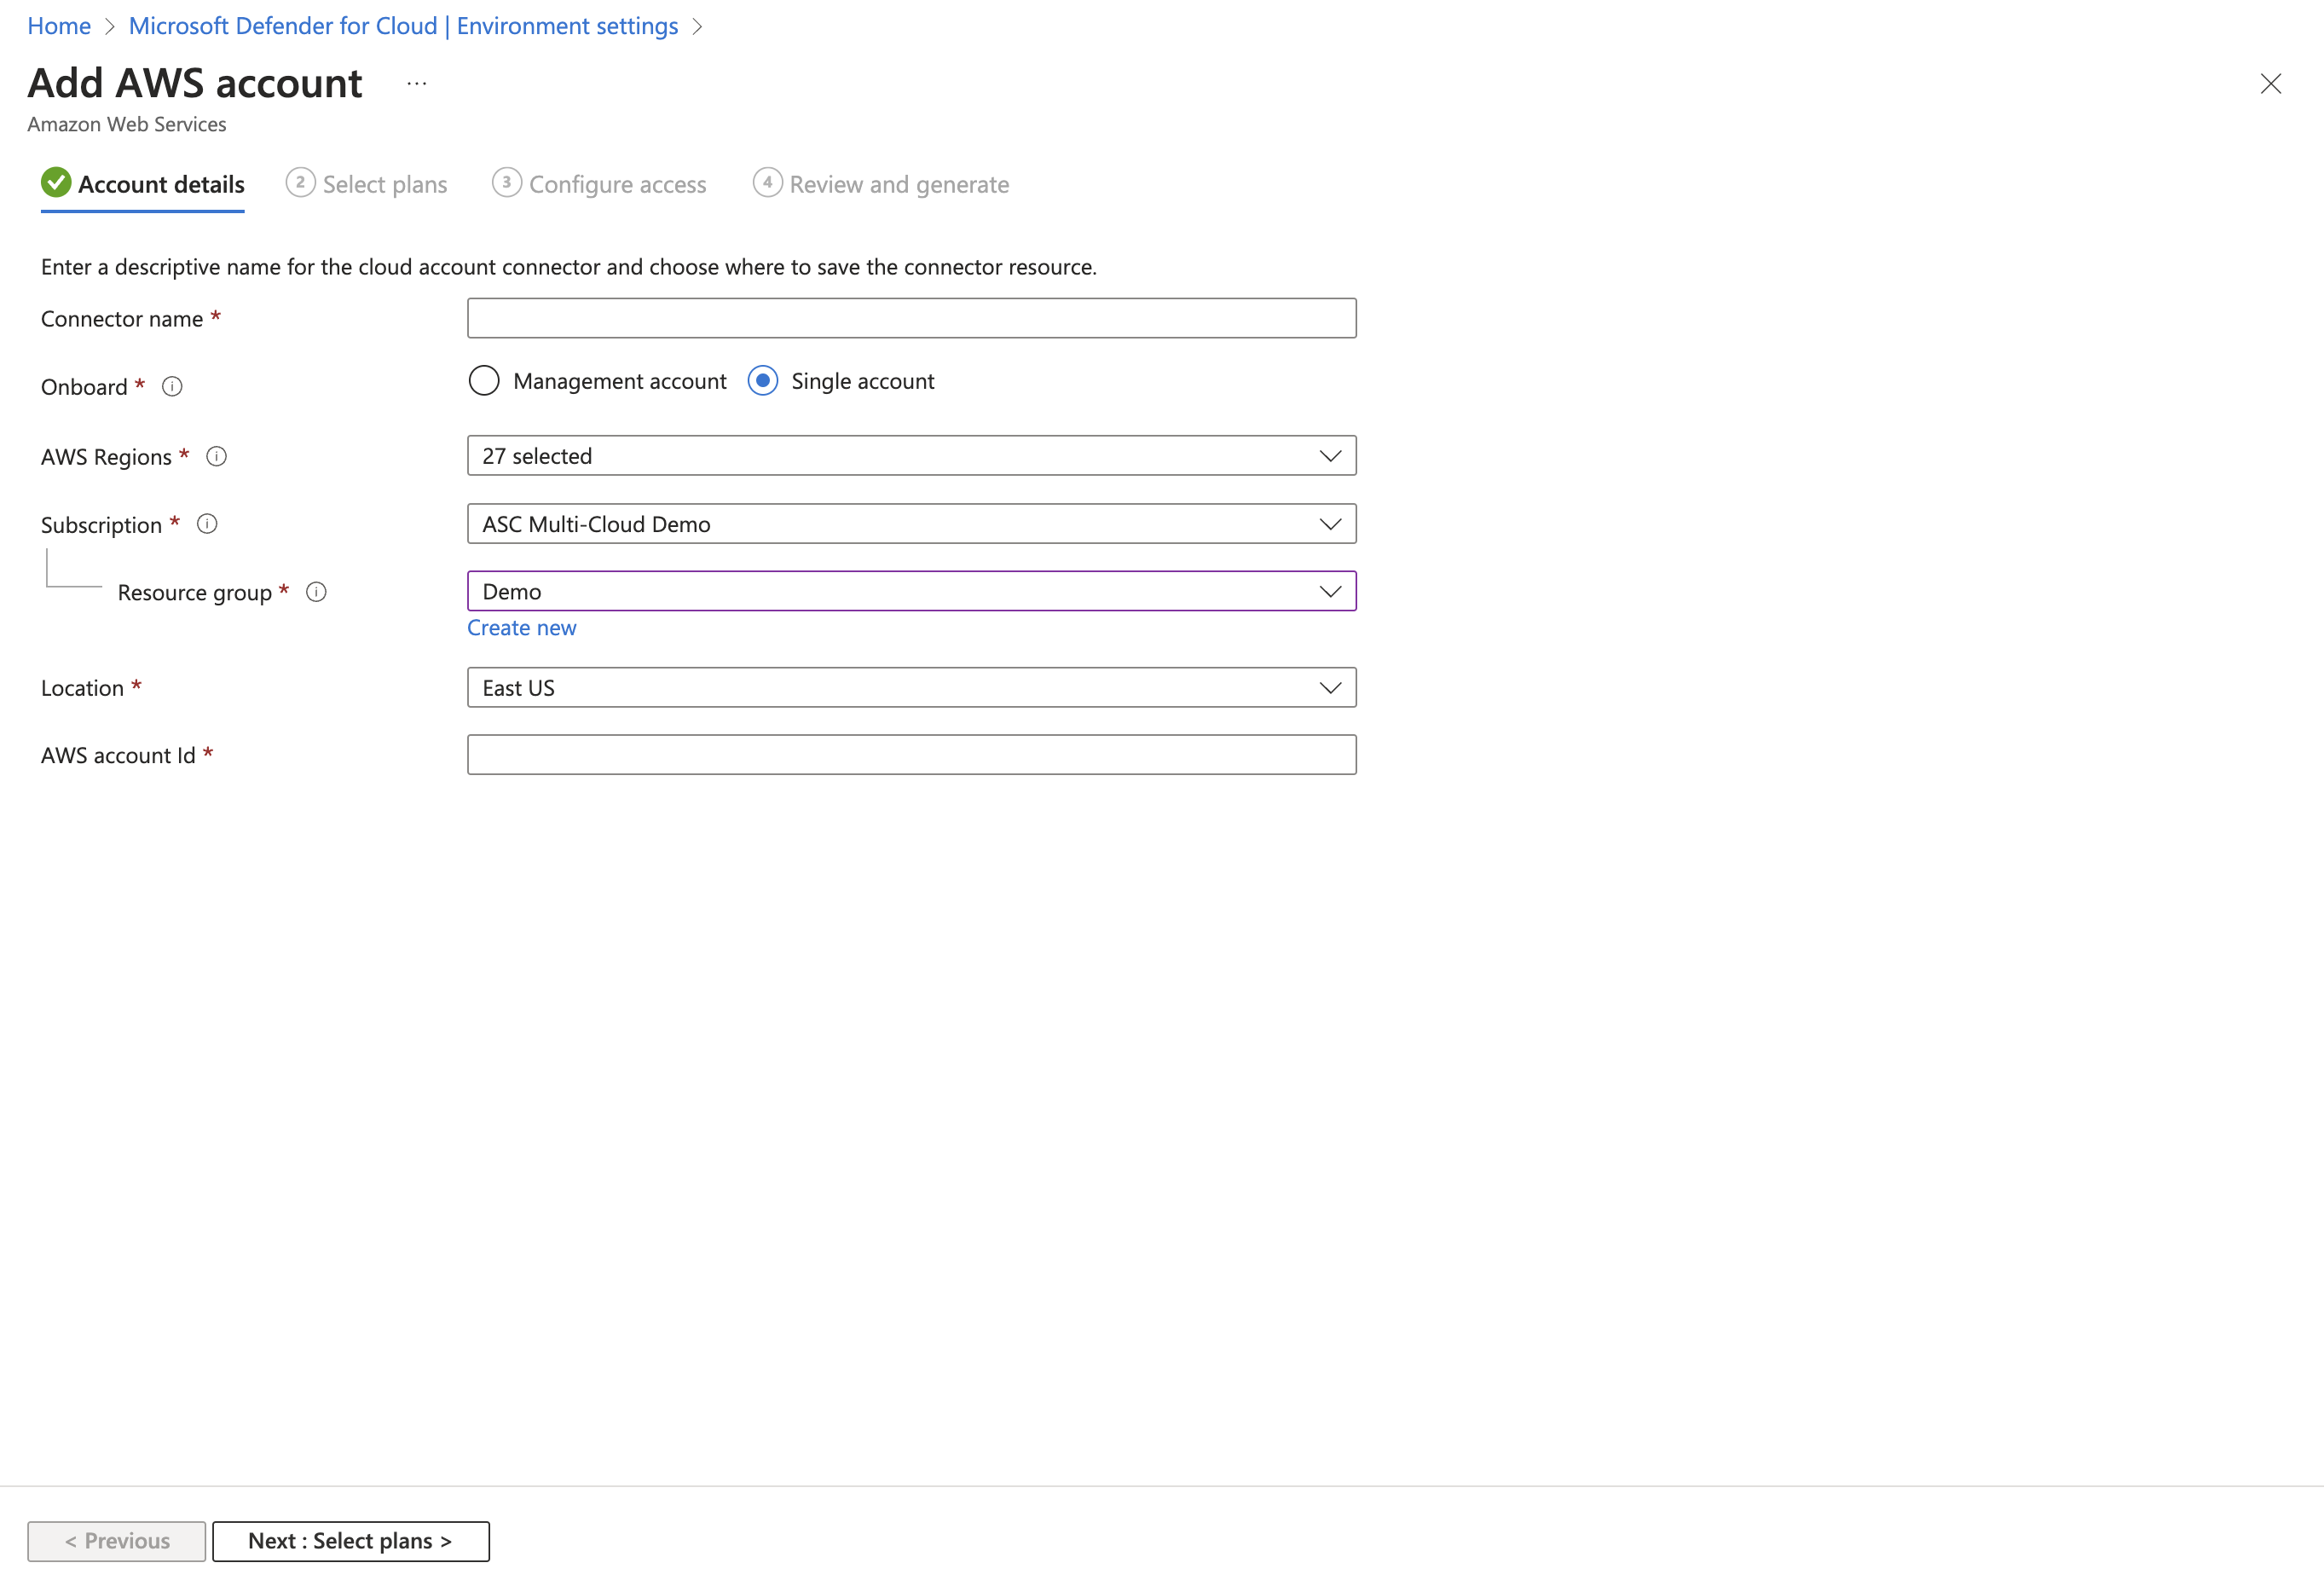
Enter the details of the AWS account, including the location where you store the connector resource.


Note
(Optional) Select Management account to create a connector to a management account. Connectors are then created for each member account discovered under the provided management account. Auto-provisioning is also enabled for all of the newly onboarded accounts.
(Optional) Use the AWS regions dropdown menu to select specific AWS regions to be scanned. All regions are selected by default.
Select Defender plans
In this section of the wizard, you select the Defender for Cloud plans that you want to enable.
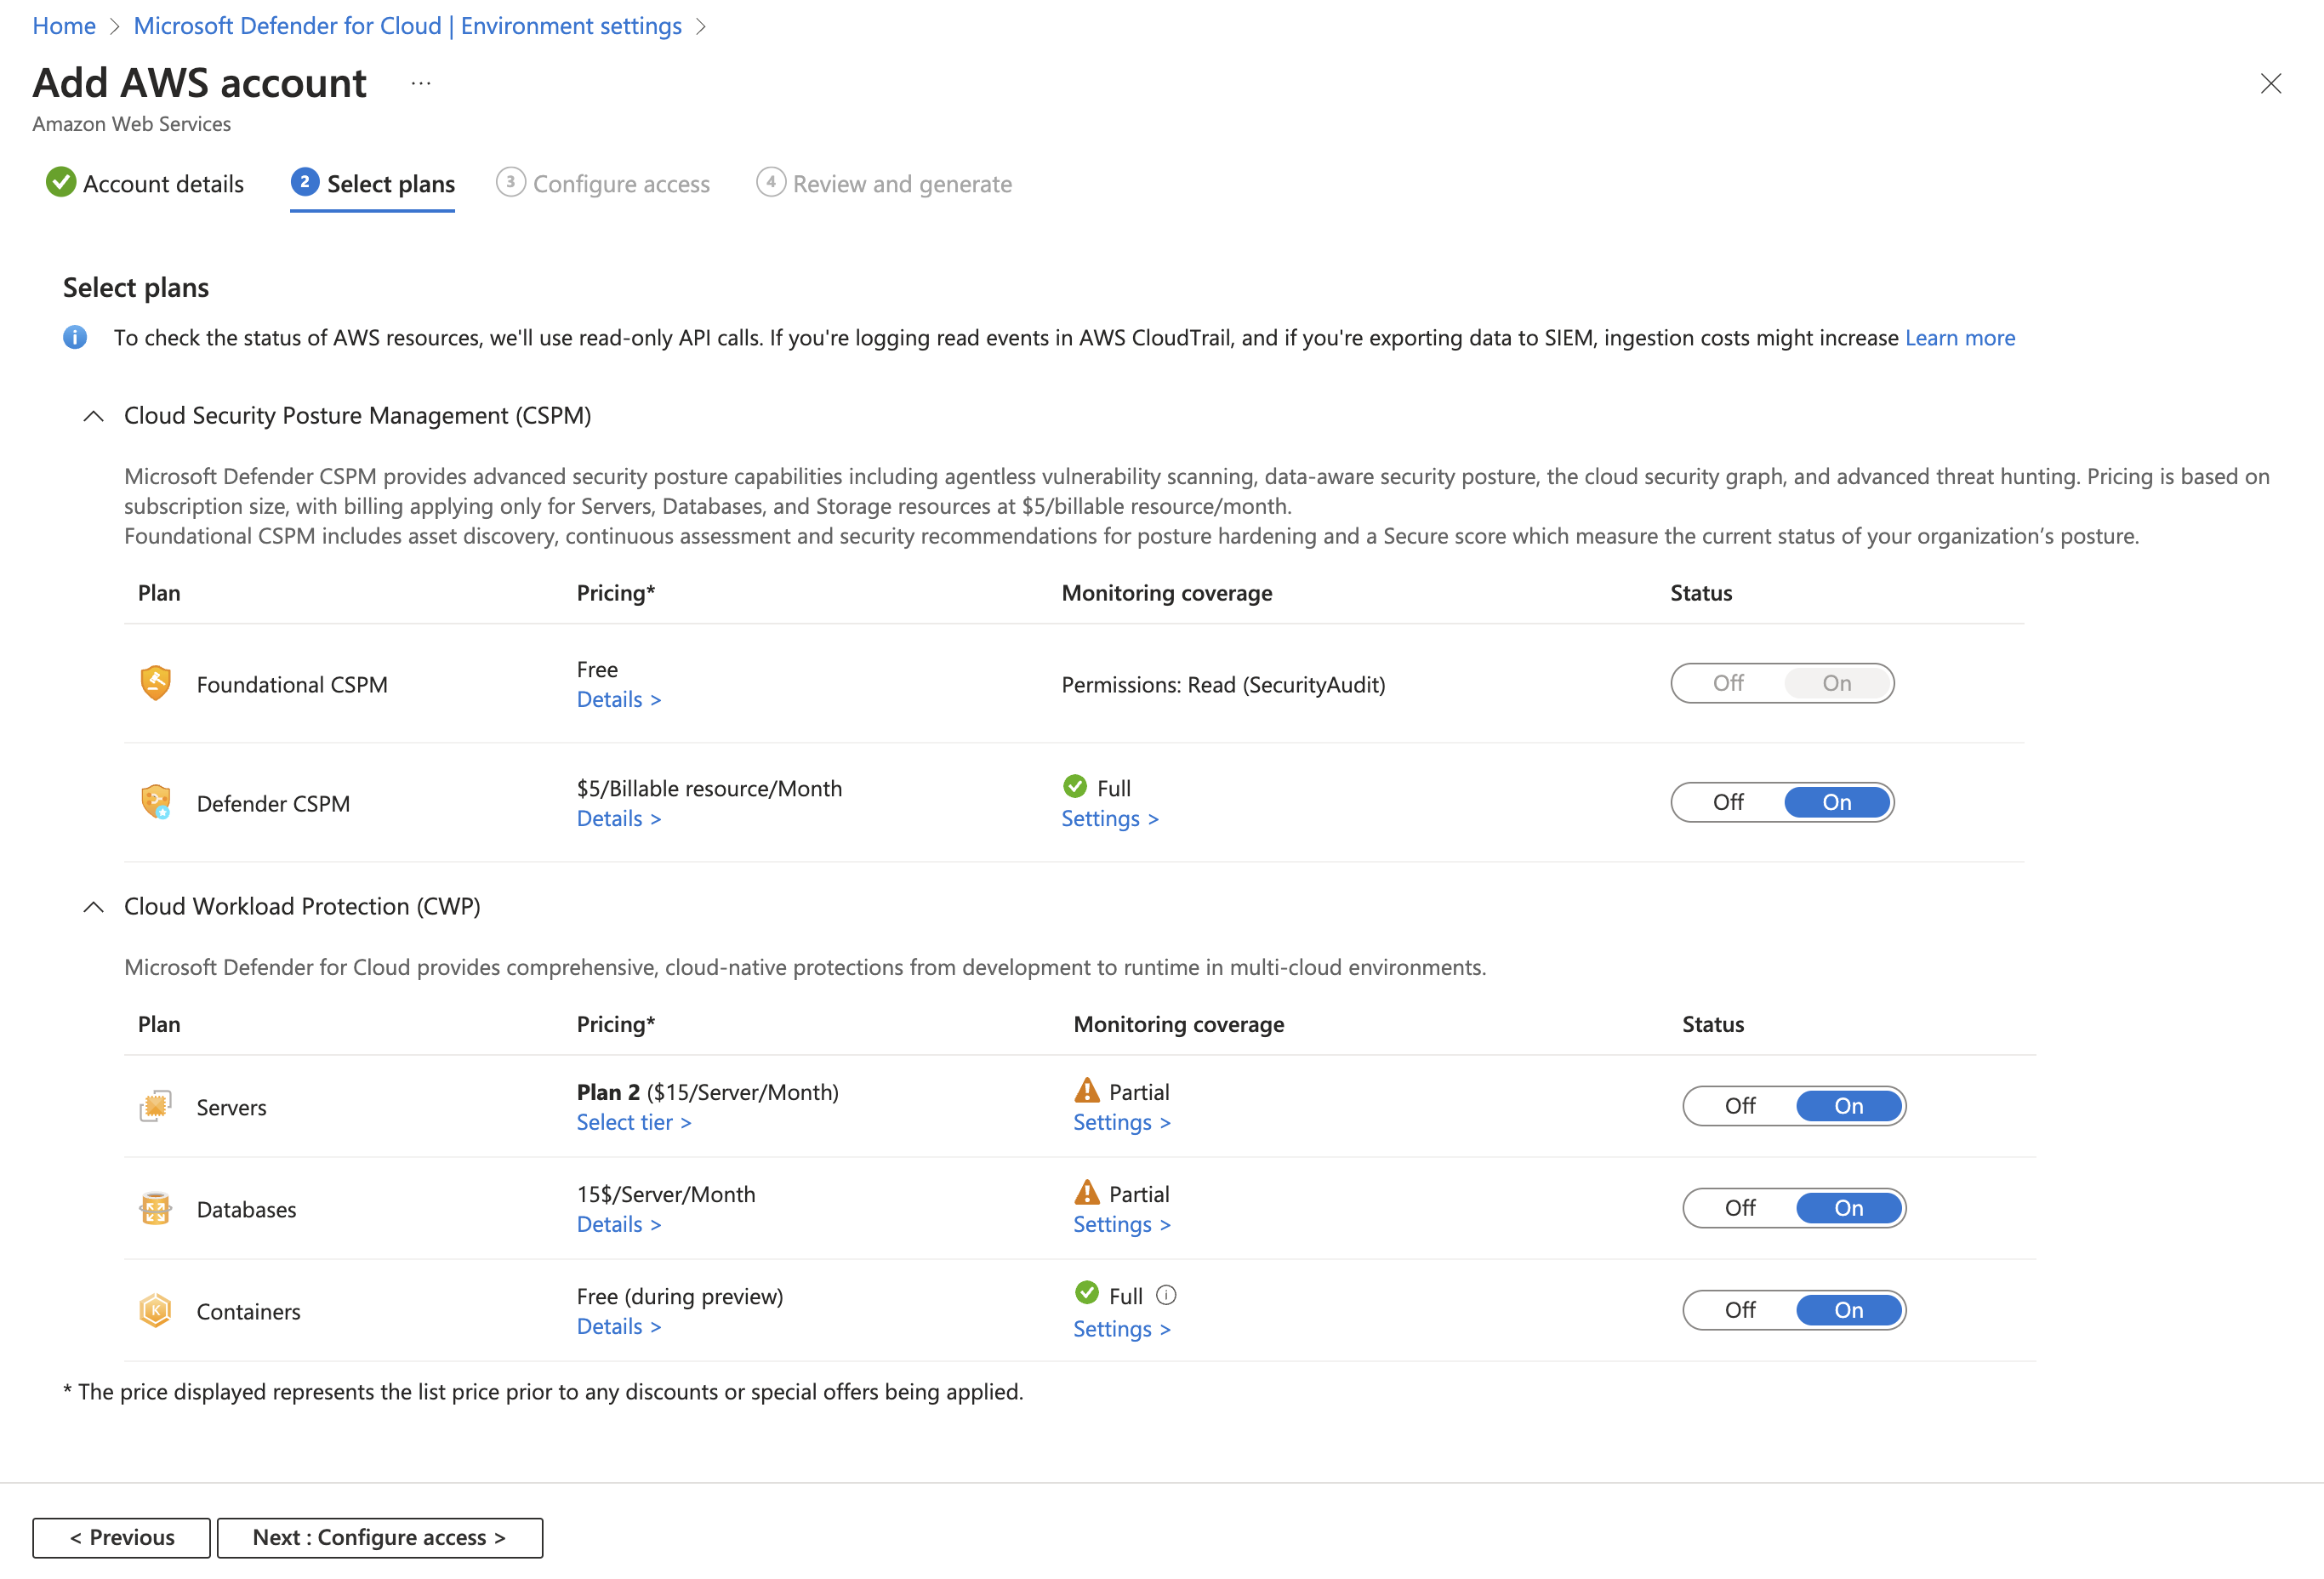
Select Next: Select plans.
The Select plans tab is where you choose which Defender for Cloud capabilities to enable for this AWS account. Each plan has its own requirements for permissions and might incur charges.
Important
To present the current status of your recommendations, the Microsoft Defender Cloud Security Posture Management plan queries the AWS resource APIs several times a day. These read-only API calls incur no charges, but they are registered in CloudTrail if you've enabled a trail for read events.
As explained in the AWS documentation, there are no additional charges for keeping one trail. If you're exporting the data out of AWS (for example, to an external SIEM system), this increased volume of calls might also increase ingestion costs. In such cases, we recommend filtering out the read-only calls from the Defender for Cloud user or ARN role:
arn:aws:iam::[accountId]:role/CspmMonitorAws. (This is the default role name. Confirm the role name configured on your account.)By default, the Servers plan is set to On. This setting is necessary to extend the coverage of Defender for Servers to AWS EC2. Ensure that you fulfilled the network requirements for Azure Arc.
Optionally, select Configure to edit the configuration as required.
Note
The respective Azure Arc servers for EC2 instances or GCP virtual machines that no longer exist (and the respective Azure Arc servers with a status of Disconnected or Expired) are removed after 7 days. This process removes irrelevant Azure Arc entities to ensure that only Azure Arc servers related to existing instances are displayed.
By default, the Containers plan is set to On. This setting is necessary to have Defender for Containers protect your AWS EKS clusters. Ensure that you fulfilled the network requirements for the Defender for Containers plan.
Note
Azure Arc-enabled Kubernetes, the Azure Arc extensions for Defender sensor, and Azure Policy for Kubernetes should be installed. Use the dedicated Defender for Cloud recommendations to deploy the extensions (and Azure Arc, if necessary), as explained in Protect Amazon Elastic Kubernetes Service clusters.
Optionally, select Configure to edit the configuration as required. If you choose to turn off this configuration, the Threat detection (control plane) feature is also disabled. Learn more about feature availability.
By default, the Databases plan is set to On. This setting is necessary to extend coverage of Defender for SQL to AWS EC2 and RDS Custom for SQL Server.
(Optional) Select Configure to edit the configuration as required. We recommend that you leave it set to the default configuration.
Select Configure access and select the following:
a. Select a deployment type:
- Default access: Allows Defender for Cloud to scan your resources and automatically include future capabilities.
- Least privilege access: Grants Defender for Cloud access only to the current permissions needed for the selected plans. If you select the least privileged permissions, you'll receive notifications on any new roles and permissions that are required to get full functionality for connector health.
b. Select a deployment method: AWS CloudFormation or Terraform.

Note
If you select Management account to create a connector to a management account, then the tab to onboard with Terraform is not visible in the UI, but you can still onboard using Terraform, similar to what's covered at Onboarding your AWS/GCP environment to Microsoft Defender for Cloud with Terraform - Microsoft Community Hub.
Follow the on-screen instructions for the selected deployment method to complete the required dependencies on AWS. If you're onboarding a management account, you need to run the CloudFormation template both as Stack and as StackSet. Connectors are created for the member accounts up to 24 hours after the onboarding.
Select Next: Review and generate.
Select Create.


Defender for Cloud immediately starts scanning your AWS resources. Security recommendations appear within a few hours.
Deploy a CloudFormation template to your AWS account
As part of connecting an AWS account to Microsoft Defender for Cloud, you deploy a CloudFormation template to the AWS account. This template creates all of the required resources for the connection.
Deploy the CloudFormation template by using Stack (or StackSet if you have a management account). When you're deploying the template, the Stack creation wizard offers the following options.

Amazon S3 URL: Upload the downloaded CloudFormation template to your own S3 bucket with your own security configurations. Enter the URL to the S3 bucket in the AWS deployment wizard.
Upload a template file: AWS automatically creates an S3 bucket that the CloudFormation template is saved to. The automation for the S3 bucket has a security misconfiguration that causes the
S3 buckets should require requests to use Secure Socket Layerrecommendation to appear. You can remediate this recommendation by applying the following policy:{ "Id": "ExamplePolicy", "Version": "2012-10-17", "Statement": [ { "Sid": "AllowSSLRequestsOnly", "Action": "s3:*", "Effect": "Deny", "Resource": [ "<S3_Bucket ARN>", "<S3_Bucket ARN>/*" ], "Condition": { "Bool": { "aws:SecureTransport": "false" } }, "Principal": "*" } ] }Note
When running the CloudFormation StackSets when onboarding an AWS management account, you might encounter the following error message:
You must enable organizations access to operate a service managed stack setThis error indicates that you have noe enabled the trusted access for AWS Organizations.
To remediate this error message, your CloudFormation StackSets page has a prompt with a button that you can select to enable trusted access. After trusted access is enabled, the CloudFormation Stack must be run again.
Monitor your AWS resources
The security recommendations page in Defender for Cloud displays your AWS resources. You can use the environments filter to enjoy multicloud capabilities in Defender for Cloud.
To view all the active recommendations for your resources by resource type, use the asset inventory page in Defender for Cloud and filter to the AWS resource type that you're interested in.

Integrate with Microsoft Defender XDR
When you enable Defender for Cloud, Defender for Cloud alerts are automatically integrated into the Microsoft Defender Portal. No further steps are needed.
The integration between Microsoft Defender for Cloud and Microsoft Defender XDR brings your cloud environments into Microsoft Defender XDR. With Defender for Cloud's alerts and cloud correlations integrated into Microsoft Defender XDR, SOC teams can now access all security information from a single interface.
Learn more about Defender for Cloud's alerts in Microsoft Defender XDR.
Learn more
Check out the following blogs:
- Ignite 2021: Microsoft Defender for Cloud news
- Security posture management and server protection for AWS and GCP
Clean up resources
There's no need to clean up any resources for this article.
Next steps
Connecting your AWS account is part of the multicloud experience available in Microsoft Defender for Cloud:
- Protect all of your resources with Defender for Cloud.
- Set up your on-premises machines and GCP projects.
- Get answers to common questions about onboarding your AWS account.
- Troubleshoot your multicloud connectors.
Feedback
Coming soon: Throughout 2024 we will be phasing out GitHub Issues as the feedback mechanism for content and replacing it with a new feedback system. For more information see: https://aka.ms/ContentUserFeedback.
Submit and view feedback for