Connect your GCP project to Microsoft Defender for Cloud
Workloads commonly span multiple cloud platforms. Cloud security services must do the same. Microsoft Defender for Cloud helps protect workloads in Google Cloud Platform (GCP), but you need to set up the connection between them and Defender for Cloud.
This screenshot shows GCP accounts displayed in the Defender for Cloud overview dashboard.

GCP authorization design
The authentication process between Microsoft Defender for Cloud and GCP is a federated authentication process.
When you onboard to Defender for Cloud, the GCloud template is used to create the following resources as part of the authentication process:
Workload identity pool and providers
Service accounts and policy bindings
The authentication process works as follows:

Microsoft Defender for Cloud's CSPM service acquires a Microsoft Entra token. The token is signed by Microsoft Entra ID using the RS256 algorithm and is valid for 1 hour.
The Microsoft Entra token is exchanged with Google's STS token.
Google STS validates the token with the workload identity provider. The Microsoft Entra token is sent to Google's STS that validates the token with the workload identity provider. Audience validation then occurs and the token is signed. A Google STS token is then returned to Defender for Cloud's CSPM service.
Defender for Cloud's CSPM service uses the Google STS token to impersonate the service account. Defender for Cloud's CSPM receives service account credentials that are used to scan the project.
Prerequisites
To complete the procedures in this article, you need:
A Microsoft Azure subscription. If you don't have an Azure subscription, you can sign up for a free one.
Microsoft Defender for Cloud set up on your Azure subscription.
Access to a GCP project.
Contributor permission on the relevant Azure subscription, and Owner permission on the GCP organization or project.
You can learn more about Defender for Cloud pricing on the pricing page.
When you're connecting GCP projects to specific Azure subscriptions, consider the Google Cloud resource hierarchy and these guidelines:
- You can connect your GCP projects to Microsoft Defender for Cloud at the project level.
- You can connect multiple projects to one Azure subscription.
- You can connect multiple projects to multiple Azure subscriptions.
Connect your GCP project
There are four parts to the onboarding process that take place when you create the security connection between your GCP project and Microsoft Defender for Cloud.
Project details
In the first section, you need to add the basic properties of the connection between your GCP project and Defender for Cloud.

Here you name your connector, select a subscription and resource group, which is used to create an ARM template resource that is called security connector. The security connector represents a configuration resource that holds the projects settings.
Select plans for your project
After entering your organization's details, you'll then be able to select which plans to enable.

From here, you can decide which resources you want to protect based on the security value you want to receive.
Configure access for your project
Once you selected the plans, you want to enable and the resources you want to protect you have to configure access between Defender for Cloud and your GCP project.
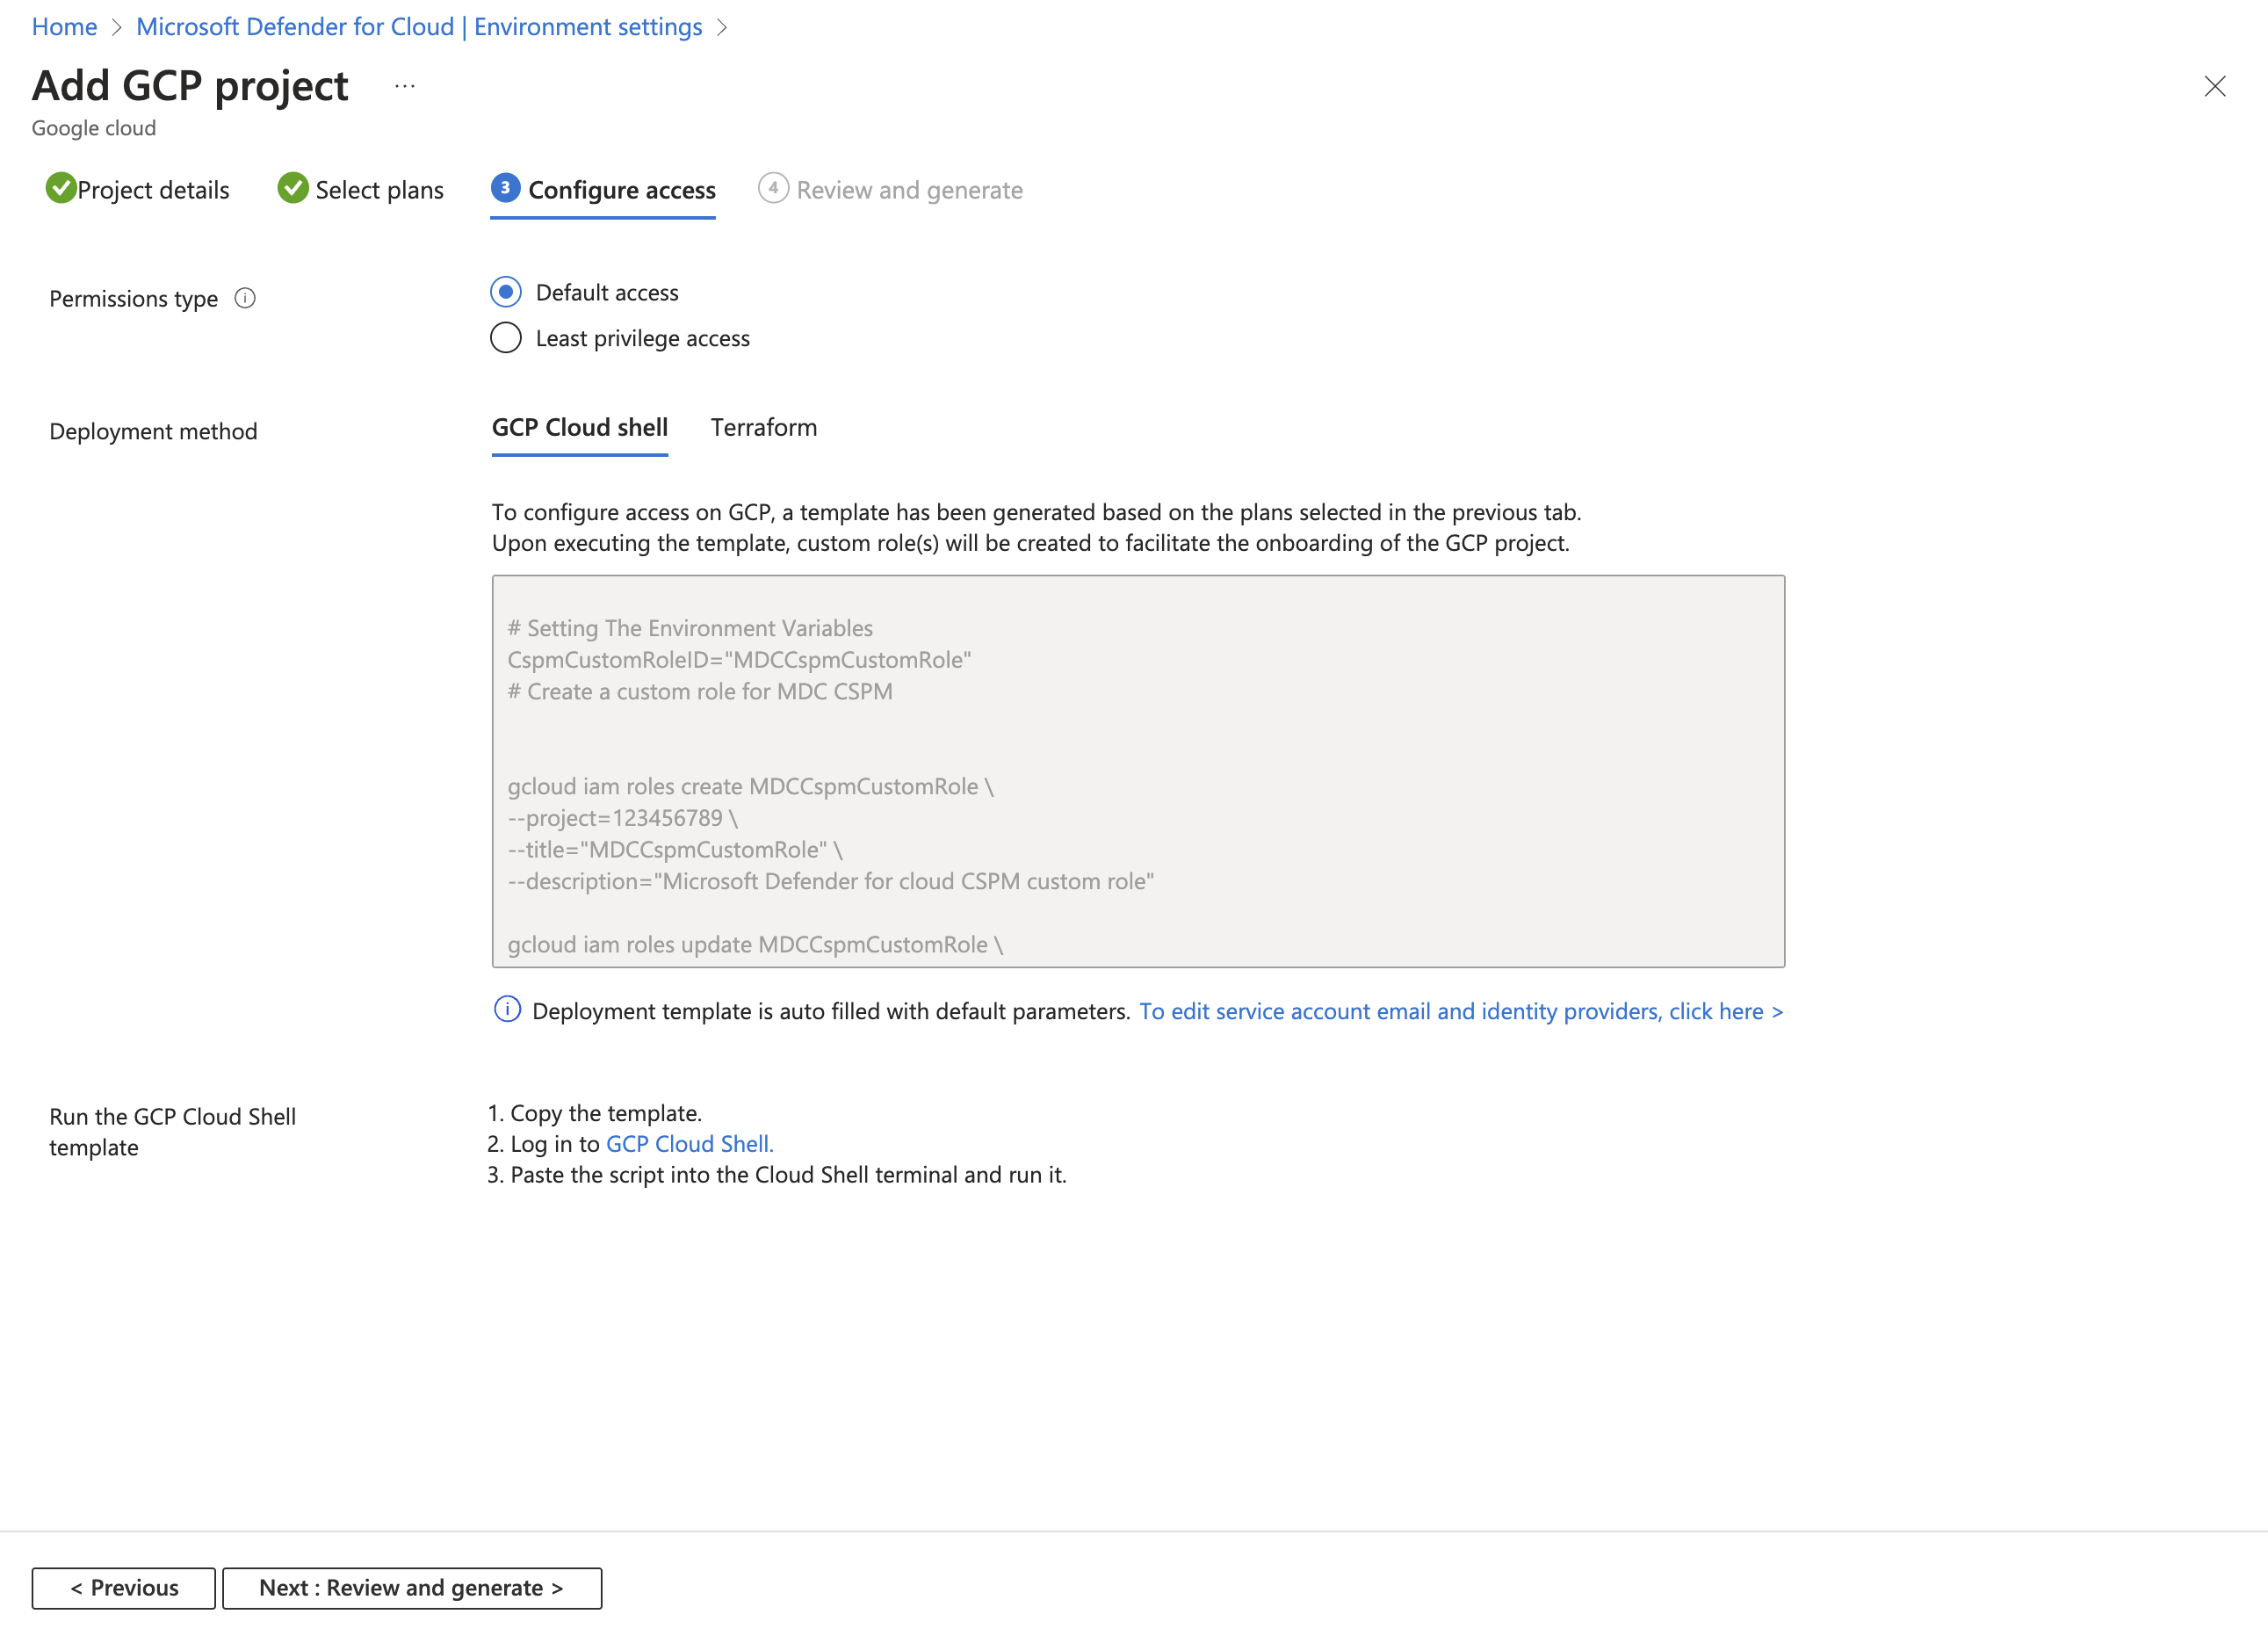
In this step, you can find the GCloud script that needs to be run on the GCP project that is going to onboarded. The GCloud script is generated based on the plans you selected to onboard.
The GCloud script creates all of the required resources on your GCP environment so that Defender for Cloud can operate and provide the following security values:
- Workload identity pool
- Workload identity provider (per plan)
- Service accounts
- Project level policy bindings (service account has access only to the specific project)
Review and generate the connector for your project
The final step for onboarding is to review all of your selections and to create the connector.

Note
The following APIs must be enabled in order to discover your GCP resources and allow the authentication process to occur:
iam.googleapis.comsts.googleapis.comcloudresourcemanager.googleapis.comiamcredentials.googleapis.comcompute.googleapis.comIf you don't enable these APIs at this time, you can enable them during the onboarding process by running the GCloud script.
After you create the connector, a scan starts on your GCP environment. New recommendations appear in Defender for Cloud after up to 6 hours. If you enabled autoprovisioning, Azure Arc and any enabled extensions are installed automatically for each newly detected resource.
Connect your GCP organization
Similar to onboarding a single project, When onboarding a GCP organization, Defender for Cloud creates a security connector for each project under the organization (unless specific projects were excluded).
Organization details
In the first section, you need to add the basic properties of the connection between your GCP organization and Defender for Cloud.

Here you name your connector, select a subscription and resource group that is used to create an ARM template resource that is called security connector. The security connector represents a configuration resource that holds the projects settings.
You also select a location and add the organization ID for your project.
When you onboard an organization, you can also choose to exclude project numbers and folder IDs.
Select plans for your organization
After entering your organization's details, you'll then be able to select which plans to enable.
From here, you can decide which resources you want to protect based on the security value you want to receive.
Configure access for your organization
Once you selected the plans, you want to enable and the resources you want to protect you have to configure access between Defender for Cloud and your GCP organization.

When you onboard an organization, there's a section that includes management project details. Similar to other GCP projects, the organization is also considered a project and is utilized by Defender for Cloud to create all of the required resources needed to connect the organization to Defender for Cloud.
In the management project details section, you have the choice of:
- Dedicating a management project for Defender for Cloud to include in the GCloud script.
- Provide the details of an already existing project to be used as the management project with Defender for Cloud.
You need to decide what is your best option for your organization's architecture. We recommend creating a dedicated project for Defender for Cloud.
The GCloud script is generated based on the plans you selected to onboard. The script creates all of the required resources on your GCP environment so that Defender for Cloud can operate and provide the following security benefits:
- Workload identity pool
- Workload identity provider for each plan
- Custom role to grant Defender for Cloud access to discover and get the project under the onboarded organization
- A service account for each plan
- A service account for the autoprovisioning service
- Organization level policy bindings for each service account
- API enablements at the management project level
Some of the APIs aren't in direct use with the management project. Instead the APIs authenticate through this project and use one of the APIs from another project. The API must be enabled on the management project.
Review and generate the connector for your organization
The final step for onboarding is to review all of your selections and to create the connector.

Note
The following APIs must be enabled in order to discover your GCP resources and allow the authentication process to occur:
iam.googleapis.comsts.googleapis.comcloudresourcemanager.googleapis.comiamcredentials.googleapis.comcompute.googleapis.comIf you don't enable these APIs at this time, you can enable them during the onboarding process by running the GCloud script.
After you create the connector, a scan starts on your GCP environment. New recommendations appear in Defender for Cloud after up to 6 hours. If you enabled autoprovisioning, Azure Arc and any enabled extensions are installed automatically for each newly detected resource.
Optional: Configure selected plans
By default, all plans are On. You can turn off plans that you don't need.

Configure the Defender for Servers plan
Microsoft Defender for Servers brings threat detection and advanced defenses to your GCP virtual machine (VM) instances. To have full visibility into Microsoft Defender for Servers security content, connect your GCP VM instances to Azure Arc. If you choose the Microsoft Defender for Servers plan, you need:
Microsoft Defender for Servers enabled on your subscription. Learn how to enable plans in Enable enhanced security features.
Azure Arc for servers installed on your VM instances.
We recommend that you use the autoprovisioning process to install Azure Arc on your VM instances. Autoprovisioning is enabled by default in the onboarding process and requires Owner permissions on the subscription. The Azure Arc autoprovisioning process uses the OS Config agent on the GCP end. Learn more about the availability of the OS Config agent on GCP machines.
The Azure Arc autoprovisioning process uses the VM manager on GCP to enforce policies on your VMs through the OS Config agent. A VM that has an active OS Config agent incurs a cost according to GCP. To see how this cost might affect your account, refer to the GCP technical documentation.
Microsoft Defender for Servers doesn't install the OS Config agent to a VM that doesn't have it installed. However, Microsoft Defender for Servers enables communication between the OS Config agent and the OS Config service if the agent is already installed but not communicating with the service. This communication can change the OS Config agent from inactive to active and lead to more costs.
Alternatively, you can manually connect your VM instances to Azure Arc for servers. Instances in projects with the Defender for Servers plan enabled that aren't connected to Azure Arc are surfaced by the recommendation GCP VM instances should be connected to Azure Arc. Select the Fix option in the recommendation to install Azure Arc on the selected machines.
The respective Azure Arc servers for GCP virtual machines that no longer exist (and the respective Azure Arc servers with a status of Disconnected or Expired) are removed after seven days. This process removes irrelevant Azure Arc entities to ensure that only Azure Arc servers related to existing instances are displayed.
Ensure that you fulfill the network requirements for Azure Arc.
Enable these other extensions on the Azure Arc-connected machines:
- Microsoft Defender for Endpoint
- A vulnerability assessment solution (Microsoft Defender Vulnerability Management or Qualys)
Defender for Servers assigns tags to your Azure Arc GCP resources to manage the autoprovisioning process. You must have these tags properly assigned to your resources so that Defender for Servers can manage your resources: Cloud, InstanceName, MDFCSecurityConnector, MachineId, ProjectId, and ProjectNumber.
To configure the Defender for Servers plan:
Follow the steps to connect your GCP project.
On the Select plans tab, select Configure.
On the Auto-provisioning configuration pane, turn the toggles to On or Off, depending on your need.
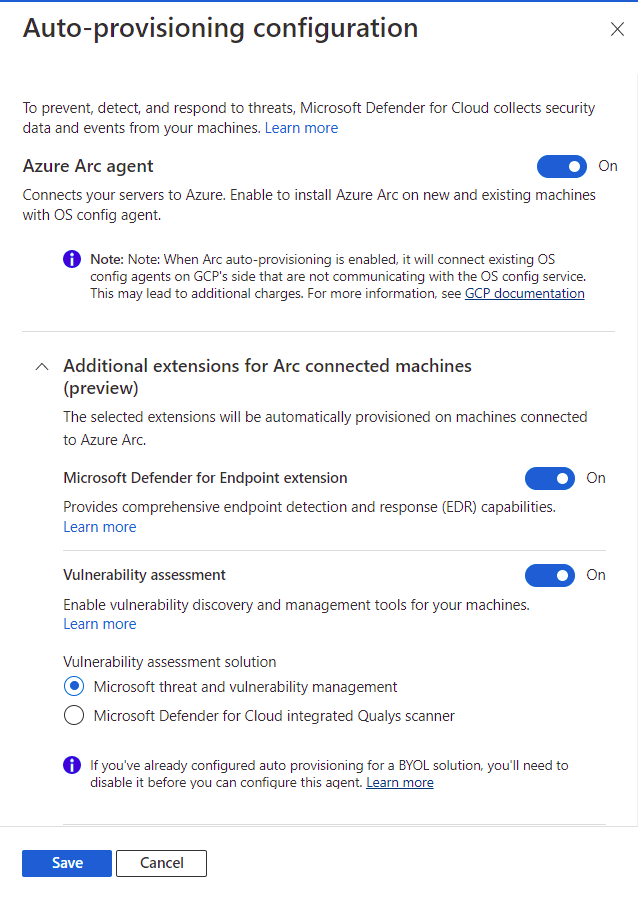
If Azure Arc agent is Off, you need to follow the manual installation process mentioned earlier.
Select Save.
Continue from step 8 of the Connect your GCP project instructions.
Configure the Defender for Databases plan
To have full visibility into Microsoft Defender for Databases security content, connect your GCP VM instances to Azure Arc.
To configure the Defender for Databases plan:
Follow the steps to connect your GCP project.
On the Select plans tab, in Databases, select Settings.
On the Plan configuration pane, turn the toggles to On or Off, depending on your need.
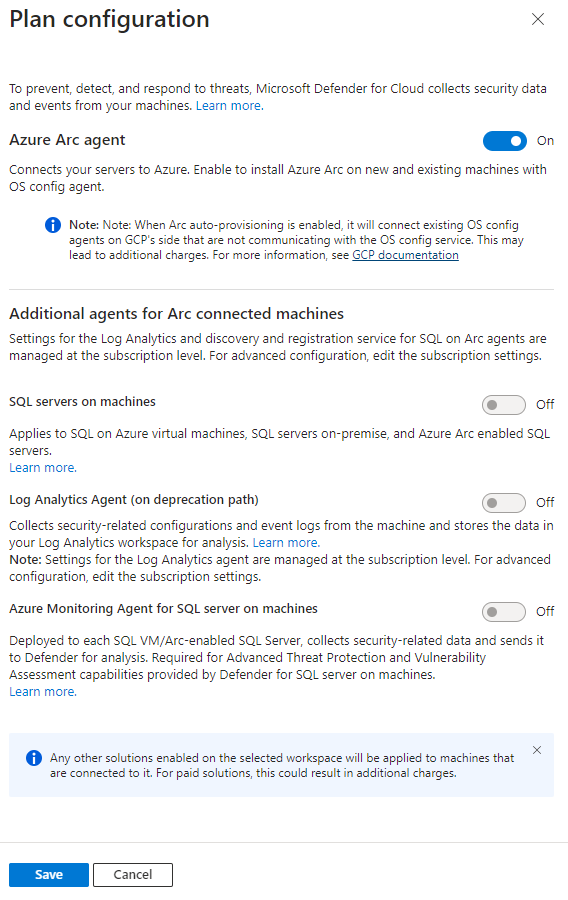
If the toggle for Azure Arc is Off, you need to follow the manual installation process mentioned earlier.
Select Save.
Continue from step 8 of the Connect your GCP project instructions.
Configure the Defender for Containers plan
Microsoft Defender for Containers brings threat detection and advanced defenses to your GCP Google Kubernetes Engine (GKE) Standard clusters. To get the full security value out of Defender for Containers and to fully protect GCP clusters, ensure that you meet the following requirements.
Note
- If you choose to disable the available configuration options, no agents or components will be deployed to your clusters. Learn more about feature availability.
- Defender for Containers when deployed on GCP, might incur external costs such as logging costs, pub/sub costs and egress costs.
Kubernetes audit logs to Defender for Cloud: Enabled by default. This configuration is available at the GCP project level only. It provides agentless collection of the audit log data through GCP Cloud Logging to the Microsoft Defender for Cloud back end for further analysis. Defender for Containers requires control plane audit logs to provide runtime threat protection. To send Kubernetes audit logs to Microsoft Defender, toggle the setting to On.
Note
If you disable this configuration, then the
Threat detection (control plane)feature will be disabled. Learn more about features availability.Auto provision Defender's sensor for Azure Arc and Auto provision Azure Policy extension for Azure Arc: Enabled by default. You can install Azure Arc-enabled Kubernetes and its extensions on your GKE clusters in three ways:
- Enable Defender for Containers autoprovisioning at the project level, as explained in the instructions in this section. We recommend this method.
- Use Defender for Cloud recommendations for per-cluster installation. They appear on the Microsoft Defender for Cloud recommendations page. Learn how to deploy the solution to specific clusters.
- Manually install Arc-enabled Kubernetes and extensions.
Agentless discovery for Kubernetes provides API-based discovery of your Kubernetes clusters. To enable the Agentless discovery for Kubernetes feature, toggle the setting to On.
The Agentless Container Vulnerability Assessment provides vulnerability management for images stored in Google Container Registry (GCR) and Google Artifact Registry (GAR) and running images on your GKE clusters. To enable the Agentless Container Vulnerability Assessment feature, toggle the setting to On.
To configure the Defender for Containers plan:
Follow the steps to connect your GCP project.
On the Select plans tab, select Configure. Then, on the Defender for Containers configuration pane, turn the toggles to On.
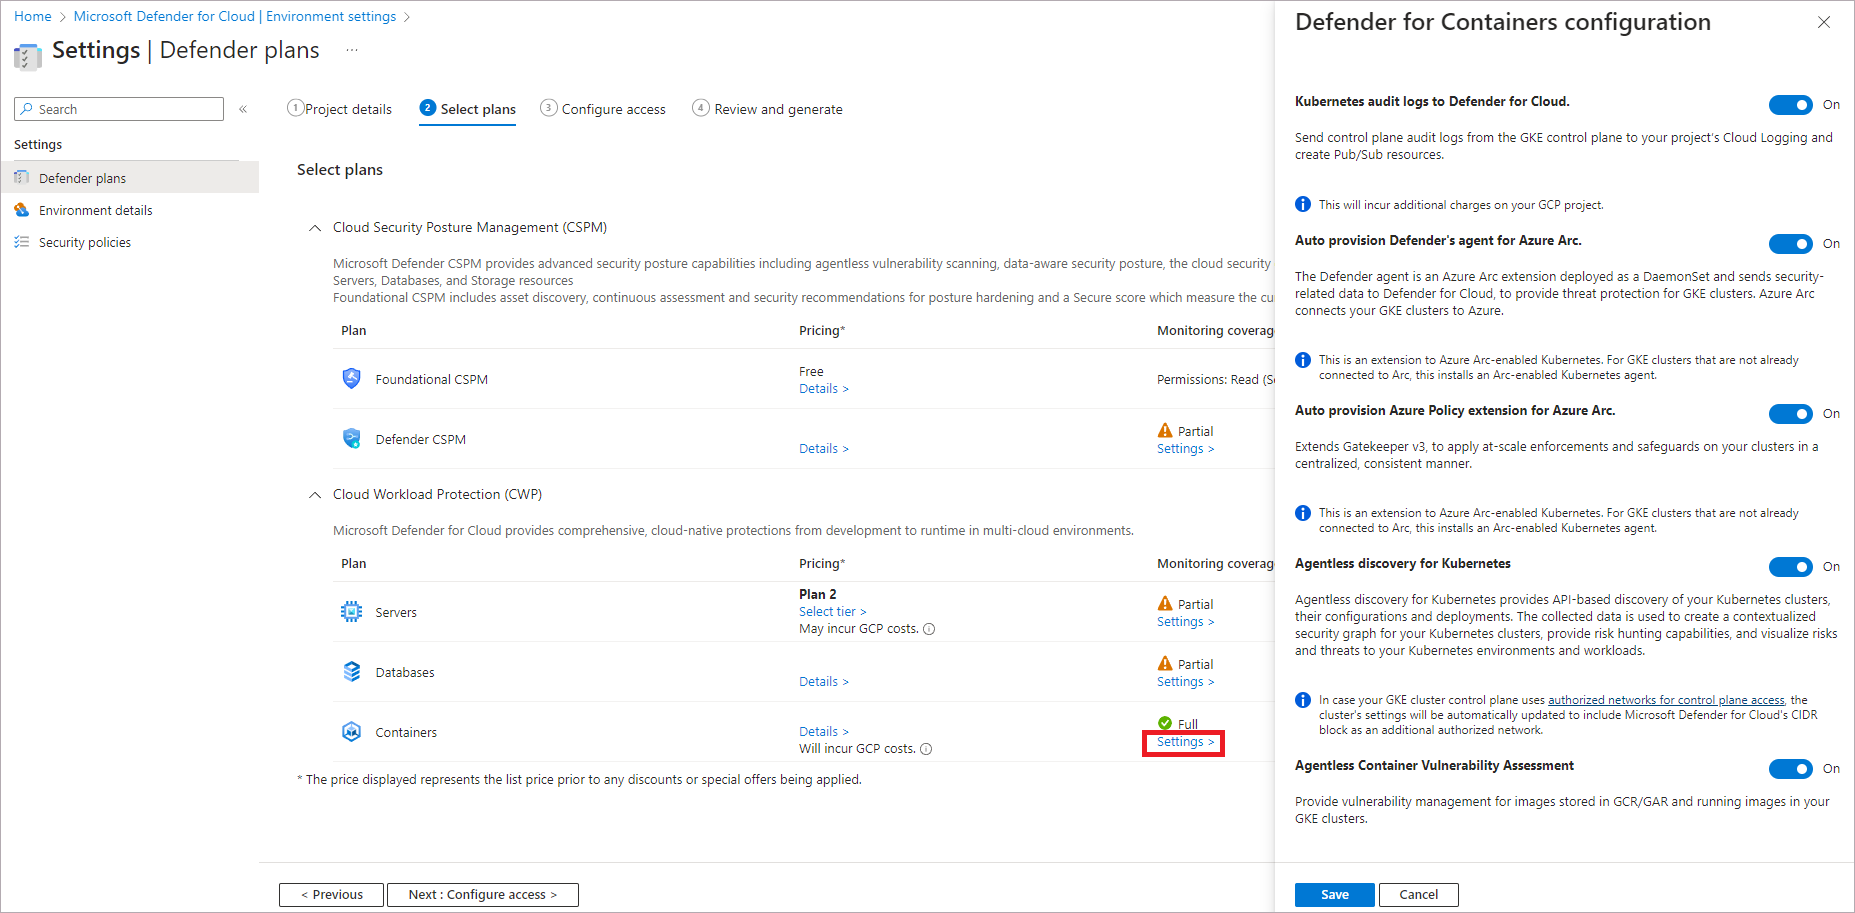
Select Save.
Continue from step 8 of the Connect your GCP project instructions.

Configure the Defender CSPM plan
If you choose the Microsoft Defender CSPM plan, you need:
- A Microsoft Azure subscription. If you don't have an Azure subscription, you can sign up for a free subscription.
- You must enable Microsoft Defender for Cloud on your Azure subscription.
- In order to gain access to all of the features available from the CSPM plan, the plan must be enabled by the Subscription Owner.
Learn more about how to enable Defender CSPM.
To configure the Defender CSPM plan:
Follow the steps to connect your GCP project.
On the Select plans tab, select Configure.
On the Plan configuration pane, turn the toggles to On or Off. To get the full value of Defender CSPM, we recommend that you turn all toggles to On.
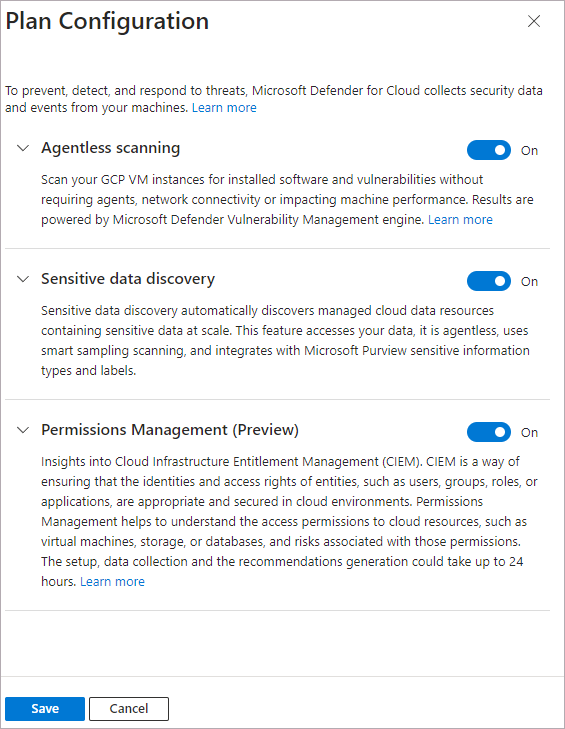
Select Save.
Continue from step 8 of the Connect your GCP project instructions.
Monitor your GCP resources
The security recommendations page in Defender for Cloud displays your GCP resources together with your Azure and AWS resources for a true multicloud view.
To view all the active recommendations for your resources by resource type, use the asset inventory page in Defender for Cloud and filter to the GCP resource type that you're interested in.

Note
As the Log Analytics agent (also known as MMA) is set to retire in August 2024, all Defender for Servers features and security capabilities that currently depend on it, including those described on this page, will be available through either Microsoft Defender for Endpoint integration or agentless scanning, before the retirement date. For more information about the roadmap for each of the features that are currently rely on Log Analytics Agent, see this announcement.
Integrate with Microsoft Defender XDR
When you enable Defender for Cloud, Defender for Cloud alerts are automatically integrated into the Microsoft Defender Portal. No further steps are needed.
The integration between Microsoft Defender for Cloud and Microsoft Defender XDR brings your cloud environments into Microsoft Defender XDR. With Defender for Cloud's alerts and cloud correlations integrated into Microsoft Defender XDR, SOC teams can now access all security information from a single interface.
Learn more about Defender for Cloud's alerts in Microsoft Defender XDR.
Next steps
Connecting your GCP project is part of the multicloud experience available in Microsoft Defender for Cloud:
- Protect all of your resources with Defender for Cloud.
- Set up your on-premises machines and AWS account.
- Troubleshoot your multicloud connectors.
- Get answers to common questions about connecting your GCP project.
Feedback
Coming soon: Throughout 2024 we will be phasing out GitHub Issues as the feedback mechanism for content and replacing it with a new feedback system. For more information see: https://aka.ms/ContentUserFeedback.
Submit and view feedback for