Neousys Nuvo-5006LP
This article describes the Neousys Nuvo-5006LP appliance for OT sensors.
Note
Neousys Nuvo-5006LP is a legacy appliance, and is supported for Defender for IoT software up to the latest patch for versions 22.2.x. We recommend that you replace these appliances with newer certified models, such as the YS-FIT2 or HPE DL20 (NHP 2LFF).
| Appliance characteristic | Details |
|---|---|
| Hardware profile | L100 |
| Performance | Max bandwidth: 30 Mbps Max devices: 400 |
| Physical specifications | Mounting: Mounting kit, Din Rail Ports: 5x RJ45 |
| Status | Supported up to the latest Defender for IoT software patch for versions 22.2.x |

The following image shows a view of the Nuvo 5006LP front panel:
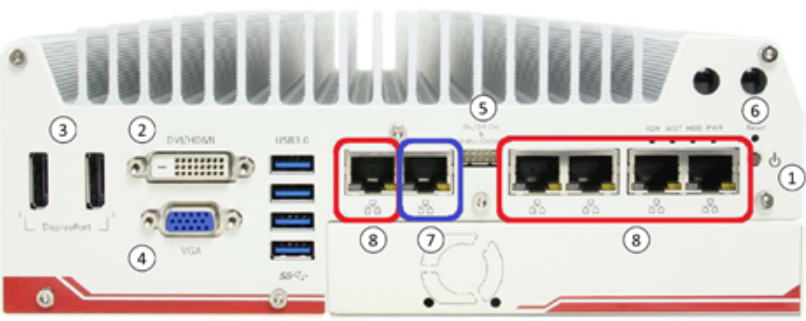
In this image, numbers indicate the following components:
- Power button, Power indicator
- DVI video connectors
- HDMI video connectors
- VGA video connectors
- Remote on/off Control, and status LED output
- Reset button
- Management network adapter
- Ports to receive mirrored data
The following image shows a view of the Nuvo 5006LP back panel:
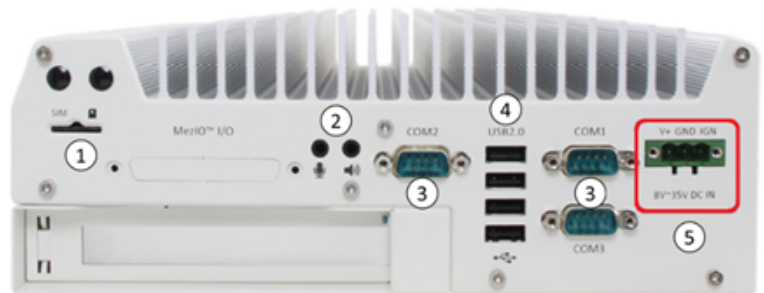
In this image, numbers indicate the following components:
- SIM card slot
- Microphone, and speakers
- COM ports
- USB connectors
- DC power port (DC IN)
Specifications
| Component | Technical Specifications |
|---|---|
| Construction | Aluminum, fanless and dust-proof design |
| Dimensions | 240 mm (W) x 225 mm (D) x 77 mm (H) |
| Weight | 3.1 kg (including CPU, memory, and HDD) |
| CPU | Intel Core i5-6500TE (6M Cache, up to 3.30 GHz) S1151 |
| Chipset | Intel® Q170 Platform Controller Hub |
| Memory | 8 GB DDR4 2133 MHz Wide Temperature SODIMM |
| Storage | 128 GB 3ME3 Wide Temperature mSATA SSD |
| Network controller | Six-Gigabit Ethernet ports by Intel® I219 |
| Device access | Four USBs: Two in front, two in the rear, and 1 internal |
| Power Adapter | 120/240VAC-20VDC/6A |
| Mounting | Mounting kit, Din Rail |
| Operating Temperature | -25°C - 70°C |
| Storage Temperature | -40°C ~ 85°C |
| Humidity | 10%~90%, non-condensing |
| Vibration | Operating, 5 Grms, 5-500 Hz, three Axes (w/ SSD, according to IEC60068-2-64) |
| Shock | Operating, 50 Grms, Half-sine 11 ms Duration (w/ SSD, according to IEC60068-2-27) |
| EMC | CE/FCC Class A, according to EN 55022, EN 55024 & EN 55032 |
Nuvo 5006LP sensor installation
This section describes how to install OT sensor software on the Nuvo 5006LP appliance. Before installing the OT sensor software, you must adjust the appliance's BIOS configuration.
Note
Installation procedures are only relevant if you need to re-install software on a preconfigured device, or if you buy your own hardware and configure the appliance yourself.
Prerequisites
Before installing OT sensor software, or updating the BIOS configuration, make sure that the operating system is installed on the appliance.
Configure the Nuvo 5006LP BIOS
This procedure describes how to update the Nuvo 5006LP BIOS configuration for your OT sensor deployment.
To configure the Nuvo 5006LP BIOS:
Power on the appliance.
Press F2 to enter the BIOS configuration.
Go to Power and change the Power On after Power Failure setting to S0-Power On.
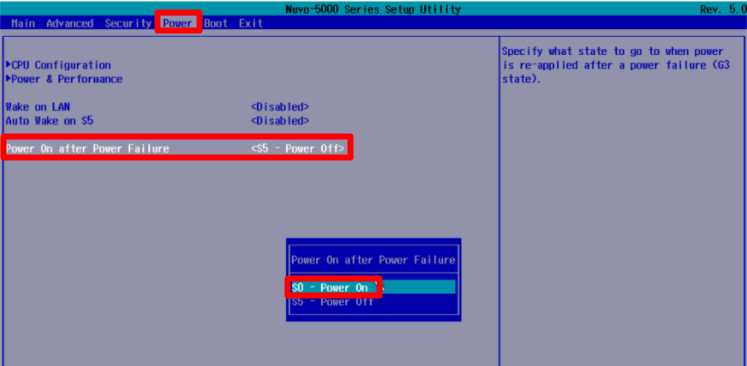
Go to Boot and ensure that PXE Boot to LAN is set to Disabled.
Press F10 to save, and then select Exit.
Install OT sensor software on the Nuvo 5006LP
This procedure describes how to install OT sensor software on the Nuvo 5006LP. The installation takes approximately 20 minutes. After the installation is complete, the system restarts several times.
To install OT sensor software:
Connect an external CD or disk-on-key that contains the sensor software you downloaded from the Azure portal.
Boot the appliance.
Select English.
Select XSENSE-RELEASE-<version> Office....
Define the appliance architecture, and network properties as follows:
Parameter Configuration Hardware profile Select office. Management interface eth0 Management network IP address IP address provided by the customer Management subnet mask IP address provided by the customer DNS IP address provided by the customer Default gateway IP address 0.0.0.0 Input interface The list of input interfaces is generated for you by the system.
To mirror the input interfaces, copy all the items presented in the list with a comma separator.Bridge interface - For example:
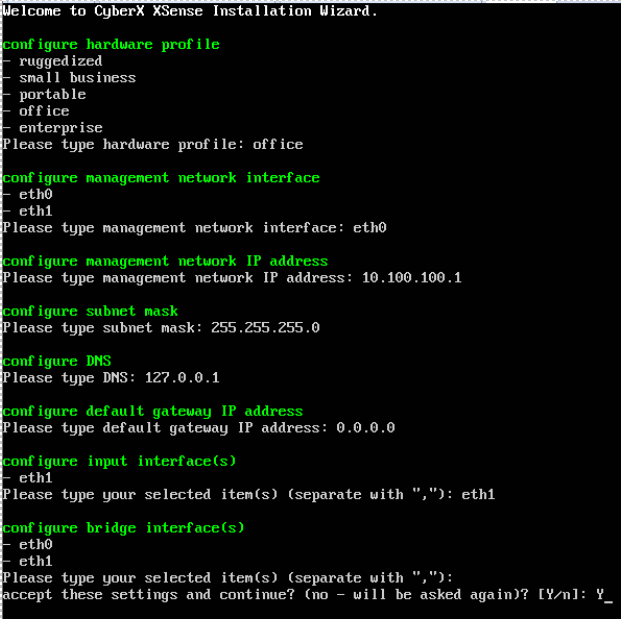
Accept the settings and continue by entering
Y.
After approximately 10 minutes, sign-in credentials are automatically generated. Save the username and passwords; you'll need these credentials to access the platform the first time you use it.
Next steps
Continue understanding system requirements for physical or virtual appliances. For more information, see Which appliances do I need?.
Then, use any of the following procedures to continue:
Feedback
Coming soon: Throughout 2024 we will be phasing out GitHub Issues as the feedback mechanism for content and replacing it with a new feedback system. For more information see: https://aka.ms/ContentUserFeedback.
Submit and view feedback for