Troubleshoot the on-premises management console (Legacy)
Important
Defender for IoT now recommends using Microsoft cloud services or existing IT infrastructure for central monitoring and sensor management, and plans to retire the on-premises management console on January 1st, 2025.
For more information, see Deploy hybrid or air-gapped OT sensor management.
This article describes basic troubleshooting tools for the on-premises management console. In addition to the items described here, you can forward alerts about failed sensor backups and disconnected sensors.
For any other issues, contact Microsoft Support.
Prerequisites
To perform the procedures in this article, make sure that you have:
- Access to the on-premises management console as a Support user. For more information, see Default privileged on-premises users.
Check system health
Check your system health from the on-premises management console.
To access the system health tool:
Sign in to the on-premises management console with the support user credentials.
Select System Settings > System Statistics.
System health data appears. Select an item to view more details in the box. For example:
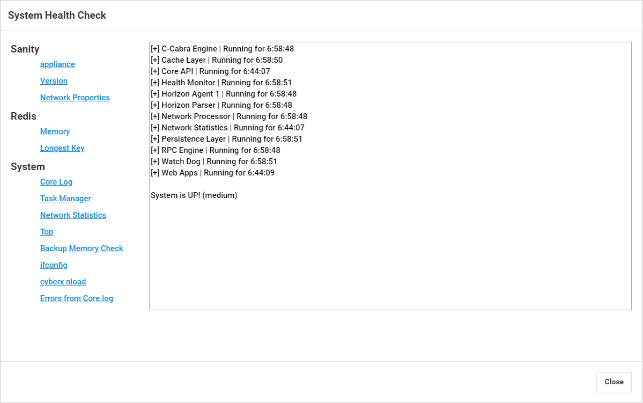
System health checks include the following:
| Name | Description |
|---|---|
| Sanity | |
| - Appliance | Runs the appliance sanity check. You can perform the same check by using the CLI command system-sanity. |
| - Version | Displays the appliance version. |
| - Network Properties | Displays the sensor network parameters. |
| Redis | |
| - Memory | Provides the overall picture of memory usage, such as how much memory was used and how much remained. |
| - Longest Key | Displays the longest keys that might cause extensive memory usage. |
| System | |
| - Core Log | Provides the last 500 rows of the core log, so that you can view the recent log rows without exporting the entire system log. |
| - Task Manager | Translates the tasks that appear in the table of processes to the following layers: - Persistent layer (Redis) - Cache layer (SQL) |
| - Network Statistics | Displays your network statistics. |
| - TOP | Shows the table of processes. It's a Linux command that provides a dynamic real-time view of the running system. |
| - Backup Memory Check | Provides the status of the backup memory, checking the following: - The location of the backup folder - The size of the backup folder - The limitations of the backup folder - When the last backup happened - How much space there is for the extra backup files |
| - ifconfig | Displays the parameters for the appliance's physical interfaces. |
| - CyberX nload | Displays network traffic and bandwidth by using the six-second tests. |
| - Errors from core log | Displays errors from the core log file. |
Investigate a lack of expected alerts
If you don't see an expected alert on the on-premises Alerts page, do the following to troubleshoot:
Verify whether the alert is already listed as a reaction to a different security instance. If it is, and that alert hasn't yet been handled, a new alert isn't shown elsewhere.
Verify that the alert isn't being excluded by Alert Exclusion rules. For more information, see Create alert exclusion rules on an on-premises management console.
Tweak the Quality of Service (QoS)
To save your network resources, you can limit the number of alerts sent to external systems (such as emails or SIEM) in one sync operation between an appliance and the on-premises management console.
The default number of alerts is 50. This means that in one communication session between an appliance and the on-premises management console, there will be no more than 50 alerts to external systems.
To limit the number of alerts, use the notifications.max_number_to_report property available in /var/cyberx/properties/management.properties. No restart is needed after you change this property.
To tweak the Quality of Service (QoS):
Sign into your on-premises management console via SSH to access the CLI.
Verify the default values:
grep \"notifications\" /var/cyberx/properties/management.propertiesThe following default values appear:
notifications.max_number_to_report=50
notifications.max_time_to_report=10 (seconds)
Edit the default settings:
sudo nano /var/cyberx/properties/management.propertiesEdit the settings of the following lines:
notifications.max_number_to_report=50
notifications.max_time_to_report=10 (seconds)
Save the changes. No restart is required.
Export logs from the on-premises management console for troubleshooting
For further troubleshooting, you may want to export logs to send to the support team, such as audit or database logs.
To export log data:
In the on-premises management console, select System Settings > Export.
In the Export Troubleshooting Information dialog:
In the File Name field, enter a meaningful name for the exported log. The default filename uses the current date, such as 13:10-June-14-2022.tar.gz.
Select the logs you would like to export.
Select Export.
The file is exported and is linked from the Archived Files list at the bottom of the Export Troubleshooting Information dialog.
For example:

Select the file link to download the exported log, and also select the
 button to view its one-time password.
To open the exported logs, forward the downloaded file and the one-time password to the support team. Exported logs can be opened only together with the Microsoft support team.
To keep your logs secure, make sure to forward the password separately from the downloaded log.

Next steps
Feedback
Coming soon: Throughout 2024 we will be phasing out GitHub Issues as the feedback mechanism for content and replacing it with a new feedback system. For more information see: https://aka.ms/ContentUserFeedback.
Submit and view feedback for