Integrate ServiceNow with Microsoft Defender for IoT (legacy)
Note
A new Operational Technology Manager integration is now available from the ServiceNow store. The new integration streamlines Microsoft Defender for IoT sensor appliances, OT assets, network connections, and vulnerabilities to ServiceNow’s Operational Technology (OT) data model. Check the software version, as more up-to-date versions of this software maybe available on the ServiceNow site.
Please read the ServiceNow’s supporting links and docs for the ServiceNow's terms of service.
Microsoft Defender for IoT's legacy integration with ServiceNow is not affected by the new integrations and Microsoft will continue supporting it.
For more information, see the new ServiceNow integrations, and the ServiceNow documentation on the ServiceNow store:
This article helps you learn how to integrate and use ServiceNow with Microsoft Defender for IoT.
The Defender for IoT integration with ServiceNow provides centralized visibility, monitoring, and control for the IoT and OT landscape. These bridged platforms enable automated device visibility and threat management to previously unreachable ICS and IoT devices.
The ServiceNow Configuration Management Database (CMDB) is enriched, and supplemented with a rich set of device attributes that are pushed by the Defender for IoT platform. This ensures a comprehensive, and continuous visibility into the device landscape. This visibility lets you monitor, and respond from a single-pane-of-glass.
Note
Microsoft Defender for IoT was formally known as CyberX. References to CyberX refer to Defender for IoT.
In this article, you learn how to:
- Download the Defender for IoT application in ServiceNow
- Set up Defender for IoT to communicate with ServiceNow
- Create access tokens in ServiceNow
- Send Defender for IoT device attributes to ServiceNow
- Set up the integration using an HTTPS proxy
- View Defender for IoT detections in ServiceNow
- View connected devices
Prerequisites
Before you begin, make sure that you have the following prerequisites:
Software requirements
Access to ServiceNow and Defender for IoT
- ServiceNow Service Management version 3.0.2.
- Defender for IoT patch 2.8.11.1 or above.
Access to a Defender for IoT OT sensor as an Admin user. For more information, see On-premises users and roles for OT monitoring with Defender for IoT.
Note
If you are already working with a Defender for IoT and ServiceNow integration and upgrade using the on-premises management console. In that case, the previous data from Defender for IoT sensors should be cleared from ServiceNow.
Architecture
On-premises management console architecture: Set up an on-premises management console to communicate with one instance of ServiceNow. The on-premises management console pushes sensor data to the Defender for IoT application using REST API.
To set up your system to work with an on-premises management console, you need to disable the ServiceNow Sync, Forwarding Rules, and Proxy configurations on any sensors where they were set up.
Sensor architecture: If you want to set up your environment to include direct communication between sensors and ServiceNow, for each sensor define the ServiceNow Sync, Forwarding rules, and proxy configuration (if a proxy is needed).
Note
The integration for legacy versions of Defender for IoT will pass data for assets and alerts but won't pass vulnerability data.
Download the Defender for IoT application in ServiceNow
To access the Defender for IoT application within ServiceNow, you need to download the application from the ServiceNow application store.
To access the Defender for IoT application in ServiceNow:
Navigate to the ServiceNow application store.
Search for
Defender for IoTorCyberX IoT/ICS Management.Select the application.
Select Request App.
Sign in, and download the application.
Set up Defender for IoT to communicate with ServiceNow
Configure Defender for IoT to push alert information to the ServiceNow tables. Defender for IoT alerts appear in ServiceNow as security incidents. This can be done by defining a Defender for IoT forwarding rule to send alert information to ServiceNow.
Forwarding alert rules run only on alerts triggered after the forwarding rule is created. Alerts already in the system from before the forwarding rule was created aren't affected by the rule.
To push alert information to the ServiceNow tables:
Sign in to the on-premises management console, and select Forwarding.
Select + to create a new rule.
In the Create Forwarding Rule pane, define the following values:
Parameter Description Name Enter a meaningful name for the forwarding rule. Warning From the drop-down menu, select the minimal security level incident to forward.
For example, if Minor is selected, minor alerts and any alert above this severity level will be forwarded.Protocols To select a specific protocol, select Specific, and select the protocol for which this rule is applied.
By default, all the protocols are selected.Engines To select a specific security engine for which this rule is applied, select Specific, and select the engine.
By default, all the security engines are involved.System Notifications Forward the sensor's online and offline status. Alert Notifications Forward the sensor's alerts. In the Actions area, select Add, and then select ServiceNow. For example:
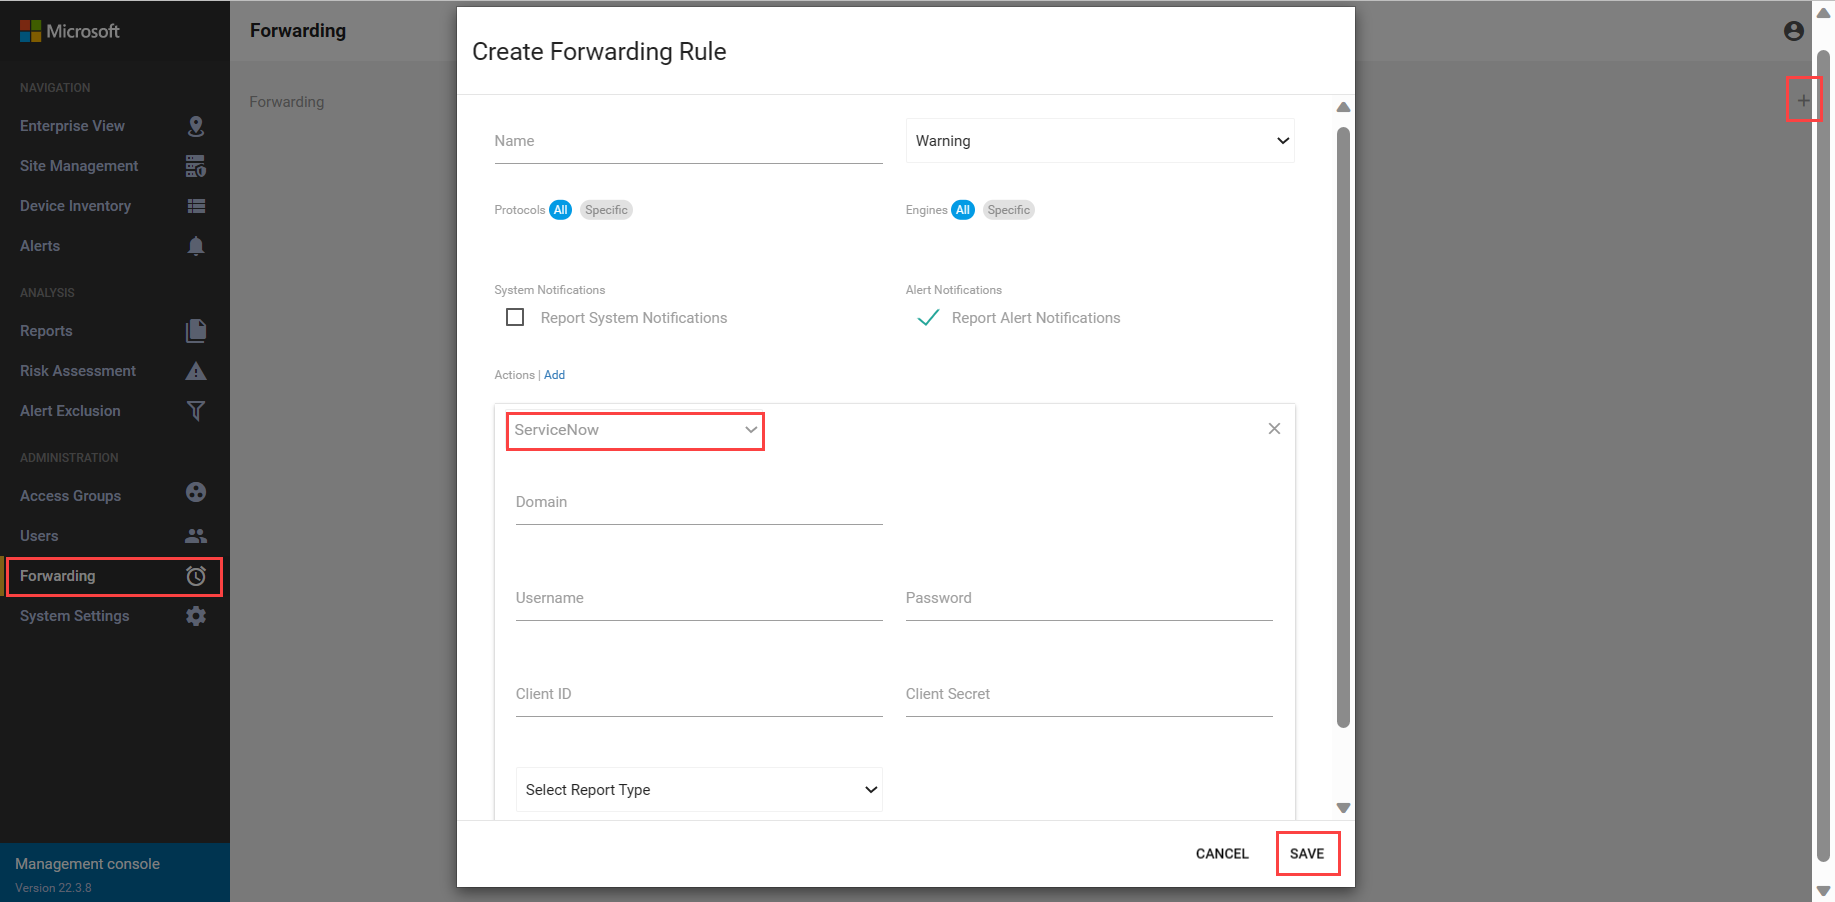
Verify that Report Alert Notifications is selected.
In the Actions pane, set the following parameters:
Parameter Description Domain Enter the ServiceNow server IP address. Username Enter the ServiceNow server username. Password Enter the ServiceNow server password. Client ID Enter the Client ID you received for Defender for IoT in the Application Registries page in ServiceNow. Client Secret Enter the client secret string you created for Defender for IoT in the Application Registries page in ServiceNow. Select Report Type Incidents: Forward a list of alerts that are presented in ServiceNow with an incident ID and short description of each alert.
Defender for IoT Application: Forward full alert information, including the sensor details, the engine, the source, and destination addresses. The information is forwarded to the Defender for IoT on the ServiceNow application.Select SAVE.

Defender for IoT alerts will now appear as incidents in ServiceNow.
Create access tokens in ServiceNow
A token is needed in order to allow ServiceNow to communicate with Defender for IoT.
You need the Client ID and Client Secret that you entered when creating the Defender for IoT Forwarding rules. The Forwarding rules forward alert information to ServiceNow, and when configuring Defender for IoT to push device attributes to ServiceNow tables.
Send Defender for IoT device attributes to ServiceNow
Configure Defender for IoT to push an extensive range of device attributes to the ServiceNow tables. To send attributes to ServiceNow, you must map your on-premises management console to a ServiceNow instance. This ensures that the Defender for IoT platform can communicate and authenticate with the instance.
To add a ServiceNow instance:
Sign in to your Defender for IoT on-premises management console.
Select System Settings, and then ServiceNow from the Management console integrations section.
Enter the following sync parameters in the ServiceNow Sync dialog box.

Parameter Description Enable Sync Enable and disable the sync after defining parameters. Sync Frequency (minutes) By default, information is pushed to ServiceNow every 60 minutes. The minimum is 5 minutes. ServiceNow Instance Enter the ServiceNow instance URL. Client ID Enter the Client ID you received for Defender for IoT in the Application Registries page in ServiceNow. Client Secret Enter the Client Secret string you created for Defender for IoT in the Application Registries page in ServiceNow. Username Enter the username for this instance. Password Enter the password for this instance. Select SAVE.

Verify that the on-premises management console is connected to the ServiceNow instance by reviewing the Last Sync date.

Set up the integrations using an HTTPS proxy
When setting up the Defender for IoT and ServiceNow integration, the on-premises management console and the ServiceNow server communicate using port 443. If the ServiceNow server is behind a proxy, the default port can't be used.
Defender for IoT supports an HTTPS proxy in the ServiceNow integration by enabling the change of the default port used for integration.
To configure the proxy:
Edit the global properties on the on-premises management console using the following command:
sudo vim /var/cyberx/properties/global.propertiesAdd the following parameters:
servicenow.http_proxy.enabled=1servicenow.http_proxy.ip=1.179.148.9servicenow.http_proxy.port=59125
Select Save and Exit.
Reset the on-premises management console using the following command:
sudo monit restart all
After the configurations are set, all the ServiceNow data is forwarded using the configured proxy.
View Defender for IoT detections in ServiceNow
This article describes the device attributes and alert information presented in ServiceNow.
To view device attributes:
Sign in to ServiceNow.
Navigate to CyberX Platform.
Navigate to Inventory, or Alert.
View connected devices
To view connected devices:
Select a device, and then select the Appliance listed in for that device.
In the Device Details dialog box, select Connected Devices.
Next steps
Feedback
Coming soon: Throughout 2024 we will be phasing out GitHub Issues as the feedback mechanism for content and replacing it with a new feedback system. For more information see: https://aka.ms/ContentUserFeedback.
Submit and view feedback for