Add and configure an environment definition
This guide explains how to add or update an environment definition in an Azure Deployment Environments catalog.
In Azure Deployment Environments, you can use a catalog to provide your development teams with a curated set of predefined infrastructure as code (IaC) templates called environment definitions.
An environment definition is composed of least two files:
- A template from an IaC framework. For example:
- An Azure Resource Manager (ARM) template might use a file called azuredeploy.json.
- A Bicep template might use a file called azuredeploy.bicep.
- A Terraform template might use a file called azuredeploy.tf, or azuredeploy.tf.json.
- A configuration file that provides metadata about the template. This file should be named environment.yaml.
Your development teams use the environment definitions that you provide in the catalog to deploy environments in Azure.
Microsoft offers a sample catalog that you can use as your repository. You can also use your own private repository, or you can fork and customize the environment definitions in the sample catalog.
After you add a catalog to your dev center, the service scans the specified folder path to identify folders that contain a template and an associated environment file. The specified folder path should be a folder that contains subfolders that hold the environment definition files.
In this article, you learn how to:
- Add an environment definition
- Update an environment definition
- Delete an environment definition
Add an environment definition
To add an environment definition to a catalog in Azure Deployment Environments (ADE), you first add the files to the repository. You then synchronize the dev center catalog with the updated repository.
To add an environment definition:
In your GitHub or Azure DevOps repository, create a subfolder in the repository folder path.
Add two files to the new repository subfolder:
An IaC template file.
An environment as a YAML file.
The environment.yaml file contains metadata related to the IaC template.
The following script is an example of the contents of an environment.yaml file for an ARM template:
    name: WebApp
    version: 1.0.0
    summary: Azure Web App Environment
    description: Deploys a web app in Azure without a datastore
    runner: ARM
    templatePath: azuredeploy.json
Use the following table to understand the fields in the environment.yaml file:
Field Description name The name of the environment definition. version The version of the environment definition. This field is optional. summary A brief description of the environment definition. description A detailed description of the environment definition. runner The IaC framework that the template uses. The value can be ARMorBicep. You can also specify a path to a template stored in a container registry.templatePath The path to the IaC template file. To learn more about the options and data types you can use in environment.yaml, see Parameters and data types in environment.yaml.
In your dev center, go to Catalogs, select the repository, and then select Sync.
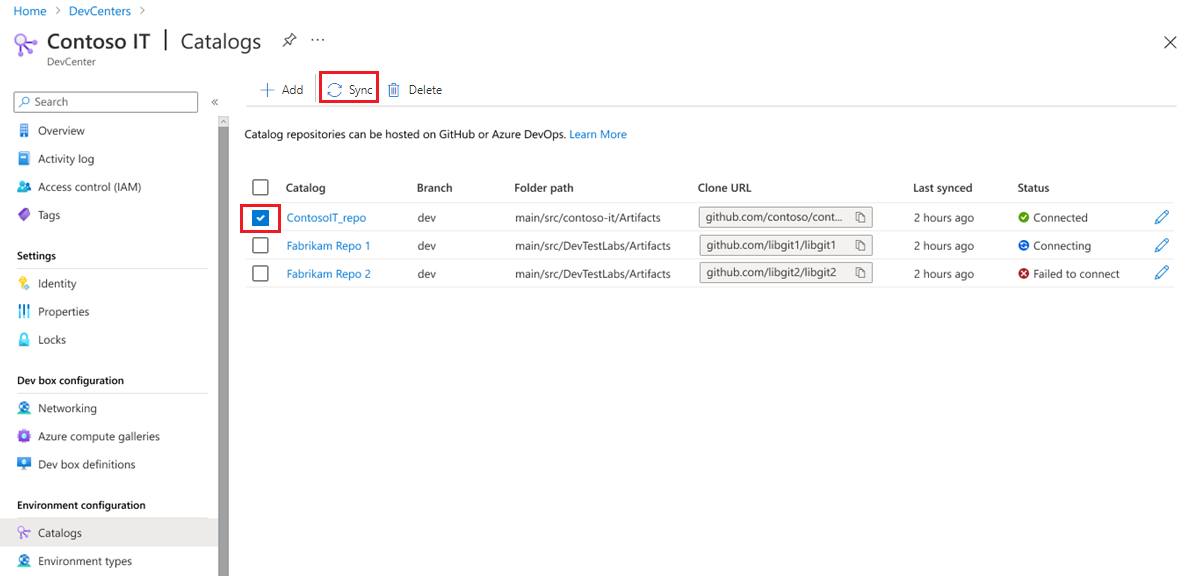

The service scans the repository to find new environment definitions. After you sync the repository, new environment definitions are available to all projects in the dev center.
Specify a Terraform image
The ADE extensibility model enables you to use your own custom container image to deploy your preferred choice of IaC framework. You can build and use your own container image to execute deployments using Terraform. Learn how to Configure a container image to execute deployments with Terraform.
When creating environment definitions that use a custom image in their deployment, the runner property provides a link to a container registry where this container image is stored.
The runner property specifies the location of the image you want to use. When you're using a Terraform image from a container registry, edit the runner property to specify the location that image, as shown in the following example:
runner: "{YOUR_REGISTRY}.azurecr.io/{YOUR_REPOSITORY}:{YOUR_TAG}"
Specify an ARM or Bicep image
The ADE team provides sample ARM and Bicep templates accessible through the Microsoft Artifact registry (also known as the Microsoft Container Registry) to help you get started. When you perform deployments by using ARM or Bicep, you can use the standard image that is published on Microsoft Artifact Registry (previously known as the Microsoft Container Registry).
To use the sample image published on the Microsoft Artifact Registry, use the respective identifiers runner: ARM for ARM and runner:Bicep for Bicep deployments.
For more information how to build and utilize ARM or Bicep container images within environment definitions, see Configure container image to execute deployments with ARM and Bicep.
Specify parameters for an environment definition
You can specify parameters for your environment definitions to allow developers to customize their environments.
Parameters are defined in the environment.yaml file.
The following script is an example of an environment.yaml file for an ARM template that includes two parameters; location and name:
name: WebApp
summary: Azure Web App Environment
description: Deploys a web app in Azure without a datastore
runner: ARM
templatePath: azuredeploy.json
parameters:
- id: "location"
  name: "location"
  description: "Location to deploy the environment resources"
  default: "[resourceGroup().location]"
  type: "string"
  required: false
- id: "name"
  name: "name"
  description: "Name of the Web App "
  default: ""
  type: "string"
  required: false
To learn more about the parameters and their data types that you can use in environment.yaml, see Parameters and data types in environment.yaml.
Developers can supply values for specific parameters for their environments through the developer portal.

Developers can also supply values for specific parameters for their environments through the CLI.
az devcenter dev environment create --environment-definition-name
                                    --catalog-name
                                    --dev-center
                                    --environment-name
                                    --environment-type
                                    --project
                                    [--description]
                                    [--no-wait]
                                    [--parameters]
                                    [--tags]
                                    [--user]
                                    [--user-id]
To learn more about the az devcenter dev environment create command, see the Azure CLI devcenter extension.
Update an environment definition
To modify the configuration of Azure resources in an existing environment definition in Azure Deployment Environments, update the associated template file in the repository. The change is immediately reflected when you create a new environment by using the specific environment definition. The update also is applied when you redeploy an environment associated with that environment definition.
To update any metadata related to the template, modify environment.yaml, and then update the catalog.
Delete an environment definition
To delete an existing environment definition, in the repository, delete the subfolder that contains the template file and the associated environment YAML file. Then, update the catalog.
After you delete an environment definition, development teams can no longer use the specific environment definition to deploy a new environment. Update the environment definition reference for any existing environments that use the deleted environment definition. If the reference isn't updated and the environment is redeployed, the deployment fails.
Related content
Feedback
Coming soon: Throughout 2024 we will be phasing out GitHub Issues as the feedback mechanism for content and replacing it with a new feedback system. For more information see: https://aka.ms/ContentUserFeedback.
Submit and view feedback for