Implement integration tests for Terraform projects in Azure
Terraform enables the definition, preview, and deployment of cloud infrastructure. Using Terraform, you create configuration files using HCL syntax. The HCL syntax allows you to specify the cloud provider - such as Azure - and the elements that make up your cloud infrastructure. After you create your configuration files, you create an execution plan that allows you to preview your infrastructure changes before they're deployed. Once you verify the changes, you apply the execution plan to deploy the infrastructure.
Integration tests validate that a newly introduced code change doesn't break existing code. In DevOps, continuous integration (CI) refers to a process that builds the entire system whenever the code base is changed - such as someone wanting to merge a PR into a Git repo. The following list contains common examples of integration tests:
- Static code analysis tools such as lint and format.
- Run terraform validate to verify the syntax of the configuration file.
- Run terraform plan to ensure the configuration will work as expected.
In this article, you learn how to:
- Learn the basics of integration testing for Terraform projects.
- Use Azure DevOps to configure a continuous integration pipeline.
- Run static code analysis on Terraform code.
- Run
terraform validateto validate Terraform configuration files on the local machine. - Run
terraform planto validate that Terraform configuration files from a remote services perspective. - Use an Azure Pipeline to automate continuous integration.
1. Configure your environment
- Azure subscription: If you don't have an Azure subscription, create a free account before you begin.
Configure Terraform: If you haven't already done so, configure Terraform using one of the following options:
Azure DevOps organization and project: If you don't have one, create an Azure DevOps organization.
Terraform Build & Release Tasks extension: Install the Terraform build/release tasks extension into your Azure DevOps organization.
Grant Azure DevOps access to your Azure Subscription: Create an Azure service connection named
terraform-basic-testing-azure-connectionto allow Azure Pipelines to connect to your Azure subscriptionsExample code and resources: Download from GitHub the integration-testing project. The directory into which you download the sample is referred to as the example directory.
2. Validate a local Terraform configuration
The terraform validate command is run from the command line in the directory containing your Terraform files. This commands main goal is validating syntax.
Within the example directory, navigate to the
srcdirectory.Run terraform init to initialize the working directory.
terraform initRun terraform validate to validate the syntax of the configuration files.
terraform validateKey points:
- You see a message indicating that the Terraform configuration is valid.
Edit the
main.tffile.On line 5, insert a typo that invalidates the syntax. For example, replace
var.locationwithvar.loactionSave the file.
Run validation again.
terraform validateKey points:
- You see an error message indicating the line of code in error and a description of the error.
As you can see, Terraform has detected an issue in the syntax of the configuration code. This issue prevents the configuration from being deployed.
It is a good practice to always run terraform validate against your Terraform files before pushing them to your version control system. Also, this level of validation should be a part of your continuous integration pipeline. Later in this article, we'll explore how to configure an Azure pipeline to automatically validate.
3. Validate Terraform configuration
In the previous section, you saw how to validate a Terraform configuration. That level of testing was specific to syntax. That test didn't take into consideration what might already be deployed on Azure.
Terraform is a declarative language meaning that you declare what you want as an end-result. For example, let's say you have 10 virtual machines in a resource group. Then, you create a Terraform file defining three virtual machines. Applying this plan doesn't increment the total count to 13. Instead, Terraform deletes seven of the virtual machines so that you end with three. Running terraform plan allows you to confirm the potential results of applying an execution plan to avoid surprises.
To generate the Terraform execution plan, you run terraform plan. This command connects to the target Azure subscription to check what part of the configuration is already deployed. Terraform then determines the necessary changes to meet the requirements stated in the Terraform file. At this stage, Terraform isn't deploying anything. It's telling you what will happen if you apply the plan.
If you're following along with the article and you've done the steps in the previous section, run the terraform plan command:
terraform plan
After running terraform plan, Terraform displays the potential outcome of applying the execution plan. The output indicates the Azure resources that will be added, changed, and destroyed.
By default, Terraform stores state in the same local directory as the Terraform file. This pattern works well in single-user scenarios. However, when multiple people work on the same Azure resources, local state files can get out of sync. To remedy this issue, Terraform supports writing state files to a remote data store (such as Azure Storage). In this scenario, it might be problematic to run terraform plan on a local machine and target a remote machine. As a result, it might make sense to automate this validation step as part of your continuous integration pipeline.
4. Run static code analysis
Static code analysis can be done directly on the Terraform configuration code, without executing it. This analysis can be useful to detect issues such as security problems and compliance inconsistency.
The following tools provide static analysis for Terraform files:
Static analysis is often executed part of a continuous integration pipeline. These tests don't require the creation of an execution plan or deployment. As a result, they run faster than other tests and are generally run first in the continuous integration process.
5. Automate integration tests using Azure Pipeline
Continuous integration involves testing an entire system when a change is introduced. In this section, you see an Azure Pipeline configuration used to implement continuous integration.
Using your editor of choice, browse to the local clone of the Terraform sample project on GitHub.
Open the
samples/integration-testing/src/azure-pipeline.yamlfile.Scroll down to the steps section where you see a standard set of steps used to run various installation and validation routines.
Review the line that reads, Step 1: run the Checkov Static Code Analysis. In this step, the
Checkovproject mentioned earlier runs a static code analysis on the sample Terraform configuration.- bash: $(terraformWorkingDirectory)/checkov.sh $(terraformWorkingDirectory) displayName: Checkov Static Code AnalysisKey points:
- This script is responsible for running Checkov in the Terraform workspace mounted inside a Docker container. Microsoft-managed agents are Docker enabled. Running tools inside a Docker container is easier and removes the need to install Checkov on the Azure Pipeline agent.
- The
$(terraformWorkingDirectory)variable is defined in theazure-pipeline.yamlfile.
Review the line that reads, Step 2: install Terraform on the Azure Pipelines agent. The Terraform Build & Release Task extension that you installed earlier has a command to install Terraform on the agent running the Azure Pipeline. This task is what is being done in this step.
- task: charleszipp.azure-pipelines-tasks-terraform.azure-pipelines-tasks-terraform-installer.TerraformInstaller@0
  displayName: 'Install Terraform'
  inputs:
    terraformVersion: $(terraformVersion)
Key points:
- The version of Terraform to install is specified via an Azure Pipeline variable named
terraformVersionand defined in theazure-pipeline.yamlfile.
- The version of Terraform to install is specified via an Azure Pipeline variable named
Review the line that reads, Step 3: run Terraform init to initialize the workspace. Now that Terraform is installed on the agent, the Terraform directory can be initialized.
- task: charleszipp.azure-pipelines-tasks-terraform.azure-pipelines-tasks-terraform-cli.TerraformCLI@0
  displayName: 'Run terraform init'
  inputs:
    command: init
    workingDirectory: $(terraformWorkingDirectory)
Key points:
- The
commandinput specifies which Terraform command to run. - The
workingDirectoryinput indicates the path of the Terraform directory. - The
$(terraformWorkingDirectory)variable is defined in theazure-pipeline.yamlfile.
- The
Review the line that reads, Step 4: run Terraform validate to validate HCL syntax. Once the project directory is initialized,
terraform validateis run to validate the configuration on the server.- task: charleszipp.azure-pipelines-tasks-terraform.azure-pipelines-tasks-terraform-cli.TerraformCLI@0 displayName: 'Run terraform validate' inputs: command: validate workingDirectory: $(terraformWorkingDirectory)Review the line that reads, Step 5: run Terraform plan to validate HCL syntax. As explained earlier, generating the execution plan is done to verify if the Terraform configuration is valid before deployment.
- task: charleszipp.azure-pipelines-tasks-terraform.azure-pipelines-tasks-terraform-cli.TerraformCLI@0
  displayName: 'Run terraform plan'
  inputs:
    command: plan
    workingDirectory: $(terraformWorkingDirectory)
    environmentServiceName: $(serviceConnection)
    commandOptions: -var location=$(azureLocation)
Key points:
- The
environmentServiceNameinput refers to the name of the Azure service connection created in Configure your environment. The connection allows Terraform to access your Azure subscription. - The
commandOptionsinput is used to pass arguments to the Terraform command. In this case, a location is being specified. The$(azureLocation)variable is defined earlier in the YAML file.
- The
Import the pipeline into Azure DevOps
Open your Azure DevOps project and go into the Azure Pipelines section.
Select Create Pipeline button.
For the Where is your code? option, select GitHub (YAML).
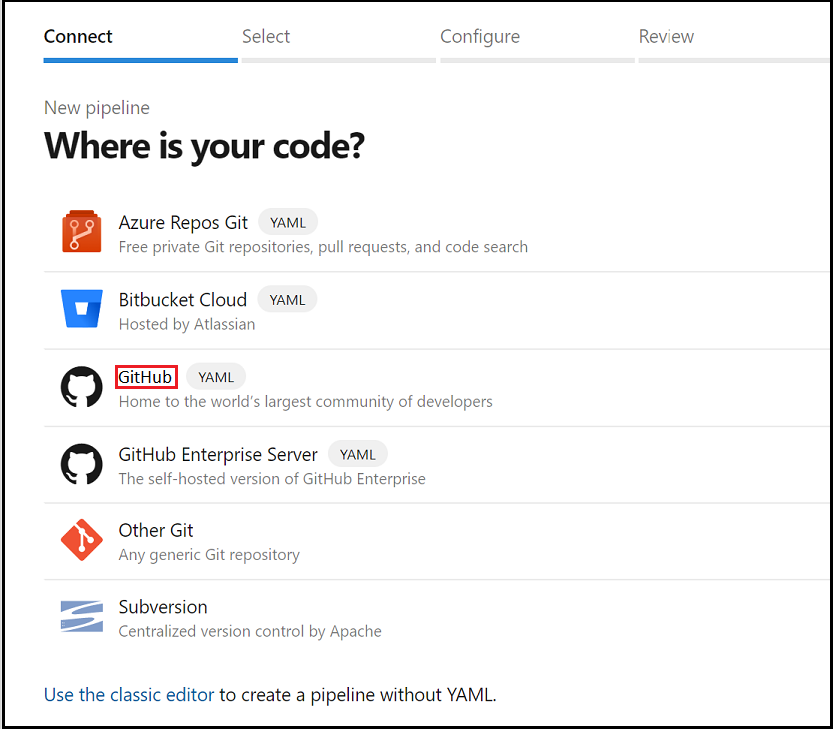
At this point, you might have to authorize Azure DevOps to access your organization. For more information on this topic, see the article, Build GitHub repositories.
In the repositories list, select the fork of the repository you created in your GitHub organization.
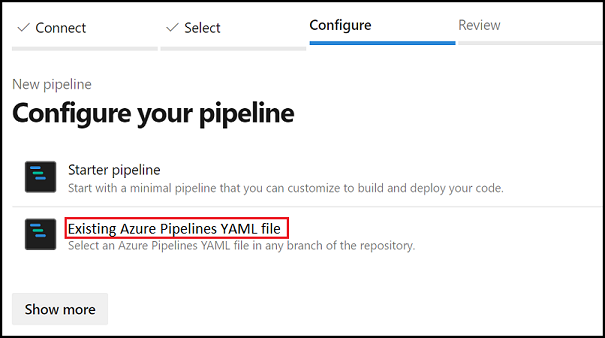
In the Configure your pipeline step, choose to start from an existing YAML pipeline.
When the Select existing YAML pipeline page displays, specify the branch
masterand enter the path to the YAML pipeline:samples/integration-testing/src/azure-pipeline.yaml.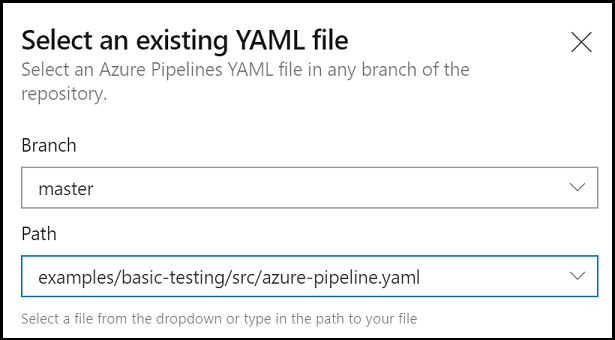
Select Continue to load the Azure YAML pipeline from GitHub.
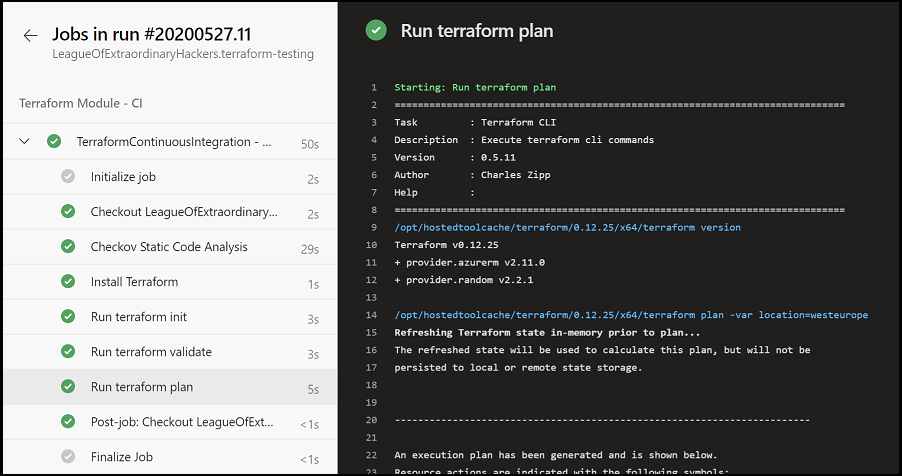
When the Review your pipeline YAML page displays, select Run to create and manually trigger the pipeline for the first time.

Verify the results
You can run the pipeline manually from the Azure DevOps UI. However, the point of the article is to show automated continuous integration. Test the process by committing a change to the samples/integration-testing/src folder of your forked repository. The change will automatically trigger a new pipeline on the branch on which you're pushing the code.

Once you've done that step, access the details in Azure DevOps to ensure that everything ran correctly.
Troubleshoot Terraform on Azure
Troubleshoot common problems when using Terraform on Azure
Next steps
Feedback
Coming soon: Throughout 2024 we will be phasing out GitHub Issues as the feedback mechanism for content and replacing it with a new feedback system. For more information see: https://aka.ms/ContentUserFeedback.
Submit and view feedback for