Bulk move work items and change the work item type in Azure Boards
Azure DevOps Services | Azure DevOps Server 2022 - Azure DevOps Server 2019
Often you find that someone created a work item of the wrong work item type (WIT) or within an incorrect project. You can correct these issues for individual work items or bulk modify several work items. You can also remove work items added to your backlog or taskboard that aren't relevant anymore.
Tip
For TFS 2018 and earlier versions, you can't change the work item type for an existing work item, but you can copy the work item and specify a new type. Also, if you have several work items with type changes you want to make, you can export them using Excel, and then re-add them as a new type.
To remove, delete, or restore deleted work items, see Remove, delete, or restore work items.
In this article you'll learn:
- How to change the work item type of one or more work items
- How to move one or more work items to another project
Tip
From the web portal, you can multi-select several work items from a backlog or query results page and perform a bulk update using the associated feature. To change, move, delete, or restore several work items at the same time, see Bulk modify work items.
Prerequisites
- You must be a member of the Contributors or Project Administrators security group. To get added, Add users to a project or team.
- To modify work items, you must have your View work items in this node and Edit work items in this node permissions set to Allow. By default, the Contributors group has this permission set. For more information, see Set permissions and access for work tracking.
- To change the work item type, you must be granted Stakeholder access or higher.
- To move work items to another project, you must be a member of the Project Administrators group or have the Move work items out of this project permission set to Allow. By default, the Contributors group doesn't have this permission set. Users granted Stakeholder access don't have access to this feature.
Note
Users with Stakeholder access for a public project have full access to all work tracking features just like users with Basic access. For more information, see Stakeholder access quick reference.
You must be added to a project as a member of the Contributors or Project Administrators security group. To get added, Add users to a project or team.
To modify work items, you must have your View work items in this node and Edit work items in this node permissions set to Allow. By default, the Contributors group has this permission set. For more information, see Set permissions and access for work tracking.
To change the work item type, you must be granted Stakeholder access or higher. For more information, see Stakeholder access quick reference.
To move work items to another project, the project must use an Inherited process model.
To move work items to another project, you must be a member of the Project Administrators group or have the Move work items out of this project permission set to Allow. By default, the Contributors group doesn't have this permission set. Users granted Stakeholder access don't have access to this feature.
Important
You can change the work item type or move work items to another project within a project collection. These features require that the data warehouse is disabled. With the data warehouse disabled, you'll use the Analytics Service to support your reporting needs. To learn more about disabling the data warehouse, see Disable the data warehouse and cube.
For more information, see Set permissions and access for work tracking or Change project-level permissions.
Important
You can't change type or move work items whose work item types support test management or that belong to the Hidden Types Category. This includes all work items that track tests—such as test cases, shared steps, and shared parameters—code review requests and responses, and feedback requests and responses.
Important
You can't change type, move work items, or delete/restore work items whose work item types support test management or that belong to the Hidden Types Category. This includes all work items that track tests—such as test cases, shared steps, and shared parameters—code review requests and responses, and feedback requests and responses.
Also, you can't change the work item type if the project is defined on a collection that uses the On-premises XML process model.
Change the work item type
Changing the work item type refreshes the work item form with the fields defined for the type selected. For example, you can change a bug to a task and the form refreshes with the fields defined for a task.
Note
You can't change the work item type if the project is defined on a collection that uses the On-premises XML process model. Also, you can't change the work item type of work items associated with test management.
You can change a single work item or several multi-selected work items to a new type.
Open a work item, choose the
 actions icon, and select the
  Change type... option.
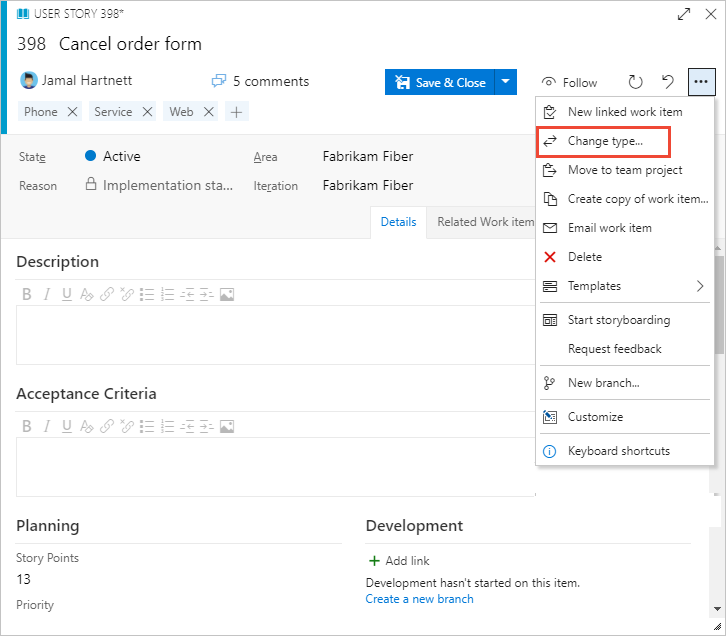
Or, from the backlog or query results page, multi-select several work items whose type you want to change. You can select several work items of the same type or different type so long as you want to change them all to the same work item type.
Choose the
actions icon, and select the
Change type... option.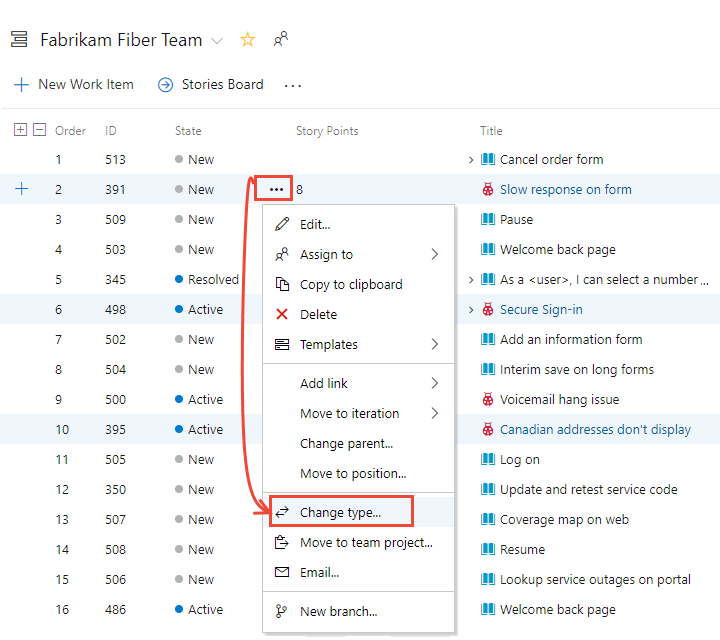
Important
From the Query Results page, the Change type… option becomes unavailable if you have checked the Query Editor's Query across projects checkbox.
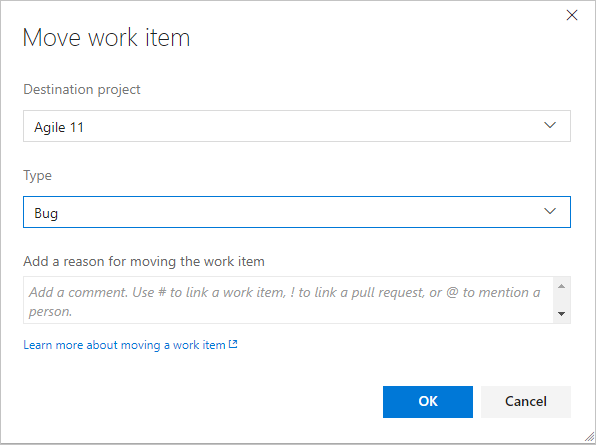
Select the type and optionally enter a comment.
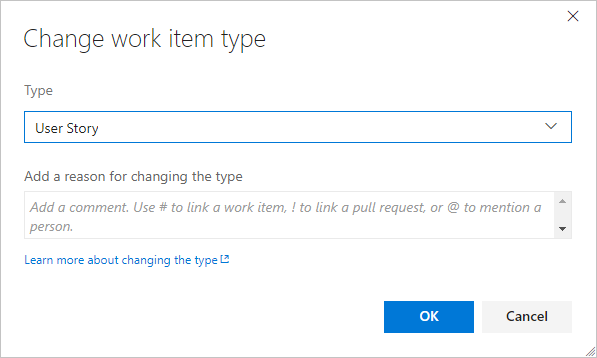
Comments are automatically added to the Discussion and an entry gets made to the History. Also, the system automatically resets the State and Reason fields to the default initial values for the work item type that you move.
Save the work item(s) to complete the change.
Note
The system automatically resets the State and Reason fields to the default initial values of the specified type. However, in some cases you may need to open the work item to change the State or Reason field to a value supported by the changed-to work item type.
From the Query Results page, save all work items that you bulk-modified. When you bulk modify items from the backlog, they're automatically saved. Work items shown in bold text indicate that local changes haven't yet been saved to the data store. The system automatically saves each work item. Refresh the page to reflect your changes.
Move a work item to another project
When you discover that a work item belongs to a different project within your organization or collection, you can move it where it belongs. You can move a single work item or several multi-selected work items.
Note the following:
- You can only move work items from one project to another project within the organization or collection.
- You can only move work items whose type exists in the project you're moving it to. For example, you can't move User Stories to a project based on the Scrum process that doesn't contain User Story as a work item type.
- You can't move work items associated with test management.
- To move work items to another project, you must be a member of the Project Administrators group or be granted explicit permissions to move work items.
- Users granted Stakeholder access don't have access to this feature even if granted permission.
Open the work item and choose the
 Move... option from the work item form's Actions menu.
If you don't see the option, then you haven't been granted permissions to move work items out of the project.
Or, from the backlog or query results page, multi-select several work items that you want to move to another project. You can select several work items so long as you want to move them all to the same project.
Choose the
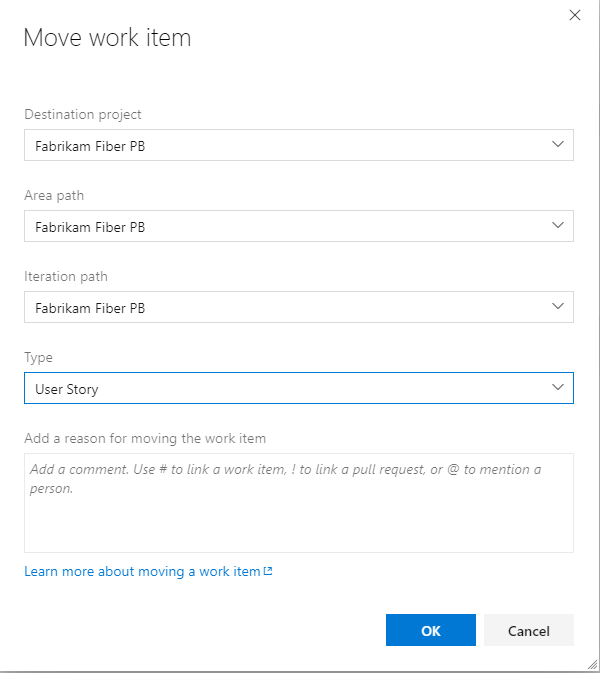
actions icon to open the context menu of one of the selected work items, and choose the Move… option.Select the destination project and choose the other options available, including changing the work item type. Optionally enter a comment.
Note
Child work items are not moved. They remain in the origin project, but the Parent-Child links remain in place.
Comments are automatically added to the Discussion and an entry gets made to the History. Also, the system automatically resets the State and Reason fields to the default initial values for the work item type that you move.
Related articles
Feedback
Coming soon: Throughout 2024 we will be phasing out GitHub Issues as the feedback mechanism for content and replacing it with a new feedback system. For more information see: https://aka.ms/ContentUserFeedback.
Submit and view feedback for