Use Azure Pipelines to build and deploy a Python web app to Azure App Service
Azure DevOps Services
Use Azure Pipelines for continuous integration and continuous delivery (CI/CD) to build and deploy a Python web app to Azure App Service on Linux. Your pipeline automatically builds and deploys your Python web app to App Service whenever there's a commit to the repository.
In this article, you learn how to:
- Create a web app in Azure App Service.
- Create a project in Azure DevOps.
- Connect your DevOps project to Azure.
- Create a Python-specific pipeline.
- Run the pipeline to build and deploy your app to your web app in App Service.
Prerequisites
- An Azure subscription. If you don't have one, create a free account.
- A GitHub account. If you don't have one, create one for free.
- An Azure DevOps Services organization. Create one for free.
- An Azure subscription. If you don't have one, create a free account.
- A GitHub account. If you don't have one, create one for free.
- An Azure DevOps Server.
- A self-hosted agent. If you need to create a self-hosted agent, see Self-hosted agents.
Create a repository for your app code
Fork the sample repository at https://github.com/Microsoft/python-sample-vscode-flask-tutorial to your GitHub account.
On your local host, clone your GitHub repository. Use the following command, replacing <repository-url> with the URL of your forked repository.
git clone <repository-url>
Test your app locally
Build and run the app locally to make sure it works.
Change to the cloned repository folder.
cd python-sample-vscode-flask-tutorialBuild and run the app
python -m venv .env source .env/bin/activate pip install --upgrade pip pip install -r ./requirements.txt export set FLASK_APP=hello_app.webapp python3 -m flask runTo view the app, open a browser window and go to http://localhost:5000. Verify that you see the title
Visual Studio Flask Tutorial.When you're finished, close the browser window and stop the Flask server with Ctrl+C.
Open a Cloud Shell
Sign in to the Azure portal at https://portal.azure.com.
Open the Azure CLI by selecting the Cloud Shell button on the portal toolbar.

The Cloud Shell appears along the bottom of the browser. Select Bash from the dropdown menu.
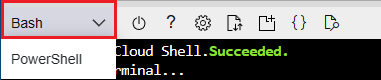
To give you more space to work, select the maximize button.
Create an Azure App Service web app
Create your Azure App Service web app from the Cloud Shell in the Azure portal.
Tip
To paste into the Cloud Shell, use Ctrl+Shift+V or right-click and select Paste from the context menu.
Clone your repository with the following command, replacing
<repository-url>with the URL of your forked repository.git clone <repository-url>Change directory to the cloned repository folder, so the
az webapp upcommand recognizes the app as a Python app.cd python-sample-vscode-flask-tutorialUse the az webapp up command to both provision the App Service and do the first deployment of your app. Replace
<your-web-app-name>with a name that is unique across Azure. Typically, you use a personal or company name along with an app identifier, such as<your-name>-flaskpipelines. The app URL becomes <your-appservice>.azurewebsites.net.az webapp up --name <your-web-app-name>The JSON output of the
az webapp upcommand shows:{ "URL": <your-web-app-url>, "appserviceplan": <your-app-service-plan-name>, "location": <your-azure-location>, "name": <your-web-app-name>, "os": "Linux", "resourcegroup": <your-resource-group>, "runtime_version": "python|3.11", "runtime_version_detected": "-", "sku": <sku>, "src_path": <repository-source-path> }Note the
URLand theruntime_versionvalues. You use theruntime_versionin the pipeline YAML file. TheURLis the URL of your web app. You can use it to verify that the app is running.Note
The
az webapp upcommand does the following actions:Create a default resource group.
Create a default App Service plan.
Create an app with the specified name.
Zip deploy all files from the current working directory, with build automation enabled.
Cache the parameters locally in the .azure/config file so that you don't need to specify them again when deploying later with
az webapp upor otheraz webappcommands from the project folder. The cached values are used automatically by default.
You can override the default action with your own values using the command parameters. For more information, see az webapp up.
The python-sample-vscode-flask-tutorial app has a startup.txt file that contains the specific startup command for the web app. Set the web app
startup-fileconfiguration property tostartup.txt.From the
az webapp upcommand output, copy theresourcegroupvalue.Enter the following command, using the resource group and your app name.
az webapp config set --resource-group <your-resource-group> --name <your-web-app-name> --startup-file startup.txtWhen the command completes, it shows JSON output that contains all of the configuration settings for your web app.
To see the running app, open a browser and go to the
URLshown in theaz webapp upcommand output. If you see a generic page, wait a few seconds for the App Service to start, then refresh the page. Verify that you see the titleVisual Studio Flask Tutorial.
Create an Azure DevOps project
Create a new Azure DevOps project.
- In a browser, go to dev.azure.com and sign in.
- Select your organization.
- Create a new project by selecting New project or Create project if creating the first project in the organization.
- Enter a Project name.
- Select the Visibility for your project.
- Select Create.
- In a browser, go to your Azure DevOps Server.
- Select your collection.
- Create a new project by selecting New project or Create project if creating the first project in the collection.
- Enter a Project name.
- Select the Visibility for your project.
- Select Create.
Create a service principal
A service principal is an identity created for use with applications, hosted services, and automated tools to access Azure resources. This access is restricted to the roles assigned to the service principal, giving you control over which resources can be accessed and at which level.
To create a service principal, go to cloud shell (bash) and run the following command. Replace <service-principal-name> with a name for your service principal, <your-subscription-id> with your subscription ID, and <your-resource-group> with the resource group for the web app.
az ad sp create-for-rbac --display-name <service-principal-name> --role contributor --scopes /subscriptions/<your-subscription-id>/resourceGroups/<your-resource-group>
The command returns a JSON object similar to the following example:
{
  "clientId": "<client GUID>",
  "clientSecret": "<string-value>",
  "subscriptionId": "<subscription GUID>",
  "tenantId": "<tenant GUID>",
  ...
}
Make note of the clientId, clientSecret, subscriptionId, and tenantId values. You need these values to create a service connection in the next section.
Create a service connection
A service connection allows you to create a connection to provide authenticated access from Azure Pipelines to external and remote services. To deploy to your Azure App Service web app, create a service connection to the resource group containing the web app.
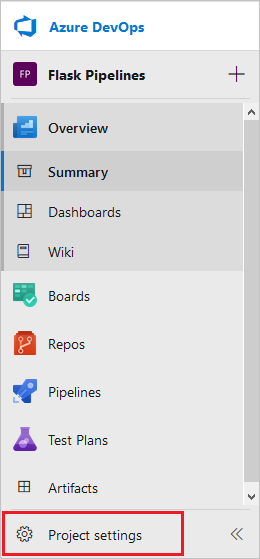
On project page, select Project settings.
Select Service connections in the Pipelines section of the menu.
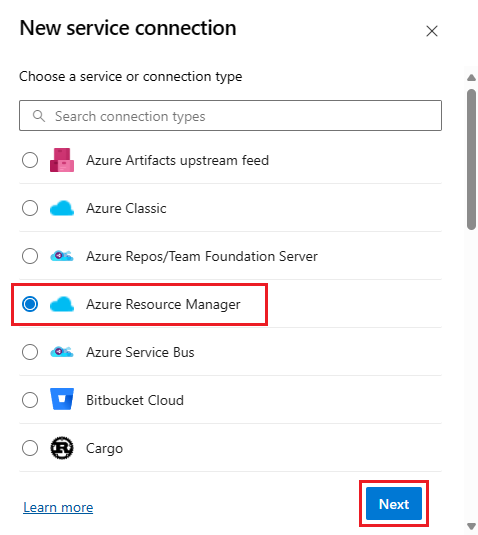
Select Create service connection.
Select Azure Resource Manager and select Next.
Select your authentication method and select Next.
In the New Azure service connection dialog, enter the information specific to the selected authentication method. For more information about authentication methods, see Connect to Azure by using an Azure Resource Manager service connection.
For example, if you're using a Workload Identity federation (automatic) or Service principal (automatic) authentication method, enter the required information.
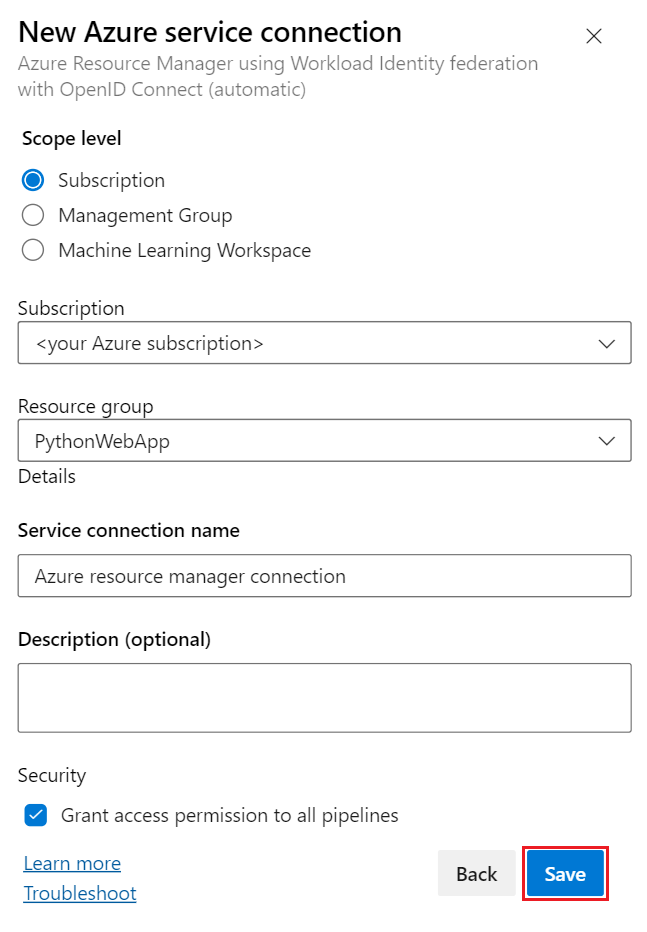
Field Description Scope level Select Subscription. Subscription Your Azure subscription name. Resource group The name of the resource group containing your web app. Service connection name A descriptive name for the connection. Grant access permissions to all pipelines Select this option to grant access to all pipelines. Select Save.
The new connection appears in the Service connections list, and is ready for use in your Azure Pipeline.
On project page, select Project settings.
Select Service connections in the Pipelines section of the menu.
Select Create service connection.
Select Azure Resource Manager and select Next.
On New Azure service connection, select Service principal (manual) and select Next
On the next dialog, fill in the required information.
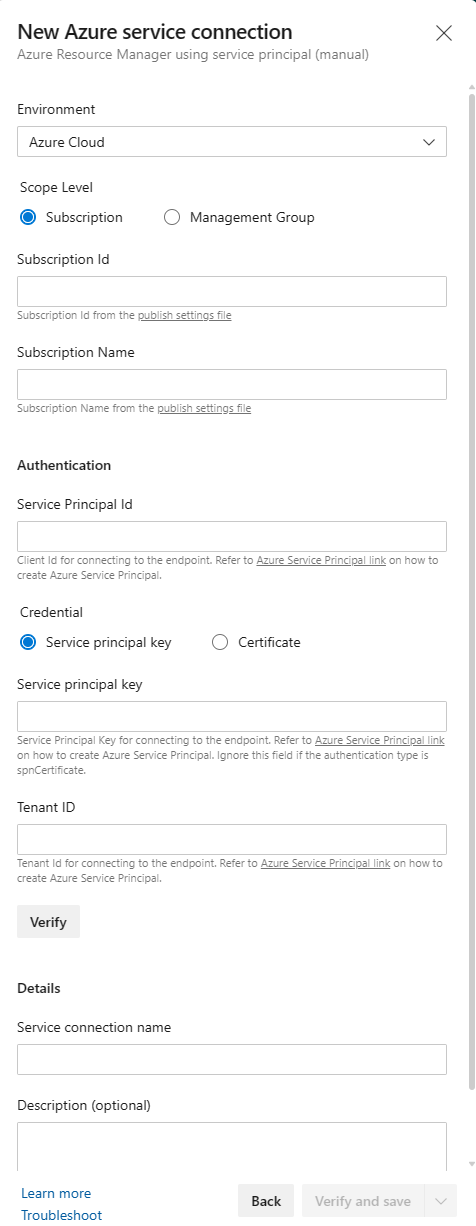
Field Description Environment Select Azure Cloud.Scope level Select Subscription. Subscription Id Your subscription ID. Subscription Name Your Azure subscription name. Service Principal Id The appIdvalue from the JSON object returned by theaz ad sp create-for-rbaccommand.Service Principal Key The passwordvalue from the JSON object returned by theaz ad sp create-for-rbaccommand.Tenant Id The tenantvalue from the JSON object returned by theaz ad sp create-for-rbaccommand.Select Verify to verify the connection.
Enter a Service connection name.
Ensure Grant access permissions to all pipelines is selected.
Select Verify and save.
The new connection appears in the Service connections list, and is ready for Azure Pipelines to use from the project.
Configure a self-hosted agent
If you're using your own self-hosted agent, you need to configure the agent to run Python. Downloading Python versions isn't supported on self-hosted agents. You must preinstall the Python version. Use the full installer to get a pip-compatible version of Python.
To avoid incompatible issues, you should match the Python version with the runtime version on your Azure App Services web app. The runtime version is shown in the JSON output of the az webapp up command.
The desired Python version needs to be added to the tool cache on the self-hosted agent so the task can use it. Normally, the tool cache is located under the _work/_tool directory of the agent; alternatively, the path can be overridden with the environment variable AGENT_TOOLSDIRECTORY. Under the tools directory, create the following directory structure based on of your Python version:
$AGENT_TOOLSDIRECTORY/
    Python/
        {version number}/
            {platform}/
                {tool files}
            {platform}.complete
The version number should follow the format of 1.2.3. The platform should either be x86 or x64. The tool files should be the unzipped Python version files. The {platform}.complete should be a 0-byte file that looks like x86.complete or x64.complete and just signifies the tool is properly installed in the cache.
For example, if you're using Python 3.11 on a 64-bit Windows machine, the directory structure would look like this:
$AGENT_TOOLSDIRECTORY/
    Python/
        3.11.4/
            x64/
                {python files}
            x64.complete
If you already have the Python version you want to use on the machine hosting your agent, you can copy the files to the tool cache. If you don't have the Python version, you can download it from the Python website.
Create a pipeline
Create a pipeline to build and deploy your Python web app to Azure App Service. To understand pipeline concepts, watch:
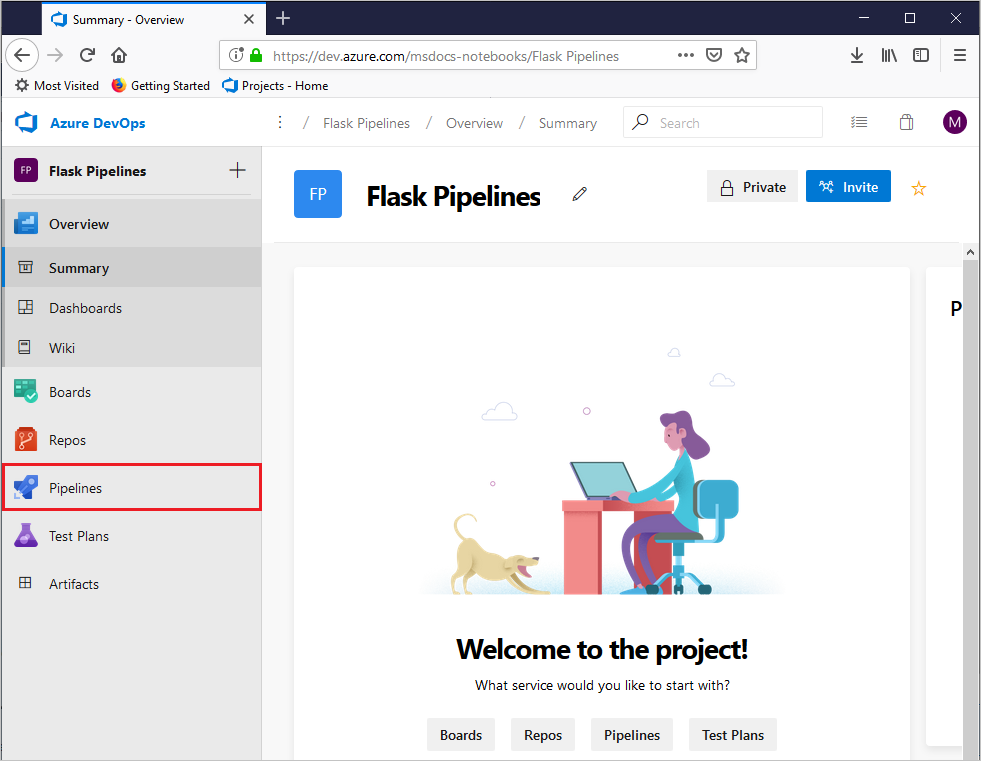
On the left navigation menu, select Pipelines.
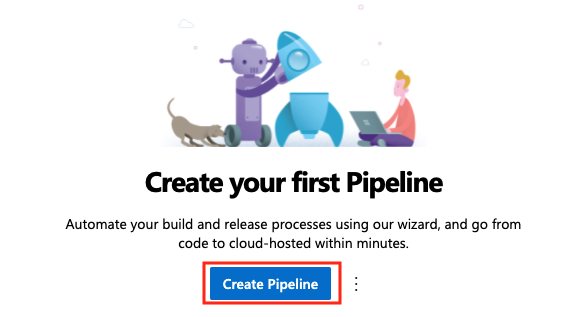
Select Create Pipeline.
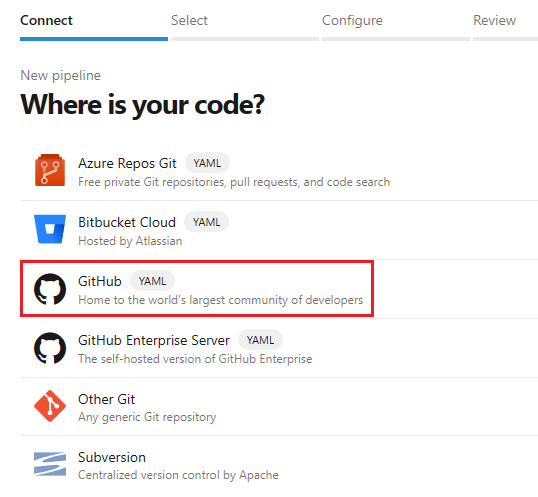
In the Where is your code dialog, select GitHub. You might be prompted to sign into GitHub.
On the Select a repository screen, select the forked sample repository.
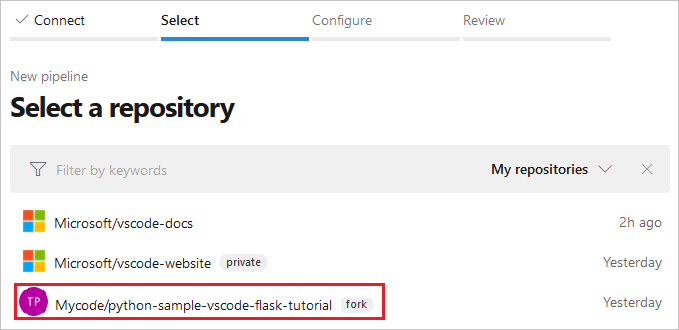
You might be prompted to enter your GitHub password again as a confirmation.
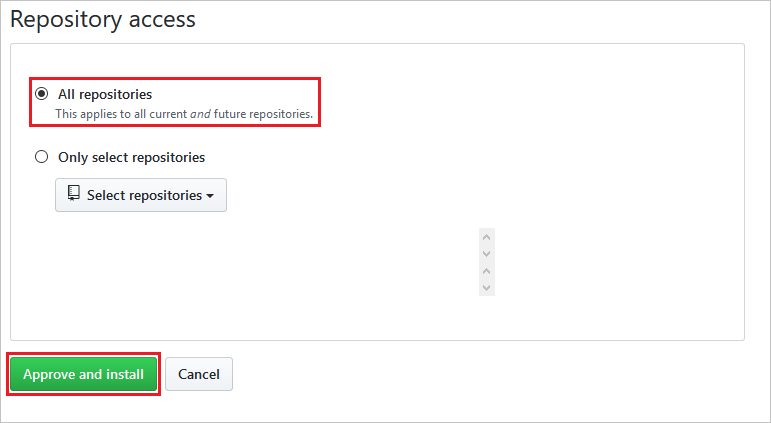
If the Azure Pipelines extension isn't installed on GitHub, GitHub prompts you to install the Azure Pipelines extension.

On this page, scroll down to the Repository access section, choose whether to install the extension on all repositories or only selected ones, and then select Approve and install.
In the Configure your pipeline dialog, select Python to Linux Web App on Azure.
Select your Azure subscription and select Continue.
If you're using your username and password to authenticate, a browser opens for you to sign in to your Microsoft account.
Select your web app name from the dropdown list and select Validate and configure.
Azure Pipelines creates a azure-pipelines.yml file and displays it in the YAML pipelines editor. The pipeline file defines your CI/CD pipeline as a series of stages, Jobs, and steps, where each step contains the details for different tasks and scripts. Take a look at the pipeline to see what it does. Make sure all the default inputs are appropriate for your code.
On the navigation menu, select Pipelines.
Select Create Pipeline.
::image type="content" source="media/create-first-pipeline.png" alt-text="Screenshot of New pipeline button.":::
In the Where is your code dialog, select GitHub Enterprise Server. You might be prompted to sign into GitHub.
On the Select a repository tab, select the forked sample repository.
You might be prompted to enter your GitHub password again as a confirmation.
If the Azure Pipelines extension isn't installed on GitHub, GitHub prompts you to install the Azure Pipelines extension.
On this page, scroll down to the Repository access section, choose whether to install the extension on all repositories or only selected ones, and then select Approve and install.
In the Configure your pipeline dialog, select Starter pipeline.
Replace the contents of the azure-pipelines.yml file with the following code.
trigger:
- main

variables:
  # Azure Resource Manager connection created during pipeline creation
  azureServiceConnectionId: '<your-service-connection-name>'

  # Web app name
  webAppName: '<your-web-app-name>'

  # Environment name
  environmentName: '<your-web-app-name>'

  # Project root folder.
  projectRoot: $(System.DefaultWorkingDirectory)

  # Python version:
  pythonVersion: '<your-python-version>'

stages:
- stage: Build
  displayName: Build stage
  jobs:
  - job: BuildJob
    pool:
      name: '<your-pool-name>'
      demands: python
    steps:
    - task: UsePythonVersion@0
      inputs:
        versionSpec: '$(pythonVersion)'
      displayName: 'Use Python $(pythonVersion)'

    - script: |
        python -m venv antenv
        source antenv/bin/activate
        python -m pip install --upgrade pip
        pip install setup
        pip install -r requirements.txt
      workingDirectory: $(projectRoot)
      displayName: "Install requirements"

    - task: ArchiveFiles@2
      displayName: 'Archive files'
      inputs:
        rootFolderOrFile: '$(projectRoot)'
        includeRootFolder: false
        archiveType: zip
        archiveFile: $(Build.ArtifactStagingDirectory)/$(Build.BuildId).zip
        replaceExistingArchive: true

    - task: PublishBuildArtifacts@1
      inputs:
        PathtoPublish: '$(Build.ArtifactStagingDirectory)'
        ArtifactName: 'drop'
        publishLocation: 'Container'

- stage: Deploy
  displayName: 'Deploy Web App'
  dependsOn: Build
  condition: succeeded()
  jobs:
  - deployment: DeploymentJob
    pool:
      name: '<your-pool-name'
    environment: $(environmentName)
    strategy:
      runOnce:
        deploy:
          steps:

          - task: UsePythonVersion@0
            inputs:
              versionSpec: '$(pythonVersion)'
            displayName: 'Use Python version'

          - task: AzureWebApp@1
            displayName: 'Deploy Azure Web App : <your-web-app-name>'
            inputs:
              azureSubscription: $(azureServiceConnectionId)
              appName: $(webAppName)
              package: $(Pipeline.Workspace)/drop/$(Build.BuildId).zip
              startUpCommand: 'startup.txt'
Replace the following placeholders with your own values:
Placeholder Description <your-service-connection-name>The name of the service connection you created. <your-web-app-name>The name your Azure App Service web app. <your-pool-name>The name of the agent pool you want to use. <your-python-version>The version of Python running on your agent. It's a good idea to match this version with the Python version running on your web app. The web app version is shown in the JSON output of the az webapp upcommand.
YAML pipeline file
The following explanation describes the YAML pipeline file. To learn about the pipeline YAML file schema, see YAML schema reference.
Variables
The variables section contains the following variables:
variables:
# Azure Resource Manager connection created during pipeline creation
azureServiceConnectionId: '<GUID>'

# Web app name
webAppName: '<your-web-app-name>'

# Agent VM image name
vmImageName: 'ubuntu-latest'

# Environment name
environmentName: '<your-web-app-name>'

# Project root folder.
projectRoot: $(System.DefaultWorkingDirectory)

# Python version: 3.11. Change this to match the Python runtime version running on your web app.
pythonVersion: '3.11'
| Variable | Description |
|---|---|
azureServiceConnectionId |
The ID or name of the Azure Resource Manager service connection. |
webAppName |
The name of the Azure App Service web app. |
vmImageName |
The name of the operating system to use for the build agent. |
environmentName |
The name of the environment used in the deployment stage. The environment is automatically created when the stage job is run. |
projectRoot |
The root folder containing the app code. |
pythonVersion |
The version of Python to use on the build and deployment agents. |
The variables section contains the following variables:
variables:
# Azure Resource Manager connection created during pipeline creation
azureServiceConnectionId: '<your-service-connection-name>'

# Web app name
webAppName: '<your-web-app-name>'

# Environment name
environmentName: '<your-web-app-name>'

# Project root folder.
projectRoot: $(System.DefaultWorkingDirectory)

# Python version: 3.11. Change this to the version that is running on your agent and web app.
pythonVersion: '3.11'
| Variable | Description |
|---|---|
azureServiceConnectionId |
The name of the Azure Resource Manager service connection. |
webAppName |
The name of the web app. |
environmentName |
The name of the environment used in the deployment stage. |
projectRoot |
The folder containing the app code. The value is an automatic system variable. |
pythonVersion |
The version of Python to use on the build and deployment agents. |
Build stage
The build stage contains a single job that runs on the operating system defined in the vmImageName variable.
  - job: BuildJob
    pool:
      vmImage: $(vmImageName)
The build stage contains a single job that runs on an agent in the pool identified by the name parameter. You can specify the agent capabilities with the demands keyword. For example, demands: python specifies that the agent must have Python installed. To specify a self-hosted agent by name, you can use the demands: Agent.Name -equals <agent-name> keyword.
  - job: BuildJob
    pool:
      name: <your-pool-name>
      demands: python
The job contains multiple steps:
The UsePythonVersion task selects the version of Python to use. The version is defined in the
pythonVersionvariable.- task: UsePythonVersion@0 inputs: versionSpec: '$(pythonVersion)' displayName: 'Use Python $(pythonVersion)'This step uses a script to create a virtual Python environment and install the app's dependencies contained in the
requirements.txtfile. The--targetparameter specifies the location to install the dependencies. TheworkingDirectoryparameter specifies the location of the app code.- script: | python -m venv antenv source antenv/bin/activate python -m pip install --upgrade pip pip install setup pip install --target="./.python_packages/lib/site-packages" -r ./requirements.txt workingDirectory: $(projectRoot) displayName: "Install requirements"The ArchiveFiles task creates the .zip archive containing the web app. The
.zipfile is uploaded to the pipeline as the artifact nameddrop. The.zipfile is used in the deployment stage to deploy the app to the web app.- task: ArchiveFiles@2 displayName: 'Archive files' inputs: rootFolderOrFile: '$(projectRoot)' includeRootFolder: false archiveType: zip archiveFile: $(Build.ArtifactStagingDirectory)/$(Build.BuildId).zip replaceExistingArchive: true - upload: $(Build.ArtifactStagingDirectory)/$(Build.BuildId).zip displayName: 'Upload package' artifact: dropParameter Description rootFolderOrFileThe location of the app code. includeRootFolderIndicates whether to include the root folder in the .zip file. Set this parameter to falseotherwise, the contents of the .zip file are put in a folder named s and App Service on Linux container can't find the app code.archiveTypeThe type of archive to create. Set to zip.archiveFileThe location of the .zip file to create. replaceExistingArchiveIndicates whether to replace an existing archive if the file already exists. Set to true.uploadThe location of the .zip file to upload. artifactThe name of the artifact to create.
Deployment stage
The deployment stage is run if the build stage completes successfully. The following keywords define this behavior:
  dependsOn: Build
  condition: succeeded()
The deployment stage contains a single deployment job configured with the following keywords:
  - deployment: DeploymentJob
    pool:
      vmImage: $(vmImageName)
    environment: $(environmentName)
| Keyword | Description |
|---|---|
deployment |
Indicates that the job is a deployment job targeting an environment. |
pool |
Specifies deployment agent pool. The default agent pool if the name isn't specified. The vmImage keyword identifies the operating system for the agent's virtual machine image |
environment |
Specifies the environment to deploy to. The environment is automatically created in your project when the job is run. |
  - deployment: DeploymentJob
    pool:
      name: <your-pool-name>
    environment: $(environmentName)
| Keyword | Description |
|---|---|
deployment |
Indicates that the job is a deployment job targeting an environment. |
pool Specifies the agent pool to use for deployment. This pool must contain an agent with the capability to run the python version specified in the pipeline. |
|
environment |
Specifies the environment to deploy to. The environment is automatically created in your project when the job is run. |
The strategy keyword is used to define the deployment strategy. The runOnce keyword specifies that the deployment job runs once. The deploy keyword specifies the steps to run in the deployment job.
  strategy:
    runOnce:
      deploy:
        steps:
The steps in the pipeline are:
Use the UsePythonVersion task to specify the version of Python to use on the agent. The version is defined in the
pythonVersionvariable.- task: UsePythonVersion@0 inputs: versionSpec: '$(pythonVersion)' displayName: 'Use Python version'Deploy the web app using the AzureWebApp@1. This task deploys the pipeline artifact
dropto your web app.- task: AzureWebApp@1 displayName: 'Deploy Azure Web App : <your-web-app-name>' inputs: azureSubscription: $(azureServiceConnectionId) appName: $(webAppName) package: $(Pipeline.Workspace)/drop/$(Build.BuildId).zipParameter Description azureSubscriptionThe Azure Resource Manager service connection ID or name to use. appNameThe name of the web app. packageThe location of the .zip file to deploy. Also, because the python-vscode-flask-tutorial repository contains the same startup command in a file named startup.txt, you can specify that file by adding the parameter:
startUpCommand: 'startup.txt'.- task: AzureWebApp@1 displayName: 'Deploy Azure Web App : $(webAppName)' inputs: azureSubscription: $(azureServiceConnectionId) appName: $(webAppName) package: $(Pipeline.Workspace)/drop/$(Build.BuildId).zip startUpCommand: 'startup.txt'Parameter Description azureSubscriptionThe Azure Resource Manager service connection ID or name to use. appNameThe name of the web app. packageThe location of the .zip file to deploy. startUpCommandThe command to run after the app is deployed. The sample app uses startup.txt.
Run the pipeline
You're now ready to try it out!
In the editor, select Save and run.
In the Save and run dialog, add a commit message then select Save and run.
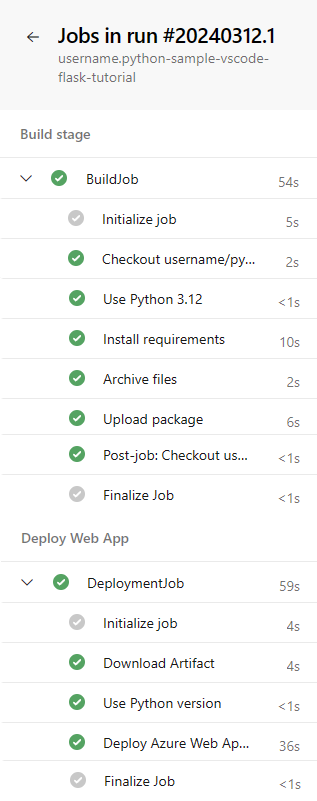
You can watch the pipeline as it runs by selecting the Stages or Jobs in the pipeline run summary.

There are green check marks next to each stage and job as it completes successfully. If errors occur, they're displayed in the summary or in the job steps.
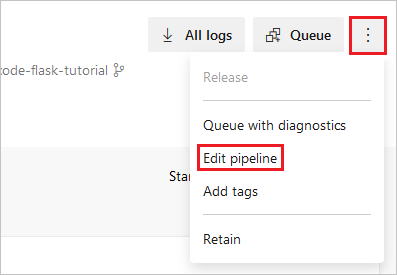
You can quickly return to the YAML editor by selecting the vertical dots at the upper right of the Summary page and selecting Edit pipeline:
From the deployment job, select the Deploy Azure Web App task to display its output. To visit the deployed site, hold down Ctrl and select the URL after
App Service Application URL.If you're using the sample app, the app should appear as follows:

Important
If your app fails because of a missing dependency, then your requirements.txt file was not processed during deployment. This behavior happens if you created the web app directly on the portal rather than using the az webapp up command as shown in this article.
The az webapp up command specifically sets the build action SCM_DO_BUILD_DURING_DEPLOYMENT to true. If you provisioned the app service through the portal, this action is not automatically set.
The following steps set the action:
- Open the Azure portal, select your App Service, then select Configuration.
- Under the Application Settings tab, select New Application Setting.
- In the popup that appears, set Name to
SCM_DO_BUILD_DURING_DEPLOYMENT, set Value totrue, and select OK. - Select Save at the top of the Configuration page.
- Run the pipeline again. Your dependencies should be installed during deployment.
Trigger a pipeline run
To trigger a pipeline run, commit a change to the repository. For example, you can add a new feature to the app, or update the app's dependencies.
- Go to your GitHub repository.
- Make a change to the code, such as changing the title of the app.
- Commit the change to your repository.
- Go to your pipeline and verify a new run is created.
- When the run completes, verify the new build is deployed to your web app.
- In the Azure portal, go to your web app.
- Select Deployment Center and select the Logs tab.
- Verify that the new deployment is listed.
Considerations for Django
You can use Azure Pipelines to deploy Django apps to Azure App Service on Linux if you're using a separate database. You can't use a SQLite database, because App Service locks the db.sqlite3 file, preventing both reads and writes. This behavior doesn't affect an external database.
As described in Configure Python app on App Service - Container startup process, App Service automatically looks for a wsgi.py file within your app code, which typically contains the app object. If you want to customize the startup command in any way, use the startUpCommand parameter in the AzureWebApp@1 step of your YAML pipeline file, as described in the previous section.
When using Django, you typically want to migrate the data models using manage.py migrate after deploying the app code. You can add startUpCommand with the post-deployment script for this purpose:
startUpCommand: python manage.py migrate
Run tests on the build agent
As part of your build process, you might want to run tests on your app code. Tests run on the build agent, so you need to install your dependencies into a virtual environment on the build agent. After the tests run, delete the virtual environment before you create the .zip file for deployment. The following script elements illustrate this process. Place them before the ArchiveFiles@2 task in the azure-pipelines.yml file. For more information, see Run cross-platform scripts.
# The | symbol is a continuation character, indicating a multi-line script.
# A single-line script can immediately follow "- script:".
- script: |
    python -m venv .env
    source .env/bin/activate
    pip install setuptools
    pip install -r requirements.txt

  # The displayName shows in the pipeline UI when a build runs
  displayName: 'Install dependencies on build agent'

- script: |
    # Put commands to run tests here
    displayName: 'Run tests'

- script: |
    echo Deleting .env
    deactivate
    rm -rf .env
  displayName: 'Remove .env before zip'
You can also use a task like PublishTestResults@2 to publish the test results to your pipeline. For more information, see Build Python apps - Run tests.
Clean up resources
To avoid incurring charges on the Azure resources created in this tutorial:
Delete the project that you created. Deleting the project deletes the pipeline and service connection.
Delete the Azure resource group that contains the App Service and the App Service Plan. In the Azure portal, go to the resource group, select Delete resource group, and follow the prompts.
Delete the storage account that maintains the file system for Cloud Shell. Close the Cloud Shell then go to the resource group that begins with cloud-shell-storage-, select Delete resource group, and follow the prompts.
Next steps
Feedback
Coming soon: Throughout 2024 we will be phasing out GitHub Issues as the feedback mechanism for content and replacing it with a new feedback system. For more information see: https://aka.ms/ContentUserFeedback.
Submit and view feedback for