Troubleshoot ARM service connections
Azure DevOps Services | Azure DevOps Server 2022 - Azure DevOps Server 2019
This article presents the common troubleshooting scenarios to help you resolve issues you may encounter when creating an Azure Resource Manager service connection. See Manage service connections to learn how to create, edit, and secure service connections.
What happens when you create an ARM service connection?
If you don't have a service connection, you can create one as follows:
From within your project, select Project settings, and then select Service connections.

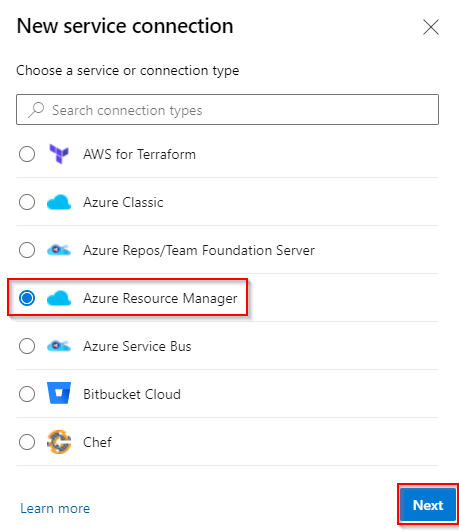
Select New service connection to add a new service connection, and then select Azure Resource Manager. Select Next when you are done.
Select Service principal (automatic), and then select **Next.
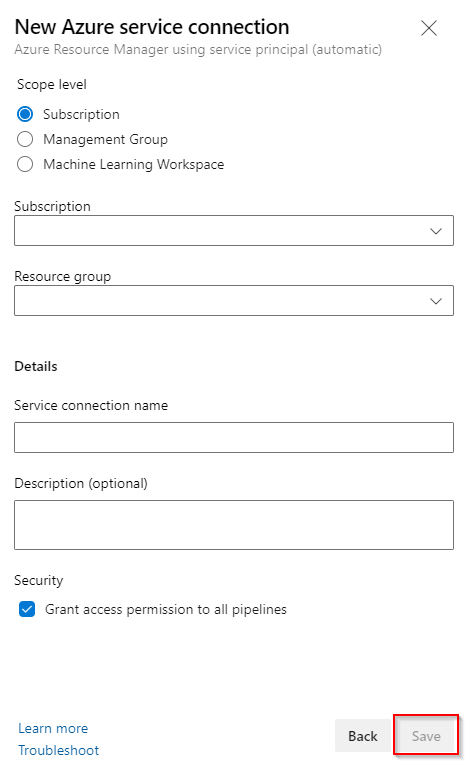
Select Subscription, and then select your subscription from the drop-down list. Fill out the form and then select Save when you are done.
When you save your new ARM service connection, Azure DevOps then:
- Connects to the Microsoft Entra tenant for to the selected subscription.
- Creates an application in Microsoft Entra ID on behalf of the user.
- After the application has been successfully created, assign the application as a contributor to the selected subscription.
- Creates an Azure Resource Manager service connection using this application's details.
Note
To create service connections you must be added to the Endpoint Creator group in your project settings: Project settings > Service connections > Security. Contributors are added to this group by default.
Troubleshooting scenarios
Below are some of the issues that may occur when creating service connections:
- Troubleshoot ARM service connections
- What happens when you create an ARM service connection?
- Troubleshooting scenarios
- Insufficient privileges to complete the operation
- Failed to obtain an access token or a valid refresh token was not found
- Failed to assign Contributor role
- Subscription isn't listed when creating a service connection
- Some subscriptions are missing from the list of subscriptions
- Service principal's token expired
- Failed to obtain the JWT by using the service principal client ID
- Azure subscription is not passed from the previous task output
- What authentication mechanisms are supported? How do managed identities work?
- Related articles
Insufficient privileges to complete the operation
This typically occurs when the system attempts to create an application in Microsoft Entra ID on your behalf.
This is a permission issue that may be due to the following causes:
- The user has only guest permission in the directory
- The user is not authorized to add applications in the directory
The user has only guest permission in the directory
The best approach to resolve this issue, while granting only the minimum additional permissions to the user, is to increase the Guest user permissions as follows.
Sign in to the Azure portal using an administrator account. The account should be an owner, global administrator, or user account administrator.
Select Microsoft Entra ID in the left navigation bar.
Ensure you are editing the appropriate directory corresponding to the user subscription. If not, select Switch directory and log in using the appropriate credentials if required.
Select Users from the Manage section.
Select User settings.
Select Manage external collaboration settings from the External users section.
Change the Guest user permissions are limited option to No.
Alternatively, if you are prepared to give the user additional permissions (administrator-level), you can make the user a member of the Global administrator role. To do so follow the steps below:
Warning
Users who are assigned to the Global administrator role can read and modify every administrative setting in your Microsoft Entra organization. As a best practice, we recommend that you assign this role to fewer than five people in your organization.
Sign in to the Azure portal using an administrator account. The account should be an owner, global administrator, or user account administrator.
Select Microsoft Entra ID from the left navigation pane.
Ensure you are editing the appropriate directory corresponding to the user subscription. If not, select Switch directory and log in using the appropriate credentials if required.
Select Users from the Manage section.
Use the search box to search for the user you want to manage.
Select Directory role from the Manage section, and then change the role to Global administrator. Select Save when you are done.
It typically takes 15 to 20 minutes to apply the changes globally. The user then can try recreating the service connection.
The user is not authorized to add applications in the directory
You must have permissions to add integrated applications in the directory. The directory administrator has permissions to change this setting.
Select Microsoft Entra ID in the left navigation pane.
Ensure you are editing the appropriate directory corresponding to the user subscription. If not, select Switch directory and log in using the appropriate credentials if required.
Select Users, and then select User settings.
Under App registrations, and then change the Users can register applications option to Yes.
You can also create the service principal with an existing user who already has the required permissions in Microsoft Entra ID. See Create an Azure Resource Manager service connection with an existing service principal for more information.
Failed to obtain an access token or a valid refresh token was not found
These errors typically occur when your session has expired. To resolve these issues:
- Sign out of Azure DevOps.
- Open an InPrivate or incognito browser window and navigate to Azure DevOps.
- Sign in using the appropriate credentials.
- Select your organization and your project.
- Create your service connection.
Failed to assign Contributor role
This error typically occurs when you do not have Write permission for the selected Azure subscription.
To resolve this issue, ask the subscription administrator to assign you the appropriate role in Microsoft Entra ID.
Subscription isn't listed when creating a service connection
A maximum of 50 Azure subscriptions are listed in the various Azure subscription drop-down menus (billing, service connection, etc.). If you're setting up a service connection and you have more than 50 Azure subscriptions, some of your subscriptions won't be listed. In this scenario, complete the following steps:
Create a new, native Microsoft Entra user in the Microsoft Entra instance of your Azure subscription.
Set up the Microsoft Entra user so that it has the proper permissions to set up billing or create service connections. For more information, see Add a user who can set up billing for Azure DevOps.
Add the Microsoft Entra user to the Azure DevOps org with a Stakeholder access level, and then add it to the Project Collection Administrators group (for billing), or ensure that the user has sufficient permissions in the Team Project to create service connections.
Log in to Azure DevOps with the new user credentials, and set up a billing. You'll only see one Azure subscription in the list.
Some subscriptions are missing from the list of subscriptions
This issue can be fixed by changing the supported account types settings and defining who can use your application. To do so, follow the steps below:
Sign in to the Azure portal.
If you have access to multiple tenants, use the Directory + subscription filter in the top menu to select the tenant in which you want to register an application.

Select Microsoft Entra ID from the left pane.
Select App registrations.
Select you application from the list of registered applications.
Under Authentication, select Supported account types.
Under Supported account types, Who can use this application or access this API? select Accounts in any organizational directory.
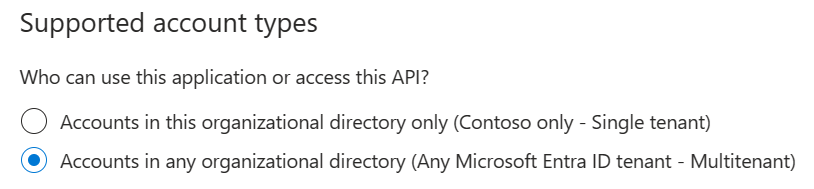
Select Save when you are done.
Service principal's token expired
An issue that often arises with service principals that are automatically created is that the service principal's token expires and needs to be renewed. However, if you have an issue with refreshing the token, see valid refresh token was not found.
To renew the access token for an automatically created service principal:
Go to Project settings > Service connections, and then select the service connection you want to modify.
Select Edit in the upper-right corner, and the select Verify.
Select Save.
Your service principal's token has now been renewed for three more months.
Note
This operation is available even if the service principal's token has not expired.
Failed to obtain the JWT by using the service principal client ID
This issue occurs when you try to verify a service connection that has an expired secret.
To resolve this issue:
Go to Project settings > Service connections, and then select the service connection you want to modify.
Select Edit in the upper-right corner, and then make any change to your service connection. The easiest and recommended change is to add a description.
Select Save to save the service connection.
Note
Select Save. Don't try to verify the service connection at this step.
Exit the service connection edit window, and then refresh the service connections page.
Select Edit in the upper-right corner, and now select Verify.
Select Save to save your service connection.
Azure subscription is not passed from the previous task output
When you set your Azure subscription dynamically for your release pipeline and want to consume the output variable from a preceding task, you might encounter this issue.
To resolve the issue, ensure that the values are defined within the variables section of your pipeline. You can then pass this variable between your pipeline's tasks.
What authentication mechanisms are supported? How do managed identities work?
An Azure Resource Manager service connection can connect to an Azure subscription by using a Service Principal Authentication (SPA) or managed identity authentication. Managed identities for Azure resources provide Azure services with an automatically managed identity in Microsoft Entra ID. You can use this identity to authenticate to any service that supports Microsoft Entra authentication without persisting credentials in code or in the service connection.
To learn about managed identities for virtual machines, see Assigning roles.
Note
Managed identities aren't supported in Microsoft-hosted agents. In this scenario, you must set up a self-hosted agent on an Azure VM and configure a managed identity for that VM.
Related articles
Feedback
Coming soon: Throughout 2024 we will be phasing out GitHub Issues as the feedback mechanism for content and replacing it with a new feedback system. For more information see: https://aka.ms/ContentUserFeedback.
Submit and view feedback for