Note
Access to this page requires authorization. You can try signing in or changing directories.
Access to this page requires authorization. You can try changing directories.
Use Azure Pipelines to continuously build and deploy a multi-container app to Azure Kubernetes Service (AKS). In this tutorial, you deploy the Tailspin Space Game web app and leaderboard API as separate containers, push both images to Azure Container Registry (ACR), and deploy them to AKS by using Kubernetes manifests.
Prerequisites
| Product | Requirements |
|---|---|
| Azure DevOps | - An Azure DevOps organization and project. Create one for free. - Permissions: - To grant access to all pipelines in the project: You must be a member of the Project Administrators group. - To create service connections: You must have the Administrator or Creator role for service connections. - An ability to run pipelines on Microsoft-hosted agents. You can either purchase a parallel job or you can request a free tier. |
| GitHub | - A GitHub account. |
| Azure | - An Azure subscription. |
Get the code
Fork the following repository into your GitHub account:
https://github.com/MicrosoftDocs/mslearn-tailspin-spacegame-web-kubernetes
Create the Azure resources
Use Azure Cloud Shell to create your Azure Kubernetes Service cluster and Azure Container Registry.
Sign in to Azure portal, then open Cloud Shell and select Bash.
Set reusable variables:
resourceSuffix=$RANDOM
registryName="tailspinspacegame${resourceSuffix}"
aksName="tailspinspacegame-${resourceSuffix}"
rgName='tailspin-space-game-rg'
(Optional) Set a default region:
az account list-locations \
  --query "[].{Name: name, DisplayName: displayName}" \
  --output table

az configure --defaults location=westus2
Create the resource group, ACR, and AKS cluster:
az group create --name $rgName

az acr create \
  --name $registryName \
  --resource-group $rgName \
  --sku Standard

az aks create \
  --name $aksName \
  --resource-group $rgName \
  --enable-addons monitoring \
  --generate-ssh-keys
Grant the AKS kubelet identity pull access to ACR. The kubelet is the node agent that runs on each Kubernetes node and pulls container images so your pods can start:
clientId=$(az aks show \
  --resource-group $rgName \
  --name $aksName \
  --query "identityProfile.kubeletidentity.clientId" \
  --output tsv)

acrId=$(az acr show \
  --name $registryName \
  --resource-group $rgName \
  --query "id" \
  --output tsv)

az role assignment create \
  --assignee $clientId \
  --role AcrPull \
  --scope $acrId
Get your ACR login server, copy the value, and keep it for the next section where you set the
RegistryNamevariable in the pipeline variable group:az acr list \ --resource-group $rgName \ --query "[].{loginServer: loginServer}" \ --output table
Set up authentication in Azure DevOps
Before you create the pipeline, set up the authentication and shared variables that Azure Pipelines uses to access your Azure resources and container registry.
In your Azure DevOps project, go to Pipelines > Library.
Create a variable group named Release.
Add a variable named
RegistryNameand set the value to your ACR login server (for example,tailspinspacegame4692.azurecr.io).Create these service connections:
- Azure Resource Manager service connection for the subscription and resource group.
- Docker Registry service connection for the ACR instance.
Create the pipeline
In this section, you create a multi-stage Azure Pipelines definition that builds two container images, publishes Kubernetes manifests, and deploys both services to your Azure Kubernetes Service cluster.
Before you paste the YAML, make sure these items already exist in your project:
- A variable group named
ReleasewithRegistryNameset to your Azure Container Registry login server. - A Docker registry service connection named
Container Registry Connection. - An Azure Resource Manager service connection named
Kubernetes Cluster Connection.
Sign in to your Azure DevOps organization, and then navigate to your project.
Select Pipelines, and then select Edit.
Paste the following snippet into your YAML file, and replace placeholder values with the appropriate values for your environment:
trigger:
- 'main'

variables:
  buildConfiguration: 'Release'
  leaderboardRepository: 'leaderboard'
  webRepository: 'web'
  tag: '$(Build.BuildId)'
  imagePullSecret: 'secret'

stages:
- stage: Build
  displayName: Build the containers
  jobs:
  - job: Build
    pool:
      vmImage: 'ubuntu-latest'
    steps:
    - task: Docker@2
      displayName: Build and push the web image to container registry
      inputs:
        command: buildAndPush
        buildContext: $(Build.Repository.LocalPath)
        repository: $(webRepository)
        dockerfile: '$(Build.SourcesDirectory)/Tailspin.SpaceGame.Web/Dockerfile'
        containerRegistry: 'Container Registry Connection'
        tags: |
          $(tag)

    - task: Docker@2
      displayName: Build and push the leaderboard image to container registry
      inputs:
        command: buildAndPush
        buildContext: $(Build.Repository.LocalPath)
        repository: $(leaderboardRepository)
        dockerfile: '$(Build.SourcesDirectory)/Tailspin.SpaceGame.LeaderboardContainer/Dockerfile'
        containerRegistry: 'Container Registry Connection'
        tags: |
          $(tag)

    - publish: '$(Build.SourcesDirectory)/manifests'
      artifact: manifests

- stage: Deploy
  displayName: Deploy the containers
  dependsOn: Build
  jobs:
  - deployment: Deploy
    displayName: Deploy
    pool:
      vmImage: 'ubuntu-latest'
    environment: 'spike.default'
    variables:
    - group: Release
    strategy:
      runOnce:
        deploy:
          steps:
          - download: current
            artifact: manifests

          - task: KubernetesManifest@1
            displayName: Create imagePullSecret
            inputs:
              action: createSecret
              connectionType: azureResourceManager
              secretName: $(imagePullSecret)
              dockerRegistryEndpoint: 'Container Registry Connection'
              azureSubscriptionConnection: 'Kubernetes Cluster Connection'
              azureResourceGroup: 'tailspin-space-game-rg'
              kubernetesCluster: 'tailspinspacegame-24591'
              namespace: 'default'

          - task: KubernetesManifest@1
            displayName: Deploy to Kubernetes cluster
            inputs:
              action: deploy
              connectionType: azureResourceManager
              azureSubscriptionConnection: 'Kubernetes Cluster Connection'
              azureResourceGroup: 'tailspin-space-game-rg'
              kubernetesCluster: 'tailspinspacegame-24591'
              namespace: 'default'
              manifests: |
                $(Pipeline.Workspace)/manifests/deployment.yml
                $(Pipeline.Workspace)/manifests/service.yml
              imagePullSecrets: |
                $(imagePullSecret)
              containers: |
                $(RegistryName)/$(webRepository):$(tag)
                $(RegistryName)/$(leaderboardRepository):$(tag)
Tip
YAML is whitespace-sensitive. Make sure to keep indentation consistent.
How the pipeline works
This pipeline uses a standard build-then-deploy pattern across two stages.
Build stage:
The two
Docker@2tasks build and push thewebandleaderboardimages to Azure Container Registry.Image tags use
$(Build.BuildId)so each run produces a traceable, unique version.The
manifestsfolder is published as a pipeline artifact so the deployment stage can consume the same manifests on a different agent.Deploy stage:
The deployment job targets the configured Azure DevOps environment, which gives you deployment history and environment-level visibility.
The
downloadstep retrieves themanifestsartifact from the current run.KubernetesManifest@1withcreateSecretcreates an image pull secret in the target namespace so cluster nodes can authenticate to Azure Container Registry.KubernetesManifest@1withdeployapplies the Kubernetes manifests and injects thewebandleaderboardimage references for the current build tag.
Run and validate deployment
Use this section to verify that your build completed, your deployment succeeded, and both application endpoints are reachable from outside the cluster.
In Azure DevOps, open your pipeline run and confirm both stages complete successfully:
- Build stage: confirms both images were built and pushed to Azure Container Registry.
- Deploy stage: confirms manifests were applied and pods were updated in your Azure Kubernetes Service cluster.
In Azure portal, open your Azure Kubernetes Service cluster, and then select Services and ingresses.
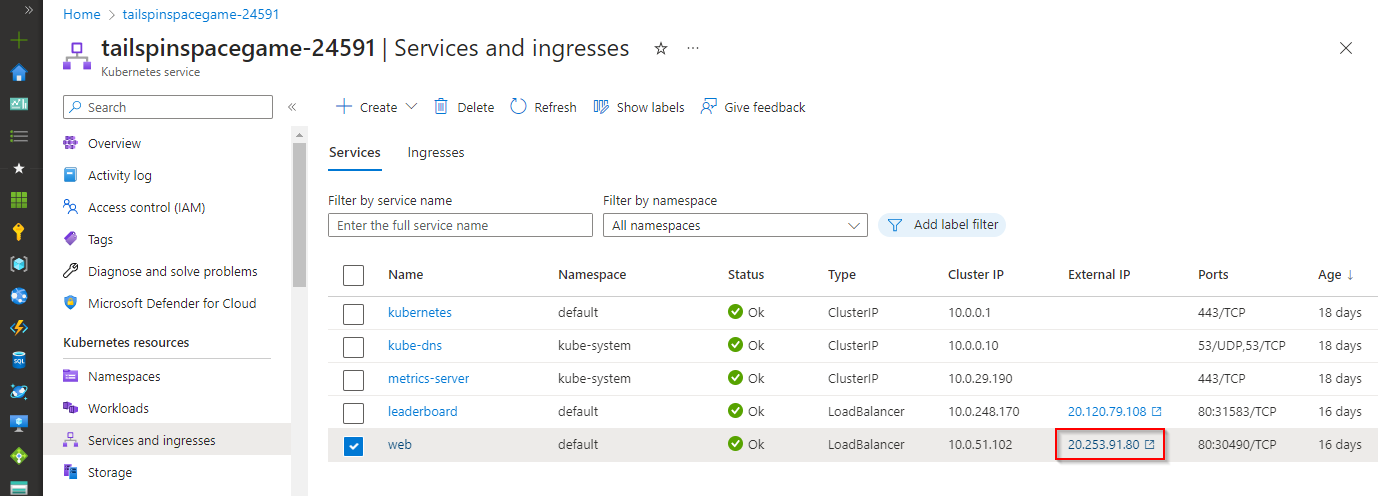
Find the
webandleaderboardservices, and wait until each service has an external IP.Open the external IP for the
webservice in your browser.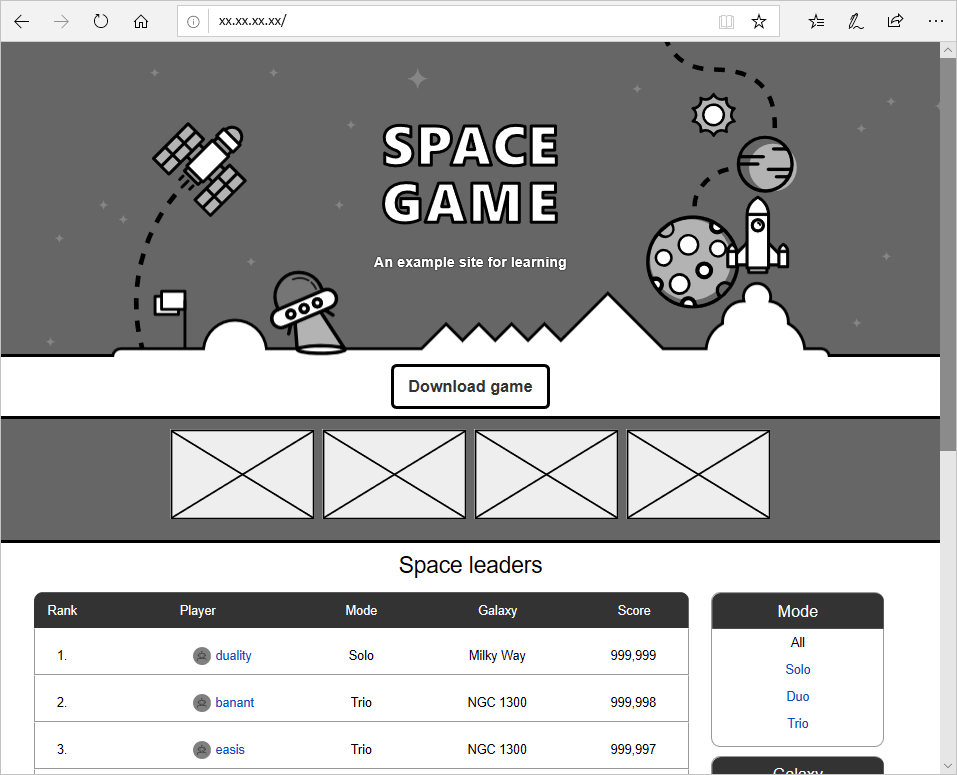
Copy the external IP for the
leaderboardservice, then open the following endpoint in your browser:http://<external-ip>/api/Leaderboard?pageSize=10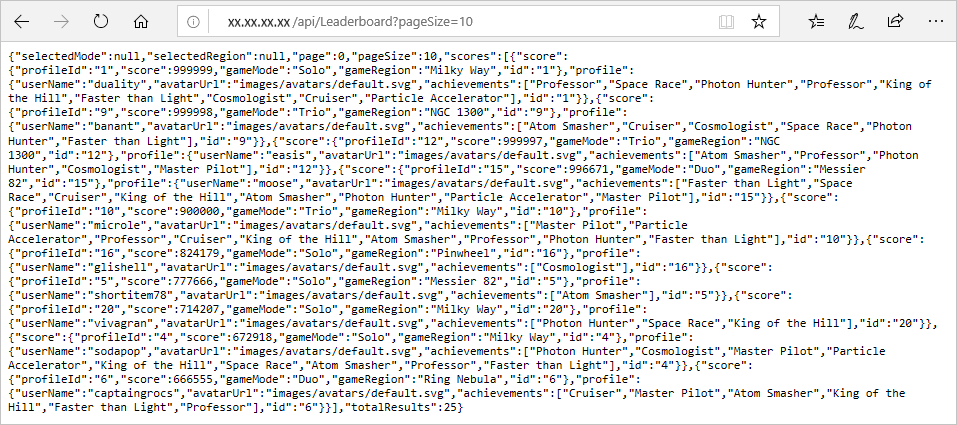
Confirm validation results:
- The Space Game web page loads from the
webservice endpoint. - The leaderboard endpoint returns JSON data from the
leaderboardAPI.
- The Space Game web page loads from the


Clean up resources
After you complete this tutorial, delete the resource group to avoid additional charges. Run the following command to remove the resource group and all resources in it.
az group delete --name tailspin-space-game-rg