Pipeline options for Git repositories
Azure DevOps Services | Azure DevOps Server 2022 - Azure DevOps Server 2019
While editing a pipeline that uses a Git repo—in an Azure DevOps project, GitHub, GitHub Enterprise Server, Bitbucket Cloud, or another Git repo—you have the following options.
| Feature | Azure Pipelines | Azure DevOps Server 2019 and higher | TFS 2018 |
|---|---|---|---|
| Branch | Yes | Yes | Yes |
| Clean | Yes | Yes | Yes |
| Tag or label sources | Project; Classic only | Team project | Team project |
| Report build status | Yes | Yes | Yes |
| Check out submodules | Yes | Yes | Yes |
| Check out files from LFS | Yes | Yes | Yes |
| Clone a second repo | Yes | Yes | Yes |
| Don't sync sources | Yes | Yes | Yes |
| Shallow fetch | Yes | Yes | Yes |
Note
Click Advanced settings in the Get Sources task to see some of the above options.
Branch
This is the branch that you want to be the default when you manually queue this build. If you set a scheduled trigger for the build, this is the branch from which your build will get the latest sources. The default branch has no bearing when the build is triggered through continuous integration (CI). Usually you'll set this to be the same as the default branch of the repository (for example, "master").
Clean the local repo on the agent
You can perform different forms of cleaning the working directory of your self-hosted agent before a build runs.
In general, for faster performance of your self-hosted agents, don't clean the repo. In this case, to get the best performance, make sure you're also building incrementally by disabling any Clean option of the task or tool you're using to build.
If you do need to clean the repo (for example to avoid problems caused by residual files from a previous build), your options are below.
Note
Cleaning is not effective if you're using a Microsoft-hosted agent because you'll get a new agent every time. When using self-hosted agents, depending on how your agents pools are configured, you may get a new agent for subsequent pipeline runs (or stages or jobs in the same pipeline), so not cleaning is not a guarantee that subsequent runs, jobs, or stages will be able to access outputs from previous runs, jobs, or stages.
Note
When using self-hosted agents, depending on how your agents pools are configured, you may get a new agent for subsequent pipeline runs (or stages or jobs in the same pipeline), so not cleaning is not a guarantee that subsequent runs, jobs, or stages will be able to access outputs from previous runs, jobs, or stages. You can use Build artifacts to share outputs of a pipeline run, stage, or job with subsequent runs, stages, or jobs.
Azure Pipelines, Azure DevOps Server 2019 and newer
There are several different clean options available for YAML pipelines.
- The
checkoutstep has acleanoption. When set totrue, the pipeline runsexecute git clean -ffdx && git reset --hard HEADbefore fetching the repo. For more information, see Checkout. - The
workspacesetting forjobhas multiple clean options (outputs, resources, all). For more information, see Workspace. - The pipeline settings UI has a Clean setting, that when set to true is equivalent of specifying
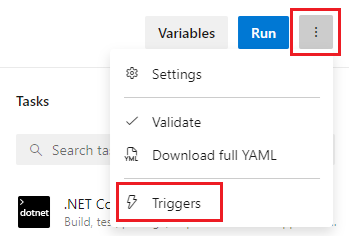
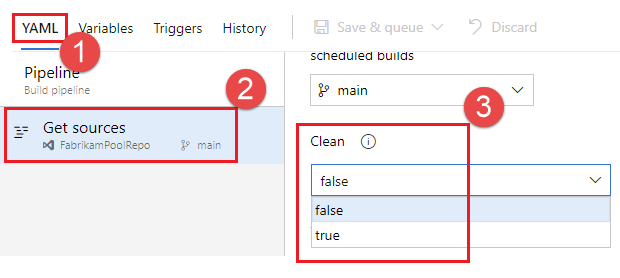
clean: truefor everycheckoutstep in your pipeline. To configure the Clean setting:Edit your pipeline, choose ..., and select Triggers.
Select YAML, Get sources, and configure your desired Clean setting. The default is true.
To override clean settings when manually running a pipeline, you can use runtime parameters. In the following example, a runtime parameter is used to configure the checkout clean setting.
parameters:
- name: clean
  displayName: Checkout clean
  type: boolean
  default: true
  values:
  - false
  - true

trigger:
- main

pool: FabrikamPool
#  vmImage: 'ubuntu-latest'

steps:
- checkout: self
  clean: ${{ parameters.clean }}
By default, clean is set to true but can be overridden when manually running the pipeline by unchecking the Checkout clean checkbox that is added for the runtime parameter.
Label sources
You may want to label your source code files to enable your team to easily identify which version of each file is included in the completed build. You also have the option to specify whether the source code should be labeled for all builds or only for successful builds.
Note
You can only use this feature when the source repository in your build is a GitHub repository, or a Git or TFVC repository from your project.
In the Label format you can use user-defined and predefined variables that have a scope of "All." For example:
$(Build.DefinitionName)_$(Build.DefinitionVersion)_$(Build.BuildId)_$(Build.BuildNumber)_$(My.Variable)
The first four variables are predefined. My.Variable can be defined by you on the variables tab.
The build pipeline labels your sources with a Git tag.
Some build variables might yield a value that is not a valid label. For example, variables such as $(Build.RequestedFor) and $(Build.DefinitionName) can contain white space. If the value contains white space, the tag is not created.
After the sources are tagged by your build pipeline, an artifact with the Git ref refs/tags/{tag} is automatically added to the completed build. This gives your team additional traceability and a more user-friendly way to navigate from the build to the code that was built. The tag is considered a build artifact since it is produced by the build. When the build is deleted either manually or through a retention policy, the tag is also deleted.
Report build status (Azure Pipelines, TFS 2018 and newer)
You've got the option to give your team a view of the build status from your remote source repository.
If your sources are in an Azure Repos Git repository in your project, then this option displays a badge on the Code page to indicate whether the build is passing or failing. The build status is displayed in the following tabs:
- Files: Indicates the status of the latest build for the selected branch.
- Commits: Indicates the build status of each commit (this requires the continuous integration (CI) trigger to be enabled for your builds).
- Branches: Indicates the status of the latest build for each branch.
If you use multiple build pipelines for the same repository in your project, then you may choose to enable this option for one or more of the pipelines. In the case when this option is enabled on multiple pipelines, the badge on the Code page indicates the status of the latest build across all the pipelines. Your team members can click the build status badge to view the latest build status for each one of the build pipelines.
GitHub
If your sources are in GitHub, then this option publishes the status of your build to GitHub using GitHub Checks or Status APIs. If your build is triggered from a GitHub pull request, then you can view the status on the GitHub pull requests page. This also allows you to set status policies within GitHub and automate merges. If your build is triggered by continuous integration (CI), then you can view the build status on the commit or branch in GitHub.
Other types of Git remote repositories
If your source is in any other type of remote repository, then you cannot use Azure Pipelines or TFS to automatically publish the build status to that repository. However, you can use a build badge as a way to integrate and show build status within your version control experiences.
Checkout path
If you are checking out a single repository, by default, your source code will be checked out into a directory called s. For YAML pipelines, you can change this by specifying checkout with a path. The specified path is relative to $(Agent.BuildDirectory). For example: if the checkout path value is mycustompath and $(Agent.BuildDirectory) is C:\agent\_work\1, then the source code will be checked out into C:\agent\_work\1\mycustompath.
If you are using multiple checkout steps and checking out multiple repositories, and not explicitly specifying the folder using path, each repository is placed in a subfolder of s named after the repository. For example if you check out two repositories named tools and code, the source code will be checked out into C:\agent\_work\1\s\tools and C:\agent\_work\1\s\code.
Please note that the checkout path value cannot be set to go up any directory levels above $(Agent.BuildDirectory), so path\..\anotherpath will result in a valid checkout path (i.e. C:\agent\_work\1\anotherpath), but a value like ..\invalidpath will not (i.e. C:\agent\_work\invalidpath).
If you are using multiple checkout steps and checking out multiple repositories, and want to explicitly specify the folder using path,
consider avoiding setting path which is subfolder of another checkout step's path (i.e. C:\agent\_work\1\s\repo1 and C:\agent\_work\1\s\repo1\repo2), otherwise, the subfolder of the checkout step will be cleared by another repo's cleaning. Please note that this case is valid if the clean option is true for repo1)
Note
The checkout path can only be specified for YAML pipelines. For more information, see Checkout in the YAML schema.
Checkout submodules
Select if you want to download files from submodules. You can either choose to get the immediate submodules or all submodules nested to any depth of recursion. If you want to use LFS with submodules, be sure to see the note about using LFS with submodules.
Note
For more information about the YAML syntax for checking out submodules, see Checkout in the YAML schema.
The build pipeline will check out your Git submodules as long as they are:
Unauthenticated: A public, unauthenticated repo with no credentials required to clone or fetch.
Authenticated:
Contained in the same project, GitHub organization, or Bitbucket Cloud account as the Git repo specified above.
Added by using a URL relative to the main repository. For example, this one would be checked out:
git submodule add /../../submodule.git mymoduleThis one would not be checked out:git submodule add https://dev.azure.com/fabrikamfiber/_git/ConsoleApp mymodule
Authenticated submodules
Note
Make sure that you have registered your submodules using HTTPS and not using SSH.
The same credentials that are used by the agent to get the sources from the main repository are also used to get the sources for submodules.
If your main repository and submodules are in an Azure Repos Git repository in your Azure DevOps project, then you can select the account used to access the sources. On the Options tab, on the Build job authorization scope menu, select either:
Project collection to use the Project Collection Build service account
Current project to use the Project Build Service account.
Make sure that whichever account you use has access to both the main repository as well as the submodules.
If your main repository and submodules are in the same GitHub organization, then the token stored in the GitHub service connection is used to access the sources.
Alternative to using the Checkout submodules option
In some cases you can't use the Checkout submodules option. You might have a scenario where a different set of credentials are needed to access the submodules. This can happen, for example, if your main repository and submodule repositories aren't stored in the same Azure DevOps organization or Git service.
If you can't use the Checkout submodules option, then you can instead use a custom script step to fetch submodules.
First, get a personal access token (PAT) and prefix it with pat:.
Next, base64-encode this prefixed string to create a basic auth token.
Finally, add this script to your pipeline:
git -c http.https://<url of submodule repository>.extraheader="AUTHORIZATION: basic <BASE64_ENCODED_TOKEN_DESCRIBED_ABOVE>" submodule update --init --recursive
Be sure to replace "<BASIC_AUTH_TOKEN>" with your Base64-encoded token.
Use a secret variable in your project or build pipeline to store the basic auth token that you generated. Use that variable to populate the secret in the above Git command.
Note
Q: Why can't I use a Git credential manager on the agent? A: Storing the submodule credentials in a Git credential manager installed on your private build agent is usually not effective as the credential manager may prompt you to re-enter the credentials whenever the submodule is updated. This isn't desirable during automated builds when user interaction isn't possible.
Check out files from LFS
Select if you want to download files from large file storage (LFS).
In the classic editor, select the check box to enable this option.
In a YAML build, add a checkout step with lfs set to true:
steps:
- checkout: self
  lfs: true
If you're using TFS, or if you're using Azure Pipelines with a self-hosted agent, then you must install git-lfs on the agent for this option to work. If your hosted agents use Windows, consider using the System.PreferGitFromPath variable to ensure that pipelines use the versions of git and git-lfs you installed on the machine. For more information, see What version of Git does my agent run?
Using Git LFS with submodules
If a submodule contains LFS files, Git LFS must be configured prior to checking out submodules. The Microsoft-hosted macOS and Linux agents come preconfigured this way. Windows agents and self-hosted macOS / Linux agents may not.
As a workaround, if you're using YAML, you can add the following step before your checkout:
steps:
- script: |
    git config --global --add filter.lfs.required true
    git config --global --add filter.lfs.smudge "git-lfs smudge -- %%f"
    git config --global --add filter.lfs.process "git-lfs filter-process"
    git config --global --add filter.lfs.clean "git-lfs clean -- %%f"
  displayName: Configure LFS for use with submodules
- checkout: self
  lfs: true
  submodules: true
# ... rest of steps ...
Clone a second repo
By default, your pipeline is associated with one repo from Azure Repos or an external provider. This is the repo that can trigger builds on commits and pull requests.
You may want to include sources from a second repo in your pipeline. You can do this by writing a script.
git clone https://github.com/Microsoft/TypeScript.git
If the repo is not public, you will need to pass authentication to the Git command.
Azure Repos
Your pipeline will already have access to other repos in its project, and you can clone them in your pipeline using a script command, as shown in the following example.
- script: |
    git clone -c http.extraheader="AUTHORIZATION: bearer $(System.AccessToken)" https://organization@dev.azure.com/project/FabrikamFiber/_git/reponame
You can clone multiple repositories in the same project as your pipeline by using multi-repo checkout.
If you need to clone a repo from another project that is not public, you will need to authenticate as a user who has access to that project.
Note
Use a secret variable to store credentials securely.
Secret variables are not automatically made available to scripts as environment variables. See Secret variables on how to map them in.
For Azure Repos, you can use a personal access token with the Code (Read) permission.
Send this as the password field in a "Basic" authorization header without a username.
(In other words, base64-encode the value of :<PAT>, including the colon.)
AUTH=$(echo -n ":$REPO_PAT" | openssl base64 | tr -d '\n')
git -c http.<repo URL>.extraheader="AUTHORIZATION: basic $AUTH" clone <repo URL> --no-checkout --branch master
Don't sync sources
Non-deployment jobs automatically fetch sources. Use this option if you want to skip that behavior. This option can be useful in cases when you want to:
Git init, config, and fetch using your own custom options.
Use a build pipeline to just run automation (for example some scripts) that does not depend on code in version control.
If you want to disable downloading sources:
- Azure Pipelines, TFS 2018, and newer: Click Advanced settings, and then select Don't sync sources.
Note
When you use this option, the agent also skips running Git commands that clean the repo.
Shallow fetch
Select if you want to limit how far back in history to download. Effectively this results in git fetch --depth=n. If your repository is large, this option might make your build pipeline more efficient. Your repository might be large if it has been in use for a long time and has sizeable history. It also might be large if you added and later deleted large files.
In these cases this option can help you conserve network and storage resources. It might also save time. The reason it doesn't always save time is because in some situations the server might need to spend time calculating the commits to download for the depth you specify.
Note
When the build is queued, the branch to build is resolved to a commit ID. Then, the agent fetches the branch and checks out the desired commit. There is a small window between when a branch is resolved to a commit ID and when the agent performs the checkout. If the branch updates rapidly and you set a very small value for shallow fetch, the commit may not exist when the agent attempts to check it out. If that happens, increase the shallow fetch depth setting.
After you select the check box to enable this option, in the Depth box specify the number of commits.
Tip
The Agent.Source.Git.ShallowFetchDepth variable mentioned below also works and overrides the check box controls. This way you can modify the setting when you queue the build.
Prefer Git from path
By default, the Windows agent uses the version of Git that is bundled with the agent software. Microsoft recommends using the version of Git that is bundled with the agent, but you have several options to override this default behavior and use the version of Git that the agent machine has installed in the path.
- Set a pipeline variable named
System.PreferGitFromPathtotruein your pipelines. - On self-hosted agents, you can create a file named .env in the agent root directory and add a
System.PreferGitFromPath=trueline to the file. For more information, see How do I set different environment variables for each individual agent?
To see the version of Git used by a pipeline, you can look at the logs for a checkout step in your pipeline, as shown in the following example.
Syncing repository: PathFilter (Git)
Prepending Path environment variable with directory containing 'git.exe'.
git version
git version 2.26.2.windows.1
This setting is always true on non-Windows agents.
Trigger Options for Other Git
When an Other/external Git repository is specified, CI builds require that the repository is accessible from the internet. If the repository is behind a firewall or proxy, then only scheduled and manual builds will work.
FAQ
What protocols can the build agent use with Git?
The agent supports HTTPS.
The agent does not yet support SSH. See Allow build to use SSH authentication while checking out Git submodules.
I use TFS on-premises and I don't see some of these features. Why not?
Some of these features are available only on Azure Pipelines and not yet available on-premises. Some features are available on-premises if you have upgraded to the latest version of TFS.
Feedback
Coming soon: Throughout 2024 we will be phasing out GitHub Issues as the feedback mechanism for content and replacing it with a new feedback system. For more information see: https://aka.ms/ContentUserFeedback.
Submit and view feedback for